background image

– 5 –

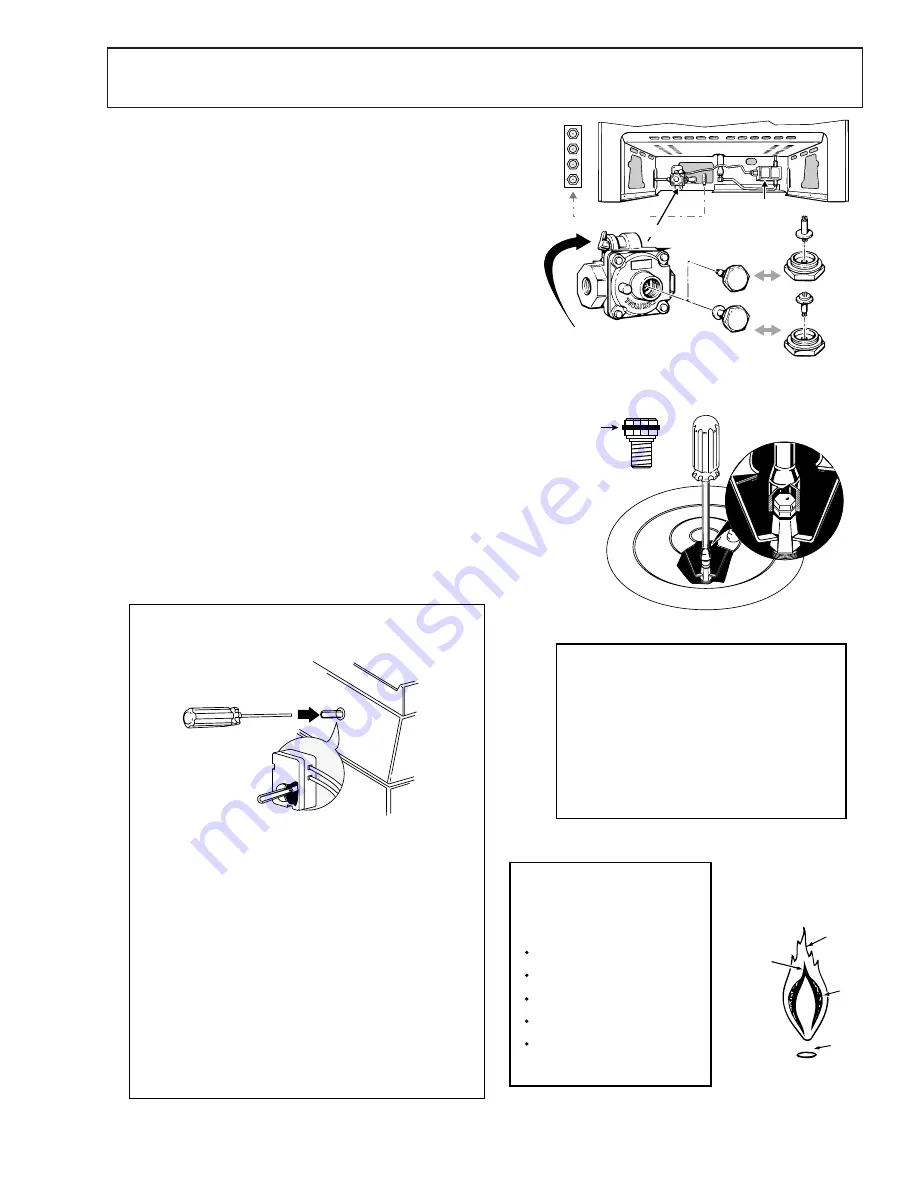
Gas Valve

(Safety Valve)

LP Orifice Spuds

Natural

LP

Pressure Regulator

SHUT OFF LEVER

Oven Only

Lever shown "CLOSED"
Pull lever to "OPEN"

Convert Regulator - Regulator is located in the lower, left 
hand rear corner of the range as viewed from the front.

Depending on the model, remove the storage drawer, 
broiler drawer or false panel to access the regulator.  Some 
models with a broiler drawer will have a metal cover over 
the regulator that must be removed for conversion and 
reinstalled when conversion is complete.

To Convert - Remove the large hex-nut which is located in 
the center of the regulator.  Remove the plastic pin from 
the bottom side of the cap, turn the pin 180 degrees and 
snap the pin back into the cap.  There are raised letters on 
the flat side of the plastic pin, "NAT" and "L.P.".  In the "LP" 
position the end of the pin marked "NAT" should be 
snapped into the bottom of the hex-nut.

Remove surfaced burners and replace all 4 top burner 
orifices spuds with the L.P. orifice spuds supplied with the 
range (refer to the Technical Data Sheet supplied with the 
product for proper L.P. spud location and orifice color 
identification).

Using a 1/2" wrench, tighten the orifice hood(s) supplying 
gas to the oven burner(s) clockwise until snug.

Open the air shutter on the oven burner(s) to the full open 
position and adjust as needed.

Adjust the low flame (simmer) setting on the surface 
burners. 

2

3

4

5

1

The top burner valves have low flame/simmer 
adjustment screws in the center of the control shafts.  A 
flashlight may be required to locate the screw.  A small 
thin blade screwdriver (approx. 3/32" blade width) is 
needed to engage the screw.

TO ADJUST THE LOW FLAME SETTING - at least two 
other burners must be lit.  Light the burner being adjusted 
and turn the knob to "LOW".  Remove the knob and 
insert the screwdriver into the shaft of the control valve.  
Turn the adjustment screw to obtain the desired flame 
size.

TEST FLAME STABILITY - by quickly turning the knob 
from "HI" to "LOW".  If the flame goes out, increase the 
flame size and test again.  Also, test flame stability by 
quickly opening and closing the oven door.  If the flame 
is extinguished by the air current created by the door 
movement, increase the flame size.

LOW FLAME (SIMMER) ADJUSTMENTS

The top burner orifices can be removed by 
removing the burner cap and burner heads.  
Using a 7 millimeter (mm) or a 9/32" nut-driver 
carefully slide the driver down over the orifice 
and rotate counterclockwise to remove.

IMPORTANT NOTE:  The orifices have a spring 
loaded retaining ring around the hex head to 
hold the orifice in the nut driver during 
installation and removal.  A slight amount of 
force is required to push the nut driver down 
over the ring.

Retaining
Ring

Yellow Tip
& Soot

Outer
Cone

Flame Lifts
Off Burner

Inner Cone
Pushed Through
Outer Cone

IMPROPER FLAME

Yellow Tips, Soot and/or
Flame Lifting off Burner

TOP BURNER FLAME ADJUSTMENTS

The top burners do not have air shutters 
adjustments and use non-adjustable 
orifices.  If the flame lifts off of the 
burner, or if you experience "Yellow Tip" 
flames and/or soot in the flames, be sure 
to check the following:

Gas pressure: 4" W.C.P. (natural) and 
10" W.C.P. (L.P.)
Inspect orifice to be sure it is drilled in 
the center and free of debris or burrs.
Be sure the correct size orifice is in 
the proper location
Make sure the range was properly 
converted if on L.P.
If the cause of sooting can not be 
found in the above checks, replace 
the orifice with one having a smaller 
diameter opening

Conversion to L.P. (Propane) Gas

5.

4.

3.

2.

1.

Summary of Contents for Appliances Profile JGB920

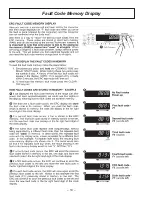
Page 1: ...C PUB 31 9046 03 00 MODEL SERIES TECHNICAL SERVICE GUIDE GE Consumer Service Training XL44TM Self Cleaning Gas Convection Ranges JGB910 JGB920 ...

Page 2: ...tch do not use any phone in the building Immediately call the gas supplier from a neighbor s phone Follow the gas supplier s instructions If you cannot reach the gas supplier call the fire department CAUTION To avoid personal injury disconnect power before servicing this product If electrical power is required for diagnosis or test purposes disconnect the power immediately after performing the nec...

Page 3: ...P Propane Gas 5 Upper Control Panel Access 7 Lower Control Panel Access 9 Warming Zone 9 Convection Oven Fan 10 Warming Drawer 11 Special Features 12 Fault Code Memory Display 14 On Board Diagnostic Tests 16 Door Latch Mechanism 18 Troubleshooting 19 Schematics and Strip Circuits 21 Wiring Diagram 25 Warranty Information 27 ...

Page 4: ......

Page 5: ......

Page 6: ...TE When the cooktop is raised the gas jets and warming zone unit are accessible for repair 7 Remove 4 wires B connected to the warming zone 8 Disengage the prop rods from the range side panel Lift off the cooktop 9 When reinstalling burner heads make sure the nipple in the burner head is positioned toward the electrode Rotate the burner head around the burner base until it is level and securely se...

Page 7: ...E SETTING at least two other burners must be lit Light the burner being adjusted and turn the knob to LOW Remove the knob and insert the screwdriver into the shaft of the control valve Turn the adjustment screw to obtain the desired flame size TEST FLAME STABILITY by quickly turning the knob from HI to LOW If the flame goes out increase the flame size and test again Also test flame stability by qu...

Page 8: ...n the orifice hoods against the orifice needle until the hoods are snug 2 2 turns DO NOT OVER TIGHTEN Check the burners for proper flame adjustment The burner flame should have approximately 1 blue cones With most LP gas small yellow tips at the end of outer cones are normal flames should not lift off burner ports If lifting is observed gradually reduce the air shutter opening until flames are sta...

Page 9: ... into the side frame slot 4 Grasp the face panel at the bottom front with one hand while gently pushing down on the top of the control panel with your other hand Pull control panel downward to release it from the vent deflector while at the same time pulling the panel forward from the bottom Remove Capacitive Touchpad 1 Remove 2 screws at each end of the control panel 2 Carefully separate the cont...

Page 10: ...vent lip is TUCKED UNDER the control panel while lowering the panel into place SPARK MODULE BALLAST TABS TUCK VENT LIP UNDER CONTROL PANEL PRIOR TO LOWER PANEL GEA00127 REINSTALLING CONTROL PANEL When reinstalling the control panel push up on the vent lip with your fingers At the same time pull forward on the control panel making sure that the vent lip is tucked under the control panel while lower...

Page 11: ...s the infinite switch for the warming zone remove the lower control panel Lower Control Panel Access Remove Lower Control Panel 1 Remove electrical power to the range Turn off gas at the main valve 2 Remove cooktop 3 Remove all knobs by pulling them straight off the stems 4 Remove 4 screws A beside rear burner knobs 5 Remove 2 screws B on top of lower control panel 6 Carefully pull panel over stem...

Page 12: ...s are evenly cooked and browned often in less time than with regular heat NOTE During convection cooking the convection fan will stop when the oven door is opened but the heat will not turn off Remove Convection Oven Fan 1 Remove 6 screws from the fan shield 2 Remove the shield 3 Remove the nut and pull the fan blades forward 4 Remove 4 screws A 5 Pull the convection fan motor bracket forward 6 Di...

Page 13: ...ng components are accessible when the warming drawer is removed Replace Warming Drawer 1 Place the left drawer rail around the inner left rail guide and slide and push it in slightly to hook it 2 Place the right drawer rail around the inner right rail guide and slide and push it in slightly to hook it 3 Slide the drawer all the way in NOTE To access the infinite switch for the warming drawer remov...

Page 14: ... 12 Special Features ...

Page 15: ... 13 ...

Page 16: ... 14 Fault Code Memory Display ...

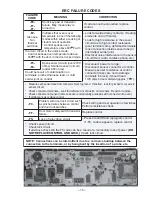
Page 17: ...on on terminals Repair or replace Check connector at sensor remove sensor and carefully pull leads with connector into oven If all above is ok replace control Problem with door lock circuit such as pinched wires between control and door lock switches Check wiring and test operation of switches Perform resistance check Replace control Door motor safety switch transistor failure Loss of relay drive ...

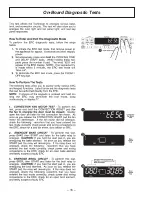
Page 18: ... 16 On Board Diagnostic Tests 1 3 2 ...

Page 19: ... 17 7 4 5 6 ...

Page 20: ... 18 8 ...

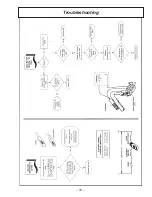
Page 21: ... 19 Troubleshooting ...

Page 22: ... 20 Notes ...

Page 23: ... CONNECTOR A1 A2 BALLAST R Y N R N O W R V R O N W W R N O S Y W W W W N N Y R R W R W N Y N O S S H1 B4 G3 H2 B5 G2 G1 W W L2 L1 L2 L1 H1 H2 J1 B3 C10 C6 C5 C1 C9 C4 C3 C2 C7 F1 F2 V V R R B2 E2 E1 D2 D1 C8 B1 O W W N N Y R R R N W Y V V Y N W W W R R W W W W W R W INDICATOR LIGHT LAMP J4 J5 WD NT BAKE BROIL FAN HI FAN LO OVEN LIGHT N INTERFACE GLASS TOUCH 1 1 1 1 18 PCB ERC III 8 1 ELECTRONIC CO...

Page 24: ...RC BOARD Relay Energized ERC BOARD Relay Energized ERC BOARD Relay Energized ERC BOARD Relay Energized A1 L 1 R E1 R L 1 L 1 L 1 L 1 Oven Light Circuit Shown with Oven Light On Fluorescent Light Circuit Lock Motor Circuit Igniter Circuits Shown with RF Switch ON Bake Circuit Broil Circuit C 0 VAC 0 VAC in Off 0 VAC in Off 0 VAC in Off Voltage in Off RELAY CONTACT OPERATION TEST COLOR SYMBOL RED WH...

Page 25: ...nternal Heating Resistor Heating Element Thermal Switch L1 L GEA00158 P H1 H2 L2 N Warming Drawer Circuit Heating Element 450 Watts 32 Ohms Indicator Light Infinite Switch Internal Heating Resistor Thermo Disc Switch Switch opens at 140 F Switch closes at 120 F L1 L GEA00157 Warming Drawer Circuit Warming Zone Circuit 140 120 ...

Page 26: ......

Page 27: ...125 C 125 C W 18 W 19 125 C R 9 125 C O 2 125 C Y 5 Y 7 105 C N 6 V 3 105 C 105 C R 12 R 10 O 4 W 22 W 20 105 C 105 C 105 C 105 C 105 C O 3 105 C R 11 105 C O 4 105 C W 22 105 C W 21 105 C 200 C R 7 200 C W 1 W 3 105 C 105 C 105 C W 4 N 6 105 C W 21 105 C W 20 105 C J5 J4 E W 5 105 C W 3 105 C W 7 150 C S 1 105 C N 11 W 11 150 C 200 C W 24 R 14 200 C K 1 1 1 1 1 1 YELLOW YELLOW YELLOW YELLOW Y Y Y...

Page 28: ... 26 Notes ...

Page 29: ...e USA In Alaska the warranty excludes the cost of shipping or service calls to your home Some states do not allow the exclusion or limitation of incidental or consequential damages This warranty gives you specific legal rights and you may also have other rights which vary from state to state To know what your legal rights are consult your local or state consumer affairs office or your state s Atto...

Page 30: ...e feeling that GE Consumer Service will still be there after your warranty expires Purchase a GE contract while your warranty is still in effect and you ll receive a substantial discount With a multiple year contract you re assured of future service at today s prices Individuals qualified to service their own appliances can have parts or accessories sent directly to their home The GE parts system ...

Reviews: