background image

Air 

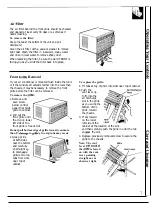
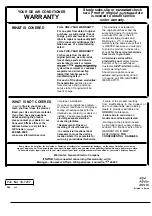
The air filter behind the front grille should be checked
and cleaned at least every 30 days or as often as it
needs cleaning.

To remove the filter:

Grasp the tab at the bottom of the unit and pull
downward.

Clean the air filter with a vacuum cleaner to remove
light dust. Wash the filter in lukewarm, soapy water
and rinse in clear water to remove sticky dust.

When replacing the filter, be sure the word FRONT is
facing you as you slide the filter back into place.
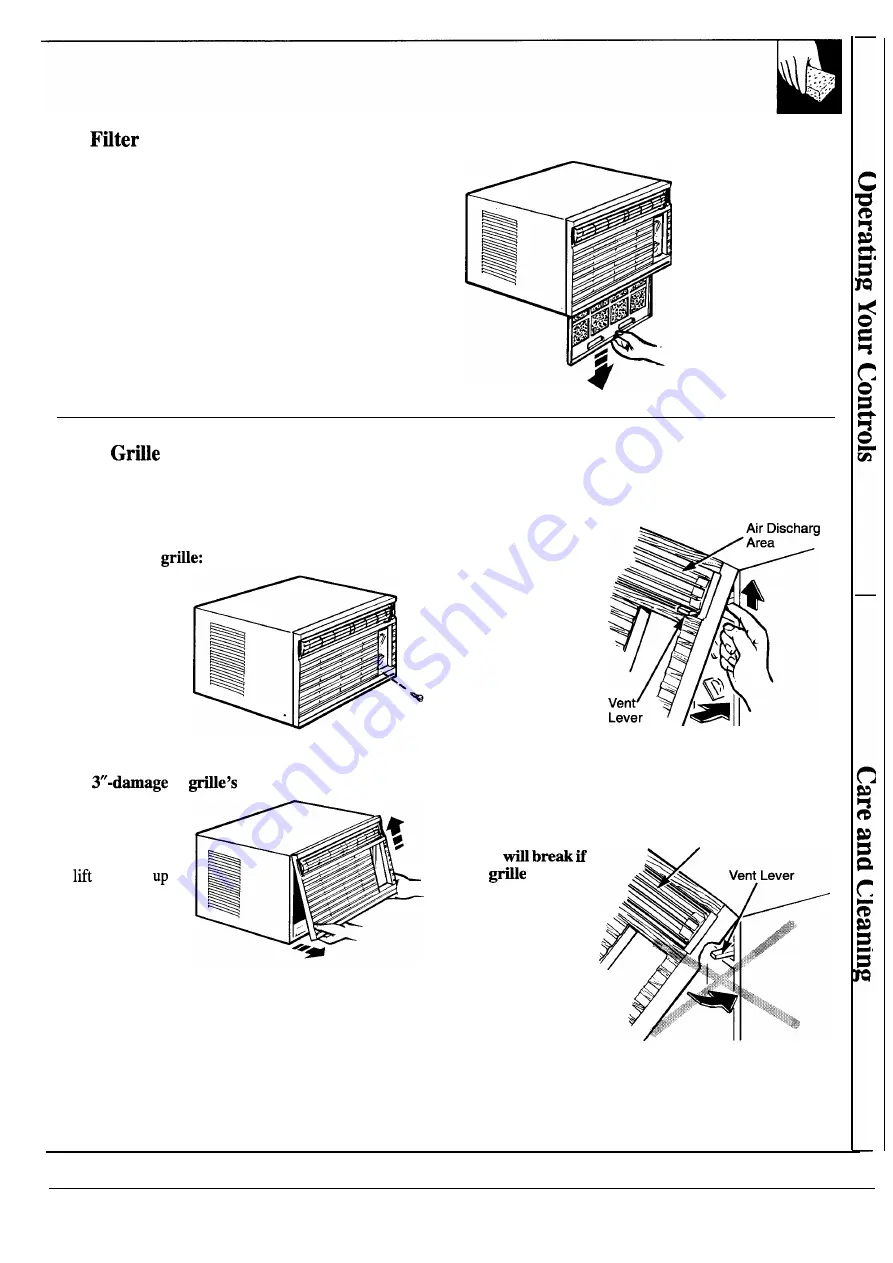
Front 

 Removal

If your air conditioner is mounted flush inside the room
or if the window sill extends farther into the room than
the chassis, it maybe necessary to remove the front
grille before the filter can be removed.

To remove the 

1. 

Remove and

save screw

below control
panel that holds
grille to cabinet.

2. Pull out the

front grille until
the clip on lower
left side of the
front grille is free of slot.

Do not pull bottom edge of grille toward you more
than 

 to 

 two top tabs may occur.

3. 

Grasp grille

at both sides
near the bottom
and carefully

 straight 

to disengage
grille’s two top
tabs from slots
near top of
cabinet.

To replace the grille:

1. 

Fit tabs at top of grille into slots near top of cabinet.

2. 

Push the

vent lever up
to fit into the
air discharge
slot in the grille
as you swing the
bottom of the
grille toward
the chassis.

3. Press inward

on the lower
left side of the

e

cabinet at the location of the slot
and then carefully push the grille in until the tab
engages the slot.

4. Replace previously removed screw to secure the

grille to the chassis.

Note: The vent

Grille

lever 


the 

 is forced

on with the vent
lever pointing
straight out as
shown at right.

7

Summary of Contents for ASV06

Page 1: ...tion 6 Control Settings 5 6 Energy Saving Tips 3 Care and Cleaning A i r Filter 7 Problem Solver l4 More questions call GEAnswer CentiP 800 626 2000 Installation Electrical Requirements 4 q Consumer Services l 5 Appliance Registration 2 Modek ASV06 ASVO ASVIO I GE Appliances ...

Page 2: ...s concerning your air conditioner H you received a damaged air conditioner Immediately contact the deder or builder that sold you the air conditioner Save time and money Before you request service Check the Problem Solver section of this guide It lists causes of minor operating problems that you can correct yourself YOU MED SERWCE To obtain service see the Consumer Services page in the back of thi...

Page 3: ...tie or other flamma the receptacle tiquids in the vicini of this or any otier apphan ENERGY SA G TWS Keep the air filter clean See the Care and Cleaning section For most efficient cooling keep the ventilation control in the CLOSED position except when you want to allow a small amount of outdoor air to enter the room or exhaust air smoke or odors from the room Don t let the room get too hot Wheneve...

Page 4: ...her your air conditioner is a 115 volt or a 230 208 volt unit it is important to have the WW ouflet and circuit checked by a qu fied electrician if there is any doubt as to whether a proper ground exists Use of Adapter Plug 115 volt models ody Because of potential safety hazards under certain conditions we strongly recommend against use of an adapter plug However if you still elect to use an adapt...

Page 5: ...ion Slide the switch to the left to the OPEN position ad the vent door opens to allow air smoke or odors to be exhausted from the room Freezing up Eyou notice that your air conditioner is not coobg as it should it may be that Inside air ice has formal on the cooling coils The ice blocks airflow and stops the unit hot and from coofig the room This tizing up is a temporary condition that most humid ...

Page 6: ...my and best performance we suggest that you set the Selector Switch at HI COOL in extremely hot weather CARE CLEmG User Maintenance Instructions firn air conditioner off and remove the plug from the wall outlet before cleaning Grflle and Cabinet Condenser Coils Wipe both sides of grille with a clean cloth lightly These coils on the weather side of the unit should be dampened with mild liquid dishw...

Page 7: ...ew below control panel that holds grille to cabinet 2 Pull out the front grille until the clip on lower left side of the front grille is free of slot Do not pull bottom edge of grille toward you more than 3 damage to e s two top tabs may occur 3 Grasp grille at both sides near the bottom and carefully lift straight Up to disengage grille s two top tabs from slots near top of cabinet To replace the...

Page 8: ...S OR LOCAL CODES AND ORDINANCES I15V 230V1208V 230V208V 230 V 208V 15 AMP c rcult 20 AMP c rmlt 15 AMP clrcud w AMP clrcu t rallel w pewndicula Wpe tindeti tvP Yandem VP If the electric supply provided does not meet the above specifications call a licensed electrician Aluminum house wiring may pose special problems onsult a qualified electrician This unit requires a separate circuit serving only t...

Page 9: ...ons in the Care and Cleaning section 2 REMOVE THE CHASSIS a 0 1 Remove and save retaining screws on each side that lock chassis to cabinet 2 Remove and save foam gasket located bemeen the bottom of the chassis and the inside bottom of the cabinet 3 Slide the chassis out of the cabinet 3 ASSEMBLE WINDOWFILLER PANELS TO CAB NEZ Slide window filler panels and their frames into channels on top and bot...

Page 10: ...nditioner cabinet into window with frame on the top of the cabinet positioned just in front of the bottom sash Pull window down until it rests on the air conditioner cabinet just behind the front flange of frame on the top of the cabinet 2 Locate three screw holes along the cabinet botiom front edge that were covered by the foam gasket Center cabinet side to side in window and mount it to window s...

Page 11: ...tep 2 between bottom of chassis and inside bottom of cabinet 3 Reinstall chassis to abinet retaining screws removed in Step 2 9 INSTALL SASH GAP GASKEZ Cut foam sash gap gasket to window width and stuff it between window sashes 10 INSTALL WINDOWLOCK Type A Scre Type E Bracket Attach right angle safety lock Type E bracket with Type A screw as shown 11 REINSTALL THE GRILLE See instructions in the Ca...

Page 12: ... steel 1 PREPARE WALL OPENING 1 Determine size of opening Measure width and height of cabinet and add 1 8 to each dimension T HEIGHT 1 8 2 Choose the wall opening location Be sure a power receptacle is or will be installed nearby 3 Make the opening Frame it to suppofi the weight of the air conditioner Add metal flashing over bottom of frame opening and 1 up on sides to reduce the possibility of mo...

Page 13: ... available at most hardware stores will futiher prevent moisture from getting into interior walls 5 For a tight seal along the bottom of the unit caulk around the botiom rail Install wood trim molding obtained locally around roomside projection of cabinet if desired H Brick Veneer L i n t e l Anale 0 Holes for 10 1 Long o Wood Screws o otiom ai INSIDE 4 SLIDE CHASSIS INTO CABINET Lifi the chassis ...

Page 14: ...control may be set at OPEN position allowing hot outside air to enter the room Cooling coils have iced up To melt ice set the Seleetor Switch to HIGH FAN and the Thermostat Control to a lower number Thermostat cfick a metallic sound may be heard when compressor cycles on and off This is normal Fans run continuously when Selector Switch is in COOL or FAN position This is normal Q Excess water may o...

Page 15: ...h impaired hearing or speech who have Braille controls for a variety of access to aTDD or a conventional tele ewriter may GE appliances and a brochure to cdl 800 TDDGEAC 800 83 W322 to request informa assist in planning a barrier free tion or service kitchen for persons with limited mobflity To obtain these items free ofcharge dl 800 626 2000 Sewice Con a 80M2G2224 You can have the secure feeling ...

Page 16: ... how to use the product Read your Use and Care material If you then have any questions about operating the product please contact your dealer or our Consumer Affairs office at the address below or call toll free GE Answer CenteF 800 626 2000 consumer information service Improper installation If you have an installation problem or if the air conditioner is of improper cooling or heating capacity fo...

Reviews: