ATS125x 4-Door DGP Installation Manual
3
Battery replacement
This product contains one or more sealed, rechargeable, BS-type lead-acid batteries.
These are a maintenance-free, leakproof, long-life batteries that should not be
removed under normal circumstances. Because removing a battery may affect the
product’s configuration settings or trigger an alarm, only a qualified installer should
remove the batteries.
To remove a battery, do the following:
1. Make sure that your product settings allow you to open the cover without starting
the tamper alarm.
2. Switch off the mains power, if necessary, and remove the cover.
3. Disconnect the battery, sliding the product's wires off the wire connectors. Note
that, depending on the battery model, the connectors may be located differently.
4. Remove the battery from the holder.
5. For proper recycling, dispose of all batteries as required by local ordinances or
regulations.
See the specifications for your product or contact technical support for information
on replacement batteries.
Important notes on mounting
Mount the unit using screws or bolts through the four mounting holes in the base.
Ensure that the unit is mounted on a flat, solid, vertical surface so that the base will
not flex or warp when the mounting screws or bolts are tightened.
Allow 50 mm clearance between equipment enclosures mounted side-by-side, and
25 mm between an enclosure and the sidewall.
Only use units in a clean environment and not in humid air.
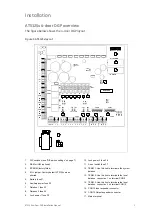
LEDs
Table 3: ATS125x LEDs
LED Description
RST
OFF: The microprocessor is functioning normally.
ON: The system is in the reset state.
Rx1
Flashing LED indicates polling data is being received from the ATS control panel on the
system databus.
Tx1
Flashing LED indicates the 4-door DGP is replying to polling from the ATS control panel
on the system databus.
Rx
Flashing LED indicates remote units (readers and interfaces) replying to polling.
Tx
Flashing LED indicates the 4-door DGP is polling remote units (readers and interfaces)
on the ATS125x local databus. The Tx LED should always be active.
L1
−
L4
Indicates the Unlock Relay is active.


