background image

10

Storage Drawers

Refrigerator/Freezer

Refrigerator—
Sealed snack
pans

The sealed snack pans retain high humidity 
for the convenient storage of lunch meats and
cheese, hors d’oeuvres, spreads and snacks.

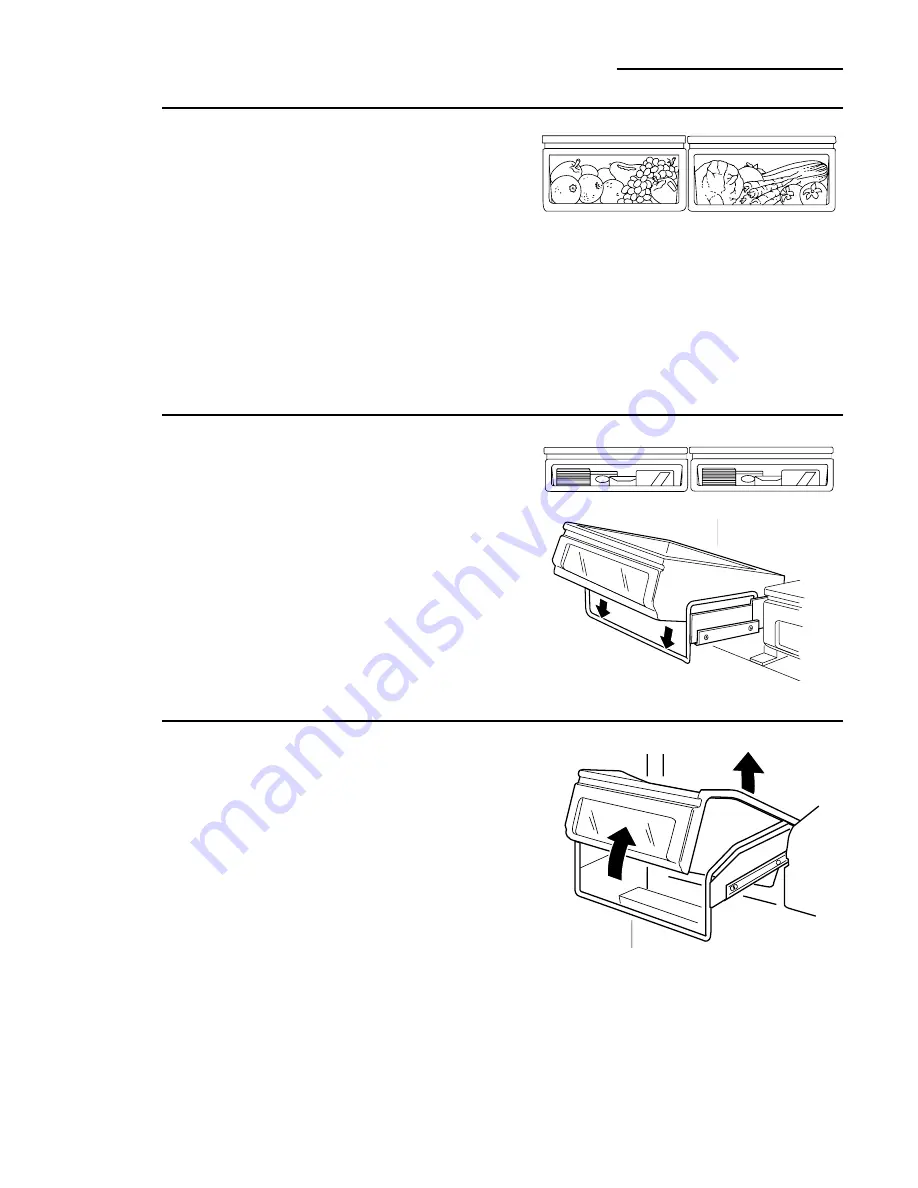
To remove a snack pan, 

pull the pan out and 

lift the front of the pan up until it snaps out of
the wire holder.

To replace a snack pan, 

place the back of the

pan in the wire holder. Lower the front of the
pan, then push down until the front of the pan
snaps into the wire holder.

Drawer
removal

Drawers in the refrigerator/freezer will 
stop before coming all the way out, to help
prevent contents from spilling onto floor. 

To remove a drawer, 

pull the drawer out and lift

the front of the drawer up and out of the wire
holder. Lift the back of the drawer up and out.

To remove the upper drawers when the door
cannot be opened fully, 

the shelf above the

drawers must be removed. Push the shelf back,
then lift up. Tilt the cover and take it out.

To replace a drawer, 

place the back of the

drawer in the wire holder, making sure the
extensions of the side of the drawer fit into 
the back of the wire holder. Lower the front 
of the drawer into the wire holder. Press 
firmly on the top of the drawer.

Refrigerator—
Storage
drawers

The upper drawers have individual, adjustable
humidity controls that let you control the
amount of cold air entering the drawers.

Slide the control all the way to the High 

setting

and the drawer provides 

higher humidity levels

recommended for most leafy vegetables.

Slide the control all the way to the Low 

setting

and the drawer provides 

lower humidity levels

recommended for most fruits.

Excess water that may accumulate in the 
bottom of the drawers should be emptied 
and the drawers wiped dry.

Summary of Contents for Built In 36 Single Door Refrirators and 36 Single Door...

Page 1: ...Owner s Manual Built In 36 Single Door Refrigerators and 36 Single Door Freezers...

Page 2: ...on the front of the Monogram refrigerator freezer Consult your kitchen designer or cabinetmaker for your customized look The information on the following pages will help you operate and maintain your...

Page 3: ...ms that you can correct yourself If you need service To obtain service see the Consumer Services page in the back of this manual We re proud of our service and want you to be pleased If for some reaso...

Page 4: ...refrigerator freezer is plugged in Unplug your refrigerator freezer before cleaning and making repairs NOTE We strongly recommend that any servicing be performed by a qualified individual Before repla...

Page 5: ...ur est branch D branchez votre r frig rateur cong lateur avant de le nettoyer et de le r parer REMARQUE Nous vous recommandons vivement de confier toute r paration un technicien qualifi Avant de rempl...

Page 6: ...r freezer should always be plugged into its own individual electrical outlet which has a voltage rating that matches the rating plate DO NOT USE AN ADAPTER PLUG TO CONNECT THE REFRIGERATOR FREEZER TO...

Page 7: ...anch dans sa propre prise de courant dont la tension nominale est identique celle indiqu e sur la plaque signal tique N UTILISEZ PAS UNE FICHE D ADAPTATION POUR RACCORDER LE R FRIG RATEUR CONG LATEUR...

Page 8: ...e control to the OFF position stops cooling in the refrigerator freezer but does not shut off power to the refrigerator freezer How to test temperatures Use the milk test for the refrigerator Place a...

Page 9: ...gether If ice is not used frequently old ice cubes will become cloudy taste stale and shrink If ice cubes get stuck in the icemaker the green power light will blink To correct this set the power switc...

Page 10: ...and out To remove the upper drawers when the door cannot be opened fully the shelf above the drawers must be removed Push the shelf back then lift up Tilt the cover and take it out To replace a drawer...

Page 11: ...all of refrigerator freezer To replace shelves Select desired shelf height With shelf front raised slightly engage top lugs in tracks at rear of cabinet Then lower front of shelf until it locks into p...

Page 12: ...eezer Door shelves Some door shelves are adjustable and can be moved up and down to meet your storage needs The deeper door shelves must be placed at the bottom of the door To remove Lift the shelf up...

Page 13: ...ot practical wring excess moisture out of sponge or cloth when cleaning around switches lights or controls Use warm water and baking soda solution about a tablespoon 15 ml of baking soda to a quart 1...

Page 14: ...to the refrigerator freezer Upper light bulb replacement Turning the control to OFF does not remove power to the light circuit There are light bulbs at the top of the refrigerator freezer To replace...

Page 15: ...ator will develop high internal humidity For proper installation the refrigerator freezer must be placed on a level surface of hard material the same height as the rest of the flooring This surface sh...

Page 16: ...Slight vibration is normal OPERATING The high speed compressor motor required to maintain near zero SOUNDS temperatures in the large freezer may produce higher sound levels than your old refrigerator...

Page 17: ...itch is in the O off position ICEMAKER Water supply turned off or not connected DOES NOT WORK Freezer too warm Piled up cubes in storage bin may cause icemaker to shut off too soon Level cubes by hand...

Page 18: ...Notes Refrigerator Freezer 18...

Page 19: ...800 626 2224 In Canada 888 880 3030 You can have the secure feeling that GE Consumer Service will still be there after your warranty expires Purchase a GE contract while your warranty is still in eff...

Page 20: ...for ordinary home use in the 48 mainland states Hawaii and Washington D C In Alaska the warranty is the same except that it is LIMITED because you must pay to ship the product to the service shop or...

Reviews: