background image

War

m

ing Dr

aw

er

Electric

GEAppliances.com

49-80507-3     01-13  GE

Safety Instructions

  . . . . . . . . . . .  2,  3

Operating Instructions


Control  Knob . . . . . . . . . . . . . . . . . . . . . . . . .5 
Crisping  Stale  Items . . . . . . . . . . . . . . . . . .7 
Drawer . . . . . . . . . . . . . . . . . . . . . . . . . . . . . . .6 
Features  . . . . . . . . . . . . . . . . . . . . . . . . . . . . .4 
Moisture  Selector  . . . . . . . . . . . . . . . . . . . .5 
ON Signal Light  . . . . . . . . . . . . . . . . . . . . . .5 
Proofing Yeast Bread  
and Dough . . . . . . . . . . . . . . . . . . . . . . . . . . .7 
Rack  . . . . . . . . . . . . . . . . . . . . . . . . . . . . . . . . .6 
Temperature  Selection  Charts . . . . . 7,  8 
Warming Serving Bowl  
and Plates. . . . . . . . . . . . . . . . . . . . . . . . . . . .6

Care and Cleaning

  . . . . . . . . . . . . . .   9

Installation Instructions

 . .   10–15

Troubleshooting Tips

  . . . . . . . . . .   16

Consumer Support


Consumer Support . . . . . . . . Back Cover 
Product Registration . . . . . . . . . . .   19,  20 
Warranty for Customers  
in Canada . . . . . . . . . . . . . . . . . . . . . . . . . . .23 
Warranty for Customers  
in  the  U.S.A.  . . . . . . . . . . . . . . . . . . . . . . . . .22

Write the model and serial 

numbers here:
Model #

 __________________

Serial #

 ___________________

You can find them on a label located on 

the backside of the lower drawer front.

In Canada, contact us at:  

www.GEAppliances.ca

PKD915

PTD915

CW9000

PJ7000

PW9000

Owner’s Manual and 

Installation Instructions

Summary of Contents for Cafe CW9000SDSS

Page 1: ...re and Cleaning 9 Installation Instructions 10 15 Troubleshooting Tips 16 Consumer Support Consumer Support Back Cover Product Registration 19 20 Warranty for Customers in Canada 23 Warranty for Customers in the U S A 22 Write the model and serial numbers here Model __________________ Serial ___________________ You can find them on a label located on the backside of the lower drawer front In Canad...

Page 2: ...ace of pot holders Never use your appliance for warming or heating the room Do not touch the heating elements or the interior surface of the warming drawer These surfaces may be hot enough to burn even though they are dark in color During and after use do not touch or let clothing or other flammable materials contact any interior area of the warming drawer allow sufficient time for cooling first O...

Page 3: ... in the warming drawer smother the fire by closing the warming drawer door and turning the warming drawer off or by using a multi purpose dry chemical or foam type fire extinguisher IN THE EVENT OF A FIRE TAKE THE FOLLOWING STEPS TO PREVENT INJURY AND FIRE SPREADING Stand away from the warming drawer when opening the warming drawer door Hot air or steam which escapes can cause burns to hands face ...

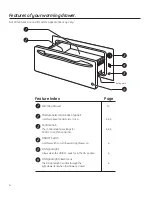
Page 4: ... keep foods moist or crisp 6 8 9 Control Knob The control knob has settings for 6 8 9 PROOF LOW MED and HIGH ON OFF Switch Use this switch to turn the warming drawer on 6 ON Signal Light Glows when the ON OFF switch is in the ON position 6 ON Signal Light Viewer Lens The ON signal light is visible through the 6 light viewer lens when the drawer is closed 4 Rating plate ...

Page 5: ...N OFF switch and glows when the ON OFF switch is in the ON position It stays on until the ON OFF switch is moved to the OFF position The ON signal light is visible through the light viewer in the drawer front panel when the drawer is closed This is a reminder that the heat is on Moist Closed Vent Crisp Open Vent Moisture Selector The moisture selector is located on the inside front of the drawer T...

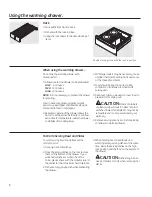
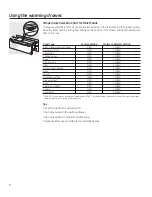
Page 6: ...ntact with the drawer Melted plastic may not be removable and is not covered under your warranty Remove serving spoons etc before placing containers in warming drawer Using the warming drawer To Warm Serving Bowl and Plates To warm serving bowls and plates set the control on LOW Use only heat safe dishes Place the empty dishes on the rack to raise them off the bottom of the drawer If you want hott...

Page 7: ...er To Crisp Stale Items Place food in low sided dishes or pans Preheat on LOW setting and open the vent Check crispness after 45 minutes Add time as needed Temperature Selection Chart for Crisp Foods To keep several different foods hot set the temperature to the food needing the highest setting Place the items needing the highest setting on the bottom of the drawer and items needing less heat on t...

Page 8: ...cereal MED CLOSED Eggs MED CLOSED Fish seafood MED CLOSED Fruit MED CLOSED Gravy cream sauces MED CLOSED Ham MED CLOSED Lamb MED CLOSED Pancakes waffles HIGH CLOSED Pies one crust MED CLOSED Pork MED CLOSED Potatoes mashed MED CLOSED Poultry HIGH CLOSED Vegetables MED CLOSED USDA FSIS recommends an internal temperature of 145 F as the minimum doneness for beef Use a portable meat thermometer to ch...

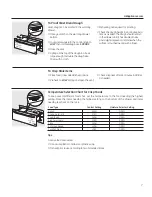
Page 9: ...eaner or polish Always wipe the surface in the direction of the grain Follow cleaner instructions for cleaning the stainless steel surface To inquire about purchasing stainless steel appliance cleaner or polish or to find the location of a dealer nearest you please call our toll free number National Parts Center 1 877 959 8688 GEAppliances com Control Knob The control knob may be removed for easie...

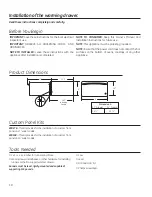
Page 10: ...other appliance Tools Needed 2 x4 or 2 x 2 lumber for runners and brace Wood screws and adhesive or other hardware for installing runners or shelf to support warmer drawer Runners must be level rigidly mounted and capable of supporting 150 pounds Saw Level Drill and 1 16 bit Phillips screwdriver Custom Panel Kits ZXD27B 7KLV NLW SURYLGHV IRU WKH LQVWDOODWLRQ RI D FXVWRP IURQW panel on 27 wide mode...

Page 11: ...rounded 3 prong receptacle should be located within reach of the drawer s 56 long power cord Locate the receptacle in an adjacent cabinet ZLWKLQ RI WKH ULJKW VLGH RU ZLWKLQ RI WKH OHIW VLGH RU UHFHVVHG UHFHSWDFOH PD EH ORFDWHG RQ WKH ULJKW VLGH RI the cutout 7 maximum from the back of the cabinet In this location the excess power cord should be coiled and taped to the right side of the unit 03257 ...

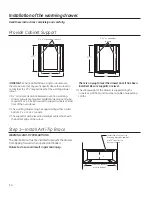
Page 12: ...ng in frameless cabinets it may be necessary to install 1 2 wide cleats to accept drawer mounting screws See drawer to find exact locations of mounting screws When installed under a cooktop Warming drawers are suitable for installation below only certain specified cooktop models See the label attached to the top of the warming drawer for suitable models A solid barrier and air gap between cooktop ...

Page 13: ...ck against rear wall 9 from floor to bottom of block 1 Min above toekick or adjust to oven installation height A NOTE Additional clearance between cutouts may be required Check to be sure that oven supports above the warming drawer location do not obstruct the required interior 231 ø2 depth and 91 ø4 height Installation below a single oven NOTE Additional clearance between cutouts may be required ...

Page 14: ... cutout A 2 minimum clearance between oven and warming drawer cutouts are required Additional clearance may be required if 2 x 4 blocks are used to support runners or solid floor of the oven above The warming drawer may be supported by either a solid bottom 2 x 4 or 2 x 2 runners The support must be level and rigidly mounted flush with the bottom edge of the cutout There is no way to level the dra...

Page 15: ...g the cord into the outlet In this location the excess power cord should be coiled and taped to the right side of the unit Make sure the cord does not get trapped by the drawer NOTE Insure that the power cord does not contact the hot surfaces on the bottom of ovens cooktops or any other appliance Push the drawer back until the front flange is flush to the cabinet front Open the drawer fully Drill ...

Page 16: ...n slide smoothly RI DOLJQPHQW See the Care and cleaning section or drags UDZHU RYHU ORDGHG RU Reduce weight to less than 50 pounds Redistribute ORDG XQEDODQFHG drawer contents Excessive Liquid in warming Remove liquid condensation drawer 8QFRYHUHG IRRGV Cover food with lid or aluminum foil Temperature setting Reduce temperature setting WRR KLJK QFRUUHFW 0RLVWXUH Set the Moisture Selector to the op...

Page 17: ...17 Notes GEAppliances com ...

Page 18: ...ion or limitation of incidental or consequential damages This warranty gives you specific legal rights and you may also have other rights which vary from state to state To know what your legal rights are consult your local or state consumer affairs office or your state s Attorney General Warrantor General Electric Company Louisville KY 40225 For The Period Of GE Will Replace One Year Any part of t...

Page 19: ...ich fails due to a defect in materials or workmanship From the date of the During this limited one year warranty Mabe will also provide free of charge all labor and original purchase in home service to replace the defective part All warranty service provided by our Factory Service Centres or an authorized Customer Care technician For service call 1 800 361 3400 Please have serial number and model ...

Page 20: ...anytime or call 800 626 2224 during normal business hours GE Consumer Home Services will still be there after your warranty expires Q DQDGD FDOO Parts and Accessories In the U S GEApplianceparts com Individuals qualified to service their own appliances can have parts or accessories sent directly to their homes VISA MasterCard and Discover cards are accepted Order on line today 24 hours every day o...

Reviews: