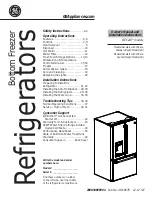
background image

GEAppliances.com

Refrigerators

Bottom Freezer

239D3389P003    Pub No. 49-60678    12-12 GE

Safety Instructions

  . . . . . . . . . . . . 2-4

Operating Instructions 

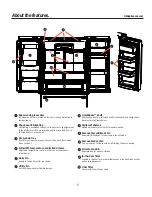
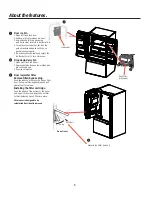
Features  . . . . . . . . . . . . . . . . . . . . . . . . . .5,  6 

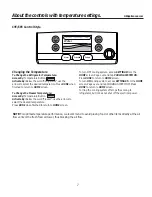
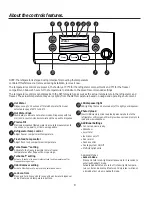
Controls   . . . . . . . . . . . . . . . . . . . . . . . . . .7,  8 

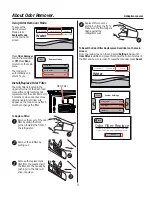
Odor  Remover   . . . . . . . . . . . . . . . . . . . . . . 9 

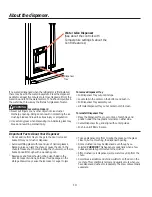
Dispenser  . . . . . . . . . . . . . . . . . . . . . . . . . .10 

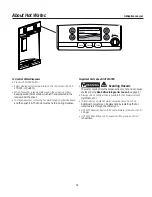
Hot  Water   . . . . . . . . . . . . . . . . . . . . . . . . .11 

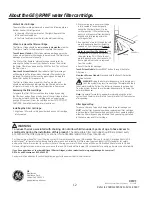
Water  Filter  . . . . . . . . . . . . . . . . . . . . . . . .12 

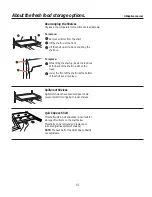
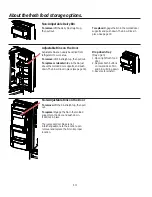
Fresh  Food  Storage  Options  . . . . .13,14 

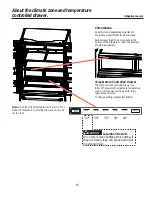
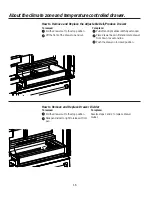
Climate Zone & Temperature  

Controlled  Drawer . . . . . . . . . . . . . . .15,16 

Freezer . . . . . . . . . . . . . . . . . . . . . . . . . . . .17 

Automatic Ice maker . . . . . . . . . . . . . . .18 

Care and Cleaning  . . . . . . . . . . . . . . . .   19 

Replacing the Lights . . . . . . . . . . . . . . . .20 


Installation Instructions


Preparing to Install the 

Refrigerator . . . . . . . . . . . . . . . . . . . . 21,  22 

Installing the Anti-Tip Bracket . . . 29, 30 

Installing  the  Refrigerator . . . . . . . 23–33 

Installing  the  Water  Line . . . . . . . . 34-35 


Troubleshooting Tips

  . . . . . . 38,  39 

Normal  Operating  Conditions  . . . . . . .37 

Service - Truth or Myth . . . . . . . . . 40,  41


Consumer Support 

GE 

Brillion™ Get Connected  

      Starter  Kit  . . . . . . . . . . . . . . . . . . . . . . . .42 

Warranty for U.S. Customers . . . . . . . .43 

RPWF Water Filter Cartridge Limited 

   Device Certificate . . . . . . . . . . . . . . . . .44 

Performance Data Sheet . . . . . . . . . . .45   

State of California Water Treatment  

Warranty . . . . . . . . . . . . . . . . . . . . . . . . . .46 

Consumer Support . . . . . . . . Back Cover

Write the model and serial 
numbers here:

Model # ____________________

Serial #  ____________________

Find these numbers on a label  
on the left side, near the middle  
of the refrigerator compartment.

GE Café™ models 

Owner’s Manual and 

Installation Instructions

Models that start with CFE are  

Standard Depth Models (SD)

Models that start with CYE are  

Counter Depth Models (CD)

Summary of Contents for Cafe ENERGY STAR CFE29TSDSS

Page 1: ...alling the Water Line 34 35 Troubleshooting Tips 38 39 Normal Operating Conditions 37 Service Truth or Myth 40 41 Consumer Support GE Brillion Get Connected Starter Kit 42 Warranty for U S Customers 4...

Page 2: ...es In refrigerators with automatic ice makers avoid contact with the moving parts of the ejector mechanism or with the heating element that releases the cubes Do not place fingers or hands on the auto...

Page 3: ...ician to make sure the outlet is properly grounded Where a standard 2 prong wall outlet is encountered it is your personal responsibility and obligation to have it replaced with a properly grounded 3...

Page 4: ...ofoam Using container materials such as paper or plastic may result in a burn while holding the cup Do not use glass containers as thermal shock can cause the container to break and may result in scal...

Page 5: ...Dairy bin Separate compartment for your items Utility bin A utility bin designed for flexible storage QuickSpace shelf Functions as a normal full sized shelf when needed and easily slides back to sto...

Page 6: ...ress both buttons on lower sides and bin will drop down 3 Reverse to reinstall Door ice water filter Remove filter bypass plug Push the indent on the cover and open filter door Pull up on filter bypas...

Page 7: ...t the desired temperature Press DONE when finished to return to HOME screen To Change the Freezer Temperature Access By Temperature Button Activate By Below the word Freezer use the arrows to select t...

Page 8: ...ts in ounces cups quarts or liters using paddle Refrigerator temp control Adjust freezer compartment temperature Fresh food temp control Adjust fresh food compartment temperature TurboFreeze setting A...

Page 9: ...wards the front of the refrigerator Remove the old filter by pulling out Remove the replacement filter from the plastic Insert the filter into the housing by pushing it in The filter will snap into pl...

Page 10: ...ve dispensed crushed ice repeatedly The snow will eventually evaporate If no water is dispensed when the refrigerator is first installed there may be air in the water line system Press the dispenser p...

Page 11: ...cts about HOT WATER WARNING Scalding Hazard The water coming from the dispenser is very hot and can cause scalds or burns Read all warnings prior to use See page 4 OZD V XVH D FRQWDLQHU WKDW LV VXLWDE...

Page 12: ...the system A newly installed filter cartridge will cause water to spurt from the dispenser Use a large pitcher or sports bottle to catch the water spray DO NOT use the hot water dispenser or hands fre...

Page 13: ...of the shelf locks into place Spillproof Shelves Spillproof shelves have special edges to help prevent spills from dripping to lower shelves Shelves in the refrigerator compartment are adjustable Quic...

Page 14: ...or relocate Slide in the bin just above the molded door supports and push down The bin will lock in place see page 33 Non Adjustable Dairy Bin To remove Lift the dairy bin straight up then pull out To...

Page 15: ...y access Excess water that may accumulate in the bottom of the drawers or under the drawers should be wiped dry 15 About the climate zone and temperature controlled drawer GEAppliances com F C MEAT BE...

Page 16: ...wer front down to seat on slide Push the drawer in to closed position How to Remove and Replace the Adjustable Deli Produce Drawer To remove Pull the drawer out to the stop position Slide pan divider...

Page 17: ...op position Remove freezer door bin by pushing plastic tab on either left or right side to release bin hinge pin Remove freezer basket by lifting up the rear of the basket and moving basket rearward u...

Page 18: ...ng ice It is normal for several cubes to be joined together If ice is not used frequently old ice cubes will become cloudy taste stale and shrink NOTE In homes with lower than average water pressure y...

Page 19: ...y result in damage to the floor covering or refrigerator Lower the leveling legs until they touch the floor When pushing the refrigerator back make sure you don t roll over the power cord or water sup...

Page 20: ...esh food compartment and on the bottom of the fresh food doors to light the freezer compartment An authorized technician will need to replace the LED light If this assembly needs to be replaced call G...

Page 21: ...Q WLPH Refrigerator Installation can vary Water Line Installation 30 minutes 3URSHU LQVWDOODWLRQ LV WKH UHVSRQVLELOLW RI WKH LQVWDOOHU 3URGXFW IDLOXUH GXH WR LPSURSHU LQVWDOODWLRQ LV QRW FRYHUHG under...

Page 22: ...U Ensure you have clearance to prevent damage to the refrigerator before safety moving it to the final location I SDVVDJHZD V DUH ODUJH HQRXJK WR DFFRPPRGDWH WKH UHIULJHUDWRU ZLWKRXW UHPRYLQJ WKH KDQG...

Page 23: ...be removed to allow the refrigerator to be safely moved indoors If passageways are less than 311 4 start with Step 1 I LW LV QRW QHFHVVDU WR UHPRYH GRRUV VNLS WR 6WHS HDYH tape and all packaging on do...

Page 24: ...ng door to prevent damage to door and electronics carefully place the door in a proper location Note The lower door hinge pin and hinge are keyed and must be matched correctly for the door to self clo...

Page 25: ...nder screw bosses before tightening screws REMOVE THE REFRIGERATOR DOORS cont Note for proper installation later please follow the next step carefully Fresh Food doors to be REMOVED and INSTALLED open...

Page 26: ...door on any other surfaces to avoid scratches Push the slide mechanism back completely until it self retracts A B C 6 REPLACING THE FREEZER DOOR Pull the slide Mechanism to full extension using both h...

Page 27: ...is too big see template Turn the set screw using 3 32 hex key clockwise by quarter to half a rotation Step 3 Adjust set screw counter clockwise if gap at the bottom is too big see template Turn the se...

Page 28: ...nstallation Instructions 28 8 A B REMOVE PACKAGING A Remove all tape foam and protective packing from shelves and drawers 10 LEVEL THE FREEZER DOOR cont Lift the door on the side requiring adjustment...

Page 29: ...he sheet or the RH side of the refrigerator Hold down in position and use the anti tip floor bracket as a template for marking the holes based upon your configuration and type of construction as shown...

Page 30: ...floor bracket by fastening the 2 or recommended 4 10 16 hex head screws tightly into place as illustrated in Figure 3 A AT 4 POSITIONING THE REFRIGERATOR TO ENGAGE THE ANTI TIP FLOOR AND BASE BRACKETS...

Page 31: ...line for at least 2 minutes If you are using copper tubing place a compression nut and ferrule sleeve onto the end of the tubing coming from the house cold water supply If you are using the GESmartCo...

Page 32: ...legs clockwise to raise the refrigerator counterclockwise to lower it NOTICE To avoid possible property damage the leveling legs must be firmly touching the floor 14 A Flat Head Screwdriver Raise LEV...

Page 33: ...d assembly G To place bins into doors Match your bin with the letter shown Position the bin hooks over the bin locator and push forward until inserted fully Bin locator each side Bin hook rear each si...

Page 34: ...er before installing the water supply line to the refrigerator To prevent burns and product damage do not hook up the water line to the hot water line For LCD Models If the refrigerator is operated be...

Page 35: ...ut off the flared fitting with a tube cutter and then use a compression fitting Do not cut formed end from GE SmartConnect Refrigerator tubing 6KXWRII YDOYH WR FRQQHFW WR WKH FROG ZDWHU OLQH The shuto...

Page 36: ...water is clear Shut the water off at the water valve after about one quart 1 liter or 2 minutes of water has been flushed through the tubing FLUSH OUT THE TUBING 8 SmartConnect Tubing Fasten the shuto...

Page 37: ...s when the refrigerator is first plugged in This happens as the refrigerator cools to the correct temperature Expansion and contraction of cooling coils during and after defrost can cause a cracking o...

Page 38: ...t Controls Water has poor taste odor Water dispenser has not been used for a long time Dispense water until all water in system is replenished Water in glass is warm Normal when refrigerator is first...

Page 39: ...B drive PRECISE FILL will not fill container Normal PRECISE FILL requires use of dispenser paddle For a specific amount of water select PRE CISE FILL to dispense water Freezer cooling fresh food not c...

Page 40: ...e bucket to the maximum capacity I should dispense 12 and 18 hours after installation TRUE Dispensing 3 4 cubes 12 hours and 18 hours after installation allows ice to disperse within the ice bucket wh...

Page 41: ...re made TRUE While purging the air from the water system check all water line connections for leaks Check the connection to the household water supply at back of refrigerator and door water line conne...

Page 42: ...PRVWDW WKDW you can manage from your computer or iPhone iPhone is a registered trademark of Apple Inc Maintenance Alerts Get text or email alerts if your Brillion enabled appliances need attention as...

Page 43: ...state To know what your legal rights are consult your local or state consumer affairs office or your state s Attorney General Warrantor General Electric Company Louisville KY 40225 Staple your receip...

Page 44: ...the water lter cartridge due to water pressure that is outside the speci ed operating range or due to excessive sediment in the water supply Damage to the product caused by accident re oods or acts o...

Page 45: ...not install where water hammer conditions may occur If water hammer conditions exist you must install a water hammer arrester Contact a plumbing professional if you are uncertain how to check for thi...

Page 46: ...ing health related contaminants Cysts Asbestos Lead Mercury CA AB1953 Low Lead Compliant Atrazine Benzene Carbofuran Lindane p Dichlorobenzene Toxaphene 2 4 D VOC s by chloroform surrogate Microbiolog...

Page 47: ...Notes GEAppliances com 47...

Page 48: ...nytime or call 800 626 2224 during normal business hours GE Consumer Home Services will still be there after your warranty expires In Canada call 1 888 261 2133 Parts and Accessories In the U S GEAppl...

Reviews: