background image

Instrucciones de instalación

12

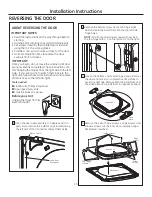
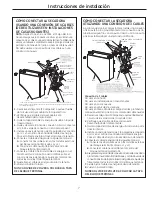
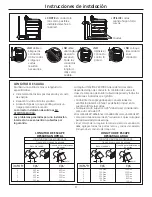
VENTILACIÓN LATERAL O POR LA PARTE 

INFERIOR (cont.)

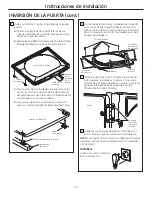
Conecte los codos y conductos de metal estándar 

para completar el sistema de salida. Cubra  

la abertura trasera con la placa (Kit WE1M454), 

disponible en su proveedor de servicios local.  

Coloque la secadora en su ubicación final. 

Placa   

(Kit WE1M454)

• 

Aplique cinta aislante 

como puede verse en la 

junta entre el conducto 

interno de la secadora y 

el codo, y también en  

la junta entre el codo  

y el conducto lateral.

Utilice sólo un conducto rígido de metal de un  

diámetro de 4” dentro del gabinete de la secadora. 

Las juntas del conducto interno deben sujetarse 

con cinta; caso contrario, pueden separarse y 

provocar un riesgo de seguridad. 

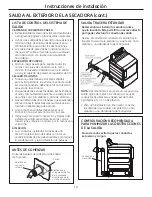
NUNCA DEJE LA ABERTURA TRASERA  

SIN LA PLACA EN SU LUGAR. 

(Kit WE1M454.)

CÓMO AGREGAR LA PLACA DE CUBIERTA  

A LA PARTE TRASERA DEL GABINETE

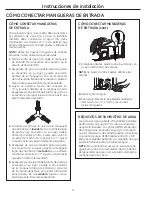
CÓMO AGREGAR CODOS Y CONDUCTOS  

DE SALIDA HACIA LA IZQUIERDA O DERECHA  

DEL GABINETE (cont.)

DUCT

TAPE

Cinta 

aislante


Introduzca el codo a través de la abertura trasera 

y conéctelo al conducto interno de la secadora.


Aplique cinta aislante 

como puede verse en la 

junta entre el conducto 

interno de la secadora y 

el codo, y también en la 

junta entre el codo y el 

conducto inferior.

Las juntas del conducto interno deben sujetarse 

con cinta; caso contrario, pueden separarse y 

provocar un riesgo de seguridad.

Cinta 

aislante

CÓMO AGREGAR UN CODO DE SALIDA A TRAVÉS DE 

LA PARTE INFERIOR DEL GABINETE
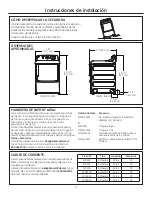
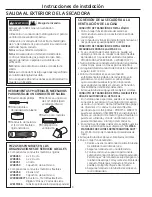
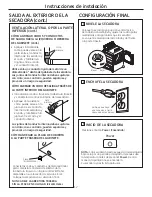
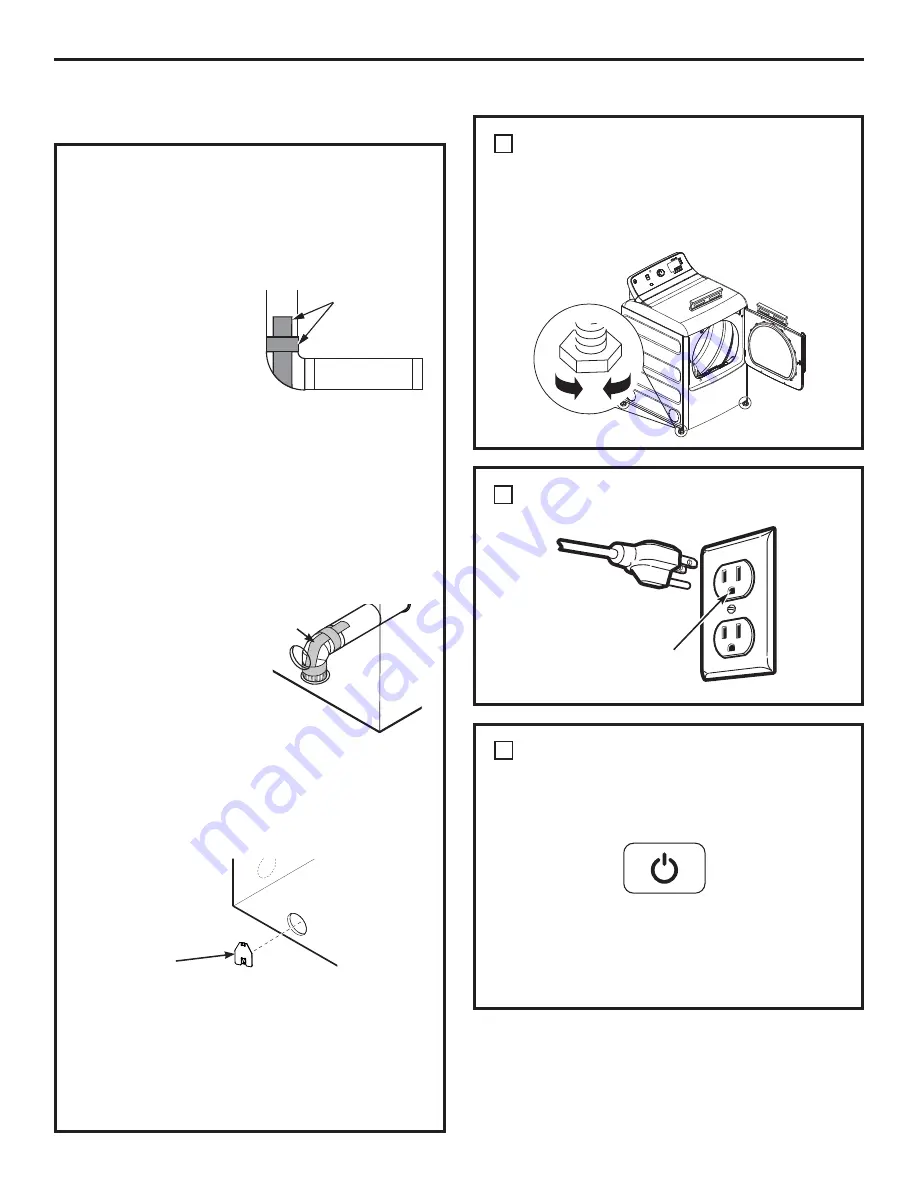
 NIVELE LA SECADORA

Bajar

Elevar 

 ENCHUFE LA SECADORA

1

CONFIGURACIÓN FINAL

2

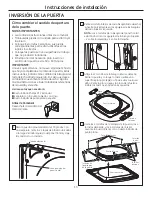
 INICIO DE LA SECADORA

Presione el botón 

Power

 (

Encendido

). 

NOTA:

 Si la secadora ha sido expuesta a temperaturas 

bajo cero por un período prolongado, deje que suba  

la temperatura antes de presionar 

Power

. De otra 

manera, la pantalla no se encenderá. 
Su secadora ya está lista para usar. 

3

SALIDA AL EXTERIOR DE LA 

SECADORA (cont.)

Verifique que haya  

una conexión a tierra 

adecuada antes del uso. 

Coloque la secadora en posición vertical cerca  

de la ubicación definitiva y ajuste las cuatro patas 

niveladoras para garantizar que la secadora  

se encuentre nivelada de lado a lado y del frente  

a la parte trasera. 

Power

Summary of Contents for CleanSpeak GTD81ESPJMC

Page 1: ...yer installation must be performed by a qualified installer Install the clothes dryer according to these instructions and local codes DO NOT install a clothes dryer with flexible plastic venting mater...

Page 2: ...Parts com 24 hours a day or by phone at 800 626 2002 during normal business hours Part Number Accessory WE25X20060 Complete kit hoses Y adapter washers included OR WE1M847 Long hose and WE01X22395 Sho...

Page 3: ...st vent Provide an opening with a free area of at least 25 square inches for introduction of outside air into the dryer room See the sections for electrical connection information If the dryer is appr...

Page 4: ...5 Ensure the rubber flat washer is in place and attach the dryer s long inlet hose to one male end of the Y connector Tighten by hand until firmly seated 6 Ensure the rubber flat washer is in place a...

Page 5: ...TERMINAL BLOCK Slip joint pliers Flat blade crewdriver Phillips screwdriver Level TOOLS YOU WILL NEED MATERIALS YOU WILL NEED 4 dia metal elbow 3 4 strain relief UL recognized 4 duct clamps 2 or 4 spr...

Page 6: ...ire or electrical shock GROUNDING INSTRUCTIONS For a grounded cord connected dryer This dryer must be grounded In the event of a malfunction or breakdown grounding will reduce the risk of electric sho...

Page 7: ...d must also be used where local codes do not permit grounding through the neutral 3 wire connection is NOT for use on new construction 7 1 Turn off the circuit breaker s 30 amp or remove the dryer s c...

Page 8: ...ion duct maximizing drying performance Avoid resting the duct on sharp objects UL LISTED FLEXIBLE METAL FOIL TYPE TRANSITION DUCT In special installations it may be necessary to connect the dryer to t...

Page 9: ...th you must add all the straight portions and elbows of the system including the transition duct EXHAUST LENGTH 9 DO NOT bend or collapse ducting Use elbows if turns are necessary DO NOT use excessive...

Page 10: ...ld present minimal resistance to the exhaust airflow and should require little or no maintenance to prevent clogging Wall caps must be installed at least 12 above ground level or any other obstruction...

Page 11: ...Preassemble 4 elbow with 4 duct Wrap duct tape around joint Insert duct assembly elbow first through the side opening and connect the elbow to the dryer internal duct Be sure not to pull or damage th...

Page 12: ...fety hazard 12 DUCT TAPE ADDING ELBOW FOR EXHAUST THROUGH BOTTOM OF CABINET Insert the elbow through the rear opening and connect it to the dryer internal duct Apply duct tape as shown on the joint be...

Page 13: ...knife Small flat blade screwdriver Before you start Unplug the dryer from its electrical outlet 1 Open the door approximately 170 degrees With a putty knife remove the 4 plastic caps located along the...

Page 14: ...nstructions swapping left and right When you finish Plug the dryer back into its electrical outlet 5 Remove and swap the 2 cover caps and door handle from the outer door A Squeeze the tabs on the insi...

Page 15: ...io La instalaci n de la secadora debe efectuarla un instalador calificado Instale la secadora de ropa de acuerdo con estas instrucciones y en cumplimiento con los c digos locales NO instale una secado...

Page 16: ...EAppliancesparts com las 24 horas del d a o en forma telef nica llamando al 800 626 2002 durante el horario comercial habitual N mero de Pieza Accesorio WE25X20060 Kit completo mangueras lavadora con...

Page 17: ...greso de aire exterior dentro de la secadora habitaci n Para acceder a informaci n sobre la conexi n el ctrica consulte la section Si se aprob la instalaci n de su secadora en alcoba o armario esto fi...

Page 18: ...lugar y sujete la manguera larga de entrada de la secadora a un extremo macho del conector en Y Ajuste a mano hasta que est firmemente asentada 6 Aseg rese de que la arandela plana de goma se encuent...

Page 19: ...po de enchufe seg n el tomacorriente de la vivienda antes de comprar el cable 4 Placa de cubierta Kit WE1M454 C MO CONECTAR UNA SECADORA ELECTRICA S ltese si su secadora ya tiene un cable de alimentac...

Page 20: ...TRUCCIONES DE CONEXI N A TIERRA Para una secadora conectada con cable con conexi n a tierra Esta secadora deber estar conectado a tierra En caso de mal funcionamiento o aver a la conexi n a tierra red...

Page 21: ...NUNCA OLVIDE DE VOLVER A COLOCAR LA TAPA DEL BLOQUE TERMINAL NUNCA OLVIDE DE VOLVER A COLOCAR LA TAPA DEL BLOQUE TERMINAL 1 Desactive el disyuntor 30 amperios o quite el fusible del circuito de la sec...

Page 22: ...ber a se apoye sobre objetos cortantes CONDUCTO DE TRANSICI N DE METAL FLEXIBLE TIPO HOJA DE ALUMINIO DE LA LISTA DE UL En instalaciones especiales puede ser necesario conectar la secadora a la ventil...

Page 23: ...a longitud total del sistema de ventilaci n debe agregar todas las partes rectas y codos del sistema incluyendo el conducto de transici n LONGITUD DE SALIDA NO doble o pliegue los conductos Utilice co...

Page 24: ...istencia m nima al flujo de salida y debe requerir poco mantenimiento para evitar las obstrucciones Las cubiertas de pared deben instalarse por lo menos a 12 sobre el nivel del suelo o cualquier otra...

Page 25: ...incendio descarga el ctrica o laceraciones ADVERTENCIA Riesgo de incendio Gire la leng eta hasta 45 Porci n A Salida del lado izquierdo Orificio de montaje Vuelva a conectar la porci n cortada A del...

Page 26: ...Introduzca el codo a trav s de la abertura trasera y con ctelo al conducto interno de la secadora Aplique cinta aislante como puede verse en la junta entre el conducto interno de la secadora y el cod...

Page 27: ...Antes de Comenzar Desenchufe la secadora del tomacorriente 1 Abra la puerta aproximadamente 170 grados Con una esp tula retire las 4 tapas de pl stico ubicadas a lo largo del lado izquierdo del panel...

Page 28: ...enchufar la secadora en la salida el ctrica 5 Quite y cambie las 2 tapas y la jaladera de la puerta exterior A Apriete las pesta as de la parte interior de los clips de la jaladera de la puerta Empuj...

Reviews: