5
Installation
Caution: READ SECTION 6 TITLED BATH USE before placing the bath
in service. Incorrect handling can damage the bath and void the warranty.
5.1
Bath Environment
The CTR –80 Bath is a precision instrument which should be located in an ap-
propriate environment. The location should be free of drafts, extreme tempera-
tures and temperature changes, dirt, etc. The surface where the bath is placed
must be level. Allow at least six inches around the bath for air circulation. The
top surface of the bath may become hot at high temperatures. Beware of the
danger of accidental fluid spills.
A fume hood should be used to remove any vapors given off by hot bath fluid.
5.2
“Dry-out” Period
Before initial use, after transport, and any time the instrument has not been en-
ergized for more than 10 days, the bath will need to be energized for a
“dry-out” period of 1-2 hours before it can be assumed to meet all of the safety
requirements of the IEC 1010-1.
5.3
Bath Preparation and Filling
Caution: Before filling the tank with fluid the drain valve must be installed
onto the pipe fitting at the back of the bath.
5.3.1
Drain Valve Installation Instructions
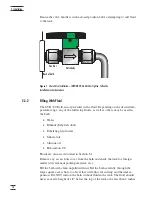
The drain valve attaches to the swage fitting located on the lower backside of
the bath. (See Figure 1.)
1.
Place the valve onto the drain fitting and hand tighten in place by turn-
ing the hex nut (attached to the bath) counter clockwise while holding
the valve stationary.
2.
Using open-end wrenches, hold the valve in place and tighten the hex
nub one quarter turn from the hand tightened position above.
The valve should be secured in place at this point. If not, repeat step number 2
being careful not to over tighten the assembly.
17
5 Installation

