background image

CARE AND CLEANING

(continued)

8

Drawer and Cover Removal

Drawers at the bottom of the fresh food compartment will stop 
before coming all the way out of the refrigerator, to help prevent
contents from spilling onto the floor. These drawers can be removed
easily by lifting the sides up slightly while pulling the drawers past 
the ‘‘stop’’ location.

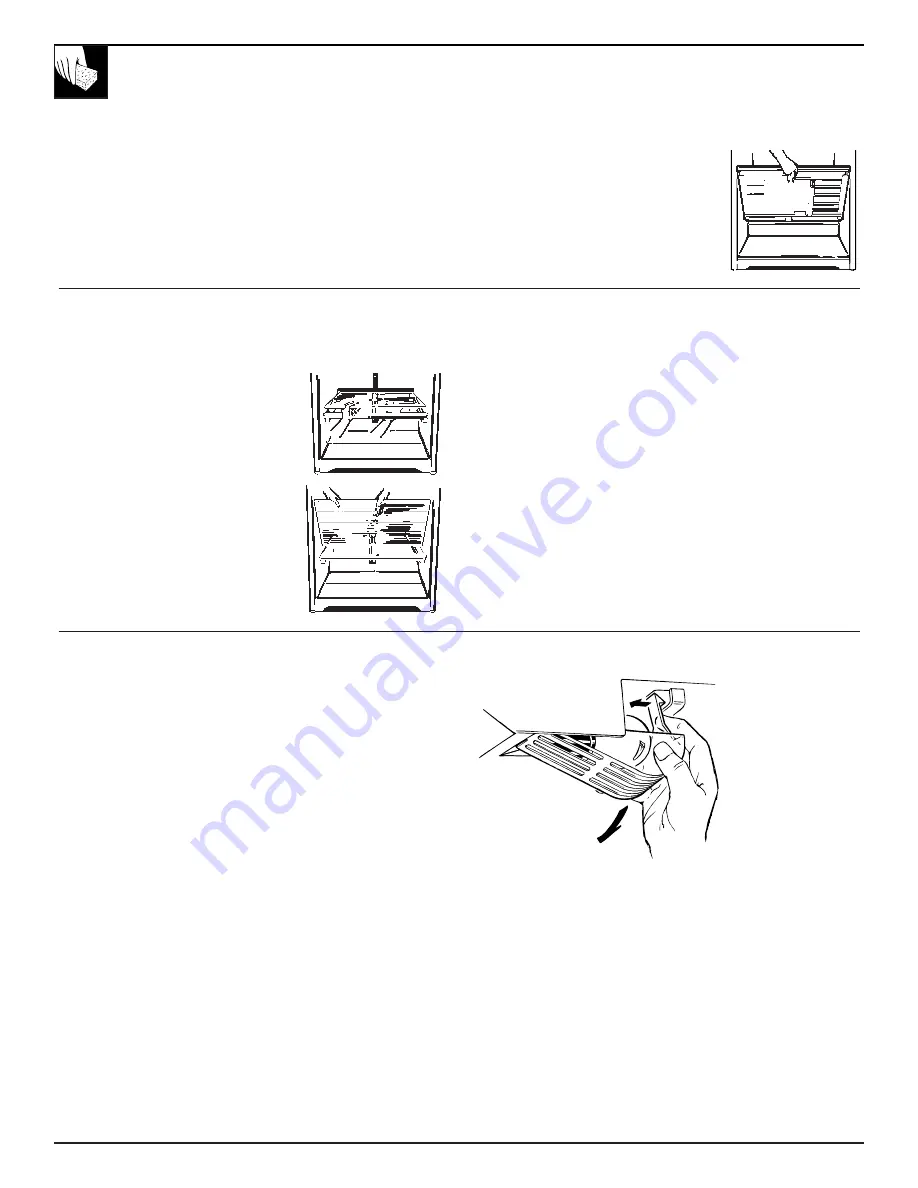
Full-Width Drawer with Plastic Cover   

(on some models)

To remove the cover, lift it off 
its supports, pull it forward, 
tilt it and take it out.

Twin Drawers with Glass Cover   

(on some models)

To remove the glass cover:

1. Remove the drawers.

2. Reach in, push the front of glass cover 

up and, at the same time, pull it forward 
as far as it will come. 

Tilt it and take it out. Avoid cleaning the 
cold glass cover with hot water because the
extreme temperature difference may cause
it to break.

3. Remove the drawer frame. (Always remove the glass cover before

you take out the drawer frame.)

Lift the frame off the supports at each side and back, pull it forward,
tilt it and take it out.

To replace the glass cover:

1. Lower the frame until it rests on the supports at each side and back.

2. Replace the glass cover, pushing its rear edge firmly into the rear

frame channel and gently lowering the front into place.

3. Replace the drawers.

Light Bulb Replacement   

(on some models)

A light bulb and socket are located at the top of the fresh food
compartment opposite the temperature control panel.

To replace the bulb, first unplug the refrigerator from its electrical
outlet. Put your hand under the light shield and release the hook at 
the bulb end of the shield. (The light shield is on some models.)
Unscrew the bulb when cool and replace with the same size and
wattage appliance bulb.

Squeeze to
release the hook

Summary of Contents for CTT14CYT

Page 1: ...Temperature Control 3 Care and Cleaning Behind Refrigerator 7 Cleaning Outside and Inside 7 Drawer and Cover Removal 8 Light Bulb Replacement 8 Under Refrigerator 7 Water Filter Accessory 6 Problem Solver 17 18 Normal Operating Sounds 17 Preparation Clearances 9 Dimensions 9 Location 9 Rollers and Levelling Legs 9 Vacation and Moving 9 Water Supply to Icemaker 9 Installation 10 16 Adapter Plug 10 ...

Page 2: ... over or damage the power cord Do not allow children to climb stand or hang on the shelves in the refrigerator They could damage the refrigerator and seriously injure themselves If your old refrigerator is still around the house but not in use be sure to remove the doors This will reduce the possibility of danger to children After your refrigerator is in operation do not touch the cold surfaces in...

Page 3: ...ttings plus 1 is the warmest 9 is the coldest At first set the dial at 4 or 5 After using the refrigerator adjust the dial if necessary Insert a coin into the slot in the middle of the dial and you can turn the dial to the setting that s best suited to your needs Allow 24 hours for the refrigerator to get cold NOTE Turning the dial to stops cooling in both compartments fresh food and frozen food s...

Page 4: ...odels To remove the ice tray shelf Lift the left side of the shelf off its supports then pull the shelf to the left to free it of the plug supports Pull the shelf to the right to free the pins from the holes in the cabinet wall Ice trays are designed to release ice cubes easily Hold tray upside down over a container and twist both ends to release cubes For only one or two ice cubes leave the tray ...

Page 5: ... with strong odors be stored wrapped foods such as Broccoli Cabbage Parsnips Brussels Cauliflower Turnips Sprouts Green Onions Low Humidity Drawer on some models This refrigerated drawer is designed to provide lower humidity storage for items such as Apples Oranges Squash Apricots Peaches summer Grapes Pears Strawberries Mushrooms Raspberries Tangerines Nectarines Snacks Drawer on some models The ...

Page 6: ...ically and wash it in lukewarm water Be sure to allow the storage bin to dry before replacing it otherwise ice cubes may stick to other parts of the icemaker If this is your first icemaker you ll hear occasional sounds that may be unfamiliar They are normal icemaking sounds and are not a cause for concern AUTOMATIC ICEMAKER on some models 6 Icemaker Ice Storage Bin Feeler arm in STOP up position F...

Page 7: ...cleaning the door gaskets apply a thin layer of petroleum jelly to the door gaskets at the hinge side This helps keep the gaskets from sticking and bending out of shape Do not use cleansing powders or other abrasive cleaners To help prevent odors leave an open box of baking soda in the rear of the refrigerator on the top shelf Change the box every three months An open box of baking soda in the fro...

Page 8: ... the extreme temperature difference may cause it to break 3 Remove the drawer frame Always remove the glass cover before you take out the drawer frame Lift the frame off the supports at each side and back pull it forward tilt it and take it out To replace the glass cover 1 Lower the frame until it rests on the supports at each side and back 2 Replace the glass cover pushing its rear edge firmly in...

Page 9: ...nket Rollers and Leveling Legs Leveling legs near each front corner of the refrigerator are adjustable They firmly position the refrigerator and prevent it from moving when the doors are opened Leveling legs should be set so the front of the refrigerator is raised just enough that the doors close easily when opened about halfway Turn the leveling legs clockwise to raise the refrigerator counterclo...

Page 10: ...POSSIBLE REMOVE THE DOORS AND DISCARD SEPARATELY DO NOT ATTEMPT TO STAND ON TOP OF YOUR APPLIANCE IT IS NOT DESIGNED FOR SUCH USE AND YOU COULD INJURE YOURSELF OR DAMAGE THE APPLIANCE BY SUCH ABUSE CHILDREN SHOULD NOT BE ALLOWED TO PLAY WITH THE APPLIANCE OR TAMPER WITH THE CONTROLS Use of Adapter Plug on some models Use of Extension Cords Because of potential safety hazards under certain conditio...

Page 11: ... not move the cabinet until the door swing reversal is completed REMOVE THE FRESH FOOD DOOR a Tape the door shut with masking tape b Use a 5 16 hex head socket screwdriver and 5 16 open end wrench to remove the two screws holding the center hinge and shim glued to it to the cabinet Lift the center hinge to free its pin from the socket in the top of the door and set hinge and screws aside c Remove ...

Page 12: ...e case for correct installation 3 REVERSE THE DOOR HANDLES on some models 1 Transfer the fresh food door handle to the right To remove the handle a Remove the handle plug using a tape tipped putty knife under the edge and remove the screw underneath b Remove two screws holding the handle to the top of the door c Remove the handle After removing the handle a Remove the screws from the right edge of...

Page 13: ...side d Transfer the door stop as shown above e Attach the handle to the right edge of the door with screws at top and bottom using bottom holes vacated by removal of the door stop screws TOP BOTTOM REHANG THE FRESH FOOD DOOR a Lower the bottom socket of the fresh food door onto the pin on the bottom hinge Be sure the plastic washer is in place on the pin b Insert the pin on the center hinge into t...

Page 14: ...COVERED SNACKS DRAWER on some models For convenient access to the Snacks drawer after reversing the door swing you can move the drawer to the other side of the cabinet 1 Slide the drawer out and remove the shelf to which it was attached 2 Remove the other half width shelf 3 Push the drawer cover forward and up off the shelf 4 Put the cover on the other half width shelf as shown flush to the side w...

Page 15: ...r pressure must be between 20 and 120 p s i 1 4 and 8 3 bars Power drill unless you have a self piercing valve Copper tubing 1 4 outer diameter to connect the refrigerator to the water supply Be sure both ends of the tubing are cut square To determine how much copper tubing you need measure the distance from the water valve on the back of the refrigerator to the water supply pipe Then add 8 feet 2...

Page 16: ...rature of 15 F 9 C or below It will then begin operation automatically if the icemaker is in the ON down position NOTE The icemaker may double cycle when it first starts causing some water spillage from the icemaker into the ice bucket This is normal and should not happen again The first few batches of cubes should be thrown away so that remaining impurities in the water line will be flushed out 9...

Page 17: ...idly on the floor The front leveling legs need adjusting or floor is weak or uneven Refer to Rollers and Leveling Legs in the Preparation section If dishes vibrate on shelves try moving them Slight vibration is normal QUESTIONS USE THIS PROBLEM SOLVER NORMAL OPERATING SOUNDS These sounds are normal and do not indicate a need for service The fan circulating air inside the freezer which keeps the te...

Page 18: ...rage bin needs to be emptied washed and old cubes need to be discarded ODOR TASTE Unsealed packages in refrigerator and or frozen food storage compartments may be transmitting odor taste to ice cubes Interior of refrigerator needs cleaning Refer to Care and Cleaning section MOISTURE FORMS ON Not unusual during periods of high humidity CABINET SURFACE BETWEEN THE DOORS MOISTURE COLLECTS Too frequen...

Page 19: ...NOTES 19 Problem Solver ...

Page 20: ...NOTES 20 ...

Page 21: ...orio para filtrar el agua 6 Cambio de bombilla 8 Debajo del refrigerador 7 Detrás del refrigerador 7 Extracción de gavetas y tapas 8 Limpieza exterior y interior 7 Solucionarlosproblemas 17 19 Ruidos normales de operación 17 Preparación Dimensiones 9 Espacio libre 9 Ruedas y patas de nivelación 9 Suministro de agua a la máquina de hacer hielo 9 Ubicación 9 Vacaciones y mudanzas 9 Instalación 10 16...

Page 22: ... pisar o dañar el cable eléctrico con las ruedas No permita que los niños se suban o se cuelguen de los entrepaños del refrigerador Podrían causar serios desperfectos al electrodoméstico y ocasionar daños personales Si su refrigerador viejo sigue en su casa pero no lo utiliza asegúrese de desmontar las puertas Esto reducirá el riesgo de peligro para los niños Una vez que el refrigerador esté en fu...

Page 23: ... en el número 4 o 5 Después de usar el refrigerador desplace el control si sea necesario Introduzca una moneda en la ranura del control y puede situar el control a la posición según sus necesidades Deje que transcurran 24 horas para permitir que se enfríe el refrigerador NOTA Al situar el control en la posición se detiene la refrigeración en ambos compartimientos el de alimentos frescos y el de al...

Page 24: ...entrepaño para las charolas de hielo Levante el lado izquierdo del entrepaño y sáquelo de sus soportes entonces tire el entrepaño hacia la izquierda para desengancharlo de los soportes Tire el entrepaño hacia la derecha para sacar las extremidades de los orificios de la pared del compartimiento Para soltar los cubos de hielo invierta la charola sosténgala sobre una gaveta de almacenamiento recipie...

Page 25: ...Gaveta de baja humedad en algunos modelos Esta gaveta refrigerada ha sido diseñada para proveer almacenaje de baja humedad para alimentos tales como Albaricoques Mandarinas Naranjas Calabaza Manzanas Nectarinas Champiñones Melocotónes Peras Fresas Moras Uvas Gaveta para bocadillos en algunos modelos La gaveta para bocadillos removible puede sacarse y llevarse al fregadero o al lugar de preparación...

Page 26: ...Asegúrese que el recipiente de almacenaje se seque antes de volver a ponerlo del contrario los cubos podrían pegarse a otras partes de la máquina de hielo Si ésta es su primera máquina de hacer hielo oirá ruidos ocasionales que le pueden resultar poco familiares Son ruidos normales de la máquina de hacer hielo y no le deberían preocupar MAQUINA AUTOMATICA DE HACER HIELO en algunos modelos 6 Máquin...

Page 27: ... Se recomienda hacer lo mismo en el compartimiento de alimentos congelados Otras partes del refrigerador incluyendo las juntas de las puertas las gavetas para carnes y hortalizas la cubitera y todas las piezas de plástico pueden limpiarse de la misma manera Después de limpiar las juntas de las puertas aplique una capa de vaselina a las juntas por el lado de las bisagras Esto ayuda a evitar que las...

Page 28: ...mperatura puede romperla 3 Saque el marco de la gaveta Siempre saque la cubierta de cristal antes de sacar el marco de la gaveta Saque el marco de los soportes levantándolo por cada lado y por detrás estire hacia delante inclínelo y sáquelo Para volver a colocar la cubierta de cristal 1 Baje el marco hasta que éste descanse en los soportes a cada lado y atrás 2 Vuelva a colocar la cubierta de cris...

Page 29: ...efrigerador con una manta Ruedas y patas de nivelación Las patas de nivelación que se encuentran junto a cada esquina delantera del refrigerador pueden ajustarse Permiten colocar firmemente el refrigerador e impiden que se mueva al abrir las puertas Las patas de nivelación deben ajustarse de forma que la parte delantera del refrigerador quede lo suficiente elevada para permitir que las puertas se ...

Page 30: ...ADURA QUEDE INSERVIBLE DE SER POSIBLE DESMONTE LAS PUERTAS Y DESHAGASE DE ELLAS POR SEPARADO ABSTENGASE DE SUBIRSE ENCIMA DEL ELECTRODOMESTICO YA QUE NO HA SIDO DISEÑADO PARA TAL USO Y PODRIA CAUSAR DAÑOS PERSONALES O MATERIALES NO PERMITA QUE LOS NIÑOS JUEGUEN CON EL ELECTRO DOMESTICO NI CON LOS CONTROLES DEL MISMO Uso del enchufe adaptador en algunos modelos Uso de cables de extensión Debido a p...

Page 31: ...o A la hora de instalar las bisagras de la puerta asegúrese de que utiliza el mismo número de calzos y arandelas que se usaron originalmente IMPORTANTE Una vez que haya empezado no mueva el gabinete hasta que haya finalizado el proceso de cambiar el modo de apertura de la SAQUE LA PUERTA DE LOS ALIMENTOS FRESCOS a Mantenga la puerta cerrada con la cinta aislante b Use el destornillador de cabeza h...

Page 32: ... y saque el tornillo de debajo b Saque los dos tornillos aguantando el tirador por la parte superior c Saque el tirador Después de haber sacado el tirador a Saque los tornillos del extremo derecho de la parte superior de la puerta e insértelos en los orificios de los tornillos del tirador en el lado opuesto 4 Arandela de plástico Clavija de la bisagra Soporte inferior de la bisagra LADO IZQUIERDO ...

Page 33: ...Asegúrese de que la arandela de plástico esté sobre la clavija 5 b Con un cuchillo de enmasillar cubierto de cinta o un destornillador de hoja delgada saque el taco del orificio de la bisagra en el lado izquierdo de la puerta y introdúzcalo en el orificio en el lado opuesto que quedó vacío al quitar la bisagra superior c Agarre el taco de la parte delantera de la puerta y transfiéralo al lado opue...

Page 34: ...que el otro entrepaño de anchura media 3 Empuje la cubierta de la gaveta hacia adelante y hacia arriba para sacarla del entrepaño 4 Reemplace la cubierta sobre el otro entrepaño de anchura media como ilustrado al ras con el lado de los arrastres que se cierran de sí mismos Vuelva a colocar ambos entrepaños en el refrigerador y deslice la gaveta para bocadillos dentro de su cubierta recolocada 8 Cl...

Page 35: ... 4 en el tubo con un taladro usando una broca bien afilada Elimine las asperezas que pudieran haberse producido al hacer el agujero con el taladro No haga un agujero si la llave es autopenetrante 2 QUE SE NECESITA Para el funcionamiento automático de la máquina de hacer hielo es necesario un abastecimiento de agua fría La presión del agua debe oscilar entre 1 4 y 8 3 barias Perfore con taladro a m...

Page 36: ...RIENTE PUESTA A TIERRA 8 COLOQUE LA VARILLA DE CONTACTO DE LA MAQUINA DE HACER HIELO EN LA POSICION ON ACTIVADA HACIA ABAJO La máquina de hacer hielo no entrará en funcionamiento hasta que haya alcanzado su temperatura operativa de 15 F 9 C o inferior En dicho momento entrará en funcionamiento siempre que se encuentre en la posición ON ACTIVADA hacia abajo NOTA El refrigerador podría hacer un cicl...

Page 37: ...rías cuando la máquina de hacer hielo se llene de agua también producen ruido PROBLEMA CAUSA POSIBLE EL REFRIGERADOR Quizás esté en el ciclo de descongelación durante el cual el motor deja de NO ENTRA EN funcionar por espacio de unos 30 minutos FUNCIONAMIENTO El control de temperatura está en la posición Si la luz interior no está encendida quizás el refrigerador no esté enchufado a la toma de cor...

Page 38: ...se abre con demasiada frecuencia o durante ratos demasiado largos CONGELADOS Es normal que haya escarcha en el interior del paquete LA MAQUINA AUTOMATICA La varilla de contacto está en la posición STOP PARADA hacia arriba DE HACER HIELO Se ha cortado o desconectado el suministro de agua NO FUNCIONA El compartimiento de alimentos congelados está demasiado caliente en algunos modelos Los cubos amont...

Page 39: ...a cada tres meses SALE AIRE CALIENTE La circulación de aire normal está enfriando el motor En el proceso de DE LA BASE DEL refrigeración es normal que el calor sea expulsado por debajo del refrigerador REFRIGERADOR Algunos suelos se decoloran a estas temperaturas normales y seguras Consulte con el vendedor de suelos si le preocupa la decoloración LA COMIDA SE CONGELA Saque la comida de la zona don...

Page 40: ...NOTAS 20 ...

Reviews: