background image

TurboCool

rapidly cools the refrigerator

compartment in order to more quickly 
cool foods. Use 

TurboCool

when adding a

large amount of food to the refrigerator
compartment, putting away foods after they
have been sitting out at room temperature
or when putting away warm leftovers. It can
also be used if the refrigerator has been
without power for an extended period.

Once activated, the compressor will turn on
immediately and the fans will cycle on and
off at high speed as needed for eight hours.
The compressor will continue to run until
the refrigerator compartment cools to
approximately 34°F (1°C), then it will cycle
on and off to maintain this setting. After 
8 hours, or if 

TurboCool

is pressed again, 

the refrigerator compartment will return 
to the original setting.

How to Use

Press 

TurboCool

. The 

TurboCool

indicator light will come on; however, 
the refrigerator temperature display 
will still show the current setting.

After 

TurboCool

is complete, the 

TurboCool

indicator light will go out.

NOTES: 

The refrigerator temperature
cannot be changed during

TurboCool

.

The freezer temperature is not
affected during 

TurboCool

.

When opening the refrigerator
door during 

TurboCool

, the fans 

will continue to run if they have
cycled on.

Consumer Support

Tr

oubleshooting T

ips

Operating Instructions

Safety Instructions

Installation Instructions

5

About the temperature controls.

ge.com

WARMER

COLDER

ADJUST REFRIGERATOR TEMP

9  IS COLDEST

WARMER

COLDER

ADJUST FREEZER TEMP

9  IS COLDEST

Initially, set the refrigerator control at 

5

and the freezer control at  

5

and allow 

12–24 hours for the temperature to stabilize.

Several adjustments may be required. Adjust the controls one increment at a time, and
allow 12 hours after each adjustment for the refrigerator to reach the temperature you
have set.

Setting the controls to 

stops cooling in both the refrigerator and freezer compartments

but does not shut off electrical power to the refrigerator. On some models, only the
refrigerator control has a 

0

setting.

Touch pad controls

Setting either control at 

0

will automatically set the other control at 

0

. The zeros will

blink until you set the controls.

If both controls are set at 

0

and either 

COLDER

pad is pressed, the controls will

automatically reset to 

5

.

Control settings will vary based on personal preferences, usage and operating
conditions and may require more than one adjustment.

NOTE: 

On some models, the refrigerator is shipped with protective film covering the temperature

controls. If this film was not removed during installation, remove it now.

About TurboCool.

(on some models)

How it Works

Summary of Contents for CustomStyle GSC23LGR

Page 1: ...nstall the Refrigerator 16 Water Line Installation 25 27 Troubleshooting Tips 28 31 Normal Operating Sounds 28 Consumer Support Consumer Support Back Cover Performance Data Sheet 32 Product Registration U S 33 34 Product Registration Canadian 35 36 State of California Water Treatment Device Certificate 37 Warranty Canadian 38 Warranty U S 39 Réfrigérateurs Côte à Côte Refrigeradores Lado a Lado Mo...

Page 2: ...ands are damp or wet Skin may stick to these extremely cold surfaces Do not store or use gasoline or other flammable vapors and liquids in the vicinity of this or any other appliance In refrigerators with automatic icemakers avoid contact with the moving parts of the ejector mechanism or with the heating element located on the bottom of the icemaker Do not place fingers or hands on the automatic i...

Page 3: ... easily climb inside Refrigerants All refrigeration products contain refrigerants which under federal law must be removed prior to product disposal If you are getting rid of an old refrigeration product check with the company handling the disposal about what to do USE OF EXTENSION CORDS Because of potential safety hazards under certain conditions we strongly recommend against the use of an extensi...

Page 4: ...standard 2 prong outlet it is your personal responsibility and obligation to have it replaced with a properly grounded 3 prong wall outlet The refrigerator should always be plugged into its own individual electrical outlet which has a voltage rating that matches the rating plate This provides the best performance and also prevents overloading house wiring circuits which could cause a fire hazard f...

Page 5: ...inue to run if they have cycled on Consumer Support Troubleshooting Tips Operating Instructions Safety Instructions Installation Instructions 5 About the temperature controls ge com WARMER COLDER ADJUST REFRIGERATOR TEMP 9 IS COLDEST WARMER COLDER ADJUST FREEZER TEMP 9 IS COLDEST Initially set the refrigerator control at 5 and the freezer control at 5 and allow 12 24 hours for the temperature to s...

Page 6: ... the month and year sticker to the new cartridge to remind you to replace the filter in six months Fill the replacement cartridge with water from the tap to allow for better flow from the dispenser immediately after installation Line up the arrow on the cartridge and the cartridge holder Place the top of the new cartridge up inside the holder Do not push it up into the holder Slowly turn it to the...

Page 7: ...the rear and move it back and forth to fit your needs CAUTION On models with an ice chute inside the top freezer door bin be careful when placing items in the bin Make sure that items do not block or fall into the ice chute Not all features are on all models Refrigerator bin Freezer tilt out bin Snugger Freezer bin Slide Out Spillproof Shelf The slide out spillproof shelf allows you to reach items...

Page 8: ...zer Shelves To remove slide out to the stop position lift the front past the stop position and slide out from rib Make sure you push the shelves all the way back in before you close the door Freezer Baskets To remove slide out to the stop position lift the front past the stop position and slide out Make sure you push the baskets all the way back in before you close the door Fixed Freezer Shelves T...

Page 9: ... is only partially open it will automatically close Beyond this stop the door will stay open Door Alignment If doors are uneven adjust the refrigerator door Using a 7 16 socket wrench turn the door adjusting screw to the right to raise the door to the left to lower it A nylon plug imbedded in the threads of the pin prevents the pin from turning unless a wrench is used After one or two turns of the...

Page 10: ...ou roll the refrigerator out you will need to move the refrigerator to the left or right as you roll it out Consumer Support Troubleshooting Tips Operating Instructions Safety Instructions Installation Instructions 10 About the crispers and pans Not all features are on all models Fruit and Vegetable Crispers Excess water that may accumulate in the bottom of the drawers should be wiped dry Adjustab...

Page 11: ...A newly installed refrigerator may take 12 to 24 hours to begin making ice Lift the bin then pull it forward until the bin stops Icemaker Feeler Arm Power Switch Lower the bin to access ice or reach the power switch NOTE In order to take full advantage of the tilt out ice bin only store items on the shelf below the ice bin that are no taller than the lowest point on the bin Models without a shelf ...

Page 12: ...u need ice in a hurry press this pad to speed up ice production This will increase ice production for the following 48 hours or until you press the pad again Door Alarm To set the alarm press this pad until the indicator light comes on This alarm will sound if either door is open for more than 3 minutes The light goes out and the beeping stops when you close the door Spill Shelf Important Facts Ab...

Page 13: ...ments Unplug the refrigerator before cleaning If this is not practical wring excess moisture out of sponge or cloth when cleaning around switches lights or controls Use warm water and baking soda solution about a tablespoon 15 ml of baking soda to a quart 1 liter of water This both cleans and neutralizes odors Rinse and wipe dry Use of any cleaning solution other than that which is recommended esp...

Page 14: ...the refrigerator away from the wall All types of floor coverings can be damaged particularly cushioned coverings and those with embossed surfaces Pull the refrigerator straight out and return it to position by pushing it straight in Moving the refrigerator in a side direction may result in damage to the floor covering or refrigerator When pushing the refrigerator back make sure you don t roll over...

Page 15: ...ment Lower Light This light is located above the top drawer Unplug the refrigerator Lift the light shield up and pull it out After replacing the bulb with an appliance bulb of the same or lower wattage replace the shield Plug the refrigerator back in Freezer Compartment Unplug the refrigerator Remove the shelf just above the light shield The shelf will be easier to remove if it is emptied first Re...

Page 16: ...rator has already been installed remove the base grille see Step 2 in Moving the Refrigerator then skip to Step 5 in Installing the Refrigerator Questions Call 800 GE CARES 800 432 2737 or Visit our Website at ge com In Canada call 1 800 561 3344 or Visit our Website at www geappliances ca Installation Refrigerator Instructions Models 25 27 If the refrigerator has an icemaker it will have to be co...

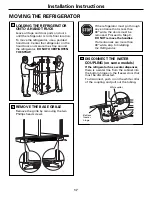
Page 17: ... two Phillips head screws 2 If the refrigerator must go through any entrance that is less than 38 wide the doors must be removed Proceed to Step 3 DO NOT remove the handles If all entrances are more than 38 wide skip to Installing the Refrigerator DISCONNECT THE WATER COUPLING on some models If the refrigerator has a water dispenser there is a water line from the cabinet into the bottom hinge on t...

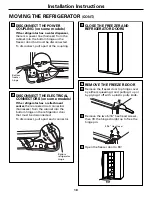
Page 18: ...shment center there are electrical connectors harnesses from the cabinet into the bottom hinge on the refrigerator door that must be disconnected To disconnect pull apart each connector 5 Bottom refrigerator hinge CLOSE THE FREEZER AND REFRIGERATOR DOORS 6 REMOVE THE FREEZER DOOR Remove the freezer door top hinge cover by either squeezing it and pulling it up or by prying it off with a plastic put...

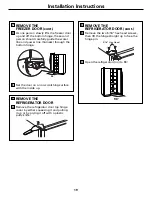
Page 19: ...ttom hinge Set the door on a non scratching surface with the inside up 7 D E 90 REMOVE THE REFRIGERATOR DOOR Remove the refrigerator door top hinge cover by either squeezing it and pulling it up or by prying it off with a plastic putty knife 8 A REMOVE THE REFRIGERATOR DOOR cont Remove the two 5 16 hex head screws then lift the hinge straight up to free the hinge pin Open the refrigerator door to ...

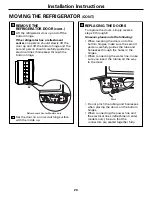
Page 20: ...OORS To replace the doors simply reverse steps 3 through 8 However please note the following When lowering the doors onto the bottom hinges make sure the second person carefully guides the tube and harnesses through the holes in the hinges When connecting the water line make sure you insert the tubing all the way to the mark Do not pinch the tubing and harnesses when placing the doors on the botto...

Page 21: ... enough to maintain proper temperatures Do not install the refrigerator where the temperature will go above 100 F 37 C because it will not perform properly Install it on a floor strong enough to support it fully loaded CLEARANCES Allow the following clearances for ease of installation proper air circulation and plumbing and electrical connections Sides 1 8 4 mm Top 1 25 mm Back 1 25 mm ...

Page 22: ...m the house cold water supply If you are using the GE SmartConnect tubing the nuts are already assembled to the tubing If you are using copper tubing insert the end of the tubing into the refrigerator connection at the back of the refrigerator as far as possible While holding the tubing tighten the fitting If you are using GE SmartConnect tubing insert the molded end of the tubing into the refrige...

Page 23: ...djusting screws clockwise to raise the refrigerator counterclockwise to lower it Use a 3 8 hex socket or wrench or an adjustable wrench 5 Rollers Roller adjusting screw LEVEL THE DOORS Adjust the refrigerator door to make the doors even at the top To align Using a 7 16 wrench turn the door adjusting screw to the right to raise the door to the left to lower it NOTE A nylon plug imbedded in the thre...

Page 24: ... controls to the recommended setting 9 START THE ICEMAKER Set the icemaker power switch to the ON position The icemaker will not begin to operate until it reaches its operating temperature of 15 F 9 C or below It will then begin operation automatically It will take 2 3 days to fill the ice bin 10 Power switch INSTALLING THE REFRIGERATOR CONT ...

Page 25: ... CONTROLS Set the controls to the recommended setting 8 START THE ICEMAKER Set the icemaker power switch to the ON position The icemaker will not begin to operate until it reaches its operating temperature of 15 F 9 C or below It will then begin operation automatically It will take 2 3 days to fill the ice bin 9 Power switch ...

Page 26: ...and then use a compression fitting Do not cut formed end from GE SmartConnect Refrigerator tubing Shutoff valve to connect to the cold water line The shutoff valve should have a water inlet with a minimum inside diameter of 5 32 at the point of connection to the COLD WATER LINE Saddle type shutoff valves are included in many water supply kits Before purchasing make sure a saddle type valve complie...

Page 27: ...has been flushed through the tubing FLUSH OUT THE TUBING 8 Installation Instructions SmartConnect Tubing Fasten the shutoff valve to the cold water pipe with the pipe clamp NOTE Commonwealth of Massachusetts Plumbing Codes 248CMR shall be adhered to Saddle valves are illegal and use is not permitted in Massachusetts Consult with your licensed plumber FASTEN THE SHUTOFF VALVE 4 Tighten the clamp sc...

Page 28: ...to provide optimal cooling and energy savings CLICKS POPS CRACKS and CHIRPS You may hear cracking or popping sounds when the refrigerator is first plugged in This happens as the refrigerator cools to the correct temperature Electronic dampers click open and closed to provide optimal cooling and energy savings The compressor may cause a clicking or chirping sound when attempting to restart this cou...

Page 29: ... is holding door open freezer require more Hot weather or frequent This is normal operating time They door openings start and stop often Temperature controls See About the controls to maintain even set at the coldest temperatures setting Refrigerator or freezer Temperature control not set See About the controls compartment too warm cold enough Warm weather or frequent Set the temperature control o...

Page 30: ...s and hold the LOCK CONTROL pad for 3 seconds Water has poor taste odor Water dispenser has not been Dispense water until all water in system is replenished on some models used for a long time Water in first glass is Normal when refrigerator Wait 24 hours for the refrigerator to completely warm on some models is first installed cool down Water dispenser has not been Dispense water until all water ...

Page 31: ...ide of refrigerator periods of high humidity Moisture collects inside Too frequent or too in humid weather air long door openings carries moisture into refrigerator when doors are opened Interior light does No power at outlet Replace fuse or reset the breaker not work Light bulb burned out See Replacing the light bulbs Water on kitchen floor or Cubes jammed in chute Poke ice through with a wooden ...

Page 32: ...78 98 65 0 04 mg L 1 4 dichlorobenzene 0 075 mg L 0 225 mg L 10 0 2283 mg L 0 000500 mg L 0 000500 mg L 99 78 99 77 0 075 mg L Atrazine 0 003 mg L 0 009 mg L 10 0 0087 mg L 0 0005 mg L 0 0005 mg L 94 22 93 33 0 003 mg L Tested using a flow rate of 0 50 gpm pressure of 60 psig pH of 7 5 0 5 temp of 68 5 F 20 3 C Measurement in Particles ml Particles used were 0 5 1 microns NTU Nephelometric Turbidi...

Page 33: ... With Service Protection Plus you can expect An extended service plan that limits unexpected repair bills Service coverage for most major brands Unlimited service calls for the length of your contract or credit toward a replacement product Service coverage for covered operating parts and labor on appliances and home electronics that fail during normal single family household use Your satisfaction ...

Page 34: ...ut here Complete and mail your Consumer Product Ownership Registration today Have the peace of mind of knowing we can contact you in the unlikely event of a safety modification After mailing the registration below store this document in a safe place It contains information you will need should you require service Our service number is 800 GE CARES 800 432 2737 Read your Owner s Manual carefully It...

Page 35: ...35 OWNERSHIP REGISTRATION P O BOX 1780 MISSISSAUGA ONTARIO L4Y 4G1 FOR CANADIAN CONSUMERS ONLY Please place in envelope and mail to Veuillez mettre dans une enveloppe et envoyez à ...

Page 36: ...36 ...
Page 37: ...ty Code for the following health related contaminants Cysts Turbidity Asbestos Lead Mercury Alachlor Atrazine Benzene Carbofuran Lindane Mercury Toxaphene 1 4 dichlorobenzene 2 4 D Microbiological Contaminants and Turbidity Inorganic Radiological Contaminants Organic Contaminants Do not use where water is microbiologically unsafe or with water of unknown quality except that systems certified for c...

Page 38: ...ight bulbs Damage to product caused by accident fire floods or acts of God Loss of food due to spoilage Proper use and care of product as listed in the owner s manual proper setting of controls Product not accessible to provide required service WARRANTOR IS NOT RESPONSIBLE FOR CONSEQUENTIAL DAMAGES IMPORTANT Keep this warranty and your bill of sale as proof of original purchase and purchase date P...

Page 39: ...ting of circuit breakers Damage caused after delivery Replacement of the water filter cartridge if included due to water pressure that is outside the specified operating range or due to excessive sediment in the water supply Replacement of the light bulbs if included or water filter cartridge if included other than as noted above Damage to the product caused by accident fire floods or acts of God ...

Page 40: ...TurboCool 43 Installation Déménagement du réfrigérateur 55 58 Installation de la conduite d eau 63 65 Installation du réfrigérateur 59 62 Préparation 54 Conseils de dépannage 66 70 Bruits de fonctionnement normaux 66 Soutien au consommateur Feuillet de données relatives à la performance de la cartouche MWF 72 Garantie pour la clientèle au Canada 71 Soutien au consommateur 73 40 Transcrivez les num...

Page 41: ... présence des enfants Débranchez votre réfrigérateur avant de le nettoyer ou de le réparer REMARQUE Nous vous recommandons vivement de confier toute réparation à un technicien qualifié Lorsque vous réglez la commande sur 0 arrêt l alimentation électrique de l ampoule n est pas coupée Ne recongelez pas les aliments surgelés qui ont complètement dégelé COMMENT VOUS DÉBARRASSER CONVENABLEMENT DE VOTR...

Page 42: ...rise de courant dont la tension nominale est identique à celle indiquée sur la plaque signalétique Cette précaution est recommandée pour garantir un rendement optimum et éviter une surcharge des circuits électriques de la résidence ce qui pourrait créer un risque d incendie par surchauffe des fils Ne débranchez jamais le réfrigérateur en tirant sur le cordon d alimentation Saisissez fermement la f...

Page 43: ...nctionner si leur cycle le demande Les commandes www electromenagersge ca 43 Soutien au consommateur Conseils de dépannage Fonctionnement Mesures de sécurité Installation Initialement réglez le réglage de votre compartiment réfrigération en position 5 et celui de votre compartiment congélation en position 5 et attendez 12 24 heures que la température se stabilise Plusieurs ajustements peuvent être...

Page 44: ...x mois Remplissez la cartouche de remplacement d eau du robinet immédiatement après l installation afin de permettre un meilleur débit du distributeur Alignez la flèche de la cartouche avec celle de support de cartouche Placez le haut de la nouvelle cartouche à l intérieur du support Ne l enfoncez pas dans le porte cartouche Tournez la cartouche lentement vers la droite jusqu au point où la cartou...

Page 45: ...e réfrigérateur Bac basculant de porte de congélateur L ergot Grands bacs Vous pouvez régler les plus grands bacs de porte de réfrigérateur et les bacs basculants de porte de congélateur Enlèvement Soulevez l avant du bac droit vers le haut puis soulevez et enlevez Remise en place ou relocalisation Engagez l arrière du bac dans les soutiens moulés de la porte Puis poussez vers le bas l avant du ba...

Page 46: ...élateur à retrait par coulissement Pour retirer faites la glisser jusqu à la position d arrêt soulevez l avant au delà de la position d arrêt et faites la glisser en dehors du support Prenez soin de pousser les clayettes jusqu au fond pour refermer la porte Paniers du congélateur Pour retirer faites la glisser jusqu à la position d arrêt soulevez l avant au delà de la position d arrêt et faites so...

Page 47: ... position d arrêt la porte restera ouverte Les portes du réfrigérateur www electromenagersge ca Alignement des portes Si les portes ne soient pas alignées réglez la porte du compartiment réfrigérateur À l aide d une clé à douille de 7 16 po tournez la vis de réglage de la porte vers la droite pour relever la porte ou vers la gauche pour l abaisser Une douille de nylon encastrée dans les filets de ...

Page 48: ... réfrigérateur vers l avant jusqu à ce que la porte s ouvre suffisamment pour vous permettre d enlever les tiroirs Parfois pour faire sortir le réfrigérateur vous devez le faire aller vers la gauche ou vers la droite en le roulant Les tiroirs de rangement Toutes les caractéristiques ne sont pas disponibles sur tous les modèles Contenants à fruits et légumes Si une quantité d eau excessive s accumu...

Page 49: ...ons automatique Machine à glaçons automatique Machine à glaçons Bras régulateur Interrupteur d alimentation Soulevez le tiroir puis tirez vers l avant jusqu à son arrêt Abaissez le tiroir pour avoir accès aux glaçons ou pour atteindre le commutateur de marche NOTE Afin de tirer pleinement avantage du tiroir basculant la taille des articles déposés sur la clayette en dessous du tiroir à glaçons ne ...

Page 50: ...dement appuyez sur cette touche pour accélérer la production de glace Cela augmente la production de glace pendant les 48 heures suivantes ou jusqu à ce que vous appuyez à nouveau sur cette touche Door Alarm Pour mettre en marche le signal sonore appuyez sur cette touche pour allumer l indicateur lumineux Ce signal sonne si l une des portes reste ouverte plus de 3 minutes La lumière s éteint et le...

Page 51: ...ire essorez bien votre linge ou votre éponge pour enlever l excès d eau lorsque vous nettoyez autour des interrupteurs des lampes ou des commandes Utilisez une solution d eau tiède et de bicarbonate de soude environ une cuillère à soupe 15 ml de bicarbonate de soude par pinte 1 liter d eau afin de nettoyer tout en neutralisant les odeurs Rincez et essuyez bien L utilisation de solutions nettoyante...

Page 52: ...eur du mur Tous les types de revêtements de sol peuvent être endommagés particulièrement ceux qui sont coussinés ou dont la surface est gaufrée Tirez le réfrigérateur en ligne droite et lorsque vous le remettez en place poussez le vers le mur en ligne droite Les déplacements latéraux du réfrigérateur pourraient endommager le revêtement de sol ou le réfrigérateur Lorsque vous remettez le réfrigérat...

Page 53: ... tiroir d en haut Débranchez le réfrigérateur Soulevez le pare lumière et enlevez le en tirant Après avoir remplacé l ampoule par une ampoule d appareil électro ménager de même puissance ou de puissance inférieure remettez le pare lumière Rebranchez le réfrigérateur Compartiment congélateur Débranchez le réfrigérateur Enlevez la clayette qui se trouve juste au dessus du pare lumière vous pouvez en...

Page 54: ...tallé enlevez la grille de base voir l étape 2 de la section Déménagement du réfrigérateur puis sautez à l étape 5 de la section Installation du réfrigérateur Questions Appelez le 1 800 561 3344 ou Visitez notre site Web à l adresse www electromenagersge ca Instructions Réfrigérateur d installation Modèles 25 et 27 AVANT DE COMMENCER Si votre réfrigérateur a une machine à glaçons il faut le branch...

Page 55: ...isez un chariot manuel rembourré Centrez le réfrigérateur sur le chariot et entourez le d une courroie NE SERREZ PAS LA COURROIE EXCESSIVEMENT 1 ENLEVEZ LA GRILLE DE BASE Enlevez la grille en retirant les deux vis à tête cruciforme 2 DÉBRANCHEZ LE RACCORD D ALIMENTATION D EAU sur certains modèles Si le compartiment réfrigération est doté d un rafraîchisseur d eau alors il faut débrancher la condui...

Page 56: ...ecteurs électriques faisceaux qui partent de la carosserie et s insèrent dans la charnière inférieure du compartiment réfrigération Pour débrancher tirez de chaque côté des connecteurs 5 Charnière inférieure du compartiment réfrigération FERMEZ LES PORTES DES COMPARTIMENTS CONGÉLATION ET RÉFRIGÉRATION 6 ENLEVEZ LA PORTE DU COMPARTIMENT CONGÉLATION Enlevez le couvercle de la charnière supérieure de...

Page 57: ...our la protéger des égratignures l intérieur vers le haut 7 D E 90 ENLEVEZ LA PORTE DU COMPARTIMENT RÉFRIGÉRATION Enlevez le couvercle de la charnière supérieure de la porte du compartiment réfrigération soit en le pressant et le tirant vers le haut soit en le dégageant à l aide d un couteau à mastiquer en plastique 8 A ENLEVEZ LA PORTE DU COMPARTIMENT RÉFRIGÉRATION suite Enlevez les deux vis à tê...

Page 58: ...ersez simplement les étapes 3 à 8 Veuillez cependant noter les points suivants Au moment d abaisser les portes sur les charnières inférieures une deuxième personne doit guider minutieusement le tube et les faisceaux électriques à travers les ouvertures des charnières Lorsque vous branchez la conduite d eau assurez vous d insérer le tube jusqu à la marque Ne pincez pas le tube et les faisceaux élec...

Page 59: ...empératures convenables N installez jamais votre réfrigérateur dans un emplacement où la température ambiante sera supérieure à 37 C 100 F Il ne fonctionnera pas bien Installez votre réfrigérateur sur un plancher suffisamment solide pour le porter lorsqu il est plein DÉGAGEMENTS Prévoyez les dégagements suivants pour faciliter l installation la bonne circulation d air et les raccordements de plomb...

Page 60: ...qui vient de l alimentation d eau froide de la maison Si vous utilisez un tuyau GE SmartConnect les écrous sont déjà assemblés au tuyau Si vous utilisez un tuyau de cuivre insérez aussi loin que possible l extrémité du tuyau dans le raccord à l arrière du réfrigérateur Tout en tenant le tuyau serrez le raccord Si vous utilisez un tuyau GE SmartConnect insérez l extrémité moulée du tuyau dans le ra...

Page 61: ... montre pour faire monter le réfrigérateur dans le sens opposé à celui des aiguilles d une montre pour le faire descendre Utilisez une douille hexagonale ou une clé de 3 8 po ou une clé anglaise 5 Roulettes Vis de réglage ALIGNEZ LES PORTES Réglez les portes du réfrigérateur pour qu elles soient bien alignées à la partie supérieure Pour aligner les portes À l aide d une clé de 7 16 po tournez la v...

Page 62: ...tions 9 METTEZ EN MARCHE LA MACHINE À GLAÇONS Mettez le commutateur de la machine à glaçons en position ON marche La machine à glaçons ne se met en marche que lorsqu elle atteint une température de fonctionnement de 9 C 15 F ou moins Elle commence immédiatement à fonctionner Il faudra 2 à 3 jours pour remplir le bac à glaçons 10 Commutateur d alimentation électrique INSTALLATION DU RÉFRIGÉRATEUR S...

Page 63: ...ux de la machine à glaçons dans des endroits où la température risque de descendre en dessous du point de congélation Si vous utilisez un outil électrique comme une perceuse électrique pendant l installation assurez vous que l isolement ou le câblage de cet outil empêche tout danger de secousse électrique Vous devez procéder à toutes vos installations conformément aux exigences de votre code local...

Page 64: ...ntre 20 et 120 p s i 1 4 et 8 1 bar Une perceuse électrique Une clé de 1 2 po ou une clé anglaise Un tournevis à lame plate et un tournevis Phillips Deux écrous à compression d un diamètre extérieur de 1 4 po et deux bagues manchons pour brancher le tuyau en cuivre au robinet d arrêt et au robinet d eau du réfrigérateur OU Si vous utilisez une trousse GE SmartConnect Refrigerator Tubing les garnit...

Page 65: ...ateur Faites passer le tuyau par un trou percé dans le mur ou le plancher derrière le réfrigérateur ou au niveau de l armoire de cuisine adjacente aussi près du mur que possible NOTE Assurez vous qu il y ait assez de tuyau en trop environ 2 4 m 8 pi enroulés trois fois en cercles d environ 25 cm 10 po de diamètre pour vous permettre de décoller le réfrigérateur du mur après l installation ACHEMINE...

Page 66: ... et GRÉSILLEMENTS Vous pouvez entendre des craquements ou des claquements lorsque le réfrigérateur est branché pour la première fois Cela se produit lorsque le réfrigérateur se refroidit à la bonne température Les registres électroniques s ouvrent et se ferment pour assurer des économies d énergie et un refroidissement optimaux Le compresseur peut causer un clic ou un grésillement lors de la tenta...

Page 67: ...ultez Les commandes Porte laissée ouverte Vérifiez qu il n y a pas un paquet qui empêche la porte de fermer Givre sur les aliments Porte laissée ouverte Vérifiez qu il n y a pas un paquet qui empêche la surgelés il est normal porte de fermer que du givre se forme à Les portes ont été ouvertes l intérieur du paquet trop souvent ou pendant trop longtemps La séparation entre Le système automatique Ce...

Page 68: ...loque ou est tombé dans la Enlevez tout objet qui bloque ou est tombé dans la chute chute à glace située à l intérieur du bac supérieur de la porte du compartiment congélation Distributeur est VERROUILLÉ Appuyez et maintenez enfoncée la touche LOCK CONTROL réglage du verrouillage pendant 3 secondes Blocs de glace irréguliers dans Brisez en autant que possible avec vos doigts et jetez ceux le bac à...

Page 69: ...tiquement Gardez une boîte ouverte de bicarbonate de soude dans le réfrigérateur Il faut nettoyer l intérieur Consultez Entretien et nettoyage De la condensation Cela n est pas inhabituel pendant Essuyez bien la surface extérieure s accumule à l extérieur les périodes de forte humidité De la condensation Les portes sont ouvertes trop s accumule à l intérieur fréquemment ou pendant trop par temps h...

Page 70: ...ivrage est C est normal le congélateur en cours Le réfrigérateur ne La fonction de dégivrage Ceci est normal Le réfrigérateur passe sur cycle s arrête jamais mais maintient le compresseur en d arrêt lorsque les portes ont été fermées pendant les températures sont marche au cours de l ouverture 2 heures normales des portes Le réfrigérateur émet La porte est ouverte Fermez la porte un signal sonore ...

Page 71: ...e à domicile en vertu de la garantie sera fourni dans les régions où il est disponible et où Mabe estime raisonnable de le fournir Cette garantie est en sus de toute garantie statutaire EXCLUSIONS DE LA GARANTIE Le propriétaire est responsable de payer les réparations occasionnées par l installation de ce produit et ou les visites nécessaires pour lui apprendre à utiliser ce produit Tout dommage a...

Page 72: ... L 10 0 0087 mg L 0 0005 mg L 0 0005 mg L 94 22 93 33 0 003 mg L Testé utilisant un débit de 0 50 gpm une pression de 60 psig un pH de 7 5 0 5 et une temp de 20 C 3 C 68 F 5 F Mesures en particules ml Les particules utilisés étaient de 0 5 1 micron NTU unités de turbidité néphélométrique Spécifications d opération Capacité certifiée jusqu à maximum de 300 gallons 1135 l jusqu à maximum de six mois...

Page 73: ...leurs électroménagers peuvent recevoir pièces et accessoires directement à la maison cartes VISA MasterCard et Discover acceptées Les directives stipulées dans le présent manuel peuvent être effectuées par n importe quel utilisateur Les autres réparations doivent généralement être effectuées par un technicien qualifié Soyez prudent car une réparation inadéquate peut affecter le fonctionnement sécu...

Page 74: ... 87 TurboCool 77 Instrucciones de instalación Cómo instalar el refrigerador 93 96 Cómo mover el refrigerador 89 92 Instalación de la tubería de agua 97 99 Preparación para instalar el refrigerador 88 Solucionar problemas 100 104 Sonidos normales de la operación 100 Servicio al consumidor Garantía para consumidores en los Estados Unidos 105 Hoja de datos de funcionamiento 106 Servicio al consumidor...

Page 75: ...Desconecte el refrigerador antes de limpiarlo o efectuar reparaciones NOTA Recomendamos enfáticamente encargar cualquier servicio a un personal calificado El colocar el control en posición 0 apagado no quita la corriente del circuito de la luz No vuelva a congelar los alimentos congelados una vez que se hayan descongelado Servicio al consumidor Solucionar problemas Operación Seguridad Instalación ...

Page 76: ...mplazarlo por un contacto adecuado para tres puntas con conexión a tierra El refrigerador deberá conectarse siempre en su propio contacto eléctrico individual que tenga un voltaje que vaya de acuerdo con la tabla de clasificación Esto garantiza la mejor ejecución y evita la sobrecarga del circuito eléctrico de la casa y los daños a causa del sobrecalentamiento de los cables Nunca desconecte el ref...

Page 77: ...nuarán funcionando si han hecho el ciclo de encendido Los controles del refrigerador ge com 77 Servicio al consumidor Solucionar problemas Operación Seguridad Instalación Inicialmente fije el control del refrigerador en 5 y el control del congelador en 5 y permita que transcurran 12 24 horas para que la temperatura se estabilice Es posible que sean necesarios varios ajustes Ajuste los controles co...

Page 78: ...ar el filtro en seis meses Llene el cartucho de reemplazo con agua de la llave para permitir que ocurra un mejor flujo a partir del dispensador inmediatamente después de la instalación Alinee la flecha del cartucho y del soporte del cartucho Coloque la parte superior del nuevo cartucho hacia arriba dentro del soporte No empuje el cartucho hacia arriba a dentro del soporte Gire el cartucho lentamen...

Page 79: ... hacia la parte trasera y muévala hacia delante y hacia atrás para que se ajuste a sus necesidades PRECAUCIÓN En los modelos con un vertedor de hielo en el interior del recipiente superior de la puerta del congelador tenga cuidado cuando coloque artículos en el recipiente Cerciórese de que ningún artículo bloquee o caiga en el vertedor de hielo Recipiente del refrigerador Recipiente inclinable del...

Page 80: ...congelador Para remover deslícelo hasta la posición tope levante el frente más allá de la posición de tope y deslícelo hacia afuera Asegúrese de haber empujado los entrepaños hasta el fondo antes de cerrar la puerta Cestas de congelador Para remover deslícelo hasta la posición tope levante el frente más allá de la posición de tope y deslícelo hacia afuera Asegúrese de haber empujado las cestas has...

Page 81: ...s allá de la posición de tope de parada la puerta permanecerá abierta Alineación de las puertas Si las puertas no están niveladas ajuste le puerta de los alimentos frescos Usando una llave de cubo de 7 16 gire el tornillo de ajuste de la puerta hacia la derecha para elevar la puerta gírelo hacia la izquierda para hacerla descender Un tapón de nylon está encajado en la rosca del pin para impedir qu...

Page 82: ...e hace rodar el refrigerador hacia adelante se necesitará moverlo el refrigerador hacia la izquierda o derecha al mismo tiempo Gavetas y cacerolas No todos los modelos tienen todas las características 82 Gavetas para las frutas y los vegetales El exceso de agua que pueda acumularse en el fondo de las gavetas deben ser secadas Gavetas con humedad ajustable Deslice el control hasta llegar a la posic...

Page 83: ...lo Levante el cubo entonces tírelo hacia afuera hasta que el cubo se detenga Dispositivo para hacer hielo Brazo detector Interruptor de alimentación Baje el cubo para lograr acceso al hielo o para alcanzar el interruptor NOTA Para aprovechar al máximo la inclinación para sacar el hielo del cubo solamente almacene artículos en el entrepaño debajo del cubo de hielo que no sean más altos que el punto...

Page 84: ...RUSHED ICE hielo triturado o WATER agua Presione el vaso suavemente contra el brazo del dispensador El recogedor no se vacía solo Para evitar las manchas de agua el recogedor y la parrilla se deberán limpiar regularmente Si no hay distribución de agua cuando el refrigerador está primeramente instalado hay posibilidad de aire en el sistema de la línea de agua Oprima el brazo del dispensador durante...

Page 85: ...illas o controles Use agua caliente y una solución de bicarbonato de sodio aproximadamente una cucharada 15 ml de bicarbonato de sodio por cada cuarto 1 litro de agua Esta solución limpia y neutraliza olores Enjuague y seque El uso de cualquier solución de limpieza que no sea la recomendada especialmente aquella que contienen destilados del petróleo pueden agrietar o dañar el interior del refriger...

Page 86: ...onato de una cucharada 15 ml de bicarbonato por un cuarto 1 litro de agua Deje abiertas las puertas Coloque el interruptor de alimentación eléctrica del dispositivo automático para hacer hielo en la posición OFF apagado y cierre el suministro de agua al refrigerador Si la temperatura pueda llegar al punto de congelación haya una persona calificada para desaguar el sistema del suministro de agua en...

Page 87: ...chufe el refrigerador Levante la cubierta de la luz y jale de ella Después de reemplazar la bombilla con una bombilla de electrodomésticos del mismo voltaje o inferior reemplace la cubierta y el mango Vuelva a enchufar el refrigerador a la corriente Compartimento del congelador Desenchufe el refrigerador Retire el entrepaño justo por encima de la cubierta de luz El entrepaño será más fácil de quit...

Page 88: ...ua requiere 30 minutos La instalación apropiada es responsabilidad del instalador Cualquier fallo del producto causada por una instalación inapropiada no se consideraba cubierto por esta garantía Si el refrigerador ya ha sido instalado remueva la parrilla base Ver el Paso 2 en Cómo mover el Refrigerador entonces pase al Paso 5 en Cómo instalar el Refrigerador Si el refrigerador tiene una máquina d...

Page 89: ... cabeza Phillips 2 Si el refrigerador debe pasar por alguna entrada menor de 38 de ancho entonces las puertas pueden ser removidas Proceda al paso 3 NO REMUEVA las manijas Si todas las entradas son más anchas de 38 pase a Cómo instalar el refrigerador DESCONECTE EL ACOPLAMIENTO DE AGUA en algunos modelos Si el refrigerador tiene un dispensador de agua eso significa que hay una línea de agua que vi...

Page 90: ...gabinete hasta la bisagra del fondo del refrigerador que deben ser desconectados Para desconectar separe cada conectador 5 Bisagra del fondo del refrigerador CIERRE LAS PUERTAS DEL CONGELADOR Y DEL REFRIGERADOR 6 REMUEVA LA PUERTA DEL CONGELADOR Remueva la cubierta de la bisagra de la puerta del congelador apretándola y levantándola o simplemente levantándola por uno de sus costados con una cuchil...

Page 91: ...a superficie donde no se ralle con la parte interna hacia arriba 7 D E 90 REMUEVA LA PUERTA DEL REFRIGERADOR Remueva la cubierta de la bisagra de la puerta del refrigerador apretándola y levantándola o levantándola por uno de sus costados con una cuchilla plástica de masilla 8 A REMUEVA LA PUERTA DEL REFRIGERADOR cont Remueva los dos tornillos de cabeza hexagonal de 5 16 entonces levante la bisagr...

Page 92: ... puertas simplemente de reversa a los pasos del 3 al 8 Sin embargo note lo siguiente Cuando se encuentre bajando las puertas hacia la bisagra del fondo cerciórese de que una segunda persona guíe con mucho cuidado la tubería y el alambrado a través de los agujeros de las bisagras Cuando se encuentre conectando la línea de agua cerciórese de insertar la tubería hasta el máximo indicado por la marca ...

Page 93: ...ra mantener las temperaturas apropiadas No instale el refrigerador donde la temperatura esté por encima de 100 F 37 C porque no funcionará apropiadamente Instálelo en un piso suficientemente resistente como para soportar todo su peso ESPACIO Permita los siguientes espacios para lograr una instalación fácil una circulación apropiada del aire y conexiones eléctricas y de plomería Lados 1 8 4 mm Supe...

Page 94: ... de agua fría de la casa Si se encuentra usando tuberías de GE SmartConnect las tuercas están ya ensambladas a la tubería Si está usando una tubería de cobre inserte el extremo de la tubería en la conexión del refrigerador en la parte posterior del refrigerador hasta donde sea posible Mientras sostiene la tubería apriete el accesorio Si se encuentra usando tuberías de GE SmartConnect inserte el ex...

Page 95: ...antar el refrigerador y en contra de las agujas del reloj para bajarlo Use una llave o un cubo de cabeza hexagonal de 3 8 o una llave ajustable 5 Rodillos Tornillo de ajuste del rodillo NIVELES LAS PUERTAS Ajuste la puerta del refrigerador para que las puertas estén niveladas en la parte superior Para linear Usando una llave de 7 16 gire el tornillo ajustable de la puerta hacia la derecha para lev...

Page 96: ...AJUSTE LOS CONTROLES Ajuste los controles donde se recomienda 9 INICIE LA MÁQUINA DE HIELOS Fije el interruptor de la máquina de hielos en la posición ON encendido La máquina de hielos no empezará a operar hasta que alcance su temperatura de operación de 15 F 9 C o menor Luego empezará a operar automáticamente Será necesario de 2 a 3 días para que se llene el cubo de hielo 10 Interruptor ...

Page 97: ...ador Para evitar quemaduras y daños al producto no conecte la línea de agua fría con la línea de agua caliente Si usted usa su refrigerador antes de conectar la línea de agua cerciórese de que el interruptor de la máquina de hielos está en la posición OFF apagado No instale la tubería de la máquina de hielos en áreas donde la temperatura baja por debajo de la temperatura de congelamiento Cuando us...

Page 98: ...parte ensanchada del extremo del tubo con un cortador de tubos y entonces usar un accesorio de compresión No corte un extremo formado por GE SmartConnect de la tubería del refrigerador Válvula de cierre para conectar la línea de agua fría La válvula de cierre debe tener una entrada de agua con un diámetro interno mínimo de 5 32 en el punto de conexión a la LÍNEA DE AGUA FRÍA Válvulas de cierre tip...

Page 99: ... haya salido a través de la tubería durante el enjuague ENJUAGUE LA TUBERÍA 8 Tubería SmartConnect Apriete la válvula de cierre a la tubería de agua fría con una abrazadera de tubo NOTA Los códigos de plomería del estado de Massachusetts 248CMR deben ser obedecidos Las válvulas de corona son ilegales y su uso no es permitido en Massachusetts Póngase en contacto con un plomero licenciado APRIETE LA...

Page 100: ...UJIDO GORJEOS Puede escuchar sonidos como de crujido o estallidos cuando el refrigerador se conecta por primera vez Esto pasa a medida que el refrigerador se enfría hasta la temperatura correcta Los reguladores electrónicos se abren y se cierran para ofrecer un enfriamiento óptimo y ahorrar energía El compresor puede causar un chasquido o un gorjeo cuando intenta volver a arrancar esto puede tomar...

Page 101: ...s de almacenamiento y un en el refrigerador congelador más grande Se dejó abierta la puerta Revise si un paquete mantiene la puerta abierta requieren más tiempo de Clima caluroso o aperturas Eso es normal operación Se arrancan y frecuentes de la puerta se paran a para Controles de temperatura Vea Los controles mantener temperaturas ajustados al punto más uniformes frío Compartimiento de El control...

Page 102: ...lo Dispositivo de hielo apagado Enciende el dispositivo de hielo o el agua no funciona en algunos o el agua está apagado modelos Los cubos están pegados Remueve los cubos al brazo detector Un artículo está bloqueando o se Remueva cualquier artículo que pueda estar ha caído dentro del vertedor de bloqueando o que se haya caído dentro del vertedor hielo dentro de la sección del congelador de la puer...

Page 103: ... sale agua y el Está tapada la línea de agua Llame a un plomero dispositivo para hacer o la llave de paso hielo no funciona Filtro de agua tapado Reemplace el cartucho del filtro o remueve el filtro y instale el tapón El dispensador está Presione la tecla LOCK CONTROL Control de bloqueo BLOQUEADO LOCKED y manténgala presionada durante tres segundos El refrigerador huele Alimentos transmitiendo Ali...

Page 104: ...emplace el fusible o reajuste el interruptor interior Bombilla fundida Vea Reemplazar las bombillas Agua en el piso de la Cubos atrapados en Empuje los cubos en el vertedero con una cuchara cocina o en el fondo el orificio de madera del congelador El refrigerador La puerta está abierta Cierre la puerta está pitando Para Compras Hechas en Iowa Este formulario debe ser firmado y fechado por el compr...

Page 105: ...bido a defectos en los materiales o A partir de la fecha manufactura Durante esta garantía limitada de treinta días GE también proporcionará sin costo de compra original un cartucho de filtro de agua de repuesto del refrigerador MODELOS DE GE PROFILE SOLAMENTE Cinco años Cualquier parte del sistema sellado de refrigeración compresor condensador evaporador y tuberías A partir de la fecha de conexió...

Page 106: ...L 0 000500 mg L 0 000500 mg L 99 78 99 77 0 075 mg L Atrazine 0 003 mg L 0 009 mg L 10 0 0087 mg L 0 0005 mg L 0 0005 mg L 94 22 93 33 0 003 mg L Probado utilizando una tasa de flujo de 0 5 gpm 1 8927 l min presión de 60 psig 4 218 Kg cm2 pH de 7 5 0 5 temp de 20 3 C Medición en partículas ml Las partículas usadas eran de 0 5 1 micrón Unidades de turbidez Nefelométrica NTU Especificaciones de Oper...

Page 107: ...n activa Puede comprarla en línea en cualquier momento o llamar al 800 626 2224 durante horas normales de oficina GE Consumer Home Services estará aún ahí cuando su garantía termine Piezas y accesorios ge com Aquellos individuos con la calificación necesaria para reparar sus propios electrodomésticos pueden pedir que se les manden las piezas o accesorios directamente a sus hogares aceptamos las ta...

Page 108: ...e anytime or call 800 626 2224 during normal business hours GE Consumer Home Services will still be there after your warranty expires In Canada call 1 888 261 2133 Parts and Accessories In the U S ge com Individuals qualified to service their own appliances can have parts or accessories sent directly to their homes VISA MasterCard and Discover cards are accepted Order on line today 24 hours every ...

Reviews: