background image

DigitalFlow™ XGM868i Service Manual

7

Chapter 1. Calibration

1.6 Testing Alarm Relays

Alarm relays may be added to the Model XGM868i by installing an appropriate option card in 

Slot 1

. This option card 

contains two or four alarm relays, which are designated A, B, C and D.

1.6.1 Preparing for Testing

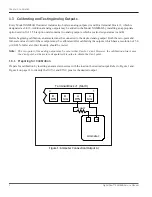
Prepare for the testing procedure by connecting an ohmmeter to the 

NO

 and 

COM

 pins of the desired alarm on the 

option card. Refer to Figure 4 on page 12 to identify 

NO, NC

 and 

COM

 pins for the desired alarm on terminal block J2.

1.6.2 Testing the Relay

1.

From the 

Keypad Program

, press the right arrow key to scroll to the 

CALIB

 menu. Press 

[Enter].


2.

In the 

Cal 

window, scroll to 

Slot 1

. Press 

[Enter].

Note:

The 

Slot 1

 option only appears at the above prompt if an option card is installed in this slot.

3.

Scroll to the desired 

Output

. (

Output A

 will be used as an example in this manual.) Press 

[Enter].

IMPORTANT:

The procedure for testing all the alarms is the same. However, when testing a different output, be sure to 
reconnect the ohmmeter at terminal block 

J2

. See Figure 4 on page 12


for the correct pin numbers.

4.

Do one of the following:

Press 

[Enter] 

on 

Close

. The ohmmeter should yield a reading of about zero. 

Press 

[Enter] 

on 

Open

. The ohmmeter should yield an infinite reading.

Note:

To test the 

NC

 relay position, move the ohmmeter lead from the 

NO

 pin to the 

NC

 pin and repeat the above test. 

In this case, the ohmmeter readings will be infinite when

 Close Alarm

 is selected and zero when 

Open Alarm

 is 

selected.

Procedure Options

This completes testing of the 

Slot 1

 alarm relays. Do one of the following: 

To test the 

normally-open

 and 

normally-closed

 contacts for another alarm relay, return to Step 3 in 

Testing the 

Relay

 above.

To calibrate/test additional inputs/outputs, proceed to the appropriate section.

To leave the 

Keypad Program

, press 

[Escape]

 twice.

Summary of Contents for DigitalFlo XGM868i

Page 1: ...GE Measurement Control Flow 910 197S Rev F January 2014 DigitalFlow XGM868i Panametrics General Purpose Gas Flow Transmitter 1 2 Channel Service Manual ...

Page 2: ......

Page 3: ... General Electric Company All rights reserved Technical content subject to change without notice DigitalFlow XGM868i Panametrics General Purpose Gas Flow Transmitter 1 2 Channel Service Manual 910 197S Rev F January 2014 ...

Page 4: ...ii no content intended for this page ...

Page 5: ... for each installation Auxiliary Equipment Local Safety Standards The user must make sure that he operates all auxiliary equipment in accordance with local codes standards regulations or laws applicable to safety Working Area WARNING Auxiliary equipment may have both manual and automatic modes of operation As equipment can move suddenly and without warning do not enter the work cell of this equipm...

Page 6: ...nd the environment In order to avoid the dissemination of those substances in our environment and to diminish the pressure on the natural resources we encourage you to use the appropriate take back systems Those systems will reuse or recycle most of the materials of your end life equipment in a sound way The crossed out wheeled bin symbol invites you to use those systems If you need more informati...

Page 7: ...1 5 Calibrating RTD Inputs 6 1 5 1 Preparing for Calibration 6 1 5 2 Accessing the Calibration Test Menu 6 1 5 3 Entering the Set Point 6 1 5 4 Entering the Slope 6 1 6 Testing Alarm Relays 7 1 6 1 Preparing for Testing 7 1 6 2 Testing the Relay 7 1 7 Testing Totalizer Outputs 8 1 7 1 Preparing for Testing 8 1 7 2 Testing the Output 8 1 8 Testing the Frequency Outputs 10 1 8 1 Preparing for Testin...

Page 8: ...37 A 2 Data Entry 37 A 3 Diagnostic Parameters 39 Appendix B Calibration and Testing with PanaView B 1 Introduction 41 B 2 Accessing the Calibration Test Menu 42 B 3 Calibrating Slot 0 Analog Outputs 43 B 4 Calibrating Slot 1 Option Cards 45 B 4 1 Analog Outputs 46 B 4 2 Analog Inputs 47 B 4 3 RTD Inputs 48 B 4 4 Entering the Set Point 48 B 4 5 Entering the Slope 48 B 4 6 Testing Alarm Relays 49 B...

Page 9: ...artup Guide for a complete description of the available option cards and the procedures for wiring them 1 2 Accessing the Calibration Menu The Calibration menu is accessible through the Keypad Program as well as through PanaView software If you are using PanaView to calibrate the XGM868i refer to Appendix B Use this menu to calibrate and test the Slot 0 analog outputs as well as to calibrate and o...

Page 10: ...oth the zero point and full scale values for all of these outputs must be calibrated After calibrating the outputs which have a resolution of 5 0 A 0 03 full scale their linearity should be tested Note The zero point of the analog output may be set at either 0 mA or 4 mA However the calibration always uses the 4 mA point as the meter extrapolates this value to obtain the 0 mA point 1 3 1 Preparing...

Page 11: ...o UP or DOWN to adjust the ammeter reading UP or DOWN until a 4 mA reading is achieved or Scroll to Numer and directly enter the mA reading In either case press Enter to confirm the entry 6 Once you have achieved a 4 mA reading scroll to either STORE to store the calibration or to ABORT to exit the menu without storing the calibration In either case press Enter Note If the ammeter reading cannot b...

Page 12: ...g inputs may be added to the Model XGM868i by installing an appropriate option card in Slot 1 This option card contains two or four analog inputs which are designated as A B C and D Both the zero point and full scale values for each input must be calibrated Calibration of the analog inputs requires the use of a calibrated current source If an independent calibrated current source is not available ...

Page 13: ...block J2 Refer to Figure 4 on page 12 for the correct pin numbers 4 Scroll to the appropriate option to select the reference point to be calibrated Press Enter IMPORTANT The procedure for calibrating all the inputs is the same However when calibrating a different input be sure to reconnect the current source at terminal block J2 See Figure 4 on page 12 for the correct pin numbers 5 Do one of the f...

Page 14: ...rating the other inputs be sure to reconnect the current source at terminal block J2 See Figure 4 on page 12 for the correct pins 1 5 3 Entering the Set Point 1 Before proceeding place the RTD in a temperature bath and allow it to stabilize at the desired set point temperature 2 Scroll to Set to program the RTD set point Press Enter 3 Use the arrow keys to enter the desired set point temperature a...

Page 15: ...tput Output A will be used as an example in this manual Press Enter IMPORTANT The procedure for testing all the alarms is the same However when testing a different output be sure to reconnect the ohmmeter at terminal block J2 See Figure 4 on page 12 for the correct pin numbers 4 Do one of the following Press Enter on Close The ohmmeter should yield a reading of about zero Press Enter on Open The o...

Page 16: ...talizer and Frequency Output Wiring 1 7 2 Testing the Output 1 From the Keypad Program press the right arrow key to scroll to the CALIB menu Press Enter 2 In the Cal window scroll to Slot 1 Press Enter Note The Slot 1 option only appears at the above prompt if an option card is installed in this slot 3 Scroll to the desired Output Output A will be used as an example in this manual Press Enter IMPO...

Page 17: ...r the number of measurement units represented by each pulse between 1 and 10 000 and press Enter That number of pulses will then be output at the specified frequency 6 Verify that the pulse counter reads the correct value Procedure Options This completes testing of the Slot 1 totalizer outputs Do one of the following To test another of the available totalizer outputs return to Step 3 in Testing th...

Page 18: ...ess Enter Note The Slot 1 option only appears at the above prompt if an option card is installed in this slot 3 Scroll to the desired Output Output A will be used as an example in this manual Press Enter IMPORTANT The procedure for testing all the outputs is the same However when testing another output be sure to reconnect the frequency counter at terminal block J2 See Figure 4 on page 12 for the ...

Page 19: ...BRATING mA Reading Full Scale STORE ABORT A C 4 mA 20 mA ANALOG INPUT Slot 1 Analog Inputs CALIBRATING B D press EXIT key STORE ABORT A C SetPt Slope RTD INPUT Slot 1 RTD Inputs CALIBRATING B D press EXIT key SLOPE TEMP SET POINT TEMP A C OPEN EXIT ALARMS Slot 1 Alarm Relays B D CLOSE A C Slot 1 Totalizer Outputs B D PULSES TIME A C Slot 1 Frequency Outputs B D FREQUENCY NOTE Plain text represents...

Page 20: ...n 1 7 8 6 5 4 3 2 9 8 7 Pin 1 2 4 5 6 3 9 11 12 10 7 8 6 5 Pin 1 4 3 2 12 11 10 9 8 7 2 4 5 6 3 Pin 1 9 11 12 10 7 8 6 5 4 3 Pin 1 2 12 11 10 9 8 7 2 4 5 6 3 Pin 1 9 10 12 11 2 Pin 1 3 4 5 6 8 7 7 8 9 10 11 12 Pin 1 3 6 5 4 2 R RTD Input A Standard Alarm H Hermetic Alarm F Frequency Output T Totalizer Output I Current Input C Current Output O Blank No Connection NOTE 17 HART OI 15 FHII 16 HART 18 ...

Page 21: ... enclosure the transducers or the flowcell a built in error code message system greatly simplifies the troubleshooting process All of the possible Model XGM868i error code messages are discussed in this chapter along with the possible causes and the recommended actions When an error code is generated it will appear on the LCD as shown in Figure 5 Figure 5 Error Message Location If an error message...

Page 22: ...t up Signal submenu as described in Chapter 1 Programming Site Data of the Programming Manual E2 Sound Speed Error Problem The sound speed exceeds the limits programmed in the Channelx Set up Signal submenu of the Keypad Program Cause The error may be caused by incorrect programming poor flow conditions or poor transducer orientation Action Compare the measured sound speed to tabulated nominal val...

Page 23: ... or liquid particulates may be present in the flowcell Action Refer to Chapter 3 Diagnostics to correct any flowcell problems E6 Cycle Skip Accel Problem The acceleration exceeds the limits programmed in the Channelx Set up Signal submenu of the Keypad Program Cause This condition is usually caused by poor flow conditions or improper transducer alignment Action Refer to Chapter 3 Diagnostics to co...

Page 24: ...the pressure measurement is below the low pressure switch setting Cause The pressure measurement exceeds the specified limits as set in the Channelx Input Output submenu Cause Check the limit value 0 to 5 000 psia entered into the Channelx Input Output submenu as described in Chapter 1 Programming Site Data of the Programming Manual E13 Over Range Problem This error code message indicates that the...

Page 25: ...Program Then complete the following instructions to display the desired diagnostic parameter Note To perform this function with PanaView software see Appendix C Programming with PanaView in the Programming Manual and or the PanaView User s Manual 1 Press Escape Enter Escape 2 In the Keypad Program window scroll to PROG and press Enter 3 In the PROG menu scroll to GLOBL and press Enter 4 Scroll to ...

Page 26: ...nces in one channel s programming invalidate an output previously chosen for the other the measurement defaults to the nearest selectable item in the parameter list The previous two prompts repeat until all of the specified of LCD Parameters have been set up When all of the display parameters have been set up the meter returns to the Global I O window To leave the Keypad Program press the Escape k...

Page 27: ...200 400 to 400 AMPup Displays the value for the signal amplitude of the upstream transducer 24 5 19 or 29 AMPdn Displays the value for the signal amplitude of the downstream transducer 24 5 19 or 29 CNTup Displays the AGC DAC count for the upstream gain setting N A N A CNTdn Displays the AGC DAC count for the downstream gain setting N A N A P up Displays signal peaks for the upstream transducer 10...

Page 28: ...vel of entrained particles may have little effect on the operation of the Model XGM868i excessive amounts of solid or liquid particles will absorb or disperse the ultrasound signals This interference with the ultrasound transmissions through the gas will cause inaccurate flow rate measurements In addition temperature gradients in the gas flow may result in erratic or inaccurate flow rate readings ...

Page 29: ...by GE the correct data will be included in the documentation For other flowcells measure the pipe wall thickness and diameter with the same accuracy desired in the flow rate readings Also check the pipe for dents eccentricity weld deformity straightness and other factors that may cause inaccurate readings Refer to Chapter 2 Initial Setup of the Startup Guide for instructions on programming the pip...

Page 30: ...g Any transducer damaged in this manner must be replaced Contact GE for information on transducers in materials suitable for the application 3 INTERNAL DAMAGE An ultrasonic transducer consists of a ceramic crystal bonded to the transducer case The bond between the crystal and the case or the crystal itself may be damaged by extreme mechanical shock and or temperature extremes Also the internal wir...

Page 31: ...68i is installed in a hazardous environment a the electronics enclosure must be moved to a safe area prior to removing the covers or b if the electronics enclosure cannot be moved to a safe area ensure that the surrounding area is free of ignitable gases Note For compliance with the European Union s Low Voltage Directive 2006 95 EC this unit requires an external power disconnect device such as a s...

Page 32: ... Board Subassembly REAR BOARD Terminal Board MIDDLE BOARDS Main Board Receiver Board Power Supply Board Slot 1 Input Output Card optional Slot 2 Logging RS485 Card optional To disassemble the circuit board assembly refer to Figure 6 on page 33 and complete the following steps 1 Disconnect the power to the XGM868i and move the electronics enclosure to a safe area Note If the electronics enclosure c...

Page 33: ...with the ground symbol will come loose from beneath it IMPORTANT Each screw will have a flat washer and a lock washer over it Be careful not to lose these washers 6 Carefully rotate the circuit board assembly counterclockwise about 20 until the five bosses in the enclosure are visible through the slots along the circumference of the terminal board Then slowly push the circuit board assembly throug...

Page 34: ...ay interconnect board by the other hand and pull the two boards apart Note The two circuit boards are attached by a connector located beneath the top edge of the LCD display board see Illustration 5 in Figure 7 on page 34 The LCD display is attached to the interconnect board as one subassembly Do not disassemble the LCD display from the interconnect board 4 Place the keypad board directly over the...

Page 35: ...oard on the right Rotate the assembly until the power supply board is facing upward 3 Locate the fuse along the left side of the power supply board just below the terminal board refer to Illustration 6 in Figure 7 on page 34 4 Pull the plastic cover off the fuse holder and remove the old fuse 5 Obtain a new fuse of the same rating and type Use only a type 3AG 1 1 4 x 1 4 Slo Blo fuse having a rati...

Page 36: ...power supply board see Illustration 8 in Figure 7 on page 34 Note A XGM868i with a DC power supply will include two more mounting screws but no heat sink 5 Carefully pull up the power supply board and heat sink assembly then slide it out The U6 EPROM is located along the upper edge of the main board on the side that was facing the power supply board see Illustration 8 in Figure 7 on page 34 It is ...

Page 37: ...onnectors a To install a data logging or RS485 option card into Slot 2 orient the option card so that its 36 pin connector is positioned over connector P2 on the interconnect board Then firmly seat the card into its connector When properly installed the side of the option card with the 36 pin connector must face the center of the interconnect board and the edge of the option card must not overhang...

Page 38: ...embling Installing the Circuit Board Assembly Most of the parts replacement procedures described in this chapter require removal of the circuit board assembly from the electronics enclosure Furthermore most of the procedures require varying degrees of disassembly of the circuit board assembly See Figure 8 on page 35 and follow the instructions in this section to assemble the circuit board assembly...

Page 39: ...eated IMPORTANT With two option cards installed it may require some patience to get all of the connectors properly aligned Do not force the assembly together or some of the pins may not enter the sockets properly 5 Secure the assembly together by installing the three mounting screws flat washers and lock washers previously removed from the terminal board Be sure to install one end of the green gro...

Page 40: ...enclosure it cannot be rotated properly 3 Attach the loose end of the green grounding jumper wire to the enclosure with the mounting screw flat washer and lock washer previously removed Be sure to install the metal label plate under this screw Refer to Illustration 2 4 From the rear of the enclosure connect the power line leads to terminal block TB5 Plug the connectors back into terminal blocks J1...

Page 41: ...olid Set Screw Illustration 3 Enclosure Assembly Mounting Screw with Washer Assembly 4 places TB6 TB2 TB5 TB3 TB4 Illustration 2 Grounding Jumper Wire Label Plate with Ground Symbol Ground Screw Terminal Block on Slot 2 Option Card TB1 Set Screw Electronics Assembly Figure 6 Model XGM868i Electronics Console Assembly ...

Page 42: ...k Washer Mounting Screw with Washer Assembly Illustration 7 J7 for AC Power Supply shown J6 for DC Power Supply P10 Connector on Terminal Board connects to P7 Connector on Terminal Board connects to J7 Connector on Main Board J9 Connector on Main Board Terminal Board J6 J7 Connector on Terminal Board connects to Power Tab on Power Supply Board Standoff Illustration 5 Screw Lock Washer and Flat Was...

Page 43: ...Slot 1 with Heatsink Screw with Washer Assembly 2 places Bracket Nylon Washer Flat Washer Lock Washer Screw Power Supply Heatsink Gap Filler white surface facing PCB J2 Connector on Power Supply J6 Connector on Power Supply Standoff Keypad Board Interconnect Board P1 Connector on Interconnect Board P2 Connector on Interconnect Board Main Board J1 Connector on I O Board Slot 1 with Heatsink J2 Conn...

Page 44: ...Chapter 4 Parts Replacement DigitalFlow XGM868i Service Manual 36 ...

Page 45: ... transmitter the details of the service should be recorded in this appendix An accurate service history of the meter can prove very helpful in troubleshooting any future problems A 2 Data Entry Record complete and detailed service data for the Model XGM868i in Table 6 Make additional copies of the table as needed Table 6 Service Record Date Description of Service Performed By ...

Page 46: ...Appendix A Service Record 38 DigitalFlow XGM868i Service Manual Table 6 Service Record cont Date Description of Service Performed By ...

Page 47: ...stem malfunction is noticed the values for the diagnostic parameters should be entered in Table 7 Table 7 Diagnostic Parameters Parameter Initial Current Parameter Initial Current SS up CNTdn SS do P up SNDSP P dn Tup TEMP Tdown PRESR DELTA AcVOL REYN StVOL Tot K Tu S1 PEAK Td S1 Qup DT S1 Qdown Tu M1 AMPup Td M1 AMPdn DT M1 CNTup Vinst 1available only if Burst Mode S M ...

Page 48: ...40 DigitalFlow XGM868i Service Manual no content intended for this page ...

Page 49: ...talizer and frequency outputs uploading XGM868i signal array data and memory data testing the EPROM RAM and DAC setting the number of channels resetting the XGM868i to default values The Model XGM868i electronics enclosure includes one slot for installation of an input output option card This slot is designated as Slot 1 and a variety of option cards are available In addition every Model XGM868i f...

Page 50: ...Wiring the Serial Port in the Startup Guide and to the document EIA RS Serial Communications 916 054 You must also install PanaView as discussed in the PanaView User s Manual 910 211 1 Power up the XGM868i and wait until it has initialized 2 Launch PanaView and wait until it initializes the XGM868i and displays the basic PanaView window 3 As described in the PanaView User s Manual open the Meter B...

Page 51: ...og output may be set for either 0 mA or 4 mA However the calibration procedure always uses the 4 mA point as the meter will extrapolate this value to obtain the 0 mA point Prepare for calibration by inserting an ammeter in series with the load on analog output A at terminal block J1 as shown in Figure 11 Figure 11 Ammeter Connection Output A 1 From the Calibration Test menu see Figure 10 on page 4...

Page 52: ... achieved a 4 mA reading double click on either 4 mA STORE to store the calibration or on 4 mA ABORT to exit the menu without storing the calibration Note If the ammeter reading cannot be adjusted within 5 0 A of the 4 or 20 mA setting contact the factory for assistance 7 PanaView returns to the Analog Output window Double click on 20 milliamps and repeat steps 5 and 6 to calibrate the high end of...

Page 53: ...ure 10 on page 42 1 In the center pane double click on Slot 1 Note The Slot 1 option only appears in the center pane if an option card has been installed in this slot Notice that all of the available outputs usually four appear at the above prompt The desired type of output may appear as the A and B output pair and or as the C and D output pair Simply select the appropriate output for calibration ...

Page 54: ...meter reading UP or DOWN until a 4 mA reading is achieved or Double click on 4 mA Numeric Cal and directly enter the mA reading in the right pane 5 Once you have achieved a 4 mA reading double click on either 4 mA STORE to store the calibration or on 4 mA ABORT to exit the menu without storing the calibration Note If the ammeter reading cannot be adjusted within 5 0 A of the 4 or 20 mA setting con...

Page 55: ...A or 4 mA However the calibration procedure always uses the 4 mA point as the meter will extrapolate this value to obtain the 0 mA point 1 In the center pane of the Calibration Test window double click on Slot 1 2 Double click on the desired input to open the Analog Input menu Input A will be used as an example in this manual IMPORTANT Calibrating Inputs B C or D is identical to calibrating Input ...

Page 56: ...re reference on terminal block J2 See Figure 4 on page 12 for the correct pin numbers Proceed to the corresponding sub section for specific instructions on each of the options shown above B 4 4 Entering the Set Point 1 Before proceeding place the RTD in a temperature bath and allow it to stabilize at the desired set point temperature If you have connected the RTD to an RTD simulator set the RTD si...

Page 57: ...Relay menu Output A will be used as an example in this manual IMPORTANT The procedure for testing Alarms B C or D is identical to that for testing Alarm A However be sure to reconnect the ohmmeter on terminal block J2 See Figure 4 on page 12 for the correct pin numbers 3 The center pane now offers three choices Double clicking on Close should yield an ohmmeter reading of about zero Double clicking...

Page 58: ... the Totalizer Output menu Output A will be used as an example in this manual IMPORTANT The procedure for testing Outputs B C or D is identical to that for testing Output A However be sure to reconnect the frequency counter on terminal block J2 See Figure 4 on page 12 for the correct pin numbers 3 At the Pulse On Time prompt enter the width of the high time for the totalizer square wave and click ...

Page 59: ...ow double click on Slot 1 2 Double click on the desired output to open the Frequency Output menu Output A will be used as an example in this manual IMPORTANT The procedure for testing Outputs B C or D is identical to that for testing Output A However be sure to reconnect the frequency counter on terminal block J2 See Figure 4 on page 12 for the correct pin numbers 3 At the Frequency prompt enter a...

Page 60: ...n Test menu The window appears similar to Figure 10 on page 42 Proceed to the appropriate section to upload data and test hardware B 5 1 Uploading Signal Array Data By uploading XGM868i signal array data for examination a user can check if the transducer signal is the proper shape and change setup parameters if necessary IMPORTANT Consult GE before using this data to change any parameters 1 In the...

Page 61: ...indow appears similar to Figure 12 and the data is available for immediate evaluation Click Exit Page to close the window and return to the Calibration Test menu Figure 12 Signal Array Data Displayed on PanaView If you double click on To File another window opens similar to Figure 13 Enter a file name and click Save PanaView stores the array data in a Windows file and closes the Calibration Test w...

Page 62: ... Item 3 The next prompt displays the value for the Hex Bytes Click Next Item 4 PanaView now offers two options for Uploading the XGM memory If you double click on To Display the right pane of the window appears similar to Figure 14 and the data is available for immediate evaluation Click Exit Page to close the window and return to the Calibration Test menu Figure 14 XGM868i Memory Data Displayed o...

Page 63: ...t window double click on Hardware Test 2 In the center pane double click on EPROM TEST 3 The right pane displays the EPROM Sum Value Click Next Item or Exit Page to return to the Hardware Test option and Exit Page again to return to the main Calibration Test menu B 5 3b NVR Test 1 From the left pane of the Calibration Test window double click on Hardware Test Note If you are in the Hardware Test o...

Page 64: ...ether the RAM is functioning Click Next Item or Exit Page to return to the Hardware Test option and Exit Page again to return to the main Calibration Test menu B 5 3d FIFO Test To check the FIFO Note If you are in the Hardware Test option skip to step 2 1 From the left pane of the Calibration Test window double click on Hardware Test 2 In the center pane double click on FIFO TEST 3 In the right pa...

Page 65: ...hen you have achieved the desired contrast double click on Store to save the contrast or on Abort to return to the Hardware Test menu without changing the contrast B 5 3g DAC Test To test the DAC digital to analog converter Note If you are in the Hardware Test option skip to step 2 1 From the left pane of the Calibration Test window double click on Hardware Test 2 In the center pane double click o...

Page 66: ... To enable you to Choose an Opcard the center pane displays a list of possible option cards Scroll to and double click on the type of card installed 4 The program asks for the Board Revision Enter the revision letter in the right pane and click Next Item 5 The next prompt asks for the Group Enter the appropriate value and click Next Item 6 The next prompt asks for the Special Mod Enter the appropr...

Page 67: ...for display 1 From the left pane of the Calibration Test window double click on Hardware Test 2 In the center pane double click on Set Chans 3 In the Number of Channels window double click on 1 or 2 Channels PanaView returns to the Hardware Test option Click Exit Page to return to the main Calibration Test menu and Close to exit the Calibration Test menu B 5 3m Initializing the XGM868i to Default ...

Page 68: ...rough 1 4 and KEY The OFF setting switches the measurement display off while the KEY setting enables users to change the measurement display via the arrow keys without accessing the Keypad Program If you select KEY To view a parameter other than the one currently displayed press the or keys to scroll through the various parameters To scroll through the channel options on a two channel XGM868i pres...

Page 69: ...age of peak set to 50 by default N A N A UP Signal Q Displays the signal quality for the upstream transducer 1200 400 to 400 DN Signal Q Displays the signal quality for the downstream transducer 1200 400 to 400 UP Amp Discrim Displays value for signal amplitude of upstream transducer 24 5 19 or 29 DN Amp Discrim Displays the value for the signal amplitude of the downstream transducer 24 5 19 or 29...

Page 70: ...62 DigitalFlow XGM868i Service Manual no content intended for this page ...

Page 71: ...of channels displayed 1 In the Factory Test menu scroll to CHAN and press Enter 2 Scroll to the desired number of channels 1 or 2 and press Enter 3 The XGM868i returns to the Factory Test menu Press Escape to return to parameter display C 3 Resetting the XGM868i to Factory Defaults 1 In the Factory Test menu scroll to INIT and press Enter 2 The screen displays the initial string ESKE0 Use the left...

Page 72: ...ent Parameter as shown in the Programming Manual Note The measurement units that appear in these prompts are those selected in the GLOBL SYSTM menu The previous two prompts repeat until all of the specified of LCD Parameters have been set up When all of the display parameters have been set up the meter returns to the Global I O window To leave the Keypad Program press the Escape key three times Af...

Page 73: ...ity 46 47 48 Resolution 46 47 48 Arrow Keys 63 B Bracket Option Card 29 C Calibrating See Parameter Name Calibration Values Displaying on PanaView 58 with Keypad Program 1 Calibration Test Menu 1 42 Entering Menu 42 Channels Resetting Number of 63 Setting Number with PanaView 59 CNTdn 19 CNTup 19 Contamination Gas 20 Corrosion Transducers 22 D DAC Test 57 Defaults Resetting Meter to 63 DELTA 19 De...

Page 74: ...e Test 55 I Initializing Meter with PanaView 59 Inputs 20 mA Option 5 47 4 mA Option 5 47 K K Re MultiK KFactor 61 Keypad Program for Calibration 1 L LCD Contrast Changing with PanaView 57 LCD Display 26 LCD Test 57 Leaks Transducers 22 Low Pressure Error E12 16 Low Signal Error E1 14 LVD Statement 23 M MDOT 61 Memory Data Uploading with PanaView 54 N No Error E0 14 NVR Test 55 O Option Card Alarm...

Page 75: ...in RTD Calibration 6 SNDSP 19 Soundspeed 61 Error E2 14 Gas 20 Special Input Error E10 16 SS do 19 SS up 19 Std Vol 61 StVOL 19 T Td M 19 Td S 19 Tdown 19 TEMP 19 Temperature 61 Temperature Input Error E8 15 Testing Alarm Relay 7 Frequency Outputs 10 Totalizer Outputs 8 XMT868 Hardware 55 Testing with PanaView Frequency Outputs 51 Hardware and Software 52 Totalizer Outputs 50 TIME 61 Tot K 19 Tota...

Page 76: ...Index 68 DigitalFlow XGM868i Service Manual User Program EPROM 28 Upgrading 28 V Velocity 61 Velocity Range Error E3 14 Vinst 19 61 Volumetric 61 W Warranty 69 ...

Page 77: ...cular purpose and warranties arising from course of dealing or usage or trade Return Policy If a GE Sensing instrument malfunctions within the warranty period the following procedure must be completed 1 Notify GE Sensing giving full details of the problem and provide the model number and serial number of the instrument If the nature of the problem indicates the need for factory service GE Sensing ...

Page 78: ...Warranty 70 DigitalFlow XGM868i Service Manual no content intended for this page ...

Page 79: ......

Page 80: ...Certified Company www ge mcs com en about_us quality html Customer Support Centers U S A The Boston Center 1100 Technology Park Drive Billerica MA 01821 U S A Tel 800 833 9438 toll free 978 437 1000 E mail sensing ge com Ireland Sensing House Shannon Free Zone East Shannon County Clare Ireland Tel 353 0 61 470200 E mail gesensingsnnservices ge com ...

Reviews: