10
49-5903-3
Installation Instructions
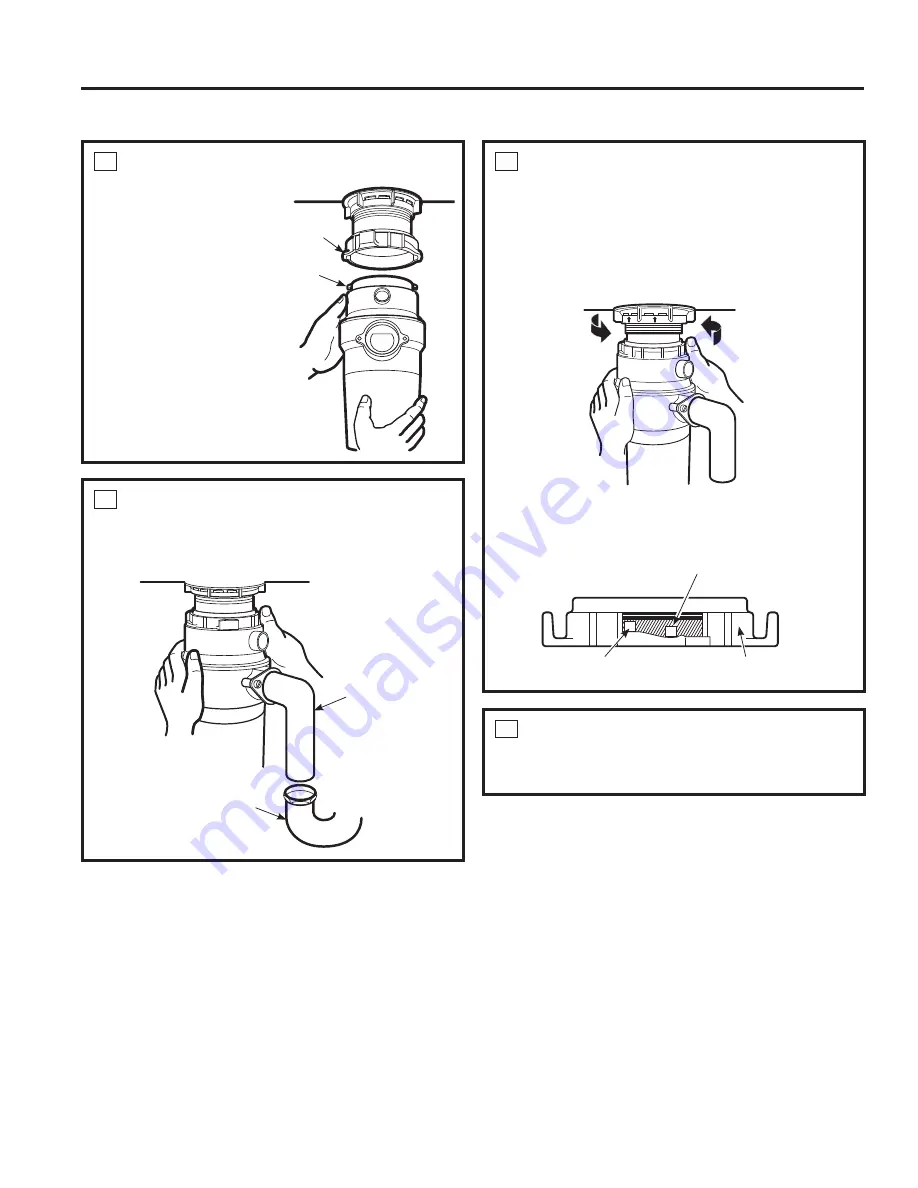
CONNECT DISPOSER TO SINK FLANGE
1
ATTACH TO SINK FLANGE
Line up the disposer
under the sink
flange. Guide the
KRSSHUSURMHFWLRQV
into the mount
ULQJVORWV7XUQWKH
mount ring about
´WRWKHULJKWVR
that the disposer
is temporarily
supported.
4
CHECK FOR LEAKS
Check the unit for leaks 24 hours after
installation and first operation.
3
LOCK MOUNT RING
7XUQWKHPRXQWULQJWRWKHULJKWXQWLOLWORFNVXS
WLJKW+RSSHUSURMHFWLRQVPXVWEHWRWKHH[WUHPH
left of the mounting slots. If the mount ring is
hard to turn, you may add a small amount of
SHWUROHXPMHOO\RUOLTXLGVRDSWRWKHKRSSHU
SURMHFWLRQ5XQZDWHUDQGFKHFNIRUOHDNV
2
LINE UP WITH OUTLET PIPE
7XUQWKHPRXQWULQJDQGWKHGLVSRVHUXQWLOWKH
disposer discharge elbow lines up with the outlet
pipe (see page 11).
INST
ALLA
TION INSTRUCTIONS
Mount Ring
Slot
Hopper
3URMHFWLRQ
'LVFKDUJH
Elbow
2XWHU3LSH
+RSSHU3URMHFWLRQLQ
³6XSSRUWHG´3RVLWLRQ
Locking Detail
+RSSHU3URMHFWLRQLQ
³/RFNHG´3RVLWLRQ
Mount Ring
Summary of Contents for DISPOSALL GFC320N
Page 13: ...49 5903 3 13 NOTES Notes...
Page 14: ...14 49 5903 3 Notes NOTES...
Page 30: ...14 49 5903 3 Notes NOTES...
Page 46: ...14 49 5903 3 Notas NOTAS...


