Issue 1
4-4 Hydraulic pressure operation (PV 623)
K0457 - [EN] English
2.
Remove the plastic cap from the end of the PRV.
3.
Set the necessary pressure with the pressure station (see
Section 4.6.1).
4.
When the pressure in the pressure station is at the new PRV
pressure, turn the adjustment screw until the PRV operates:
counterclockwise
decreases the operating pressure
clockwise
increases the operating pressure
5.
Do steps 3 and 4 until the PRV operates at the correct
pressure. Then press the plastic cap back into position.
4.6 Pressure
operation
After you correctly attach an applicable device to the test port
(Section 4.4), use these steps to set the necessary pressure. If
applicable, attach the correct PRV (Section 4.5).
Note:
To operate correctly, make sure the reservoir contains
the correct amount of hydraulic fluid; see Section 4.2.
During the procedure, you can add more hydraulic fluid; see
Section 4.6.2. When the procedure is complete, you can then
drain this fluid back out of the device; see Section 4.6.3.
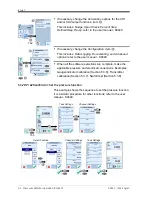
4.6.1 Hydraulic pressure procedure
1
4
2
3
+
-
+
Step
Procedure
1.
Seal the system.
2.
Close the refill valve and then wind the volume
adjuster fully clockwise and counterclockwise until the
pressure starts to increase.
Continue the clockwise/counterclockwise sequence until
you get the necessary pressure
OR
for full control, go to
step 3.
The counterclockwise operation refills the pressure
mechanism but there is no change in pressure to the
device under test or the PM 620 module (if applicable).
Note:
At higher pressures, it is easier to turn the wheel if
you fold in the handle; see Section 1.4.5.
3.
For full control, open the refill valve (1 turn). You can
now increase (+) or decrease (-) the pressure with the
volume adjuster.
4.
If you increase pressure and get to the limit of travel,
close the refill valve again and wind the volume
adjuster fully counterclockwise.
5.
Continue to do steps 2 to 4 until you get the necessary
pressure.


