How to Sharpen Knives
Do not attempt to sharpen hollow ground blades or those with serrated edges.
1.
Be sure knife is clean and free of
grease.
2.
Place heel of knife into the guide
slot located on the side of the can
opener. Lightly draw the blade
towards you, applying a slight
downward pressure. Repeat this
procedure four to five times to put
on a “factory sharp” edge.
1.
Read all instructions.
2.
To protect against risk of electrical
shock, do not immerse cord, plug
or motor unit in water or other
liquid.
3.
Close supervision is necessary when
any appliance is used by or near
children.
4.
Unplug from outlet when not in
use, before putting on or taking off
parts, and before cleaning.
5.
Avoid contacting moving parts.
6.
Do not operate any appliance with a
damaged cord or plug, or after the
appliance malfunctions or is
dropped or damaged in any
manner. Call Customer Service (see
warranty) to return for
examination, repair, or electrical or
mechanical adjustment.
7.
The use of attachments not
recommended or sold by
manufacturer may cause fire,
electric shock or injury.
8.
Do not use outdoors.
9.
Do not let cord hang over edge of
table or counter, or contact hot
surfaces, including the stove.
10.
Do not open pressurized (aerosol-
type) cans or cans of flammable
liquids, such as lighter fluids.
IMPORTANT SAFEGUARDS
SAVE THESE INSTRUCTIONS!
When using electrical appliances, basic safety precautions should always be
followed, including the following:
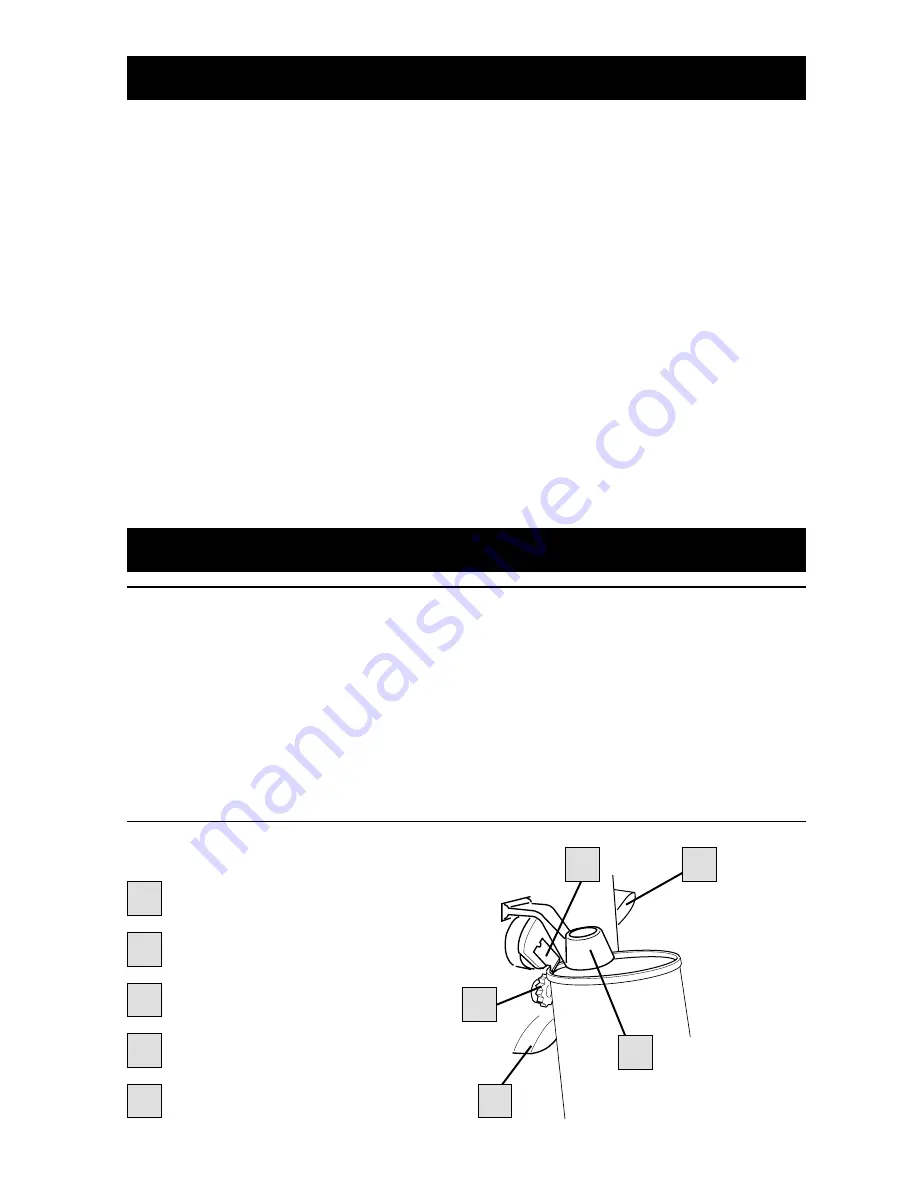
Parts and Features
Piercing Lever
Cutting Blade
Feed Wheel
Can Rest
Magnet
1
2
3
4
5
1
2
3
5
4
How to Open Cans
1.
Plug cord into 120 volt, AC outlet.
2.
Raise piercing lever, tilt can so that
the rim of the can rests on the edge
of the feed wheel, lower the lever
until the blade pierces the can.
3.
Press lever down all the way to pierce
lid and start cutting action. “Power
Pierce” feature: When you press
lever, motor will start rotating can for
easier piercing.
4.
Let go of lever and can opener will
continue cutting and will stop
automatically when can has been
opened. (It is normal for motor to
occasionally continue cutting action
for a few seconds after lid has been
completely severed.)
5.
To remove can, grasp can firmly and
raise lever. Carefully slide lid from
magnet and dispose of properly.
PLEASE NOTE: To open cans over 2 lbs.,
hold top of can opener to stabilize it. Unit
will not open rimless cans. If there is a
dent in the rim of the can, open other end.
Never open or eat the contents of a
dented, bulging or punctured can.
How to Clean Blade Assembly
Never submerge can opener in water.
1.
Unplug cord.
2.
Wipe can opener with a damp cloth.
Clean around blade area with
toothpick or cotton swab if
necessary.
HINT: Cutting mechanism may collect food
or paper from can labels, and should be
cleaned frequently to maintain optimum
performance.
This appliance has a polarized plug
(one blade is wider than the other).
As a safety feature, this plug will fit in a
polarized outlet only one way. If the
plug does not fit fully in the outlet,
reverse the plug. If it still does not fit,
contact a qualified electrician. Do not
attempt to defeat this safety feature.
CAUTION: To reduce the risk of electric
shock, do not immerse the can opener in
water.
Consumer Safety Information
THIS APPLIANCE IS INTENDED FOR HOUSEHOLD USE ONLY.


