background image

g

GE Vingmed Ultrasound

Monitor Replacement Complete, S5 / V5 

 
1. Introduction 


1. Purpose 

This document describes how to replace the monitor for System FiVe / Vivid FiVe. 
 

2. Contents 

The “Monitor Replacement Complete, System FiVe / Vivid FiVe” FC200267 consists of the 
following parts: 
 
FA200507 Cable, Monitor GND 
FC307118 EIZO cable lock 
FC307103 Adapter plate f. EIZO 
FA307626 Lock for EIZO 
066E0076 Monitor 17” EIZO 
080A359B Plate screw 3.5x9.5 
080B9040 Lock-nut M4 Hexagon 
080B1060 Nut lock M6 Durlok 
080C2066 Washer, flat (4 ea.) 
080X3147 Plug, Skiffy (4 ea.) 
FA314396 Label, System FiVe 
FB314558 Label, Vivid FiVe 
 

3. Tools 

Tools needed for assembling: 
Philips Screw driver 
7mm and 10mm wrenches 
Hammer 
 

4. Assembling of the mechanical parts 
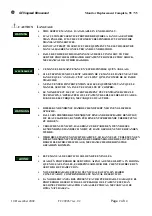
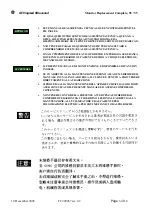


CAUTION! 

Please be aware of that the monitor weight is approx. 19 kg. 

Two persons are needed when lifting the monitor. 


10 December 2002 

FC209267 rev. 02 

Page

 7 

of

 14


Summary of Contents for FiVe

Page 1: ...g GE Vingmed Ultrasound Technical Publication Direction FC209267 Revision 02 GE Vingmed Ultrasound Monitor Replacement Complete System FiVe Vivid FiVe Copyrighted 2002 by GE Medical Systems ...

Page 2: ...S A DES DANGERS ELECTRIQUES MECANIQUES OU AUTRES DIESES KUNDENDIENST HANDBUCH EXISTIERT NUR IN ENGLISCHER SPRACHE FALLS EIN FREMDER KUNDENDIENST EINE ANDERE SPRACHE BENÖTIGT IST ES AUFGABE DES KUNDEN FÜR EINE ENTSPRECHENDE ÜBERSETZUNG ZU SORGEN VERSUCHEN SIE NICHT DAS GERÄT ZU REPARIEREN WENN DIESES KUNDENDIENST HANDBUCH NICHT ZU RATE GEZOGEN UND VERSTANDEN WURDE WIRD DIESE WARNUNG NICHT BEACHTET ...

Page 3: ...TE DEVIDO A CHOQUES ELÉTRICOS MECÂNICOS OU OUTROS IL PRESENTE MANUALE DI MANUTENZIONE È DISPONIBILE SOLTANTO IN INGLESE SE UN ADDETTO ALLA MANUTENZIONE ESTERNO ALLA GEMS RICHIEDE IL MANUALE IN UNA LINGUA DIVERSA IL CLIENTE È TENUTO A PROVVEDERE DIRETTAMENTE ALLA TRADUZIONE SI PROCEDA ALLA MANUTENZIONE DELL APPARECCHIATURA SOLO DOPO AVER CONSULTATO IL PRESENTE MANUALE ED AVERNE COMPRESO IL CONTENUT...

Page 4: ...rrier A transportation company will not pay a claim for damage if an inspection is not requested within this 14 day period Call Traffic and Transportation Milwaukee WI 414 785 5052 or 8 323 5052 immediately after damage is found At this time be ready to supply name of carrier delivery date consignee name freight or express bill number item damaged and extent of damage Complete instructions regardi...

Page 5: ... Vingmed Ultrasound Monitor Replacement Complete S5 V5 REVISION HISTORY Rev Date By Description 01 14 Aug 02 SØ Doc release 02 10 Dec 02 SØ System Five included 10 December 2002 FC209267 rev 02 Page 5 of 14 ...

Page 6: ...Replacement Complete S5 V5 Table of Contents 1 Purpose 7 2 Contents 7 3 Tools 7 4 Assembling of the mechanical parts 7 5 Mounting the monitor on the system 11 6 Mounting the front label 14 10 December 2002 FC209267 rev 02 Page 6 of 14 ...

Page 7: ...er plate f EIZO FA307626 Lock for EIZO 066E0076 Monitor 17 EIZO 080A359B Plate screw 3 5x9 5 080B9040 Lock nut M4 Hexagon 080B1060 Nut lock M6 Durlok 080C2066 Washer flat 4 ea 080X3147 Plug Skiffy 4 ea FA314396 Label System FiVe FB314558 Label Vivid FiVe 3 Tools Tools needed for assembling Philips Screw driver 7mm and 10mm wrenches Hammer 4 Assembling of the mechanical parts CAUTION Please be awar...

Page 8: ...ve screw Figure 1 Carefully lift the monitor up on a table or similar with the screen facing down Unscrew the 4 screws holding the original monitor pedestal in position as shown in figure 1 Remove the pedestal keep the 4 screws near by for mounting the adapter plate 10 December 2002 FC209267 rev 02 Page 8 of 14 ...

Page 9: ... Pull Figure 2 Pull the monitor cover upwards 1 2 cm as shown in figure 2 Mount the adapter plate FC307103 as shown by using the 2 screws in position marked X Figure 3 Mount the 4 washers 080C2066 4 onto the 4 plugs 080X3147 as shown in figure 3 10 December 2002 FC209267 rev 02 Page 9 of 14 ...

Page 10: ...ards Figure 4 Press the monitor cover back in place and fasten it with the remaining 2 screws as shown in figure 4 Fasten the 4 plugs in the holes as shown Use a hammer to knock the plugs into the holes Then the monitor is ready to be mounted on the system 10 December 2002 FC209267 rev 02 Page 10 of 14 ...

Page 11: ...nd wire is fixed to the main frame as shown in figure 5 If not attach the security ground wire FA200507 Cable Monitor GND to the frame Angle plate adapter Pedestal Figure 6 Carefully lift the monitor onto the system pedestal and push the monitor forwards Make sure that the angle in front of the adapter plate interferes with the pedestal as shown in figure 6 10 December 2002 FC209267 rev 02 Page 11...

Page 12: ...s FA307626 Lock f Eizo Figure 7 Figure 7 showing the Lock for Eizo and the nut locks Angles adapter plate Pedestal Figure 8 Figure 8 showing the rear right side of the monitor Make sure the two angles at the rear of the adapter plate interferes with the pedestal 10 December 2002 FC209267 rev 02 Page 12 of 14 ...

Page 13: ...nd 0801060 Nut lock as shown in figure 8 Mount the ground connection between the monitor and the system The ground connection is located under the monitor at the rear end Then mount the cables from the system on to the monitor Plate screw 080A359B Cable lock FC307118 Figure 10 Place the FC307118 EIZO cable lock at the monitor rear end as shown in figure 10 Use 2 self tapping plate screws 080A359B ...

Page 14: ...g GE Vingmed Ultrasound Monitor Replacement Complete S5 V5 6 Mounting the front label Monitor front label FA314396 System FiVe FB314558 Vivid FiVe 10 December 2002 FC209267 rev 02 Page 14 of 14 ...

Reviews: