background image

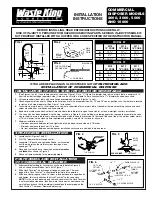
Summary of Contents for GCG1500 BB

Page 1: ...on Instructions 15 Built In Compactors 6C61580 SS 6C61500 BB 6061500 WW GCG1700I1 ZC6S150 SS ZCGP150I1 For ZCGP150II and 6C61700 II also refer to the instructions provided on the template packed with those models ...

Page 2: ...pose This compactor is designed for BUILT IN installations ONLY WARNING Do not allow items to fall or collect behind the compactor Failure to follow this instruction could result in a fire CAUTION For personal safety remove house fuse or oven circuit breaker before beginning installation to avoid severe or fatal shock injury CONTENTS Design Information Models Available 3 Product Dimensions and Cle...

Page 3: ...m rain from the floor 3 7 6 cm rain from either side 23 58 4 cm 33 3 4 85 8 cm min to 35 88 9 cm max Allow 23 58 4 cm clearance atthe front for a full drawer opening Allow 6 15 2 cm clearance on the right side to the nearest vertical wall or cabinet for bag removal Nete This compactor is designed for built in applications only TOOLS REQUIRED Level Phillips Screwdriver Pliers Gloves Measuring Tape ...

Page 4: ...abinet that is firmly attached to the house structure Weight on the compactor drawer could cause the compactor to tip and result in injury Never allow anyone to climb sit or hang on the compactor drawer MODELS WiTH A CUSTOM DRAWER PANEL Models ZCGP150 II and GCG1700 II The custom drawer panel and custom handle of your choice should be secured to the compactor before installation begins A template ...

Page 5: ...ground to a gas pipe DO NOT change the power supply cord plug If it does not fit the outlet have a proper outlet installed by a qualified electrician DO NOT have a fuse in the neutral or grounding circuit Afuse in the neutral or grounding circuit could result in an electrical shock DO NOT use an extension cord with this compactor Failure to follow these instructions could result in death or seriou...

Page 6: ...quid household cleaner and water Check thatthe power supply cord is attached to the cord clip on the rear of the compactor _ Cord cli_ IMPORTANT Use the shipping carton as a pad Do not slide the compactor across a finished floor Damage will occur UNPACKING THE COMPACTOR CONT Open the compactor drawer and remove any shipping materials or other items shipped in the drawer Do not remove the compactor...

Page 7: ...f the compactor beneath the countertop Adjust the position of the retaining brackets so that the screws can meet the underside of the countertop Mounting clips are provided for stone or other hard countertops that will not accept screws Retaining bracket Countertop I_ ADJUSTING THE BASE TOEKICK Atoekick extension is supplied It can be used to cover any gaps from the bottom of the compactor to the ...

Page 8: ... the compactor slightly and roll the unit into the cabinet opening until the retaining brackets stop Lift here I_ ATTACH THE COMPACTOR TO THE COUNTERTOP Use two 8 18 x 1 2 45 7 cm x 1 3 cm mounting screws to fasten the retaining brackets at the top of the compactor to the underside of the countertop Retaining bracket _ _r Mounting screws If the brackets cannot be attached to the underside of the c...

Page 9: ...AG CADDY on some models Set the bag caddy into the drawer and hook the pre punched holes in the caddy on the drawer buttons Setthe trash bag into the bag caddy and fold over Hook the holes in the bag over the drawer buttons Trash Drawer buttons _9qFINALIZE THE INSTALLATION Turn power on atthe source Refer to your Owner s Manual for operating instructions 9 ...

Page 10: ...Notes 10 ...

Page 11: ...Notes 11 ...

Page 12: ...TE P odtlcr ilnpvovelnent is a continuil_g Lql _aVOl at General Electri Thel etk_re lnatevials _ll_pem al_ce mid specifi ations _11 _ sul_je r to hmlge without nori e GE Consumer Industrial Appliances General Electric Company Louisville KY40225 ge com Pub No 31 30596 206C1559P140 08 05JR Printedin China ...

Reviews: