background image

Before you call for service…

Consumer S

u

p

por

t

Tr

oubleshooting T

ips

Operating Instructions

Safety Instructions

Installation

Instructions

16

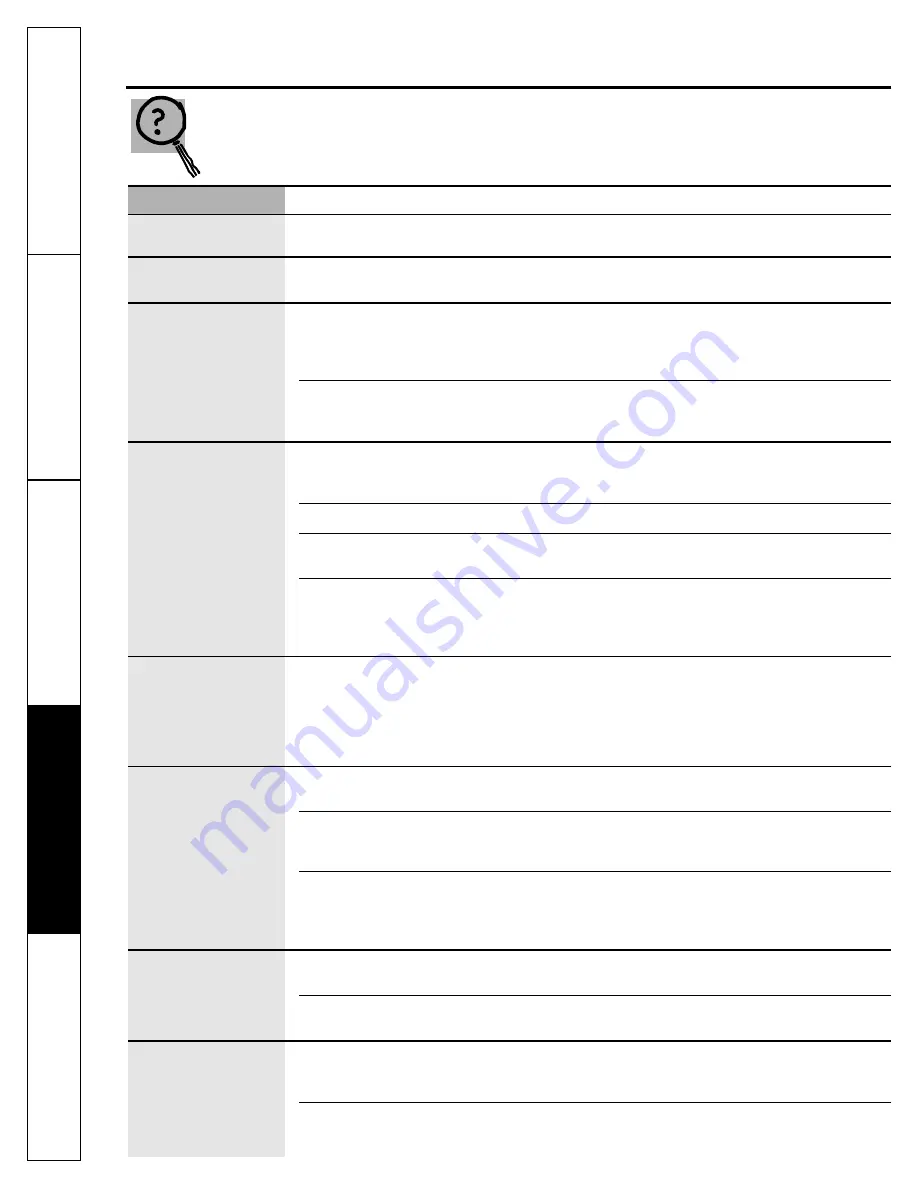
Problem

Possible Causes

What To Do

Sounds you might hear

Running water from the unit 

This is normal.

to a drain.

Water has air bubbles

Air in system after installation.

Will go away after water runs for a while.

and is cloudy

Chlorine taste and/or

The ppm of aesthetic chlorine 

If the water supply contains more than 2.0 ppm of 

odor in the Reverse

in your water supply exceeds 

aesthetic chlorine, additional filtering of the water supply  

Osmosis product water

maximum limits and has destroyed 

to the Reverse Osmosis is needed. Correct this condition 

the Reverse Osmosis membrane.

before doing maintenance on the Reverse Osmosis system.

The prefilter is no longer

Replace the Reverse Osmosis membrane cartridge, 

removing aesthetic chlorine 

flow control, screen, prefilter and postfilter. 

from the water supply.

Other taste and/or odor

High-quality product water

This is normal.

may have a different taste 
than what you’re used to.

Low water usage.

Completely drain system and allow to refill.

Contamination in product 

Use sanitizing procedures. 

water storage.

Prefilter and postfilter 

Replace the prefilter and postfilter. If taste and odor

need to be changed and/or

persists, replace the Reverse Osmosis cartridge, flow 

the Reverse Osmosis cartridge

control and screen.

needs to be changed.

Water leaking from 

Drain side of faucet air gap 

Inspect and eliminate restriction or plug. It is important 

faucet air gap hole

(3/8

tubing) plugged, restricted

that there are no dips, loops or low spots in the drain line

or incorrectly connected to the

from the faucet air gap to the drain pipe. Refer to the 

drain point.

Filtration Drain Connection 

section, for proper drain

connection. If drain line adapter was used as the drain
point, periodic inspection/cleaning is recommended.

System makes product

This is normal.

Water flow rate will be lower than your regular faucet.

water slowly

Water supply to the Reverse 

Increase water pressure, precondition the water, etc., 

Osmosis system not within

as needed to conform to specification guidelines before 

specifications.

doing maintenance on the Reverse Osmosis system.

Prefilter cartridge plugged

Replace the prefilter and postfilter. If rate does not 

with sediments and/or the

increase, replace the Reverse Osmosis cartridge, flow 

Reverse Osmosis cartridge

control and screen.

plugged with sediments.

Faucet light blinking

Prefilter and postfilter 

Replace filters. Don’t forget to sanitize the system when 

need replacing.

replacing filters.

Timer was not reset when filters 

Remove and replace battery in faucet base.

were replaced.

Six months have passed

Battery may be dead.

Replace battery. 

NOTE: 

Replacing the battery resets the 

and faucet light is not 

six-month timer, so be sure to replace 

the 

prefilter and 

blinking

postfilter if it is time to do so.

Battery may have been 

Any time the battery is removed and reinserted, the 

removed recently.

six-month timer starts over again. Do not remove 
the battery unless you wish to restart the timer.

Troubleshooting Tips 
Save time and money! Review the chart first and you may
not need to call for service.

Summary of Contents for GEGXRM10RBL

Page 1: ...anitization 11 Water Test Kit 13 Operating Instructions About the RO System 14 15 Troubleshooting Tips 16 Consumer Support Consumer Support Back Cover Parts List Catalog 17 18 Warranty 20 Manuel d utilisation et d installation Manual del propietario y instalación La section française commence à la page 21 Osmose Inversée Système de Filtration La sección en español empieza en la página 41 Ósmosis I...

Page 2: ... more than 27 mg L nitrate and 3 mg L nitrite in combination measured as N and is certified for nitrate nitrite reduction only for water supplies with a pressure of 280kPa 40 psig or greater SAVE THESE INSTRUCTIONS READ AND FOLLOW THIS SAFETY INFORMATION CAREFULLY n Install or store where it will not be exposed to temperatures below freezing or exposed to any type of weather Water freezing in the ...

Page 3: ... membrane life grains per gallon gpg 10 For water with hardness greater than 10 grains at 6 9 pH the use of a softener is recommended Failure to install a water softener will reduce the life of the Reverse Osmosis membrane See chart for additional information on the possible need for a water softener a Tested according to NSF ANSI Standard 58 Source water test parameters are 50 psig 77 F pH of 7 5...

Page 4: ...e reference Proper installation is the responsibility of the installer Product failure due to improper installation is not covered under the Warranty A shut off valve must be available or added near the installation point TOOLS AND MATERIALS REQUIRED FOR INSTALLATION Drill with 1 1 2 Drill Bit type as required if mounting hole is needed for faucet Adjustable Open End Wrenches Phillips and Flat Bla...

Page 5: ...able drain point and air gap check your local codes are needed for reject water from the Reverse Osmosis membrane cartridge BASEMENT INSTALLATION If installing in a basement leave enough tubing in place during installation to be able to move the unit to the floor for ease at servicing and making filter membrane changes Additional tubing and fittings required RO FAUCET The RO product water faucet i...

Page 6: ...stic ferrule should be oriented with the reduced tapered end fitting into the saddle valve Make sure the tube is fully inserted into the valve Tighten the compression nut securely NOTE If any water leaks from the saddle valve connection ensure that all components are sufficiently secured by tightening the compression nut If the leak continues remove the compression nut ferrule brass insert and tub...

Page 7: ...moothly Optional water supply connection using saddle valve Pre drill 1 4 hole Seal make sure the seal is in place Clamp X Nut 2 not required if holes in clamp are threaded Valve Handle Ferrule Compression nut Tube Clamp Z Use to connect the tubing For 1 4 OD or larger metal tubing only Snug valve into bracket DO NOT OVERTIGHTEN Some threads should be visible Rubber gasket Brass insert ...

Page 8: ...l the faucet A In an existing sink spray attachment or soap dispenser hole B In a hole to be drilled in the sink top C In a hole to be drilled in the countertop next to the sink NOTES Be sure the faucet base will fit flat against the surface at the selected location so the bottom gasket between the base and surface area will seal Make sure to leave enough clearance at the back of the faucet in cas...

Page 9: ...d must be in place purchase and install if necessary to prevent a clog in the Reverse Osmosis drain line Route the drain line 3 8 black from the faucet air gap to the drain line adapter ensuring that there are no dips loops or low spots in the line that could result in a clogged drain line The tubing must be cut to length to provide a straight routing from the faucet to the drain Drain noise in th...

Page 10: ...ove all cartridges as described in the Sanitization section Chlorine will destroy the Reverse Osmosis cartridge Hold the Reverse Osmosis assembly up to the wall surface where you will install it Mark locations for the screws The arrows on the top of the bracket show the location of the screw holes 1 Connect the tubing to the storage tank Run the length of 3 8 orange tubing from the tee fitting on ...

Page 11: ...to close the water supply valve or tank shut off valve will cause water to spray or run when sumps are removed 4 Remove the sumps Be careful sumps will be full of water Discard filters Thoroughly wash sumps with dish soap Thoroughly wipe inside of heads with a paper towel moistened with dish soap Rinse well 5 Install empty postfilter sump 7 Fill prefilter sump with water to within 1 of O ring Add ...

Page 12: ...creen Unscrew the black 1 4 line from the fitting Remove flow control with clean knife edge Remove screen with a clean toothpick Tighten the nut hand tight and then tighten 1 4 turn with pliers DO NOT OVERTIGHTEN 13 Flow control Screen Compression nut 1 4 Black tubing INSTALL THE BATTERY 1 Remove the lens cover from the faucet base Grip it from both sides and pull forward 2 Install one CR2032 3V b...

Page 13: ...Thin Film Polyamide The Water Test Kit To obtain an independent laboratory water test kit please call Legend Technical Services at 1 800 826 8553 ext 47 and leave your contact details They will contact you to find out what water tests you are interested in and inform you of the cost of the testing You will then receive a kit that will include all necessary tests to properly indicate the performanc...

Page 14: ... rupture Automatic Shutoff Valve To conserve water the drinking water system has an automatic shutoff When the storage tank has filled to capacity and the drinking water faucet is closed pressure closes the shutoff Water flow to the Reverse Osmosis housing is shut off until drinking water is used again and pressure drops in the Reverse Osmosis system What the Reverse Osmosis System Does Reverse Os...

Page 15: ...ality drinking water flows through the tubing and to the system faucet System Monitor A timer is provided in the faucet base to remind you when it is time to replace your prefilter and postfilter Replace the filters when the amber light begins to flash in order to protect the RO membrane and keep the system functioning properly Be sure to remove and replace the battery at the same time to reset th...

Page 16: ...n or plug It is important faucet air gap hole 3 8 tubing plugged restricted that there are no dips loops or low spots in the drain line or incorrectly connected to the from the faucet air gap to the drain pipe Refer to the drain point Filtration Drain Connection section for proper drain connection If drain line adapter was used as the drain point periodic inspection cleaning is recommended System ...

Page 17: ... and do not permit the use of the saddle valve For installation use plumbing code 248 CMR of the Commonwealth of Massachusetts 17 Consumer Support Troubleshooting Tips Operating Instructions Safety Instructions Installation Instructions Optional Accessories Parts list GEAppliances com ...

Page 18: ...006 HOUSING RO MEMBRANE 1 0021 WS28X10039 BRACKET 1 0022 WS22X10044 CONNECTOR 3 8 X 3 8 MNPT 1 0023 WS32X10019 STORAGE TANK 1 0024 WX5X140 WRENCH 1 0025 WS03X10038 O RING SUMP HOUSING 2 0026 FX12P CARBON BLOCK CARTRIDGE 2 0027 WS20X10007 SUMP HOUSING 2 0028 WS18X10006 DRAIN LINE ADAPTER DLA9 1 0033 WS02X10032 SCREWS BRACKET 8 0034 WS31X10026 HOUSING HEAD 2 0035 WS15X10023 SADDLE VALVE 1 0036 WS07X...

Page 19: ...19 Consumer Support Troubleshooting Tips Operating Instructions Safety Instructions Installation Instructions Notes ...

Page 20: ...Incidental or consequential damage caused by possible defects with this appliance What GE Will Not Cover Staple your receipt here Proof of the original purchase date is needed to obtain service under the warranty This warranty is extended to the original purchaser and any succeeding owner for products purchased for home use within the USA If the product is located in an area where service by a GE ...

Page 21: ...ien et nettoyage Désinfection 31 Remplacement des cartouches pré filtre post filtre et osmose inversée 31 32 Trousse pour le test d eau 33 Fonctionnement Au sujet du système de filtration par osmose inversée 34 35 Conseils de dépannage 36 Soutien au consommateur Garantie 39 Liste des pièces catalogue 37 38 Soutien au consommateur 40 La section Française Écrivez ici les numéros de modèle et de séri...

Page 22: ...table pour des concentrations maximum de nitrates à 27 mg par litre et de nitre à 3 mg par litre en combinaison appelée N Il est acceptable pour la réduction de nitrate nitre dans de l eau dont la pression est égale ou supérieure à 280kPA 40psig CONSERVEZ CES INSTRUCTIONS VEUILLEZ LIRE ET SUIVRE ATTENTIVEMENT CES MESURES DE SÉCURITÉ n Installez l appareil ou entreposez le de telle façon qu il ne s...

Page 23: ... installé la durée de vie de la membrane du système de filtration par osmose inversée est réduite Voyez le graphique pour les informations complémentaires concernant la nécessité d installer un adoucisseur d eau a Lorsque testé conformément à la norme 58 de NSF ANSI Pour le test les paramètres de l eau d origine sont de 50 psig 77 F un pH de 7 5 0 5 et une valeur ppm parties par million de 750 40 ...

Page 24: ...ur est responsable de bien installer Toute panne du produit due à une mauvaise installation n est pas couverte par la garantie Un robinet d arrêt doit être disponible ou ajouté à côté du point d installation OUTILLAGE ET MATÉRIEL REQUIS POUR L INSTALLATION Perceuse et mèche de perceuse de 1 1 2 po du type nécessaire si un trou de montage est requis pour le robinet Clefs à molette réglables Tournev...

Page 25: ...iltration nécessite un point de vidange approprié et un espace d air vérifiez vos codes locaux INSTALLATION DANS UN SOUS SOL Si l installation est effectuée dans un sous sol ménagez une longueur de conduite suffisante au cours de l installation afin de faciliter l entretien et d assurer le remplacement des filtres membrane Conduite et raccords supplémentaires sont nécessaires ROBINET RO Le robinet...

Page 26: ...z que la bague de plastique doit être orientée en présentant l extrémité amincie du raccord dans la soupape à bride Assurez vous que le tube est inséré à fond dans la soupape Serrez l écrou de compression fermement NOTE Si la soupape à bride laisse fuir de l eau vérifiez que tous les composants sont bien raccordés en serrant l écrou de compression Si la fuite se poursuit retirez l écrou de compres...

Page 27: ...urce d alimentation d eau avec utilisation de la soupape à bride Pour OD de 1 4 po ou tube métallique de plus grandes dimensions Montez la soupape dans le support NE SERREZ PAS EXCESSIVEMENT Plusieurs filets doivent être visibles Joint en caoutchouc Trou de 1 4 po pré percé Joint assurez vous que le joint est en place Bride X Écrou 2 Non nécessaire si les trous de la bride sont filetés Soupage Poi...

Page 28: ...ubes noirs de 1 4 po et de 3 8 po dans les raccords cannelés adéquats de la base du robinet Poussez le tube de 3 8 po bleu à travers la base 4 Alignez le joint de façon à recouvrir le trou entièrement Placez ensuite le boulon à ailettes de la base dans le trou Base de robinet Évier Joint Boulon à ailettes Base de robinet Raccord cannelé de 1 4 po Tube noir de 1 4 po Raccord cannelé de 3 8 po Tube ...

Page 29: ...e de vidange du système de filtration par osmose inversée en dérivation de l espace d air Maintenez l espace d air au point de vidange dans le sous sol Conduite noire de 1 4 po OPTION B INSTALLATION D ADAPTATEUR DE LA CONDUITE DE VIDANGE MISE EN GARDE N INSTALLEZ PAS L ADAPTATEUR DE LA CONDUITE DE VIDANGE EN AVAL DU BROYEUR À DÉCHETS Installez l adaptateur de conduite de vidange fourni sous l évie...

Page 30: ...ersée au raccord d entrée du réservoir 5 Des vis à bois sont fournies pour fixation sur une surface de bois Procurez vous d autres vis si besoin est 2 Accrochez l ensemble de filtration par osmose inversée sur les vis 3 Mettez du chatterton d étanchéïté pour filetage sur le raccord et les filetages du réservoir Serrez avec une clé anglaise 4 Réservoir Au robinet Conduite d alimentation Conduite or...

Page 31: ...ARDE Ne pas fermer le robinet d alimentation d eau ou le robinet d arrêt du réservoir causera des pulvéristations ou des écoulements d eau lorsque les corps de filtre sont enlevés 4 Enlevez les corps de filtre Faites attention les corps de filtre seront pleins d eau Jetez les filtres Nettoyez soigneusement les corps de filtre avec du produit vaisselle Essuyez soigneusement l intérieur des têtes av...

Page 32: ...res Vérifiez qu il n y pas de fuites 14 Si vous remplacez la cartouche de filtration par osmose inversée remplacez aussi le régulateur de débit et le tamis Dévissez la conduite noire de 1 4 po du raccord Enlevez le régulateur de débit avec une lame de couteau propre Enlevez le tamis avec un cure dent propre Serrez l écrou à la main puis serrez le de 1 4 de tour avec des pinces NE SERREZ PAS TROP 1...

Page 33: ...de filtration FX12M Pellicule mince en polyamide Trousse de test d eau Pour obtenir une trousse de test d eau d un laboratoire indépendant veuillez appeler Legend Technical Services au 1 800 826 8553 poste 47 et laissez les informations pour vous contacter Ils vous contacteront pour vous demander d identifier les tests d eau qui vous intéressent et pour vous informer du coût du test Vous recevrez ...

Page 34: ...ion d eau potable comporte un robinet d arrêt automatique Lorsque le réservoir est plein et que le robinet d alimentation en eau potable est fermé la pression ferme l appareil Le débit d eau vers le logement du système de filtration par osmose inversée est interrompu jusqu à ce que l eau potable soit à nouveau utilisée et que la pression chute dans le système Ce que ce système accomplit Le procédé...

Page 35: ...iments sont réduits de l eau par le post filtre L eau potable propre de haute qualité s écoule par la conduite vers le robinet du système Moniteur du système Une minuterie est fournie dans la base du robinet pour vous rappeler quand il est temps de remplacer votre pré filtre et votre post filtre Remplacez les filtres lorsque la lumière ambre commence à clignoter pour protéger la membrane de filtra...

Page 36: ...ite de vidange soit rectiligne est colmaté l écoulement est entre l espace d air du robinet et la conduite de vidange limité ou la conduite n a pas été Réferez vous à la section Raccordement à la conduite de correctement raccordé au vidange pour vous assurer d un bon raccord de la point de vidange conduite Si vous avez utilisé un adaptateur pour la conduite au point de vidange il est recommandé d ...

Page 37: ...ualifié et ne permettent pas l utilisation de soupapes à étrier Pour l installation utilisez le code 248 CMR du Commonwealth du Massachusetts 37 Soutien au consommateur Conseils de dépannage Fonctionnement Mesures de sécurité Installation Accessoires facultatifs Liste de pièces www electromenagersge ca ...

Page 38: ...O TIGE X 1 4 PO 1 0020 WS20X10006 LOGEMENT MEMBRANE DE 1 FILTRATION PAR OSMOSE INVERSÉE 0021 WS28X10039 SUPPORT 1 0022 WS22X10044 CONNECTEUR 3 8 PO 1 X 3 8 PO MNPT 0023 WS32X10019 RÉSERVOIR DE STOCKAGE 1 0024 WX5X140 CLÉ 1 0025 WS03X10038 JOINT TORIQUE CORPS DE FILTRE 2 0026 FX12P CARTOUCHE DE BLOC DE CHARBON 2 0027 WS20X10007 CORPS DE FILTRE 2 0028 WS18X10006 ADAPTATEUR DE CONDUITE 1 DE VIDANGE D...

Page 39: ...tre les cartouches de membrane et les piles après trente jours à partir de la date d achat n Les dommages causés par accident au produit les incendies inondations ou actes de Dieu n Les dommages fortuits ou indirects à la propriété personnelle résultant de défauts possibles de cet appareil Ce qui n est pas couvert Agrafez le reçu d achat ici Pour obtenir le service sous garantie vous devrez fourni...

Page 40: ...urs électroménagers peuvent recevoir pièces et accessoires directement à la maison cartes VISA MasterCard et Discover acceptées Les directives stipulées dans le présent manuel peuvent être effectuées par n importe quel utilisateur Les autres réparations doivent généralement être effectuées par un technicien qualifié Soyez prudent car une réparation inadéquate peut affecter le fonctionnement sécuri...

Page 41: ...o de agua 50 Cuidado y limpieza Desinfección 51 Kit de prueba del agua 53 Procedimiento para la reposición del pre filtro post filtro y cartucho del sistema de Ósmosis Inversa 51 52 Instrucciones de operación Sobre el Sistema de Ósmosis Inversa 54 55 Consejos para la solución de fallas 56 Soporte al consumidor Garantía 62 Lista de partes Catálogo 57 58 Soporte al consumidor 63 Escriba los números ...

Page 42: ...el agua Este sistema es aceptable para el tratamiento de concentraciones entrantes de nitrato de no más de 27 mg L y nitrito de 3 mg L en combinación medidas en N y es aceptable para la reducción de nitrato nitrito sólo para suministros de agua con presión de 280kPa 40 psig o mayor CONSERVE ESTAS INSTRUCCIONES LEA Y SIGA CUIDADOSAMENTE ESTA INFORMACIÓN DE SEGURIDAD n Instale o almacene donde no es...

Page 43: ...comienda el uso de un descalcificador de agua No instalar un descalcificador de agua reducirá la vida de la membrana del sistema de Ósmosis Inversa Consulte la tabla para información adicional sobre la posible necesidad de un descalcificador de agua a Prueba según el Estándar 58 de NSF ANSI Los parámetros de prueba del agua de la fuente son 50 psig pH de 7 5 0 5 y 750 40 ppm sólidos totales disuel...

Page 44: ... del instalador Las averías del producto causadas por una instalación inadecuada no están cubiertas por la garantía Debe existir una válvula de cierre disponible o se debe agregar una cerca al punto de instalación HERRAMIENTAS Y MATERIALES REQUERIDOS PARA LA INSTALACIÓN Taladro y broca de 1 1 2 para taladro tipo según el requerido si se necesita un orificio de montaje para el grifo Llaves abiertas...

Page 45: ...a el agua rechazada del cartucho de la membrana del sistema de Ósmosis Inversa INSTALACIÓN EN SÓTANO Si se va a instalar en un sótano deje suficiente tubería en su lugar durante la instalación para poder mover la unidad hacia el piso para mayor facilidad en el servicio y hacer cambios al filtro membrana Tubería y accesorios adicionales se necesitarán GRIFO DEL SISTEMA DE OI El grifo del agua produ...

Page 46: ...n el accesorio de extremo cónico reducido dentro de la válvula de montura Asegúrese de que la tubería esté completamente introducida dentro de la válvula Ajuste la tuerca de compresión firmemente NOTA Si se detecta una pérdida de agua en la conexión de la válvula de montura verifique que todos los componentes estén bien firmes ajustando la tuerca de compresión Si la pérdida continúa quite la tuerc...

Page 47: ...inistro de agua usando válvula de montura Para OD de 1 4 o tubo de metal más largo únicamente Acomode la válvula en el soporte NO APRIETE DEMASIADO Deberán verse algunos filetes Empaque de caucho Orificio de 1 4 previamente abierto Sello asegúrese que el sello está en su lugar Grapa X Tuerca 2 no se requiere si el orificio en la grapa tiene filetes Válvula Manija Casquillo Tuerca de compresión Tub...

Page 48: ...gro de 1 4 y el tubo negro de 3 8 sobre de los accesorios dentados correctos de la base del grifo Presione el tubo azul de 3 8 a través de la base 4 Alinee la junta para cubrir el orificio por Base de grifo Lavaplatos Junta Tornillo basculante Base de grifo Accesorio dentado de 1 4 Tubo negro de 1 4 Accesorio dentado de 3 8 Tubo negro de 3 8 Tubo azul de 3 8 INSTALACIÓN DEL GRIFO CONT 5 Ajuste el ...

Page 49: ...perior de la torre depósito Tubo de drenaje del sistema de Ósmosis Inversa pasando el vacío de aire del grifo Mantenga el vacío de aire en el punto de drenaje en el sótano Tubo negro de 1 4 OPCIÓN B INSTALACIÓN DEL ADAPTADOR DEL TUBO DE DRENAJE PRECAUCIÓN NO INSTALE EL ADAPTADOR DEL TUBO DE DRENAJE HACIA ABAJO DEL TRITURADOR Instale el adaptador del tubo de drenaje que se suministra debajo del lav...

Page 50: ...rio en la entrada del tanque 5 Se incluyen tornillos para sujetar a una superficie de madera Adquiera otros tornillos según sea necesario 2 Cuelgue la ensambladura del sistema de Ósmosis Inversa en los tornillos 3 Aplique cinta de sellado de rosca de tubos al accesorio del tanque Inserte en las roscas del tanque Apriete con una llave 4 Tanque de almacenamiento Hacia el grifo Tubo de suministro Tub...

Page 51: ...sa PRECAUCIÓN No cerrar la válvula de suministro de agua o la válvula de cierre del tanque causará que el agua se riegue hacia donde se han retirado los sumideros 4 Retire los sumideros Tenga cuidado éstos estarán llenos de agua Deseche los filtros Lave completamente los sumideros con jabón para platos Limpie completamente el interior de las cabezas con papel toalla humedecido con jabón para plato...

Page 52: ...a de Ósmosis Inversa también reemplace el control del flujo y la rejilla Destornille el tubo negro de 1 4 del accesorio Retire el control del flujo con el borde de un cuchillo limpio Retire la rejilla con un palillo limpio Apriete la tuerca con la mano y luego dé 1 4 de giro con alicates NO APRIETE EN EXCESO 13 Control del flujo Rejilla Tuerca de compresión Tubo negro de 1 4 INSTALACIÓN DE LA BATE...

Page 53: ...rtucho pre filtro post filtro FX12P Bloque de carbono Repuesto de cartucho del sistema de Ósmosis Inversa FX12M Poliamida de película delgada Kit de prueba del agua Para obtener un kit de prueba del agua de un laboratorio independiente llame a Legend Technical Services al 1 800 826 8553 ext 47 y deje sus datos para contactarlo Ellos le contactarán para averiguar qué pruebas de agua le interesan y ...

Page 54: ...ua el sistema de agua de consumo tiene un apagado automático Cuando el tanque de almacenamiento ha llenado su capacidad y el grifo de agua de consumo está cerrado la presión cierra el apagado automático El flujo de agua hacia la caja del sistema de Ósmosis Inversa se apaga hasta que el agua de consumo se use nuevamente y la presión caiga en el sistema de Ósmosis Inversa Qué hace el sistema de Ósmo...

Page 55: ...o Agua limpia de alta calidad lista para tomar fluye a través del tubo hacia el grifo del sistema Monitor del sistema Se incluye un temporizador en la base del grifo para recordarle el momento de reemplazar el pre filtro y post filtro Reemplace los filtros cuando la luz ambarina empiece a encenderse de forma intermitente para proteger la membrana del sistema de Ósmosis Inversa y mantenga el sistem...

Page 56: ...ingido o caídas en la línea de drenaje desde el vacío de aire del incorrectamente conectado grifo hacia la tubería de drenaje Consulte la sección hacia el punto de drenaje Instalación de la conexión del drenaje de filtración para una conexión apropiada del drenaje Si el adaptador de la línea de drenaje se usó como el punto de drenaje se recomienda una inspección limpieza periódica El sistema produ...

Page 57: ...arte de un plomero certificado y no permiten el uso de válvula de montura Para la instalación use el código de plomería 248 CMR de Massachusetts 57 Lista de partes GEAppliances com Soporte al consumidor Solucionar problemas Operación Seguridad Instalación Accesorios opcionales ...

Page 58: ... NPT X 3 8 2 0015 FX12M MEMBRANA DEL SISTEMA 1 DE ÓSMOSIS INVERSA 0016 WS03X10045 ANILLO TÓRICO 1 CAJA PROTECTORA DE MEMBRANA DEL SISTEMA DE ÓSMOSIS INVERSA 0017 WS31X10025 TAPA CAJA PROTECTORA 1 DE MEMBRANA DEL SISTEMA DE ÓSMOSIS INVERSA 0018 WS22X10042 ACCESORIO DE 1 8 NPT X 1 4 1 0019 WS22X10043 CODO VÁSTAGO DE 1 4 X 1 4 1 0020 WS20X10006 CAJA PROTECTORA DE MEMBRANA 1 DEL SISTEMA DE ÓSMOSIS INV...

Page 59: ...59 Notas GEAppliances com Soporte al consumidor Solucionar problemas Operación Seguridad Instalación ...

Page 60: ...Notas 60 Soporte al consumidor Solucionar problemas Operación Seguridad Instalación ...

Page 61: ...61 Notas GEAppliances com Soporte al consumidor Solucionar problemas Operación Seguridad Instalación ...

Page 62: ... al comprador original y cualquier comprador posterior de productos comprados para uso residencial dentro de Estados Unidos Si el producto está situado en un área que no dispone de servicio por parte de un proveedor de servicio autorizado de GE podría tener que hacerse cargo de los costes de envío o bien podría solicitársele que lleve el producto a una centro de servicio de GE autorizado para real...

Page 63: ...tiva Puede comprarla en línea en cualquier momento o llamar al 800 626 2224 durante horas normales de oficina GE Consumer Home Services estará aún ahí cuando su garantía termine Piezas y accesorios GEAppliances com Aquellos individuos con la calificación necesaria para reparar sus propios electrodomésticos pueden pedir que se les manden las piezas o accesorios directamente a sus hogares aceptamos ...

Page 64: ...nytime or call 800 626 2224 during normal business hours GE Consumer Home Services will still be there after your warranty expires In Canada call 1 888 261 2133 Parts and Accessories In the U S GEAppliances com Individuals qualified to service their own appliances can have parts or accessories sent directly to their homes VISA MasterCard and Discover cards are accepted Order on line today 24 hours...

Reviews: