16
5
6
2
1
7
2 2
Click
7~8mm
3
4
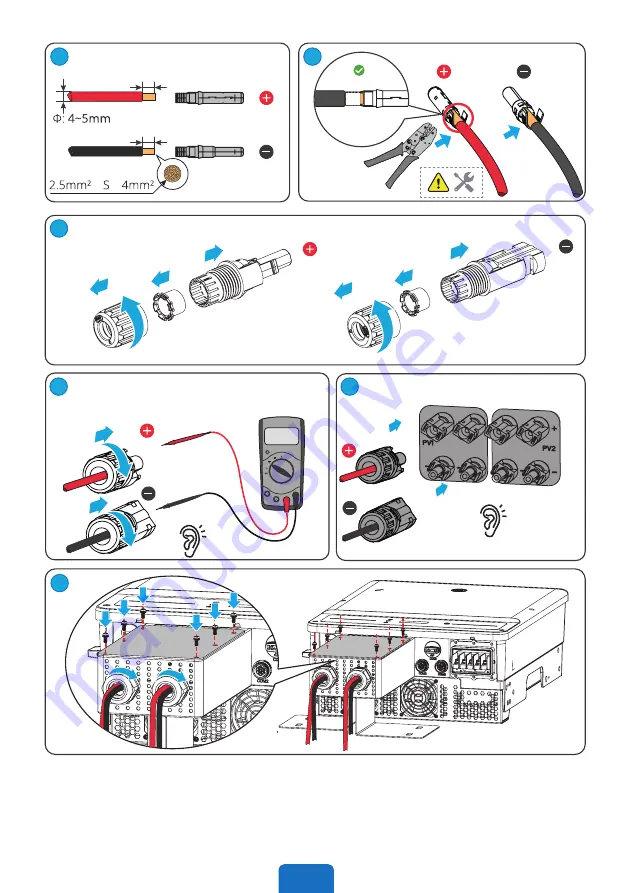
Use a multimeter to measure the DC voltage
and check the polarity of the connectors.
≤ ≤
Page 1: ...www gesolarinverter com SOLAR INVERTER V1 1 GEP 4 20kW Three Phase Quick Installation Guide...
Page 2: ...ot follow the instructions For more warranty details please visit https www gesolarinverter com DC Side 1 Ensure the component frames and the bracket system are securely grounded 2 Connect the DC cabl...
Page 3: ...rts and terminals are sealed 5 The voltage and frequency at the connection point meet the on grid requirements Check Items Before Switching Power ON High voltage hazard Power off the inverter first be...
Page 4: ...paratuur of persoonlijk letsel als u de instructies niet opvolgt Meer informatie over de garantie vindt u op https www gesolarinverter com DC zijde 1 Zorg ervoor dat de frames van de onderdelen en het...
Page 5: ...het aansluitpunt voldoen aan de eisen van het elektriciteitsnet Controleer deze punten voordat u de stroom inschakelt Hoogspanningsgevaar Schakel de omvormer eerst uit voordat u werkzaamheden verricht...
Page 6: ...za uszkodzenia sprz tu lub obra enia cia a w przypadku nieprzestrzegania instrukcji Wi cej informacji na temat gwarancji mo na znale na stronie https www gesolarinverter com Po stronie DC 1 Upewni si...
Page 7: ...kcie pod czenia spe niaj wymagania sieci Kontrola element w przed w czeniem zasilania Ryzyko zwi zane z wysokim napi ciem Przed przyst pieniem do jakichkolwiek czynno ci najpierw wy czy zasilanie falo...
Page 8: ...caso as instru es n o sejam seguidas Para mais detalhes sobre a garantia visite https www gesolarinverter com Lado CC 1 Garanta que as estruturas dos componentes e o sistema de suporte estejam aterra...
Page 9: ...ilizados est o vedados 5 A tens o e frequ ncia no ponto de conex o cumprem os requisitos da rede el trica Verifique os itens antes de ligar a alimenta o Risco por alta tens o Desligue o inversor antes...
Page 10: ...12 Communication Port COM3 13 AC Output Terminal 14 Ventilation Valve 15 Fan 02 Product Introduction Het product Informacje og lne o produkcie Apresenta o do produto GEP12 3 10 GEP15 3 10 GEP20 3 10 G...
Page 11: ...na embalagem x 1 x 1 optional x 1 optional x 1 x 1 x 1 x 1 x 6 03 Inverter Installation Installatie van de omvormer Instalacja falownika Instala o do inversor N means the number of actual accessories...
Page 12: ...Requirements Benodigde ruimte Wymagania dotycz ce przestrzeni Requisitos de espa o 0 100 RH IP65 300mm 300mm 500mm 200mm 200mm Angle Requirements Benodigde hoek Wymagania dotycz ce k t w Requisitos d...
Page 13: ...12 Installing the Inverter Omvormer monteren Monta falownika Instala o do inversor Avoid the water pipes and cables buried in the wall when drilling holes 1...
Page 14: ...after connecting the DC input cable to the equipment Otherwise the DC input cable cannot be connected M5 1 2 2N m 8 9 7 04 Electrical Connection Elektrische aansluiting Po czenia elektryczne Conex o e...
Page 15: ...e przewodu DC ze skrzynk PV Conectando o cabo CC com caixa FV Notice The PV box is designed for GEP 15 3 10 and GEP20 3 10 in Australia only Install the cover of the PV box after connecting the DC inp...
Page 16: ...15 Click Click Staubli MC4 DC Connector Use a multimeter to measure the DC voltage and check the polarity of the connectors 1 2 3 4 2 3 4 1 4 5 6 2 1 1 2 2 2 2 2 2 7 1 1 2 2 1 1 1 2 2 1 1 2 2...
Page 17: ...16 5 6 2 1 1 2 2 2 2 2 2 7 1 1 2 2 2 Click Click 7 8mm 7 8mm 2 3 1 2 3 4 2 3 4 1 4 Use a multimeter to measure the DC voltage and check the polarity of the connectors...
Page 18: ...en zonder PV doos Pod czanie przewodu DC bez skrzynki PV Conectando o cabo CC sem caixa FV Click Click Click Devalan DC Connector Use a multimeter to measure the DC voltage and check the polarity of t...
Page 19: ...18 Click Click Staubli MC4 DC Connector Use a multimeter to measure the DC voltage and check the polarity of the connectors 7 8mm 7 8mm 1 2 3 4 1 1 2 3 4 1 1 2 3 4 5 2 2 2...
Page 20: ...C Output Cable AC uitgangskabel aansluiten Pod czanie przewodu wyj ciowego AC Conectando o cabo de sa da CA 4 3 1 2 M3 1 3 4 10 25mm L1 L2 L3 N PE L1 L2 L3 N PE L L1 1 2 mm L1 L1 L2 L3 N PE M5 1 2 2N...
Page 21: ...B 2 RS485 B 3 RS485 A 4 RS485 A 5 Meter 6 Meter DRED COM3 1 DRM1 5 2 DRM2 6 3 DRM3 7 4 DRM4 8 5 REFGen 6 Com DRM0 RS485 Meter DRED 2 2 3 4 1 5 6 7 3 M2 0 3 0 4N m 4 6 5mm 25mm 1 Warning Do not remove...
Page 22: ...8 REFGen 6 5mm 25mm 1 3 6 2 2 1 4 5 3 M3 0 6 0 8N m 4 3 2 1 RS485 RSD Installing Communication Module Communicatiemodule installeren Instalacja modu u komunikacyjnego Instalando o m dulo de comunica...
Page 23: ...issioning Inbedrijfstelling Uruchomienie Comissionamento Long press for 2s Short press 2 Wait for 20s the inverter will set the safety country automatically and go back to the standby interface 1 Sele...
Page 24: ...rGo 4 2 1 3 5 6 Bluetooth SOL BLE WiFi SOL WiFi WiFi initial password 12345678 Scan the QR Code on the equipment if you need to use GPRS are the last 8 digits of the inverter SN Initial password for B...
Page 25: ...wanie przez aplikacj Power Sight Monitoramento via App Power Sight 5 6 3 2 1 Please contact GE or the dealer to obtain the account and password Configure WiFi following the instructions For WiFi modul...
Page 26: ...25 For more detailed instructions scan the QR code below to see the user manual GEP 4 20kW Three Phase User Manual...
Page 27: ......
Page 28: ...registered trademark of General Electric Company and is used under license by GoodWe Technologies Co Ltd 2021 All Rights Reserved Local Contacts 340 00545 01 www gesolarinverter com sales gesolarinve...