background image

08

PT

Verificar Item

1

O inversor está bem instalado em um local limpo, com boa ventilação e facilidade de 

operação.

2

O cabo PE, o cabo de entrada CC, o cabo de saída CA e o cabo de comunicação 

estão conectados de maneira correta e segura.

3

As braçadeiras de cabos estão distribuídas de maneira correta e uniforme, e sem 

rebarbas.

4

As portas e os conectores não utilizados estão vedados.

5

A tensão e frequência no ponto de conexão cumprem os requisitos da rede elétrica.

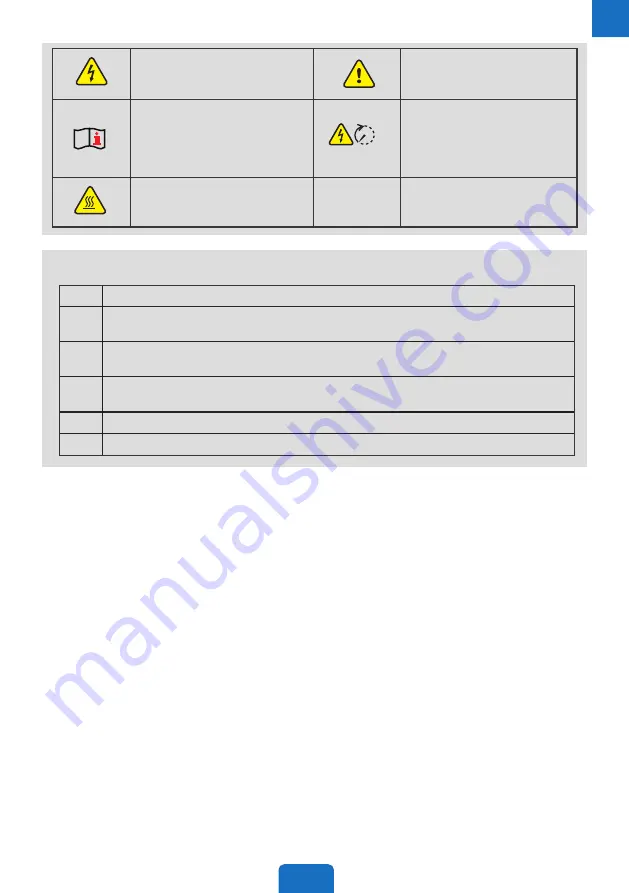
Verifique os itens antes de ligar a alimentação

Risco por alta tensão. Desligue 

o inversor antes de efetuar 

qualquer operação.

Existem potenciais riscos. 

Use o EPI adequado antes de 

efetuar qualquer operação.

Leia o guia na íntegra antes de 

efetuar qualquer operação.

Descarga com atraso. 

Aguarde até os componentes 

estarem totalmente 

descarregados após o 

desligamento.

Risco por alta temperatura. Não 

toque no equipamento para 

evitar ferimentos graves.

N/D

N/D

5min

Summary of Contents for GEP4.0-3-10

Page 1: ...www gesolarinverter com SOLAR INVERTER V1 1 GEP 4 20kW Three Phase Quick Installation Guide...

Page 2: ...ot follow the instructions For more warranty details please visit https www gesolarinverter com DC Side 1 Ensure the component frames and the bracket system are securely grounded 2 Connect the DC cabl...

Page 3: ...rts and terminals are sealed 5 The voltage and frequency at the connection point meet the on grid requirements Check Items Before Switching Power ON High voltage hazard Power off the inverter first be...

Page 4: ...paratuur of persoonlijk letsel als u de instructies niet opvolgt Meer informatie over de garantie vindt u op https www gesolarinverter com DC zijde 1 Zorg ervoor dat de frames van de onderdelen en het...

Page 5: ...het aansluitpunt voldoen aan de eisen van het elektriciteitsnet Controleer deze punten voordat u de stroom inschakelt Hoogspanningsgevaar Schakel de omvormer eerst uit voordat u werkzaamheden verricht...

Page 6: ...za uszkodzenia sprz tu lub obra enia cia a w przypadku nieprzestrzegania instrukcji Wi cej informacji na temat gwarancji mo na znale na stronie https www gesolarinverter com Po stronie DC 1 Upewni si...

Page 7: ...kcie pod czenia spe niaj wymagania sieci Kontrola element w przed w czeniem zasilania Ryzyko zwi zane z wysokim napi ciem Przed przyst pieniem do jakichkolwiek czynno ci najpierw wy czy zasilanie falo...

Page 8: ...caso as instru es n o sejam seguidas Para mais detalhes sobre a garantia visite https www gesolarinverter com Lado CC 1 Garanta que as estruturas dos componentes e o sistema de suporte estejam aterra...

Page 9: ...ilizados est o vedados 5 A tens o e frequ ncia no ponto de conex o cumprem os requisitos da rede el trica Verifique os itens antes de ligar a alimenta o Risco por alta tens o Desligue o inversor antes...

Page 10: ...12 Communication Port COM3 13 AC Output Terminal 14 Ventilation Valve 15 Fan 02 Product Introduction Het product Informacje og lne o produkcie Apresenta o do produto GEP12 3 10 GEP15 3 10 GEP20 3 10 G...

Page 11: ...na embalagem x 1 x 1 optional x 1 optional x 1 x 1 x 1 x 1 x 6 03 Inverter Installation Installatie van de omvormer Instalacja falownika Instala o do inversor N means the number of actual accessories...

Page 12: ...Requirements Benodigde ruimte Wymagania dotycz ce przestrzeni Requisitos de espa o 0 100 RH IP65 300mm 300mm 500mm 200mm 200mm Angle Requirements Benodigde hoek Wymagania dotycz ce k t w Requisitos d...

Page 13: ...12 Installing the Inverter Omvormer monteren Monta falownika Instala o do inversor Avoid the water pipes and cables buried in the wall when drilling holes 1...

Page 14: ...after connecting the DC input cable to the equipment Otherwise the DC input cable cannot be connected M5 1 2 2N m 8 9 7 04 Electrical Connection Elektrische aansluiting Po czenia elektryczne Conex o e...

Page 15: ...e przewodu DC ze skrzynk PV Conectando o cabo CC com caixa FV Notice The PV box is designed for GEP 15 3 10 and GEP20 3 10 in Australia only Install the cover of the PV box after connecting the DC inp...

Page 16: ...15 Click Click Staubli MC4 DC Connector Use a multimeter to measure the DC voltage and check the polarity of the connectors 1 2 3 4 2 3 4 1 4 5 6 2 1 1 2 2 2 2 2 2 7 1 1 2 2 1 1 1 2 2 1 1 2 2...

Page 17: ...16 5 6 2 1 1 2 2 2 2 2 2 7 1 1 2 2 2 Click Click 7 8mm 7 8mm 2 3 1 2 3 4 2 3 4 1 4 Use a multimeter to measure the DC voltage and check the polarity of the connectors...

Page 18: ...en zonder PV doos Pod czanie przewodu DC bez skrzynki PV Conectando o cabo CC sem caixa FV Click Click Click Devalan DC Connector Use a multimeter to measure the DC voltage and check the polarity of t...

Page 19: ...18 Click Click Staubli MC4 DC Connector Use a multimeter to measure the DC voltage and check the polarity of the connectors 7 8mm 7 8mm 1 2 3 4 1 1 2 3 4 1 1 2 3 4 5 2 2 2...

Page 20: ...C Output Cable AC uitgangskabel aansluiten Pod czanie przewodu wyj ciowego AC Conectando o cabo de sa da CA 4 3 1 2 M3 1 3 4 10 25mm L1 L2 L3 N PE L1 L2 L3 N PE L L1 1 2 mm L1 L1 L2 L3 N PE M5 1 2 2N...

Page 21: ...B 2 RS485 B 3 RS485 A 4 RS485 A 5 Meter 6 Meter DRED COM3 1 DRM1 5 2 DRM2 6 3 DRM3 7 4 DRM4 8 5 REFGen 6 Com DRM0 RS485 Meter DRED 2 2 3 4 1 5 6 7 3 M2 0 3 0 4N m 4 6 5mm 25mm 1 Warning Do not remove...

Page 22: ...8 REFGen 6 5mm 25mm 1 3 6 2 2 1 4 5 3 M3 0 6 0 8N m 4 3 2 1 RS485 RSD Installing Communication Module Communicatiemodule installeren Instalacja modu u komunikacyjnego Instalando o m dulo de comunica...

Page 23: ...issioning Inbedrijfstelling Uruchomienie Comissionamento Long press for 2s Short press 2 Wait for 20s the inverter will set the safety country automatically and go back to the standby interface 1 Sele...

Page 24: ...rGo 4 2 1 3 5 6 Bluetooth SOL BLE WiFi SOL WiFi WiFi initial password 12345678 Scan the QR Code on the equipment if you need to use GPRS are the last 8 digits of the inverter SN Initial password for B...

Page 25: ...wanie przez aplikacj Power Sight Monitoramento via App Power Sight 5 6 3 2 1 Please contact GE or the dealer to obtain the account and password Configure WiFi following the instructions For WiFi modul...

Page 26: ...25 For more detailed instructions scan the QR code below to see the user manual GEP 4 20kW Three Phase User Manual...

Page 27: ......

Page 28: ...registered trademark of General Electric Company and is used under license by GoodWe Technologies Co Ltd 2021 All Rights Reserved Local Contacts 340 00545 01 www gesolarinverter com sales gesolarinve...

Reviews: