background image

Summary of Contents for GFDN120ED0WW

Page 1: ...se conditions will obstruct dryer airflow and increase the risk of fire Do not install or store this appliance in any location where it could be exposed to water and or weather Save these instructions Installers Be sure to leave these instructions with the customer NOTE Installation and service of this dryer requires basic mechanical and electrical skills It is your responsibility to contact a qua...

Page 2: ...NSTRUCTIONS This dryer must be connected to a grounded metal perma nent wiring system or an equipment grounding conductor must be run with the circuit conductors and connected to the equipment grounding terminal on the appliance CONNECTING DRYER USING 4 WIRE CONNECTION MUST BE USED FOR MOBILE HOME INSTALLATION NOTE Since January 1 1996 the National Electric code requires that the new constructions...

Page 3: ...O NOT USE DUCT LONGER THAN SPECIFIED IN THE EX HAUST LENGTH TABLE Using exhaust longer than specified length will Increase the drying times and the energy cost Reduce the dryer life Accumulate lint creating a potential fire hazard The correct exhoust instollation is YOUR RESPONSIBILITY Problems due to incorrect installation are not covered by the warranty Remove and discard existing plastic or met...

Page 4: ...t creating a potential fire hazard Never install a screen in or over the exhaust duct This will cause lint to accumulate creating a potential fire hazard Do not assemble ductwork with any fasteners that extend into the duct These fasteners can accumulate lint creating a potential fire hazard Do not obstruct incoming or exhausted air Provide an access for inspection and cleaning of the exhaust syst...

Page 5: ...uct should not exceed 8 feet 2 4m Avoid resting the duct on sharp objects ELBOW REQUIRED BOWS _ REQUIRED EXCESSIVE I _ CRUSH I _ FLEXIBLE I I _ _ _EXHAUST I II M_ AGAINST I 51 LEVELING AND STABILIZING YOUR DRYER Stand the dryer upright near the final location and adjust the 4 leveling legs at the corners to ensure that the dryer is level from side to side and front to rear LEVEL LEVEL FRONT TO BAC...

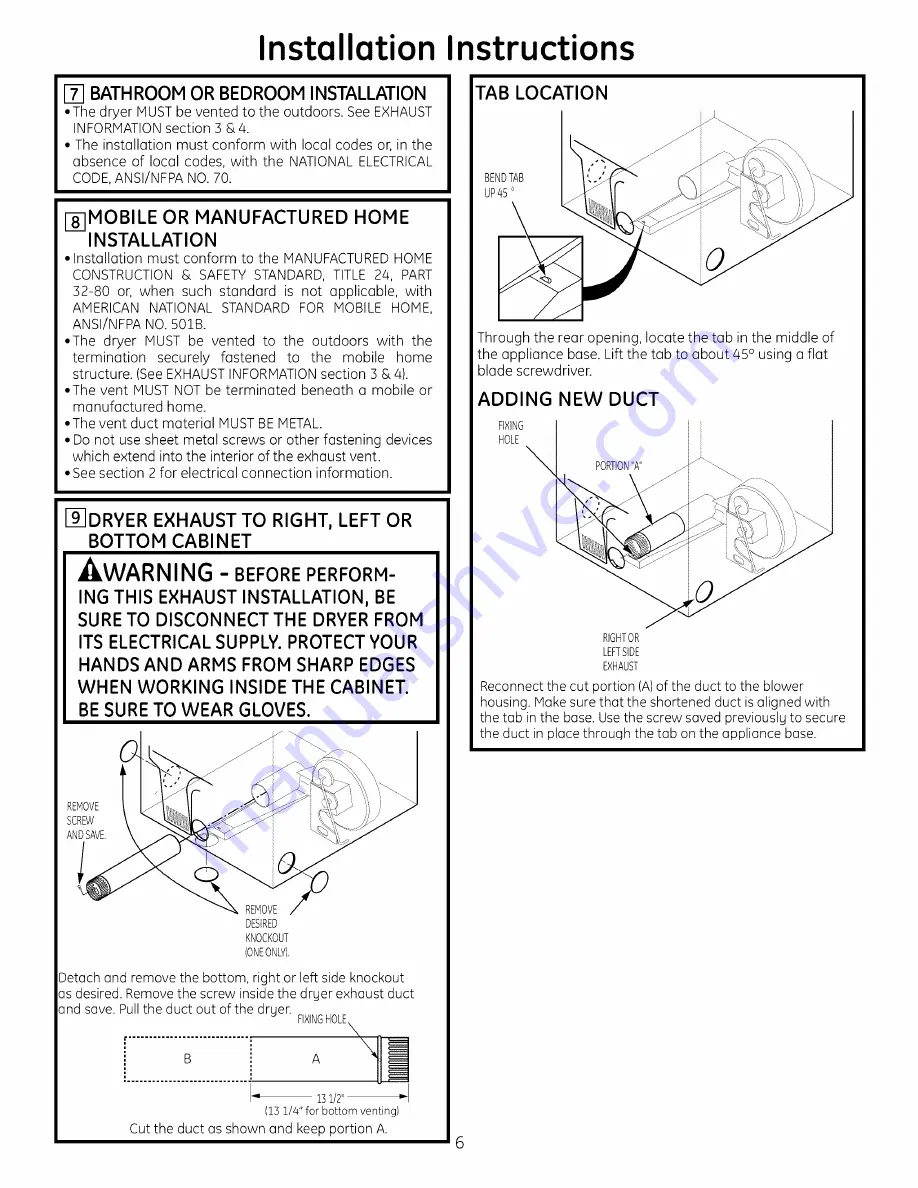
Page 6: ...vent See section 2 for electrical connection information 191DRYER EXHAUST TO RIGHT LEFT OR BOTTOM CABINET WARNING BEFORE PERFORM ING THIS EXHAUST INSTALLATION BE SURE TO DISCONNECT THE DRYER FROM ITS ELECTRICAL SUPPLY PROTECT YOUR HANDS AND ARMS FROM SHARP EDGES WHEN WORKING INSIDE THE CABINET BE SURE TO WEAR GLOVES REMOVE SCREW AN DSAVE REMOVE 0 DESIRED KNOCKOUT ONE ONLY Detach and remove the bot...

Page 7: ...UST THROUGH BOTTOM OF CABINET Insert the elbow through the reor opening ond connect it to the dryer internol duct Apply duct tope on the joint between the dryer internol duct ond elbow os shown on poge 6 J CAUTION Internal ductjoints must besecured with tape otherwise they may separate and causea safety hazard ADDING COVER PLATE TO REAR OF CABINET SIDES AND BOTTOM EXHAUST PLATE KIT WE1M454 Connect...

Page 8: ... la secadora e incrementan el riesgo de incendio No instale o almacene este aparato en un lugar donde se vea expuesto al agua y o alas inclemencias del tiempo Guarde estas instrucciones Instaladores AsegOrese de dejar estas instrucciones al consumidor NOTA La instalaci6n y reparaci6n de esta secadora requieren capaci dades mec6nicasy el_ctricas basicas Essu responsabilidad contactar a un instalado...

Page 9: ... con conexi6n a tierra o debe utilizarse un con ductor de conexi6n a tierra del equipamiento con los con ductores de circuito y conectarse a la terminal de conexi6n a tierra del aparato COMO CONECTAR LA SECADORA USAN DO UNA CONE I6N DE 4 CABLES DEBE UTILIZARSE EN INSTALACIONES DE CASAS M6VILES NOTA Desdeel I de enero de 1996 el C6digo El_ctrico Nacional exige que las nuevasconstrucciones utilicen ...

Page 10: ...UN CONDUCTO DE UNA LONGITUD MAYOR A LA ESPECIFICADA EN LA TABLA DE LONGITUD DE SALIDA AI utilizar una salida de mayor Iongitud a la especificada se Incrementar6n lostiempos de secadoy el costa de energ a Reducir6 la vida 0til de la secadora Acumular6 pelusa Io que podria generar un riesgo potencial de incendio La correcta instalaci6n de salida es SU RESPONSABILIDAD Los problemas generados por una ...

Page 11: ...riesgo potencial de incendio Nunca instale un filtro dentro o sobre el conducto de salida Esto provocar6 la acumulaci6n de pelusas Io que genera un riesgo potencial de incendio No arme la red de conductos con sujeciones que se extiendan dentro del conducto Estas sujeciones pueden acumular pelusa Io que genera un riesgo potencial de incendio No obstruya el aire que entra y sale Incluya un acceso pa...

Page 12: ... 2 4 m No coloque el conducto sobre objetos afilados coco NECESARIO CESAR__ DE SAUDA EXCESIVA I_a_ai_kllll_ NO APLASTE LA SAUDA FLEXIBLE CONTRA C6MO NIVELAR Y ESTABILIZAR SU SECADORA Coloque la secadora en posici6n vertical cerca de la ubicaci6n definitiva y ajuste las cuatro patas de nivelaci6n en los extremos para garantizar que la secadora se encuentre nivelada de lado a lado y del frente a la ...

Page 13: ...DA 0 PARTE INFE RIOR DEL GABINETE ZkADVERTENCIA ANTES DE EFEC TUAR ESTA INSTALACION DE SALIDA ASEGORESE DE DESCONECTAR LA SECA s DORA DEL SUMINISTRO ELECTRICO PROTEJA SUS MANOS Y BRAZOS DE LOS LADOS AFILADOS CUANDO TRABAJE s DENTRO DEL GABINETE ASEGURESE DE USAR GUANTES QUITE EL TORNILLO Y CONSERVEL _ QUITE EL RECORTE DESEADO SOLO UNO Despegue y quite el recorte inferior derecho o izquierdo seg0n ...

Page 14: ...A TRAVESDE LA PARTEINFERIORDELGABINETE Introduzca el coda a trav6s de la abertura trasera y con6ctelo al conducto interno de la secadora Aplique cinta aislante en lajunta entre el conducto interno de la secadora y el coda coma puede verse en la p6gina 6 Z_PRECAUCI6N Las juntas del conducto interno deben sujetarse con cinta caso contrario pueden separarse y provocar un riesgo de seguridad C6MOAGREG...

Reviews: