Top Trim Screws
2
STEP 2 REMOVE DOOR PANEL
• Open dishwasher door.
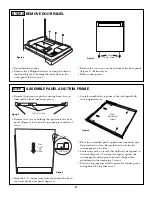
• Remove the 6 Phillips head screws along the sides of
the door (Figure 2) holding the inner door to the
outer panel. Retain screws.
• Remove the two screws on the bottom of the door panel
(Figure 3). Retain screws.
• Remove door panel.
STEP 3 ASSEMBLE PANEL AND TRIM FRAME
• Remove the protective plastic covering from the top,
sides and the front trim frame pieces.
• Remove the 3 screws holding the top trim to the steel
panel (Figure4). Set aside the top trim piece and the 3
screws.
• Loosely assemble the top trim to the steel panel with
the 3 original screws.
• Slide the 1/4" custom panel into the channel between
the trim and the steel panel (figure 5).
• Place the assembled panel, appearance side down on a
flat protected surface. Be careful not to scratch the
custom panel or the trim.
• Loosen one of the 4 screws that holds the steel panel to
the trim (Figure 6). Press the steel panel against the
custom panel and retighten the screw. Repeat this
adjustment to the remaining 3 screws.
• Press the top trim piece flush against the custom panel
and tighten all 3 top trim screws.
Figure 2
Figure 3
Bottom
Phillips Screws
Figure 4
Figure 5
Figure 6
Slide
Panel
Into
Frame
Top View
Custom Panel
Panel
Adjustment
Screws


