


49-3000255 Rev 1
13
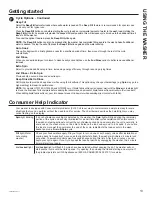
Cycle Options - Continued
Deep Fill
Select the
Deep Fill
feature for loads where extra water is needed.
The
Deep Fill
feature is recommended for special case
loads only, not for typical use.
Press the
Deep Fill
button once before starting the cycle to add an incremental amount of water to the wash load. Holding the
Deep Fill
button for 3 seconds will provide the deepest fill level possible; this will increase cycle time due to the additional time it
takes to fill the washer.
To cancel the option if desired, press the
Deep Fill
button again.
NOTE:
The
Deep Fill
button can also be pressed after the washer has completed filling and is in the wash phase if additional
water is desired. To stop the extra fill, press the
Deep Fill
button again and the water will stop.
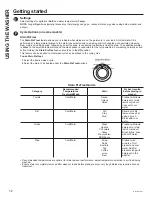
Auto Soak
This option begins with a brief agitation, soaks for a specified period of time, then moves through the rest of the cycle
automatically.
2nd Rinse
When you use extra detergent or bleach to clean heavily soiled clothes, use the
2nd Rinse
option to better remove additional
residues.
Extra Spin
Select to provide additional spin time, increasing energy efficiency through reducing drying times.
2nd Rinse + Extra Spin
Provides both a second rinse and an extra spin.
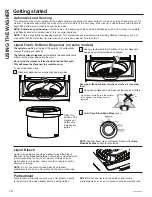
Deep Rinse/Extra Rinse
Set this option to provide a deep rinse
or when using fabric softener. This option may change other settings (e.g.
Spin
may go to a
higher setting) to maximize performance.
NOTE:
For models GTW340, GTW490 and GTW500 only. If liquid fabric softener is desired, wait until the
Rinse
cycle status light
is lit and the final rinse fill is complete before adding the recommended amount of liquid fabric softener directly to the rinse bath.
When adding liquid fabric softener, pour into deeper areas of rinse water while avoiding direct contact with fabric.
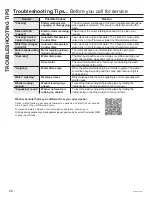
F
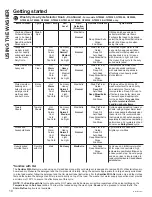
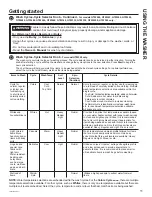
Consumer Help Indicator
Your washer is equipped with Consumer Help Indicator (CHI). CHI is our way to communicate a simple remedy for some
situations that you can perform without the need to call for service. The chart below describes the helpful lights you may
notice flashing on the display.
Spin
light blinking
If an out-of-balance condition is detected by the washer, the
Spin
light will blink during the remaining
portion of the cycle and will stay illuminated for a short time after cycle completion. When this occurs,
the washer is taking actions to correct the out-of-balance condition and complete the cycle normally. In
some cases, the washer may not be able to balance the load and spin up to full speed. If you notice
the load is more wet than normal at the end of the cycle, redistribute the load evenly in the wash
basket and run a
Drain & Spin
cycle.
Fill
light (Water
not entering
washer)
Check your house water supply. Did you forget to turn on one or both supply valves after installation or
coming back from vacation? As soon as the light starts to flash, the washer will initiate a 4 minute lock-
out period. The washer controls won’t respond/change during this time. After the 4 minutes, you can
begin your cycle again. If you try to bypass the lock-out period by unplugging the washer, the 4 minute
timer will start over again.
Lid Locked
light
Lid Locked
light will flash if 3 cycles have been started without opening the lid. The washer will not
start another cycle until the lid is opened. Try opening, then closing the lid and starting a new cycle. If
the problem persists, call GE Appliances at 800.GE.CARES (800.432.2737) for service.
USING THE W
A
SHER
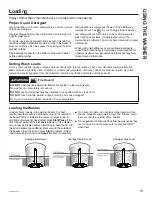
Getting started


