background image

20

49-3000255 Rev 1

Installation Instructions


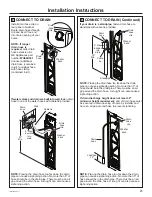
Connect drain hose to drain port on back of washer. Open 
clamp with pliers and slide onto hose end. Holding clamp 
open, push hose end onto drain port until fully seated. 
Release clamp between locating ribs on hose end. Outlet 
of hose end should be oriented vertically.

3


CONNECT DRAIN HOSE TO 

WASHER

5


CONNECT WATER HOSES TO 

OUTLET VALVES

Drain 

hose

Drain 

port

Drain 

end

Clamp

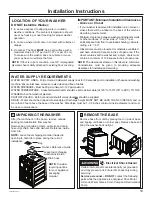
Determine which is HOT water line before attaching 
water hoses to faucets. Traditionally, HOT faucet is on 
left.
(If screen washers are not installed) With protruding 
part of screen toward you, install strainer screen/rubber 
washer into each of the free ends of two water hoses.
Connect hot water hose to hot water 
outlet valve of your home. Hand 
tighten and use pliers to tighten 
hoses between 1/4 and 1/2 turn 
beyond hand-tight. Open hot water 
valve.
Connect cold water hose to cold 
water outlet valve of your home. 
Hand tighten and use pliers to 
tighten hoses between 1/4 and 1/2 
turn beyond hand-tight. Open cold water valve.
Check for leaks and drips at the hose couplings. Tighten 
as necessary.

Unplug electrical cord before installing water hoses. If 
not installed, install rubber washer in one end of hot 
water hose. Thread hot water hose onto connection 
labeled 

H

 at top rear of washer. Hand tighten and use 

pliers to tighten hoses between 1/8 and 1/4 turn beyond 
hand-tight.
If not installed, install rubber washer in one end of cold 
water hose 

C

. Thread cold water hose onto connection 

labeled 

C

 at top rear of washer. Hand tighten and use 

pliers to tighten hoses between 1/8 and 1/4 turn beyond 
hand-tight.

0RYH ZDVKHU DV FORVH WR ¿QDO ORFDWLRQ DV SRVVLEOH

leaving room for you to make water, drain, and electrical 
connections to your home.

4


CONNECT WATER HOSES TO 

WASHER

Rubber 

washer

Rubber 

washer

Remove the cap from the drain port, if present, before 
installing the drain hose. It is normal for a small amount 
of residual water from the factory quality test process to 
drain out of the port when removing the cap.

Cap

Port

Washer Back

Summary of Contents for GTW480

Page 1: ...28 OWNER S MANUAL INSTALLATION INSTRUCTIONS Write the model and serial numbers here Model _________________ Serial _________________ You can find them under the lid of the washer ENGLISH ESPA OL GE i...

Page 2: ...s into every GE Appliances product and we think you will too Among other things registration of your appliance ensures that we can deliver important product information and warranty details when you n...

Page 3: ...en this appliance is used near children Before the washer is removed from service or discarded remove the door or lid Failure to follow these instructions may result in death or injury to persons DO N...

Page 4: ...tions for your appliance packaging material PARTS AND ACCESSORIES Order on line at GEApplianceparts com today 24 hours a day or by phone at 800 626 2002 during normal business hours In Canada visit yo...

Page 5: ...ual features and appearance may vary from your model Controls To reduce the risk of fire electric shock or injury to persons read the IMPORTANT SAFETY INFORMATION before operating this appliance WARNI...

Page 6: ...E F EXTRA RINSE Select when adding Fabric Softener Fill Soak Wash Rinse Spin START PAUSE Hold 3 Sec to Stop Water Level Temperature COLORS NORMAL LOW MED MAX AUTO HIGH WHITES DELICATES BULKY ITEMS SPE...

Page 7: ...ev 1 7 USING THE WASHER Getting started Medium Precise Fill D B A C E F Medium Large Precise Fill Small Super D B A C E F Medium Large Precise Fill Small Super D B A C E F Regular Large Small Precise...

Page 8: ...after load sensing and spin Pressing Pause will unlock the lid if locked at that time pause the cycle and the Pause indicator light will blink To continue the cycle press Start again If water remains...

Page 9: ...periods to provide optimal fabric care Casual clothes lightly soiled office wear Casuals Hot Warm Colors Cool Cold Tap Cold Ex Heavy Heavy Normal Medium Light Ex Light Max Extra Normal Stain PreTreat...

Page 10: ...appropriate for these items Only use this cycle for water resistant bedding or bulky items Towels Sheets Towels Sheets Hot Warm Colors Cool Cold Tap Cold Ex Heavy Heavy Normal Medium Light Ex Light Ma...

Page 11: ...Note that three soil levels are available Heavy Regular and Light Rinse is cold Light colored items More heavily soiled or items with body soils Casuals Warm Heavy Medium Light Normal Wash temperature...

Page 12: ...lts before placing in washer Tomato Cool Warm Sauce Catsup Salsa Pretreat with liquid detergent or stain remover product rinse with cool water Dirt Cool Warm Dirt Clay Mud Allow dirt to dry remove loo...

Page 13: ...nt of liquid fabric softener directly to the rinse bath When adding liquid fabric softener pour into deeper areas of rinse water while avoiding direct contact with fabric F Consumer Help Indicator You...

Page 14: ...these steps 1 Make sure dispenser is securely attached to agitator 2 Use only liquid diluted fabric softener Pour into dispenser using amount recommended on package Never pour fabric softener directly...

Page 15: ...urdy cottons easy care delicates and whether the fabric produces lint terry cloth chenille or collects lint velveteen corduroy Wash lint producers such as cotton towels and socks separate from lint co...

Page 16: ...ces ConnectPlus will allow your appliance to communicate with your smartphone for remote appliance monitoring control and notifications WiFi Connectivity For assistance with the appliance or the GE Ap...

Page 17: ...the Washer Immediately wipe off any spills with a damp cloth Interior of the Washer Leave the lid open after washing to allow moisture to evaporate If you want to clean the basket use a clean soft cl...

Page 18: ...tension For discharge heights from 60 96 NOTE We strongly recommend the use of new water supply hoses Hoses degrade over time and need to be replaced every 5 years to reduce the risk of hose failures...

Page 19: ...ng material carton from washer Remove bag containing clamp cable tie and drain hose clip drain hose and Owner s Reference Guide from tub NOTE Leave foam shipping material inside tub opening to hold tu...

Page 20: ...home Hand tighten and use pliers to tighten hoses between 1 4 and 1 2 turn beyond hand tight Open cold water valve Check for leaks and drips at the hose couplings Tighten as necessary Unplug electric...

Page 21: ...und the drain hose A snug fit can also cause a siphoning action NOTE Placing the drain hose too far down the drain pipe can cause a siphoning action No more than 5 of hose should be in the drain pipe...

Page 22: ...or washer Remove the cap from the drain port if present before installing the drain hose Run the washer through a complete cycle Check for water leaks and proper operation Place these instructions in...

Page 23: ...is correctly inserted in and secured to drain facility Household drain clogged Check household plumbing You may need to call a plumber Drain hose rubs on wall Make sure drain hose does not make contac...

Page 24: ...ckets not dissolving Laundry detergent packet placed in dispenser Laundry detergent packets should not be used in the dispensers They should only be added directly to the wash basket following the man...

Page 25: ...cle Out of balance condition has been detected Allow cycle to continue and finish If load is wet at the end of the cycle even out load and run a Drain Spin cycle Pilling Result of normal wear on poly...

Page 26: ...mming Water drain pump The drain pump will make a humming sound when pumping out water after agitation stops and continue until spin is complete Drive motor The drive motor will make a humming sound d...

Page 27: ...in Canada for home use within Canada If the product is located in an area where service by a GE Appliances Authorized Servicer is not available you may be responsible for a trip charge or you may be...

Page 28: ...that are available while your warranty is still in effect You can purchase it on line anytime GE Appliances Services will still be there after your warranty expires GEAppliances com extended warranty...

Reviews: