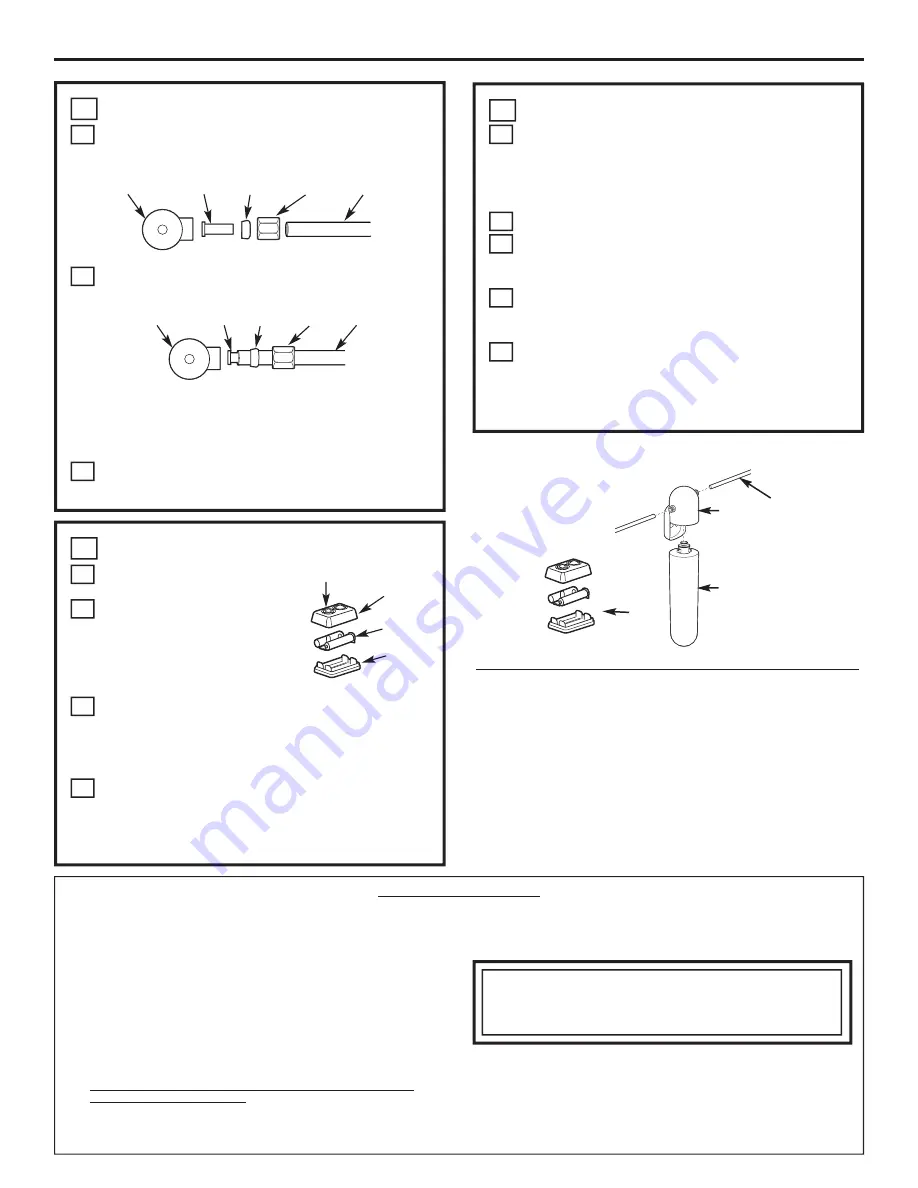
INSTALL COMPRESSION FITTINGS
Take the remaining section of tubing, slide the compression
hex nut and 3/8” ferrule (tapered end away from the
compression nut) onto the tubing, and put in the tube insert.
Fasten the assembly onto the cold water supply valve.
Do not overtighten.
NOTE:
Overtightening will cause the tubing to separate from
the fitting.
NOTE:
For shut-off valves with 1/2” or 7/16” compression
fittings, please use appropriate adapters provided in the kit.
Connect the other end to the inlet side as indicated
by the arrow on the filter head/bracket.
C
A
B
7
•
What does this warranty cover?
— Any defect in materials or workmanship in the manufactured product.
•
What does this warranty not cover?
— Filter cartridge and batteries after 30 days from date of purchase.
— Service trips to your home to teach you how to use the product.
— Improper installation, delivery or maintenance.
— Failure of the product if it is abused, misused, altered, used commercially or used
for other than the intended purpose.
— Use of this product where water is microbiologically unsafe or of unknown quality,
without adequate disinfection before or after the system. Systems certified for cyst
reduction may be used on disinfected water that may contain filterable cysts.
— Damage to the product caused by accident, fire, floods or acts of God.
—
Incidental or consequential damage caused by possible defects with this
appliance, its installation or repair.
•
For how long after the original purchase?
— One (1) year.
•
How do I make a warranty claim?
— Return to the retailer from which it was purchased, along with a copy of the “Proof
of Purchase.” A new or reconditioned unit will be provided. This warranty excludes
the cost of shipping the product to your home.
This warranty is extended to the original purchaser and any succeeding owner for
products purchased for home or office use within the USA. In Alaska, the warranty
excludes the cost of shipping or service to your home or office.
Some states do not allow the exclusion or limitation of incidental or consequential
damages. This warranty gives you specific legal rights, and you may also have other
rights, which vary from state to state. To know what your legal rights are, consult
your local or state consumer affairs office or your state’s Attorney General.
Contact us at ge.com, or call toll-free at 800.952.5039 in the U.S., or 866.777.7627 in Canada.
Installation Instructions
FINAL CHECK
Insert the filter into the filter head/bracket. Turn
the filter 1/4 turn to the right until it stops. The
top surface of the filter will become flush with
the bottom of the filter head/bracket when it is
fully installed.
Slowly turn on the water supply.
Check the entire system for leaks. If there are
leaks, refer back to the
Cut the Tubing
section
to reinsert the tubing.
If leaking from fittings, shut off water pressure
and tighten or reseal fittings. If leaking from the
filter, tighten the filter.
After installation, let water run for approximately
5 minutes to flush the filter and to remove air.
NOTE:
It is normal for there to be air in the
system causing bubbles in the water.
E
D
C
B
A
9
PARTS LIST
Ref. No. Part No.
Part Description
001
GXULQR
Replacement Filter Cartridge
1
002
WS19X10024
Filter Head/Bracket
1
003
GXULQ-KIT
Kit
1
004
GXULQ-TIMER
Timer and Batteries
1
To obtain replacement parts, call toll-free 800.626.2002 (U.S.),
800.663.6060 (Canada–English), 800.361.3869 (Canada–French).
GE Consumer & Industrial
Appliances
General Electric Company
Louisville, KY 40225
003
004
001
LIMITED ONE YEAR WARRANTY
EXCLUSION OF IMPLIED WARRANTIES—Your sole and exclusive remedy is
product exchange as provided in this Limited Warranty. Any implied warranties,
including the implied warranties of merchantability or fitness for a particular
purpose, are limited to one year or the shortest period allowed by law.
4
002
Shut-Off Valve Tubing Insert
Ferrule
Hex Nut
Tubing
Shut-Off Valve Tubing Insert Ferrule
Hex Nut
Tubing
INSTALL THE BATTERIES
Insert coin or screwdriver in the slot
between the timer cap and base.
Gently pry open and separate the
timer base from the cap. Install or
change 2 new AAA 1.5 volt batteries.
After having the batteries in place,
line up the base and cap and snap
them back together.
After new batteries are installed or
filter is changed, push and hold the timer blue reset button
for approximately 5 seconds. Release the reset button
after the light flashes 5 times. The light will flash again
in 180 days to remind you that it is time to change the filter.
Attach timer to remote location for easy viewing.
NOTE:
Do not mix old and new batteries. Do not mix alkaline,
standard (carbon-zinc) or rechargeable (ni-cad, ni-mh, etc.)
batteries.
D
C
B
A
8
Timer
Cap
Timer
Base
2 AAA
Batteries
Blue Reset Button
NOTE:
Timer
appearance may vary.
Summary of Contents for GXULQ
Page 5: ...5 Notes...
Page 11: ...Notes 11...


