background image

12

49-88065

%HVXUHWKHFRQWUROVDUHWXUQHGWR2))DQGWKHVXUIDFHXQLWVDUHFRROEHIRUHDWWHPSWLQJWRUHPRYHWKHP

CARE AND CLE

ANING:

 Cleaning the Range – Exterior

Cleaning the Range – Exterior (Cont.)

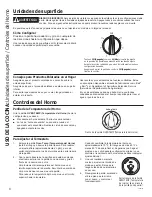
Surface Units

To clean the surface units, turn the control to the highest 
setting for a minute. The coils will burn off any soil.

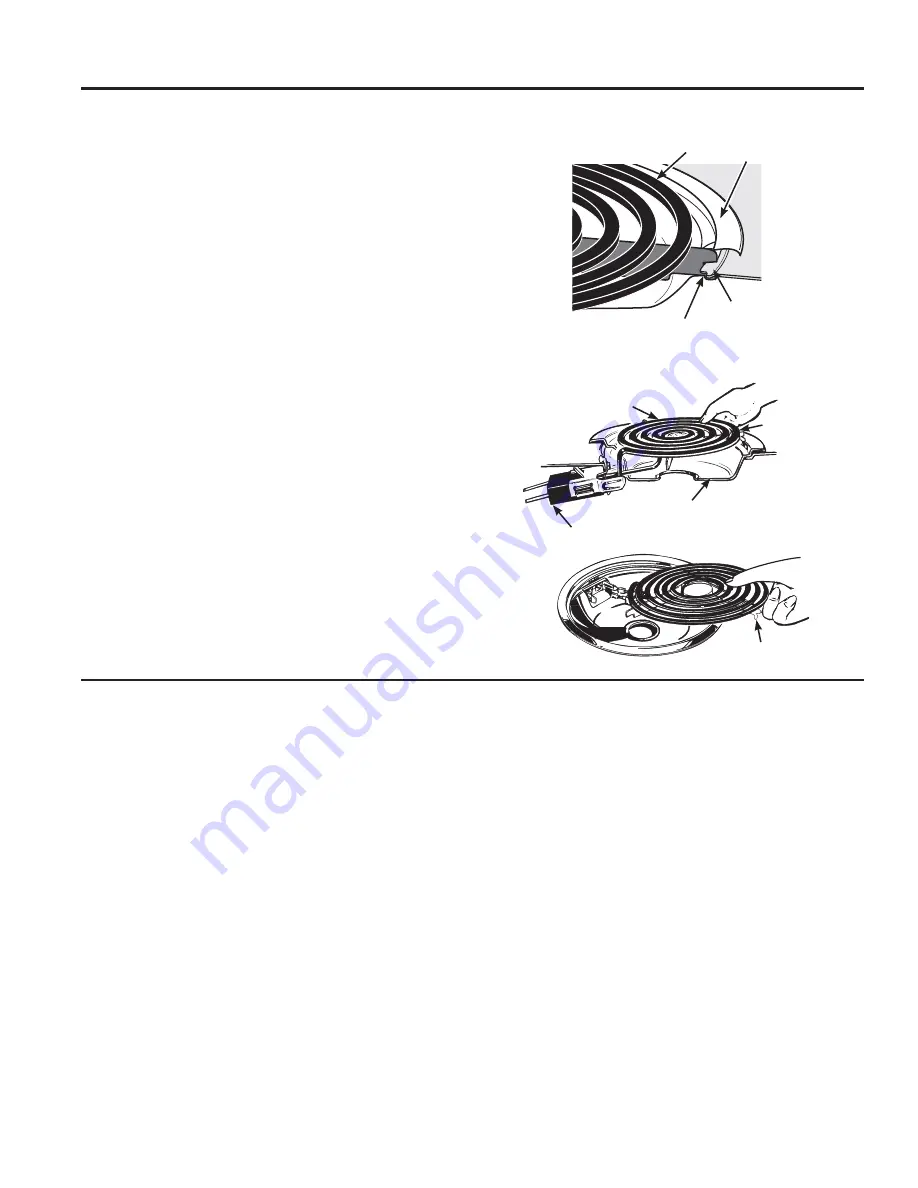
To remove a surface unit:

To remove the drip pans for cleaning, the surface units 
must be removed first.
1.  Push the surface unit back toward the receptacle to 

free the locking tab from the cooktop.

2.  Lift the surface unit about 1 inch above the drip pan 

and pull it out.

Do not lift the surface unit more than 1 inch. If you do, it 
may not lie flat on the drip pan when you plug it back in.

NOTE:

 Repeated lifting of the surface unit more than 1 

inch above the drip pan can permanently damage the 
receptacle.

To replace a surface unit:

1.  Replace the drip pan into the recess in the cooktop. 

Make sure the opening in the pan lines up with the 
receptacle.

2.  Insert the terminals of the surface unit through the 

opening in the drip pan and into the receptacle.

3.  Push the surface unit in and down to lock the tab in 

place so it rests evenly in the cooktop.

Do not immerse the surface units in liquids of any kind.

Do not clean the surface units in a dishwasher.

Do not bend the surface unit plug terminals.

Do not attempt to clean, adjust or in any way repair the 
plug-in receptacle.

Drip Pans

Remove the surface units. Then lift out the drip pans.

For best results, clean the drip pans by hand. Place 
them in a covered container (or a plastic bag) with 

1

»

4

 cup 

ammonia to loosen the soil. Rinse with clean water and 
polish with a clean soft cloth.

The drip pans may also be cleaned in a dishwasher.

&OHDQWKHDUHDXQGHUWKHGULSSDQVRIWHQ%XLOWXSVRLO

especially grease, may catch fire.

Do not cover the drip pans with foil. Using foil so close to 
the receptacle could cause shock, fire or damage to the 
range.

NOTE:

 If your cooktop is equipped with shiny, silver-

colored drip pans, do not clean them in the self-cleaning 
oven. Permanent damage to the finish can occur.

If your cooktop is equipped with black or gray porcelain-
coated drip pans, they can be cleaned in the oven during 

WKHVHOIFOHDQLQJF\FOH%HIRUH\RXEHJLQDVHOIFOHDQLQJ

cycle, remove any heavy soil from the drip pans and 
place them on the porcelain-coated oven racks. Do not 
place the drip pans directly on the oven bottom. After 
the self-cleaning cycle is completed and the drip pans 
are cool, wipe them with a damp cloth to remove any 
remaining ash or residue.

When properly seated, the locking tab 

should lock onto the cooktop rim through 

the notch in the drip pan.

Locking Tab

Cooktop Rim

Drip pan

Surface unit

Receptacle

Drip Pan

Locking 

Tab

Surface Unit

Locking Tab

Summary of Contents for Hotpoint RA724K5WH

Page 1: ... 13 Maintenance 14 Troubleshooting Tips 15 Ranges Compact Electric Coil Free Standing Write the model and serial numbers here Model __________________ Serial ___________________ You can find the rating label on the front behind the range drawer or under the cooktop for coil models For a Spanish version of this manual visit our website at GEAppliances com Para consultar una version en español de es...

Page 2: ...ket On some models the storage drawer or kick panel can be removed for easy inspection If visual inspection is not possible slide the range forward confirm the anti tip bracket is securely attached to the floor or wall and slide the range back so the rear leveling leg is under the anti tip bracket If the range is pulled from the wall for any reason always repeat this procedure to verify the range ...

Page 3: ... nearby the surface units or any interior area of the oven allow sufficient time for cooling first Other surfaces of the appliance may become hot enough to cause burns Potentially hot surfaces include the cooktop areas facing the cooktop oven vent opening surfaces near the opening and crevices around the oven door Ŷ R QRW KHDW XQRSHQHG IRRG FRQWDLQHUV 3UHVVXUH could build up and the container coul...

Page 4: ...ire that may spread to surrounding cabinets Use a deep fat thermometer whenever possible to monitor oil temperature Ŷ To avoid oil spillover and fire use a minimum amount of oil when shallow pan frying and avoid cooking frozen foods with excessive amounts of ice Ŷ 8VH SURSHU SDQ VL H VHOHFW FRRNZDUH KDYLQJ flat bottoms large enough to cover the surface heating element The use of undersized cookwar...

Page 5: ...ange when opening the oven door Hot air or steam which escapes can cause burns to hands face and or eyes Ŷ Do not use the oven if a heating element develops a glowing spot during use or shows other signs of damage A glowing spot indicates the heating element may fail and present a potential burn fire or shock hazard Turn the oven off immediately and have the heating element replaced by a qualified...

Page 6: ...ervice Ŷ Service to repair or replace light bulbs except for LED lamps EXCLUSION OF IMPLIED WARRANTIES Your sole and exclusive remedy is product repair as provided in this Limited Warranty Any implied warranties including the implied warranties of merchantability or fitness for a particular purpose are limited to one year or the shortest period allowed by law This warranty is extended to the origi...

Page 7: ...te with all the details including your phone number or write to General Manager Customer Relations GE Appliances Appliance Park Louisville KY 40225 Accessories Looking For Something More GE offers a variety of accessories to improve your cooking and maintenance experiences To place an order visit us online at www GEApplianceParts com U S or www GEAppliances ca Canada or call 800 626 2002 U S 800 6...

Page 8: ...letely remove the two screws on the back of the knob 2 With the back of the knob facing you hold the outer edge of the knob with one hand and turn the front of the knob with the other hand To increase the oven temperature move the top screw toward the right You ll hear a click for each notch you move the knob To decrease the oven temperature move the top screw toward the left Each click will chang...

Page 9: ...coated cookware check food earlier than minimum cook time If undesirable results are obtained with this type of cookware consider reducing RYHQ WHPSHUDWXUH E QH W WLPH Shiny pans can produce more evenly cooked baked goods such as cakes and cookies Glass and ceramic pans heat slowly but retain heat well These types of pans work well for dishes such as pies and custards Air insulated pans heat slowl...

Page 10: ...es angel food DNH Use shiny cookware Cookies biscuits scones on a Single Rack DNH Use shiny cookware Cookies biscuits scones on Multiple Racks DNH Ensure adequate airflow Beef Pork Hamburgers URLO Use a broil pan move food down for more doneness less searing Watch food closely when broiling For best performance center food below the broil heating element Steaks Chops URLO Use a broil pan move food...

Page 11: ...ted Surfaces Painted surfaces include the sides of the range and the door top of control panel and the drawer front Clean these with soap and water or a vinegar and water solution Do not use commercial oven cleaners cleaning powders steel wool or harsh abrasives on any painted surface Stainless Steel Surfaces on some models Do not use a steel wool pad it will scratch the surface To clean the stain...

Page 12: ...asher Do not bend the surface unit plug terminals Do not attempt to clean adjust or in any way repair the plug in receptacle Drip Pans Remove the surface units Then lift out the drip pans For best results clean the drip pans by hand Place them in a covered container or a plastic bag with 1 4 cup ammonia to loosen the soil Rinse with clean water and polish with a clean soft cloth The drip pans may ...

Page 13: ...ades fruit juices tomato sauces and basting liquids containing acids may cause discoloration and should be wiped up immediately Let hot surfaces cool then clean and rinse Manual Cleaning Do not use oven cleaners abrasive cleaners strong liquid cleansers steel wool scouring pads or cleaning powders on the interior of the oven Clean with a mild soap and water or vinegar and water solution Rinse with...

Page 14: ...Maintenance CARE AND CLEANING Maintenance Lift Off Oven Door 7KH GRRU LV YHU KHDY H FDUHIXO ZKHQ UHPRYLQJ DQG OLIWLQJ WKH GRRU R QRW OLIW GRRU E WKH KDQGOH WARNING If improperly removed oven door hinges may suddenly open and can cause personal injury to appendages near the hinge Follow instructions below to avoid a risk of injury when removing and re installing the oven door To remove the door 1 O...

Page 15: ... cookware to minimize cycling My new oven doesn t cook like my old one Is something wrong with the temperature settings Your new oven has a different cooking system from your old oven and therefore may cook differently than your old oven For the first few uses follow your recipe times and temperatures carefully If you still think your new oven is too hot or too cold you can adjust the temperature ...

Page 16: ...rner element Lower the rack position of the food My oven door glass appears to be tinted or have a rainbow color Is this defective No The inner oven glass is coated with a heat barrier to reflect the heat back into the oven to prevent heat loss and keep the outer door cool while baking This is normal Under certain light or angles you may see this tint or rainbow color Sometimes the oven takes long...

Page 17: ... Cuidado y Limpieza Limpieza de la Cocina Exterior 11 Limpieza de la Cocina Interior 13 Mantenimiento 14 Consejos para la Solución de Problemas 15 CocinasEléctricas Compactas con Bobinas y Modo de Pie Escriba los números de modelo y de serie aquí Nº de Modelo______________ Nº de Serie ________________ Encontrará la etiqueta de calificación en el frente detrás del cajón de la cocina o debajo de la ...

Page 18: ...alizar una inspección visual deslice la cocina hacia adelante confirme que el soporte anti volcaduras esté ajustado de forma segura al piso o la pared y deslice la cocina hacia atrás de modo que la pata niveladora trasera se encuentre debajo del soporte anti volcaduras Si la cocina es expulsada de la pared por alguna razón siempre repita este procedimiento a fin de verificar que esté asegurado de ...

Page 19: ... KRUQR GHMH SDVDU XQ WLHPSR SUXGHQFLDO para que se enfríen Otras superficies del aparato pueden calentarse lo suficiente como para provocar quemaduras Las superficies potencialmente calientes incluyen la estufa las áreas orientadas hacia la estufa la abertura de ventilación del horno las superficies cercanas a la abertura y las hendiduras ubicadas alrededor de la puerta del horno Ŷ 1R FDOLHQWH UHF...

Page 20: ...asa cuando sea posible para controlar la temperatura del aceite Ŷ 3DUD HYLWDU HO GHUUDPH GH DFHLWH XQ LQFHQGLR XWLOLFH una cantidad mínima de aceite cuando fría en sartenes poco profundas y evite la cocción de alimentos congelados con una cantidad excesiva de hielo Ŷ 8WLOLFH HO WDPDxR GH UHFLSLHQWH DGHFXDGR OLMD recipientes con bases planas lo suficientemente grandes para cubrir el elemento calent...

Page 21: ...RUQR DO DEULU OD SXHUWD GHO mismo El aire caliente o el vapor que sale puede FDXVDU TXHPDGXUDV HQ ODV PDQRV URVWUR X RMRV Ŷ 1R XVH HO KRUQR VL XQ HOHPHQWR GH FDOHQWDPLHQWR genera un punto brillante durante el uso o aparecen otros signos de daños Un punto brillante indica que el elemento para calentar puede fallar y generar una posible quemadura incendio o descarga eléctrica Apague el horno de inme...

Page 22: ...R FDXVDGR GHVSXpV GH OD HQWUHJD Ŷ 3URGXFWR QR DFFHVLEOH SDUD EULQGDU HO VHUYLFLR UHTXHULGR Ŷ 6ROLFLWH HO VHUYLFLR WpFQLFR SDUD UHSDUDU R UHHPSOD DU ODV lámparas excepto las lámparas LED EXCLUSIÓN DE GARANTÍAS IMPLÍCITAS 6X QLFD H FOXVLYD DOWHUQDWLYD HV OD UHSDUDFLyQ GHO SURGXFWR FRPR VH LQGLFD HQ OD DUDQWtD LPLWDGD DV JDUDQWtDV LPSOtFLWDV incluyendo garantías implícitas de comerciabilidad o conven...

Page 23: ...HU GtD GHO DxR 3DUD PD RU FRQYHQLHQFLD XQ VHUYLFLR PiV UiSLGR DKRUD SXHGH GHVFDUJDU HO 0DQXDO GHO 3URSLHWDULR RUGHQDU piezas o incluso programar el servicio técnico a través de Internet Desea realizar una consulta o necesita ayuda con su electrodoméstico Accesorios Busca Algo Más GE ofrece una variedad de accesorios para mejorar sus experiencias de cocción y mantenimiento Para realizar una orden v...

Page 24: ...án extender el tiempo requerido para traer el agua al punto de hervor Controles del Horno Para Ajustar el Termostato 1 Empuje la perilla Oven Temp Temperatura del Horno fuera del rango y observe la parte trasera Para realizar un ajuste afloje aproximadamente un giro pero sin quitar completamente los dos tornillos en la parte trasera de la perilla 2 Con la parte trasera de la perilla hacia usted so...

Page 25: ... más gruesa Si utiliza utensilios oscuros y revestidos controle la comida antes del tiempo mínimo de cocción Si se obtienen resultados no deseados con este tipo de utensilios considere la SRVLELOLGDG GH UHGXFLU OD WHPSHUDWXUD GHO KRUQR HQ OD próxima vez Las ollas brillantes pueden producir resultados de horneado más parejos en tortas y galletas Las ollas de vidrio y cerámica calientan con lentitud...

Page 26: ...hitos en un Solo Estante RUQHDU Use utensilios brillantes DOOHWDV JDOOHWLWDV EL FRFKLWRV HQ 0 OWLSOHV VWDQWHV RUQHDU VHJ UHVH GH TXH KD D XQ IOXMR GH DLUH DGHFXDGR Bife y Cerdo DPEXUJXHVDV Asar 8VH OD SDUWH SDUD DVDU PXHYD OD FRPLGD PiV DEDMR SDUD TXH quede más preparada y menos soasada Preste atención a la comida al asarla Para un mejor rendimiento centre la comida debajo del elemento calentador ...

Page 27: ...l panel de control y el frente del cajón Límpielas con jabón y agua o con una solución de agua y vinagre No utilice limpiadores de horno comerciales polvos limpiadores esponjillas de acero o abrasivos potentes sobre cualquier superficie pintada Estufa de esmalte de porcelana en algunos modelos El acabado de esmalte de porcelana es resistente pero puede romperse si se utiliza incorrectamente Este a...

Page 28: ...cial en terminales de enchufes No intente limpiar ajustar ni de ninguna forma reparar el receptáculo del enchufe Cubetas de Goteo Retire las unidades de la superficie Luego retire las cubetas de goteo Para obtener mejores resultados limpie las cubetas de goteo en forma manual Coloque las mismas en un envase cubierto o en una bolsa plástica con de taza de amoníaco para aflojar la suciedad Enjuague ...

Page 29: ... limpiadores de horno limpiadores abrasivos limpiadores líquidos fuertes estropajos de acero almohadillas para fregar ni polvos limpiadores en el interior del horno Limpie el mismo con agua y jabón o una solución de vinagre y agua Enjuague con agua limpia y seque con una tela seca O OLPSLDU VXSHILFLHV DVHJ UHVH GH TXH HVWpQ D WHPSHUDWXUD ambiente y fuera del contacto con la luz solar CUIDADO Y LIM...

Page 30: ... Horno Desmontable La puerta es muy pesada Tenga cuidado al retirar y levantar la puerta No levante la puerta usando la manija ADVERTENCIA Si se eliminan de forma inapropiada las bisagras de la puerta del horno se podrán abrir repentinamente y ocasionar lesiones personales sobre extremidades que estén cerca de la bisagra Siga las siguientes instrucciones a fin de evitar riesgos de lesión al retira...

Page 31: ...e que cocine de forma diferente En los primeros usos use los tiempos y temperaturas de VX UHFHWD FRQ FXLGDGR 6L D Q SLHQVD TXH VX KRUQR QXHYR cocina con demasiado calor o demasiado frío podrá ajustar el termostato usted mismo para aplicar su preferencia de cocción específica NOTA Este ajuste afecta las temperaturas de DNH RUQHDU RQYHFWLRQ DNH RUQHDU SRU RQYHFFLyQ no afectará las funciones Convecti...

Page 32: ...FLyQ GHO HVWDQWH FRQ FRPLGD La puerta de vidrio del horno parece estar teñida o tener un color arcoíris Es esto un defecto No El vidrio del horno interno está cubierto con una barrera de calor que refleja este último nuevamente hacia el horno a fin de evitar la pérdida de calor y de mantener fría la puerta externa mientras se hornea VWR HV QRUPDO DMR FLHUWDV OXFHV iQJXORV HV SRVLEOH TXH visualice ...

Reviews: