background image

Summary of Contents for IAV53E

Page 1: ...2 The internal connections are shown in Figure 1 BURDEN VOLTS AMPERES WATTS 115 0 144 4 5 J OPERATING COIL 1 ø O Figure 1 K 6400143 21 Internal Connection Diagram These instructions do not purport to cover all details or variations in equipment nor to provide for every possihie contingency to be met in connection with installation operation or maintenance Should further information he desired or s...

Page 2: ... 28824 I l 1 L I i T it 1 4 1O O _ it I Wfl QO TACZ2 i Figure 2 K 6315689 Typical Time Voltage Curves for Type IAV53L Relays 10 10 90 200 GENERAL ELECTRIC METER AND CONTROL BUSINESS DEPT MALVERN PA 19355 2 ...

Page 3: ...GEH 1814J IAV51A IAV52A IAV53A I AV 53 B IAV53C 1AV530 IAV53K IAV53L IAV53M IAV53N JNSTR ICTIONS VOLTAGE RELAYS TYPES GENERAL ELECTRIC ...

Page 4: ...AL TESTS 9 Drawout Relays General 9 PowerRequirements General 10 Pickup VoltageTest 10 Time Voltage Test 10 INSTALLATION 11 INSPECTION 11 LOCATION 11 MOUNTING 11 CONNECTIONS 11 GROUND CONNECTIONS 11 FIELD INSTALLATION TESTS 11 PERIODIC CHECKS AND ROUTINE MAINTENANCE 11 DISKANDBEARINGS 11 CONTACTCLEANING 12 SERVICINGANDADJUSTMENTS 12 TARGETANDSEAL lN UNIT 12 VOLTAGE SETTING 12 TIME SETTING 13 BEARI...

Page 5: ...ontact to enable the machine breaker closing circuit when normal machine voltage is present and the normally closed contact to operate the machine breaker trip circuit for undervoltage conditions The operating time characteristic for the IAV53A IAV53B IAVS3K and IAVS3L relays are shown in Figure 13 The IAV53D and IAV53N time characteristics are shown in Figure 14 The IAV53C is designed for ground ...

Page 6: ...230 230 460 IAVS3C 115 115 IAVS3M 199 199 IAV53D 115 IAV53N 240 The current closing rating of the contacts is 30 amperes for voltages not exceeding 250 volts The current carrying ratings of all but the IAV53C and IAV53M are affected by the selection of the tap on the seal in coil as indicated in Table II TABLE II TAP FUNCTION 02 2 0 0 6 2 0 DC Resistance 10 8 3 0 24 0 78 0 18 Minimum Operating I 0...

Page 7: ...ts of the target seal in coil of the protective relay The above data in regard to contact rating apply to all relays covered by these instructions except the Types IAV53B and IAV53D which do not have seal in units In these cases the contact ratings are limited in their current carrying capacity by the interrupting ratings as shown below FUNCTION VOLTS AMPERES AC DC Makeand 125 1 5 0 3t interrupt 2...

Page 8: ...in Figure 12 The IAV53A relay is an under and overvoltage relay with double throw contacts The left hand contacts close as the voltage increases to some predetermined value The right hand contacts close when the voltage decreases to some lower value Between these two voltage values both contacts are open Time voltage characteristics are shown in Figure 13 The Type IAV53B relay differs from the Typ...

Page 9: ...ontacts such that when the main contacts close the seal in unit picks up and seals in When the seal in unit picks up it raises a target into view which latches up and remains exposed until released by pressing a button beneath the lower left corner of the cover The case is suitable for either surface or semi flush panel mounting and an assortment of hardware is provided for either mounting The cov...

Page 10: ...al cartons in a place that is free from moisture dust and metallic chips ACCEPTANCE TESTS Immediately upon receipt of the relay an INSPECTION and ACCEPTANCE TEST should be made to make sure that no damage has been sustained in shipment and that the relay calibrations have not been disturbed If no pickup value for the left contact is specified on the requisition for the relays with tap blocks the r...

Page 11: ...and bottom pivot and bearing screws are tight 7 There should be no noticeable friction in the rotating structure 8 Rotate the time dial to the zero position 0 Check by means of a neon lamp that the contacts just close There should be approximately 1 32 inch wipe on the stationary contact If the contact does not close adjust the disk position by backing off the two clamping screws on the stop arm a...

Page 12: ...voltage should be checked on one or more taps on relays that close contacts on increasing voltage The pickup voltage should be tap value 5 The drop out voltage should be checked on one or more taps on relays that close contacts on decreasing voltage The dropout voltage is a variable depending upon user requirements Refer to the VOLTAGE SETTING section under SERVICING AND ADJUSTMENTS See relay name...

Page 13: ... the pickup voltage and time voltage tests described in ACCEPTANCE TESTS ELECTRICAL TESTS should be made to determine that the adjustments have not been disturbed The relay may be tested while mounted on the panel either from its own or another source of power by inserting a separate testing plug in place of the connecting plug Or the cradle can be drawn out and replaced by another that has been l...

Page 14: ...stationary contact and place it in the desired tap Next remove the screw from the other undesired tap and place it in the left hand contact This procedure is necessary to prevent the right hand stationary contact from getting out of adjustment Screws should not be in both taps at the same time as pickup for direct current DC will be the higher tap value and AC pickup will be increased VOLTAGE SETT...

Page 15: ... obtaining each characteristic To make time settings set the time dial to the number required to give the desired characteristic by turning it until the number lines up with the notch in the adjacent frame The time indicated by the curves is the time required to close the relay contacts when the voltage is suddenly increased from a value below pickup to the value on the curve Figure 13 shows the c...

Page 16: ...Protection 22 11 Connection Diagram for the Type IAVS3 Relay 23 12 Time Voltage Curves for Type IAVS1 A and IAV52A Relays 15 Tolerance 24 1 3 Time Voltage Curves for Type IAV53A 1AV538 IAVS3K and IAVS3L Relays 15 Tolerance 25 14 Time Voltage Curves for Type IAVS3D and IAV53N Relays 15 Tolerance 26 15 Front View of Type IAV51A Relay Withdrawn From Case 27 16 Back View of Type IAVS1A Relay Withdrawn...

Page 17: ...GEH 1814 SEAL IN OPERATI NC COIL RESISTOR WHEN USED SHORT FINGER Figure 1 K 6209664 71 Internal Connections of the Type IAVS1 A Relay Front View 1 2 6 15 ...

Page 18: ...GEH 1814 SEAL I 1 UN I T OPERATING Co t L Figure 2 K 6209665 3 Internal Connections of the Type IAVS2A Relay Front View I TT 6 16 ...

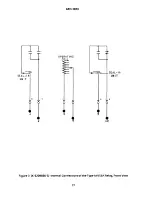
Page 19: ...GEH 1814 1 1 OPERATING SEANJ 1 SEALIN Figure 3 K 6209666 3 Internal Connections of the Type IAVS3A Relay Front View 17 ...

Page 20: ...GEH 1814 Figure 4 K 6400143 2 Internal Connections of the Type IAV53B and IAV53D Relays Front View I OPERATING COIL SHORT FINGER 6 18 ...

Page 21: ...GEH 1814 SEAt I N UN T VOLTAGE Figure 5 K 6400385 2 Internal Connections of the Type IAV53C Relay Front View 2 19 ...

Page 22: ...V53M Relay Figure 7 K 6556475 1 Internal Connection Diagram for Type IAV53K Relay Figure 8 K 6556476 Internal Connection Diagram for Type IAV53L and IAV53N Relays If SHORT FINGER 2 L i 1S SEAL IN ELEMENT lID 1 N 15 l ri I 4 N C 4 L 1 1 10 SHDPT F NEP 10 SHORT FINGER 20 ...

Page 23: ...BRUSH CONNECTING PLUG TRAVELS 1 4 INCH BEFORE ENGAGING THE MAIN BRUSH ON THE TERMINAL BLOCK Figure 9 8025039 Cross Section of Drawout Case Showing Position of Auxiliary Brush CONNECTING PLUG CONNECTING BLOCK AUXILIARY BRUSH TERMINAL BLOCK SHORTING BAR 21 ...

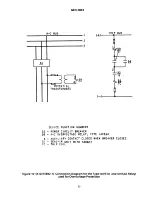
Page 24: ...UIT BREAKER 59 A C OVERVOLTAGE RELAY TYPE IAV51A a AUXILIARY CONTACT CLOSED WHEN BREAKER CLOSES SI SEAL IN UNIT WITH TARGET TC TRIP COIL Figure 10 K 6375692 1 Connection Diagram fortheType IAV51A and IAV52A Relays used for Overvoltage Protection A C BUS TI I P C 1 2 3 C 22 ...

Page 25: ...SES ON OVERVOLTAGE TO AUXILIARY RELAYS OR INDICATING DEVICES 27 59 UNDER AND OVERVOLTAGE RELAY TYPE IAV53K Figure 11 0275A4305 1 Connection Diagram forthe Type 1AV53 Relay 3 POTENTIAL TRANS 6 10 CLOSES ON 27 50 UNDERVOLTAGE 20 23 ...

Page 26: ...to C D 0 U 0 0 C C 1 3 P U m I SGNODS N 3W11 Ui 0 I 6 0 Ui 0 0 0 0 0 0 0 m z 00 ...

Page 27: ...Co 1 0 I w U w U 4 C 1 10 7 0 c U 1 F 7 TIME TO CLOSE LEFT CONTACTS AHEN VOLTAGE IS 4 JI41 SUDDENLY INCREASED FROM ZERO TO THE I I I I CATED OCKUP ULTPLE r_IJ_LL LZ I Z I I TIME VOLTAGE CURVES FOR 121AV53A VOLTAGE RELAY EE zLJ t 6 4 j I m V 7_ _ I P LE 0 S ______s____ LEFT CONTACTS CLOSED 40 PER ThT CUTACI CLCUPF Cc Ej C T4 T P CUP CEN 60 1UU 1Q 140 160 180 T OF VOLTAGE REOUIRED TO CLOSE LEFT CONT...

Page 28: ... S_ ir ld 1DV1NC N S L 1 1 id I 11flr d UId c jV 1QNI iLL i Od OSVDNI A1NC GPS I OVf1Of N3HM1D1NO Ld313SOiDQ1LL 7 EEEZEEEEEZ 1d3 NOd_fl1V O1VDICNL3H1 Oi G3DflcE I1 Si 3Vfl0A N3HM SIDVINOD 1Hi 3501D 01 3YLL I a J 1 0 a z m C O I a OC Co Wa 3I I a 0 0 a E I m 0 0 a r V dfl 4DId IDYINO 1d31 dO O kNI dflSO1D 1DiNOD iHOW ...

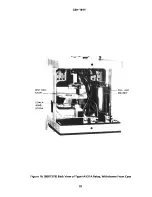
Page 29: ... MOVNC CONTACT A EMS a I NIR I LLF IRI VOlTAGE RELAY I 17____________ in 7r1 Wv 4 p I TIME 3IAL MAIN STATIONARY BRUS i AND COP TACT ASSEMBLY MAIN MOVING CONTACT AND CARRIER 3PRING ADJUSTING RING DRAG MAGNET Figure 15 8007378 Front View of Type IAVS1A Relay Withdrawn From Case I TAP BLOCK çi TAPPLUG tii Qt1 ç 27 ...

Page 30: ...DISK AND SHiFT LOWER iEWE SCREw GEH 181 4 I Figure 16 8007379 Back View of Type IAV51A Relay Withdrawn From Case AND MA NET I 28 ...

Page 31: ...XFL TOR Ut QN L jOt4 C DEVICE FUNCTION NUMBERS 59 OVERVOLTAGE RELAY TYPE IAV SI SEAL IN UNIT WITH TARGET Figure 17 K 6154391 3 Test Connections for Overvoltage Relays A C SUPPLY OF CORRECT FREQUENCY MF 2 TIMER 29 ...

Page 32: ...POTENT I OMETER I S 2 __ T 1 T l MF 2 TIMER 5V6 DEVICE FUNCT O N NUMBERS 58 UNDER AND OVERVOLTAGE RELAY TYPE 14V53 SI SEAL IN UNIT WITH TARGET Figure 18 K 6375693 1 Test Connections for Undervoltage Contacts of Over and Undervoltage Relays 30 ...

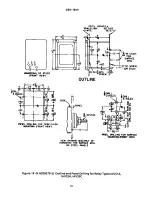
Page 33: ... M T6 SCREW iOR STUD OUTLINE PAtL DRLLI 4G FOP SU4I FLUSH hXJNTEIG FRONT V W ST 1 10 VIEW SH Y 14G ASSEM9 Y OF HARDWA FOR SURFACE MTG ON STEEL PANELS L DRILLWG FOR SURF4C dOtJmNGFNONT VIEW Figure 19 K 6209270 2 Outline and Panel Drilling for Relay Types IAV51A IAV52A IAV53C pfr_PANEL U 31 ...

Page 34: ...D NUMBERING 97531 00000 00000 10 8 6 r 2 BACK VIE1 5 8 DRILL 2 HOLES IL 1 111MM 1_ CU11IUT CUTOUT MAY REPLACE DRILLED HOLES 8 812 223MM 1 156 29MM 3 7GMM 3 906 99MM yL1 5MM 1 72MM 5 687 1 44MM PANEL DRILLING FOR SEMI FLUSH MOUNTING FRONT VIEW 500 12MM TYPrCAL 3 4 DR LL 1 0 HOLtS 1 9MM TYPICAL DIM INCHES MM PANEL W ILLNG FOR UFACE OUN1ING FRONT VIEW 3 0 76M1 i 5 16 18 STUD 1 VIEW SHOWiNG ASSEM L T ...

Page 35: ...G ASSEMBLY OF HARDWARE FOR SURFACE MTG ON STEEL PANELS Figure 21 K 6209272 7 Outline and Panel Drilling Dimensions for Relay Types IAV53K IAV53L IAV53M and IAV53N Relays 10 32 2 5 16 18 STUDS FOR SURFACE MTG 10 312 261MM PANEL LOCATION SEMI FLUSH SURFACE MTG MTG GLASS 19 17 15 13 11 00000 00000 2018 16 14 12 STUD NUMBERING 97531 00000 00000 10 9 6 4 2 1 125 29MM I 218 5MM 3 4 DRILL 20 HOLES 1 9MM ...

Page 36: ...GE Power Management 215 Anderson Avenue Markham Ontario Canada L6E 1B3 Tel 905 294 6222 Fax 905 201 2098 www ge comlindsyslpm ...

Reviews: