background image

Operating Instructions

Safety Instructions

Installation Instructions

Tr

oubleshooting T

ips

Consumer Support

20

Using the convection oven.

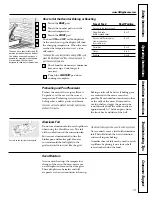
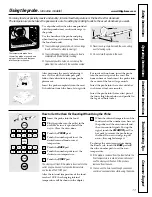
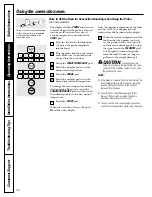
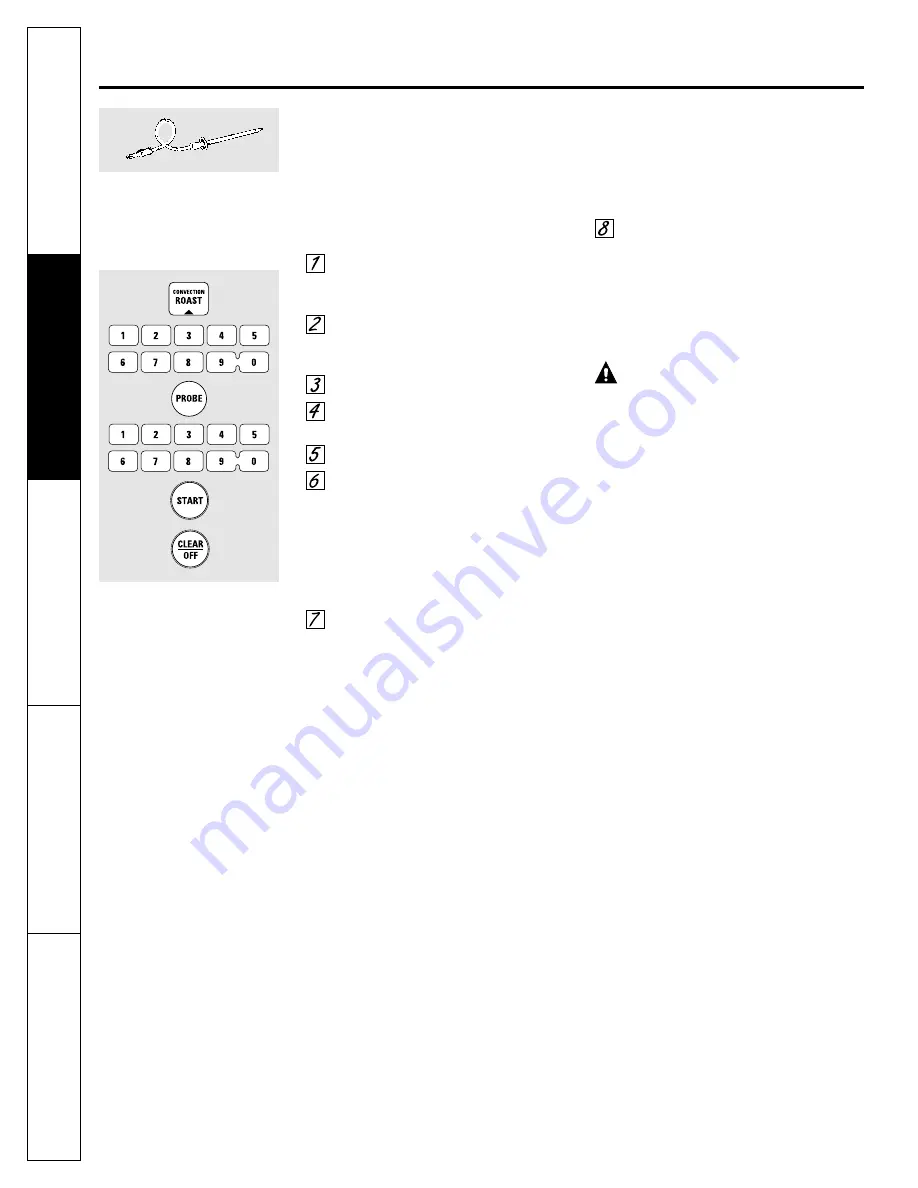
How to Set the Oven for Convection Roasting when Using the Probe

(on some models)

The display will flash 

PROBE

and the oven

control will signal if the probe is inserted
into the outlet, and you have not set 
a probe temperature and touched the 

START

pad.

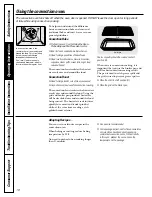
Place the shelf in the shelf position
(A). Insert the probe completely 
into the food.

Plug the probe into the outlet in the
oven. Make sure it is pushed all the
way in. Close the oven door.

Touch the 

CONVECTION ROAST

pad.

Touch the number pads to set the
desired oven temperature.

Touch the 

PROBE

pad.

Touch the number pads to set the
desired internal food temperature.

To change the oven temperature during
the Convection Roast cycle, touch the

CONVECTION ROAST

pad and then touch

the number pads to set the new desired
temperature.

Touch the 

START

pad.

When the oven starts to heat, the word 

LO

will be in the display.

After the internal temperature of the food
reaches 100°F, the changing internal
temperature will be shown in the display.

When the internal temperature of the
food reaches the number you have
set, the probe and the oven turn off
and the oven control signals. To stop
the signal, touch the 

CLEAR/OFF

pad.

Use hot pads to remove the probe
from the food. Do not use tongs to
pull on it—they might damage it.

CAUTION:

To prevent possible

burns, do not unplug the probe from the oven
outlet until the oven has cooled. Do not store
the probe in the oven.

NOTE:

If the probe is removed from the food before the
final temperature is reached, a tone will sound
and the display will flash until the probe is
removed from the oven.

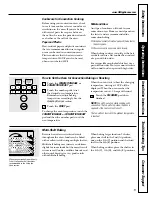
You will hear a fan while cooking with this
feature. The fan will stop when the door is
opened but the heat will not turn off.

You can use the timer even though you cannot
use timed oven operations while using the probe.

For best results when roasting large
turkeys and roasts, we recommend
using the probe included in the
convection oven. 

Summary of Contents for J2B915

Page 1: ...eplacement 37 Oven Shelves 37 Stainless Steel Surfaces 33 Self Cleaning 29 30 Warming Drawer 35 Installation Instructions 38 51 Anti Tip Device 51 Check Ignition of Surface Burners 49 50 Connect Range to Electric 43 45 Connect Range to Gas 42 44 Dimensions and Clearances 40 Electrical Connections 46 48 Level the Range 50 Location Guidelines 41 LP 51 Safety Instructions 38 39 Accessories 56 Trouble...

Page 2: ...ot use any phone in your building Immediately call your gas supplier from a neighbor s phone Follow the gas supplier s instructions If you cannot reach your gas supplier call the fire department Installation and service must be performed by a qualified installer service agency or the gas supplier WARNING If the information in this manual is not followed exactly a fire or explosion may result causi...

Page 3: ...nge does not fit this application use the universal Anti Tip device WB2X7909 To check if the device is installed and engaged properly carefully tip the range forward The Anti Tip device should engage and prevent the range from tipping over If you pull the range out from the wall for any reason make sure the device is properly engaged when you push the range back against the wall If it is not there...

Page 4: ... rather than a yellow flame will minimize incomplete combustion Exposure to these substances can be minimized by venting with an open window or using a ventilation fan or hood When using electrical appliances basic safety precautions should be followed including the following Use this appliance only for its intended purpose as described in this Owner s Manual Be sure your appliance is properly ins...

Page 5: ...never use your appliance for warming or heating the room Large scratches or impacts to glass doors can lead to broken or shattered glass Never wear loose fitting or hanging garments while using the appliance Be careful when reaching for items stored in cabinets over the range Flammable material could be ignited if brought in contact with flame or hot oven surfaces and may cause severe burns Do not...

Page 6: ... from the vent may ignite flammable items and will increase pressure in closed containers which may cause them to burst If a combination of oils or fats will be used in frying stir together before heating or as fats melt slowly Use a deep fat thermometer whenever possible to prevent overheating fat beyond the smoking point Use the least possible amount of fat for effective shallow or deep fat fryi...

Page 7: ...re than two hours Do not touch the heating element or the interior surface of the warming drawer These surfaces may be hot enough to burn REMEMBER The inside surface of the warming drawer may be hot when the drawer is opened Use care when opening the drawer Open the drawer a crack and let hot air or steam escape before removing or replacing food Hot air or steam which escapes can cause burns to ha...

Page 8: ... the oven is cool If shelves must be handled when hot do not let pot holder contact the heating elements Pulling out the shelf to the stop lock is a convenience in lifting heavy foods It is also a precaution against burns from touching hot surfaces of the door or oven walls The lowest position R is not designed to slide Do not heat unopened food containers Pressure could build up and the container...

Page 9: ...rates on the range are properly placed before using any burner After Lighting a Gas Burner Do not operate the burner for an extended period of time without cookware on the grate The finish on the grate may chip without cookware to absorb the heat Be sure the burners and grates are cool before you place your hand a pot holder cleaning cloths or other materials on them Sealed Gas Burners Your gas ra...

Page 10: ... on the sealed gas burner it will cause incomplete combustion and can result in exposure to carbon monoxide levels above allowable current standards This can be hazardous to your health Top of Range Cookware Aluminum Medium weight cookware is recommended because it heats quickly and evenly Most foods brown evenly in an aluminum skillet Use saucepans with tight fitting lids when cooking with minimu...

Page 11: ...ur oven was set for a timed oven operation and a power outage occurred the clock and all programmed functions must be reset The time of day will flash in the display when there has been a power outage If Err appears in the display you have tried to set a time or temperature outside of the control s limits Press CLEAR OFF and enter a new setting CLOCK Pad Touch this pad before setting the clock COO...

Page 12: ...ucts when cooking in the oven it is important that the flow of hot air from the oven and fresh air to the oven burner be uninterrupted Avoid touching the vent openings or nearby surfaces during oven or broiler operation they may become hot Handles of pots and pans on the cooktop may become hot if left too close to the vent Do not leave plastic items on the cooktop they may melt if left too close t...

Page 13: ...nd Pan Placement Preheat the oven if the recipe calls for it To preheat set the oven at the correct temperature Preheating is necessary when baking cakes cookies pastry and breads For ovens without a preheat indicator light or tone preheat 10 minutes Baking results will be better if baking pans are centered in the oven as much as possible Pans should not touch each other or the walls of the oven I...

Page 14: ... Food Book Your Kitchen Guide USDA Rev June 1985 Quantity and Shelf First Side Second Side Food or Thickness Position Time min Time min Comments Ground Beef 1 lb 4 patties C 13 8 Space evenly 1 2 to 3 4 thick 4 lbs 12 patties C 15 11 Beef Steaks Rare 3 4 to 1 thick E 6 4 Steaks less than 3 4 thick Medium 1 to 11 2 lbs D 8 6 are difficult to cook rare Well Done D 10 8 Slash fat Rare 11 2 thick C 10...

Page 15: ...et the Timer The timer does not control oven operations The maximum setting on the timer is 9 hours and 59 minutes Touch the KITCHEN TIMER ON OFF pad Touch the number pads until the amount of time you want shows in the display The maximum number of minutes that can be entered is 60 To set additional time you will need to set it by hours and minutes For example to enter 1 hour and 30 minutes touch ...

Page 16: ...cycle tone will sound Touch the CLEAR OFF pad to clear the display How to Set a Delayed Start and Automatic Stop You can set the oven control to delay start the oven cook for a specific length of time and then turn off automatically Make sure the clock shows the correct time of day Touch the BAKE pad Using the number pads enter the desired temperature Touch the COOKING TIME pad NOTE If your recipe...

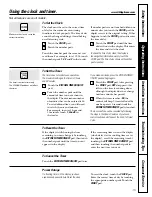
Page 17: ...e center of the lowest large muscle Insert the probe into the center of dishes such as meat loaf or casseroles Insert the probe into the meatiest part of the inner thigh from below and parallel to the leg of a whole turkey Using the probe on some models www GEAppliances com How to Set the Oven For Roasting When Using the Probe Insert the probe into the food Plug the probe into the outlet in the ov...

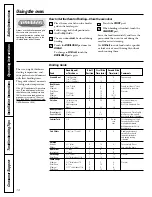
Page 18: ...oods Good results with cookies biscuits brownies cupcakes cream puffs sweet rolls angel food cake and bread The convection fan circulates the heated air evenly over and around the food Convection Roast Good for large tender cuts of meat uncovered Oven door must be closed for convection roasting The convection fan circulates the heated air evenly over and around the food Using the grid and broiler ...

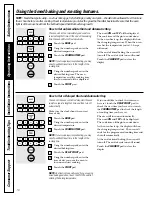
Page 19: ...ture When the oven starts to heat the changing temperature starting at 100 F will be displayed When the oven reaches the temperature you set 3 beeps will sound Touch the CLEAR OFF pad when finished NOTE You will hear a fan while cooking with convection The fan will stop when the door is opened but the heat will not turn off The fan will not start until the preheat temperature is reached Cookware f...

Page 20: ...e START pad When the oven starts to heat the word LO will be in the display After the internal temperature of the food reaches 100 F the changing internal temperature will be shown in the display When the internal temperature of the food reaches the number you have set the probe and the oven turn off and the oven control signals To stop the signal touch the CLEAR OFF pad Use hot pads to remove the...

Page 21: ...b Bone in 3 to 5 lbs Medium 17 20 300 F 160 F Well 20 24 300 F 170 F Boneless 3 to 5 lbs Medium 17 20 300 F 160 F Well 20 24 300 F 170 F Seafood Fish whole 3 to 5 lbs 30 40 total 375 F Lobster Tails 6 to 8 oz each 20 25 total 325 F Poultry Whole Chicken 21 2 to 31 2 lbs 24 26 325 F 180 185 F Cornish Hens Unstuffed 1 to 11 2 lbs 50 55 total 325 F 180 185 F Cornish Hens Stuffed 1 to 11 2 lbs 55 60 t...

Page 22: ...h the CLEAR OFF pad to clear the display if necessary Remove the food from the oven Remember foods that are left in the oven continue cooking after the controls are off How to Set a Delayed Start and Automatic Stop You can set the oven control to delay start the oven cook for a specific length of time and then turn off automatically Make sure the clock shows the correct time of day Touch the CONVE...

Page 23: ...e DELAY START pad again and the display will show no shdn no shut off Touch the START pad to activate the no shut off and leave the control set in this special features mode Fahrenheit or Celsius Temperature Selection Your oven control is set to use the Fahrenheit temperature selections but you may change this to use the Celsius selections Touch the BAKE and BROIL HI LO pads at the same time for 3...

Page 24: ...odels Your control will allow you to lock out the touch pads so they cannot be activated when touched or cleaning the panel To lock the controls Touch the 9 and 0 touch pads at the same time for 3 seconds until the control beeps twice The display will show LOC continuously and the time of day if not blacked out NOTE All cooking and timing functions will be cancelled when locking out the control To...

Page 25: ... during the Sabbath feature How to Exit the Sabbath Feature Touch the CLEAR OFF pad If the oven is cooking wait for a random delay period of approximately 30 seconds to 1 minute until only is in the display Press and hold both the BAKE and BROIL HI LO pads at the same time until the display shows SF Tap the DELAY START pad until 12 shdn or no shdn appears in the display 12 shdn indicates that the ...

Page 26: ...he number pads the same way you read them For example to change the oven temperature 15 F touch 1 and 5 When you have made the adjustment touch the START pad to go back to the time of day display Use your oven as you would normally NOTE The thermostat adjustment for Baking will also affect Convection Baking or Convection Roasting Most recipes for baking have been developed using high fat products ...

Page 27: ...s When Using the Warming Drawer The warming drawer will keep hot cooked foods at serving temperature Always start with hot food Do not use to heat cold food other than crisping crackers chips or dry cereal Do not line the warming drawer or pan with aluminum foil Foil is an excellent heat insulator and will trap heat beneath it This will upset the performance of the drawer and could damage the inte...

Page 28: ...escape and the food to cool Allow extra time for the temperature inside the drawer to stabilize after adding items With large loads it may be necessary to use a higher setting and cover some of the cooked food items Do not use plastic containers or plastic wrap CAUTION Do not keep food in the warming drawer for more than two hours Food Type Control Setting Bacon HI Eggs HI Fish HI Gravy sauces HI ...

Page 29: ...place and the oven light is off IMPORTANT The health of some birds is extremely sensitive to the fumes given off during the self cleaning cycle of any range Move birds to another well ventilated room How to Set the Oven for Cleaning Touch the SELF CLEAN pad Using the number pads enter the desired clean time if a time other than 4 hours is needed Clean cycle time is normally 4 hours You can change ...

Page 30: ...temperature and the LOCKED DOOR light goes off When the LOCKED DOOR light is off open the door After a Clean Cycle You may notice some white ash in the oven Wipe it up with a damp cloth after the oven cools If white spots remain remove them with a soap filled scouring pad and rinse thoroughly with a vinegar and water mixture These deposits are usually a salt residue that cannot be removed by the c...

Page 31: ... range www GEAppliances com Sealed Burner Assemblies Turn all controls OFF before removing the burner parts The burner grates caps and burner heads can be lifted off making them easy to clean The electrodes are not removable CAUTION Do not operate the cooktop without all burner parts and grates in place The electrode of the spark igniter is exposed when the burner head is removed When one burner i...

Page 32: ...the burner heads Lift off when cool To remove burned on food soak the burner heads in a solution of mild liquid detergent and hot water for 20 30 minutes For more stubborn stains use a toothbrush After cleaning Before putting the burner caps and heads back shake out excess water and then dry them thoroughly by setting in a warm oven for 30 minutes NOTE Do not use steel wool or scouring powders to ...

Page 33: ...ooktop Surface To avoid damaging the porcelain enamel surface of the cooktop and to prevent it from becoming dull clean up spills right away Foods with a lot of acid tomatoes sauerkraut fruit juices etc or foods with high sugar content could cause a dull spot if allowed to set When the surface has cooled wash and rinse For other spills such as fat spatterings etc wash with soap and water once the ...

Page 34: ...id content such as milk tomatoes sauerkraut fruit juices or pie filling to remain on the surface They may cause a dull spot even after cleaning To clean the outside of the door Use soap and water to thoroughly clean the top sides and front of the oven door Rinse well You may also use a glass cleaner to clean the glass on the outside of the door Spillage of marinades fruit juices tomato sauces and ...

Page 35: ...arm water to thoroughly clean To remove the warming drawer Pull the drawer straight out until it stops Press the left rail release up and press the right rail release down while pulling the drawer forward and free To replace the warming drawer Place the left drawer rail around the inner left rail guide and slide it in slightly to hook it Place the right drawer rail around the inner right rail guid...

Page 36: ...ar of the cooktop at the top and bottom of the oven door and at the bottom of the range under the warming drawer Lower Control Panel and Knobs It s a good idea to wipe the control panel after each use of the oven Clean with mild soap and water or vinegar and water rinse with clean water and polish dry with a soft cloth Do not use abrasive cleansers strong liquid cleaners plastic scouring pads or o...

Page 37: ...ver Do not remove any screws to remove the cover Do not touch hot bulb with a wet cloth Replace bulb with a 40 watt household appliance bulb To replace cover Place it into the groove of the light receptacle Pull the wire forward to the center of the cover until it snaps into place When in place the wire holds the cover firmly Be certain the wire is in the depression in the center of the cover Conn...

Page 38: ...electrical diagram is in an envelope attached to the back of the range FOR YOUR SAFETY Do not store or use combustible materials gasoline or other flammable vapors and liquids in the vicinity of this or any other appliance If you smell gas Open windows Don t touch electrical switches Extinguish any open flame Immediately call your gas supplier CAUTION FOR PERSONAL SAFETY DO NOT USE AN EXTENSION CO...

Page 39: ...operating burners install a ventilation hood over the range that projects forward at least 5 beyond the front of the cabinets The ventilating hood must be constructed of sheet metal not less than 0 0122 thick Install above the cooktop with a clearance of not less than 1 4 between the hood and the underside of the combustible material or metal cabinet The hood must be at least as wide as the applia...

Page 40: ...and pipe opening see Gas Pipe and Electric Outlet Locations may be adjusted to meet specific requirements 281 4 to 29 Depth with door closed includes door handle Depth varies depending on model See specifications sheet for your model 30 361 4 1 4 To cabinets below cooktop and at the range back 30 30 3 Minimum 13 To wall on either side Maximum depth for cabinets above countertops Front edge of the ...

Page 41: ...n the floor covering This will allow the range to be moved for cleaning or servicing Also make sure your floor covering will withstand 180 F See the Installation Safety Instructions section Make sure the wall coverings around your range can withstand the heat generated up to 200 F by the range See the Installation Safety Instructions section TOOLS YOU WILL NEED Phillips and flat blade screwdrivers...

Page 42: ...tween 10 and 13 of water column When checking for proper operation of the regulator the inlet pressure must be at least 1 greater than the operating manifold pressure as given above The pressure regulator located at the inlet of the range manifold must remain in the supply line regardless of whether natural or LP gas is being used A flexible metal appliance connector used to connect the range to t...

Page 43: ... 40 amp The receptacle must be NEMA 14 50R to accept the 4 prong plug supplied with the range If the electrical service provided does not meet the above specifications it is recommended that a licensed electrician install an approved outlet Locate the electric supply as illustrated Recommended acceptable electrical outlet area Orient the electrical receptacle so the length is parallel to the floor...

Page 44: ...rmit connection at the shut off valve When all connections have been made make sure all range controls are in the off position and turn on the main gas supply valve Use a liquid leak detector at all joints and connections to check for leaks in the system When using test pressures greater than 1 2 psig to pressure test the gas supply system of the residence disconnect the range and individual shut ...

Page 45: ...ed with a 4 prong plug to be used in a NEMA 14 50R receptacle Should you choose to change your plug use only a 3 wire power cord 3 wire conduit or 4 wire conduit Follow the appropriate instructions below in Step 5 for your application Effective January 1 1996 the National Electric Code requires that new construction not existing utilize a 4 conductor connection to an electric range A range cord ra...

Page 46: ...relief Allow enough slack to easily attach the wires to the terminal block Insert the 3 terminal screws removed earlier through each power cord terminal ring and into the lower terminals of the terminal block Be certain that the center wire white neutral is connected to the center lower position of the terminal block Tighten screws securely approximately 20 inch lbs into the terminal block Secure ...

Page 47: ...ert the center bare wire white neutral tip through the bottom center terminal block opening On certain models the wire will need to be inserted through the ground strap opening and then into the bottom center block opening Insert the two side bare wire tips into the lower left and the lower right terminal block openings Tighten the screws until the wire is firmly secure approximately 20 inch lbs N...

Page 48: ...and the ground plate removed earlier and secure it in place with the ground screw removed earlier Insert the bare wire white neutral tip through the bottom center of the terminal block opening Insert the two side bare wire tips into the lower left and the lower right terminal block openings Tighten the screws until the wire is firmly secure approximately 20 inch lbs NOTE Make sure the wire is comp...

Page 49: ...ons Safety Instructions Installation Instructions Troubleshooting Tips Seal the Openings Seal any openings in the wall behind the range and in the floor under the range when hookups are completed Assemble Surface Burners Assemble burner as shown Place burner heads over the electrodes on the cooktop in the correct locations according to their size Make sure the slot in the burner head is positioned...

Page 50: ...front leveling legs can be adjusted from the bottom and the rear legs can be adjusted from the top or the bottom Use an open end or adjustable wrench to adjust the leveling legs until the range is level After the range is level slide the range away from the wall so that the Anti Tip device can be installed Leg leveler Lower range Raise range on some models Raise range Lower range on some models Qu...

Page 51: ...om spilled hot liquids or from the range itself Typical installation of anti tip bracket attachment to wall Bracket Screw must enter wood or metal Wall plate When All Hookups Are Completed MAKE SURE ALL CONTROLS ARE LEFT IN THE OFF POSITION MAKE SURE THE FLOW OF COMBUSTION AND VENTILATION AIR TO THE RANGE IS UNOBSTRUCTED Converting to LP Gas or converting back to natural gas from LP This range lea...

Page 52: ...e moved during cleaning or range section and look for the gas shut off lever moving at the back of the range Burner flames very Improper air to gas ratio If range is connected to LP gas contact the person large or yellow who installed your range or made the conversion Control signals after You forgot to enter a bake Touch the BAKE pad and desired temperature or the entering cooking time temperatur...

Page 53: ...gged into a live do not work inserted in the electrical outlet properly grounded outlet A fuse in your home may be Replace the fuse or reset the circuit breaker blown or the circuit breaker tripped Oven controls improperly set See the Using the clock and timer section Oven light does not work Light bulb is loose or defective Tighten or replace the bulb Plug on range is not completely Make sure ele...

Page 54: ... to the range for 5 minutes and then reconnect power If the function error code repeats call for service Probe appears in This is reminding you to enter Enter a probe temperature the display a probe temperature after plugging in the probe Display goes blank A fuse in your home may be Replace the fuse or reset the circuit breaker blown or the circuit breaker tripped The clock is in the See the Spec...

Page 55: ...all the way in smoothly or drags See the Care and cleaning of the range section Drawer is overloaded or load Reduce weight Redistribute drawer contents is unbalanced Warming drawer A fuse in your home may be Replace the fuse or reset the circuit breaker will not work blown or the circuit breaker tripped The oven is self cleaning Wait for the self clean cycle to finish and the oven to cool Controls...

Page 56: ... 888 261 3055 Canada during normal business hours Have your model number ready Tired of discolored racks Wishing you had extra heavy duty oven racks NOW AVAILABLE for your range GE s innovative self cleanable porcelain coated oven racks Heavy Duty Durable Able to be cleaned in a self cleaning oven Visit www GEAppliances com U S or www GEAppliances ca Canada for more information Grates Broiler Pan ...

Page 57: ...otection or you may request your money back on the remaining value of your contract No questions asked It s that simple Protect your refrigerator dishwasher washer and dryer range TV VCR and much more any brand Plus there s no extra charge for emergency service and low monthly financing is available Even icemaker coverage and food spoilage protection is offered You can rest easy knowing that all y...

Page 58: ...t Ownership Registration today Have the peace of mind of knowing we can contact you in the unlikely event of a safety modification After mailing the registration below store this document in a safe place It contains information you will need should you require service Our service number is 800 GE CARES 800 432 2737 Read your Owner s Manual carefully It will help you operate your new appliance prop...

Page 59: ...tates do not allow the exclusion or limitation of incidental or consequential damages This warranty gives you specific legal rights and you may also have other rights which vary from state to state To know what your legal rights are consult your local or state consumer affairs office or your state s Attorney General Warrantor General Electric Company Louisville KY 40225 For The Period Of GE Will R...

Page 60: ...tended warranty and learn about special discounts that are available while your warranty is still in effect You can purchase it on line anytime or call 800 626 2224 during normal business hours GE Consumer Home Services will still be there after your warranty expires Parts and Accessories www GEAppliances com Individuals qualified to service their own appliances can have parts or accessories sent ...

Reviews: