background image

Summary of Contents for JB250DF2CC

Page 1: ...terior 18 Maintenance 19 Troubleshooting Tips 21 JB250 30 Free Standing Range JS250 30 Slide In Range JB350 30 Free Standing Range JSS28 30 Slide In Range JDS28 30 Drop In Range For a Spanish version of this manual visit our Website at GEAppliances com Para consultar una version en espafiol de este manual de instrucciones visite nuestra sitio de internet GEAppliances cam Write the model and serial...

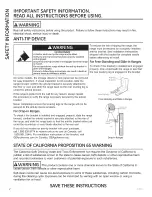
Page 2: ...th the range to see that the rear leveling leg is engaged in the bracket Anti mip _ q Bracket f i i I t 0 Leveling Leg __ Free Standing and Slide ln Ranges Never completely remove the leveling legs or the range will not be secured to the anti tip device properly For Drop In Ranges To check if the bracket is installed and engaged properly slide the range forward confirm the anti tip bracket is secu...

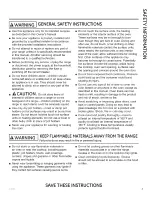
Page 3: ...ce units or any interior area of the oven allow sufficient time for cooling first Other surfaces of the appliance may become hot enough to cause burns Potentially hot surfaces include the cooktop areas facing the cooktop oven vent opening surfaces near the opening and crevices around the oven door Do not heat unopened food containers Pressure could build up and the container could burst causing an...

Page 4: ...ing point oil may ignite resulting in fire that may spread to surrounding cabinets Use a deep fat thermometer whenever possible to monitor oil temperature To avoid oil spillover and fire use a minimum amount of oil when shallow pan frying and avoid cooking frozen foods with excessive amounts of ice Use proper pan size select cookware having flat bottoms large enough to cover the surface heating el...

Page 5: ... the oven door Hot air or steam which escapes can cause burns to hands face and or eyes Do not use the oven if a heating element develops a glowing spot during use or shows other signs of damage A glowing spot indicates the heating element may fail and present a potential burn fire or shock hazard Turn the oven off immediately and have the heating element replaced by a qualified service technician...

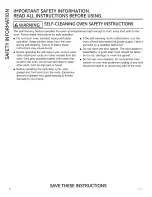
Page 6: ...nsils from the oven Only gray porcelain coated oven racks may be left in the oven Do not use self clean to clean other parts such as drip pans or bowls Before operating the self clean cycle wipe grease and food soils from the oven Excessive amount of grease may ignite leading to smoke damage to your home If the self cleaning mode malfunctions turn the oven off and disconnect the power supply Have ...

Page 7: ...glass cooktop caused by hardened spills of sugary materials or melted plastic that are not cleaned according to the directions in the Owner s Manual Replacement of house fuses or resetting of circuit breakers Damage to the product caused by accident fire floods or acts of God Incidental or consequential damage caused by possible defects with this appliance Damage caused after delivery Product not ...

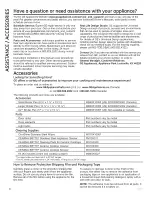
Page 8: ...te with all the details including your phone number or write to General Manager Customer Relations GE Appliances Appliance Park Louisville KY 40225 GE offers a variety of accessories to improve your cooking and maintenance experiences To place an order visit us online at www GEApplianceParts com U S or www GEAppliances ca Canada or call 800 626 2002 U S 800 661 1616 Canada The following products a...

Page 9: ...slight clicking sounds during cooking indicating the control is maintaining your desired setting Be sure you turn the control knob to OFFwhen you finish cooking Melt Co 2 off 6 Hi 8 Melt setting on some models will melt chocolate or butter C Z 61 4 3 rn Z 61 rn o tO h Q N C U3 Home Canning Tips Be sure the canner is centered over the surface unit Make sure the canner is flat on the bottom To preve...

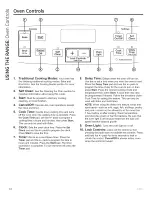
Page 10: ...tart pad The timer countdown is complete To turn the timer off press the Timer pad 8 Delay Time Delays when the oven will turn on Use this to set a time when you want the oven to start Press the Delay Time pad and use the pads to program the time of day for the oven to turn on then press Start Press the desired cooking mode and temperature then press Start A cook time may also be programmed if des...

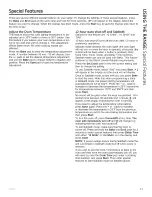
Page 11: ...ting and then to change the setting To use Sabbath mode select SAb and press Start A will appear in the display and the clock will not display Once in Sabbath mode at any time you can press Bake to start the oven Note that when programming a bake in Sabbath mode the preset starting temperature will automatically be set to 350 F Press the or pads to increase or decrease the temperature in 25 F incr...

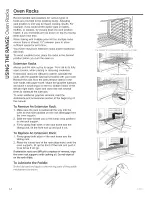
Page 12: ...ake the graphite lubricant and place 4 small drops on the two bottom tracks of the left and right sides Open and close the rack several times to distribute the lubricant To order additional graphite lubricant read the Assistance and Accessories section at the beginning of the manual The number of rock positions moy vory by model Upper Front Roil Fully Open Position To Remove An Extension Rack 1 Ma...

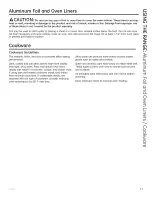
Page 13: ...finish and size of cookware affect baking performance Shiny pans can produce more evenly cooked baked goods such as cakes and cookies Dark coated and dull pans absorb heat more readily than light shiny pans Pans that absorb heat more readily can result in a browner crisper and thicker crust If using dark and coated cookware check food earlier than minimum cook time If undesirable results are obtai...

Page 14: ...nt increases smoking spattering and the possibility of fats igniting For best performance center food below the broil heating element Broiling on rack position 7 is not recommended Try broiling foods that you would normally grill Adjust rack positions to adjust the intensity of the heat to the food Place foods closer to the broil element when a seared surface and rare interior is desired Thicker f...

Page 15: ...Broil Lo 2 or 3 broiling For best performance when broiling center Bake food below the broil heating element If breaded or coated in sauce avoid Broil Hi modes Boneless chicken breasts Broil Lo 2 or 3 Broil skin side down first Watch food closely when Bake broiling For best performance when broiling center food below the broil heating element Whole turkey Bake 2 or 3 Use a low sided pan such as a ...

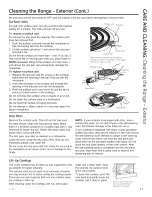
Page 16: ...erior or exterior of the oven Clean with a mild soap and water or vinegar and water solution Rinse with clean water and dry with a soft cloth When cleaning surfaces make sure that they are at room temperature and not in direct sunlight If stain on the door vent trim is persistent use a mild abrasive cleaner and a sponge scrubber for best results Spillage of marinades fruit juices tomato sauces and...

Page 17: ...he surface units Then lift out the drip pans For best results clean the drip pans by hand Place them in a covered container or a plastic bag with cup ammonia to loosen the soil Rinse with clean water and polish with a clean soft cloth The drip pans may also be cleaned in a dishwasher Clean the area under the drip pans often Built up soil especially grease may catch fire Do not cover the drip pans ...

Page 18: ...The oven will turn off automatically when the self clean cycle is complete and the self clean light will be off Slide the latch handle to the left as far is it will go and open the door Never force the latch handle Forcing the handle will damage the door lock mechanism After the oven has cooled down wipe any ash out of the oven We recommend venting your kitchen with an open window or using a venti...

Page 19: ...ise 1 4 turn until the tabs of the glass cover clear the grooves of the socket Wearing latex gloves may offer a better grip 2 Remove the bulb by turning it counter clockwise To replace 1 Replace bulb with a new 40 watt appliance bulb Insert the bulb and turn it clockwise until it is tight 2 Place the tabs of the glass cover into the grooves of the socket Turn the glass cover clockwise 1 4 turn For...

Page 20: ...e with the door at the same angle as the removal position seat the indentation of the hinge arm into the bottom edge of the hinge slot The notch in the hinge arm must be fully seated into the bottom of the slot Repeat for right side Fully open the door If the door will not fully open the indentation is not seated correctly in the bottom edge of the slot Push the hinge locks up against the front fr...

Page 21: ... your home may be Replace the fuse or reset the circuit breaker blown or the circuit breaker tripped Frequent cycling off and Improper cookware being used Use only flat cookware to minimize cycling on of surface units My new oven doesn t cook like my old one is something wrong with the temperature Food does not bake properly Your new oven has a different cooking system from your old oven and there...

Page 22: ...ecial Features section Crackling or This is the sound of the metal This is normal popping sound heating and cooling during both the cooking and cleaning functions Why is my range making Your range cycles the heating This is normal a clicking noise when elements by turning relays on using my oven and off to maintain the oven temperature Clock and timer do not A fuse in your home may be Replace the ...

Page 23: ...own or the circuit breaker tripped The clock is turned off Oven is in Sabbath Mode cycle Heavily soiled ovens may need to self clean again or for a longer period of time Close the oven door Press the Cancel Off pad Allow the oven to cool Press the Cancel Off pad Allow the oven to cool for one hour Put the oven back into operation Disconnect all power to the oven for at least 30 seconds and then re...

Page 24: ...ing too high The cookware or food in the oven will cause the oven to take longer to preheat Remove items to reduce preheat time Adding more racks to the oven will cause the oven to take longer to preheat Remove some racks Reset the clock The Broil Hi Lo and Bake pads must be touched at the same time and held for 3 seconds Touch the Bake pad and desired temperature or the Self Clean pad and desired...

Page 25: ...ci6n 14 Guio de Cocci6n 15 Cuidado y Limpieza Limpiezo de Io Cocino Exterior 16 Limpiezo de Io Cocino Interior 18 Montenimiento 19 Consejos para la Soluci6n de Problemas 21 Cocina con Modo de Pie JB250 de 30 Cocina Deslizable JS250 de 30 Cocina con Modo de Pie JB350 de 30 Cocina Deslizable JSS28 de 30 Cocina Empotrable JDS28 de 30 Escriba los nSmeros de modelo y de serie aqui N de Modelo N de Seri...

Page 26: ...ice por debajo det mostrador o bloque de madera adjunto a la pared trasera Si usted no recibi6 un soporte anti volcaduras con su compra tlame al 1 800 626 8774 para recibir uno sin costo alguno en Canada llame at 1 800 561 3344 Para consultar instrucciones de instalaci6n det soporte visite GEAppliances com en Canada GEAppliances ca Para reducir et riesgo de volcar la cocina esta debe sujetarse med...

Page 27: ...ras superficies del aparato pueden calentarse Io suficiente como para provocar quemaduras Las superficies potencialmente calientes incluyen la estufa las teas orientadas hacia la estufa la abertura de ventilaciOn del homo las superficies cercanas a la abertura y las hendiduras ubicadas alrededor de la puerta del horno No caliente recipientes cerrados de alimentos Podria haber una acumulaciOn de pr...

Page 28: ...ropagarse a los gabinetes cercanos Utilice un term6metro para grasa cuando sea posible para controlar la temperatura del aceite Para evitar el derrame de aceite y un incendio utilice una cantidad minima de aceite cuando fria en sartenes poco profundas y evite la cocci6n de alimentos congelados con una cantidad excesiva de hielo Utilice el tamafio de recipiente adecuado Elija recipientes con bases ...

Page 29: ... abrir la puerta del mismo El aire caliente o el vapor que sale puede causar quemaduras en las manos rostro y u ojos No use el homo si un elemento de calentamiento genera un punto brillante durante el uso o aparecen otros signos de dafios Un punto brillante indica que el elemento para calentar puede fallar y generar una posible quemadura incendio o descarga el6ctrica Apague el horno de inmediato y...

Page 30: ...aya en el homo 61o se pueden dejar dentro del homo los estantes para homo cubiertos de porcelana No use la funci6n de limpieza automatica para limpiar otras partes tales como ollas de goteo o recipientes Antes de utilizar el ciclo de limpieza autom_tica limpie la grasa y restos de comida que haya en el homo Una cantidad excesiva de grasa se puede incendiar Io cual puede producir da_os con humo en ...

Page 31: ... y patios recomendados Dafios a la estufa de vidrio provocados por derrames endurecidos de materiales azucarados o plastico derretido que no se timpiaron de acuerdo con las instrucciones det Manual det Propietario Reemptazo de fusibtes de la casa o reinicio de disyuntores Dafios ocasionados sobre et producto por accidente incendio inundaciones o catastrofes naturates Dafios incidentales o consecue...

Page 32: ...quese con nosotros a traves de nuestro sitio web con todos los detaltes incluyendo su nQmero tetef6nico o escriba a General Manager Customer Relations GE Appliances Appliance Park Louisville KY 40225 iGE ofrece una variedad de accesorios para mejorar sus experiencias de cocci6n y mantenimiento Para realizar una orden visitenos a traves de Internet en www GEApplianceParts eom EE UU o en www GEAppli...

Page 33: ... escuche leves sonidos de ajuste durante la cocci6n indicando que el control est6 manteniendo su configuraci6n deseada Aseg_rese de girar la perilla de control a Off IApagado cuando finalice la cocci6n off La configuraci6n Melt Derretir en algunos modelos derretir6 chocolate o manteca Consejos para Productos Enlatados en el Hogar AsegQrese que el producto enlatado se encuentre sobre la unidad supe...

Page 34: ...e la tecla Start Iniciar La cuenta regresiva del temporizador se complet6 Para apagar el temporizador presione la tecla Timer Temporizador 8 Delay Time Tiempo de Retraso Genera un retraso cuando el homo es encendido Use esta tecla para configurar el momento en que desea que el homo se inJcJe Presione la tecla Delay Time Tiempo de Retraso y use las teclas para programar la hora del dJa en que desea...

Page 35: ...l y tuego para modificar ta configuraci6n O0 Para usar et modo Sabbath Sabatico seteccione SAb m Sabatico y presione Start Iniciar Aparecera una en la D pantalla y et reloj no sera exhibido D Una vez en el modo Sabbath Sab_tico en cualquier _D momento que sea posible presione Bake Hornear para _ iniciar et homo Observe que at programar et horneado C_ en et modo Sabbath Sabatico ta temperatura de i...

Page 36: ...n et recorrido deslizable con una toalla de papet agite et tubricante de grafito y coloque 4 gotitas en los dos recorridos inferiores de los lados izquierdo y derecho Abra y cierre et estante varias veces para distribuir et lubricante Para ordenar mas tubricante de grafito tea ta secci6n de Asistencia y Accesorios en et comienzo de este manual Para Retirar un Estante Extensible 1 AsegQrese de intr...

Page 37: ... et horneado Las otlas oscuras revestidas y opacas absorben el calor mas rapidamente que las ollas ctaras y britlantes AI usar ollas que absorben et calor mas rapidamente tas comidas podran resultar mas doradas crocantes y con una capa mas gruesa Si utitiza utensitios oscuros y revestidos controle ta comida antes det tiempo minimo de cocci6n Si se obtienen resultados no deseados con este tipo de u...

Page 38: ...alpicaduras y la posibitidad de que se incendien las grasas No se reeomienda asar en el estante de la posieion 7 Intente asar las comidas que normalmente haria a ta parritla Ajuste tas posiciones de los estantes para ajustar ta intensidad det cator a la comida Coloque tas comidas mas cerca det etemento para asar cuando se desee una superficie mas cocinada y un interior poco cocido Las comidas mas ...

Page 39: ...Bajo 2 o 3 ci6n a la comida al asarla Para un mejor rendimiento centre la Hornear comida debajo del elemento catentador para asar Si se empan6 o cubri6 con salsa evite los modos Broil Hi Asar Pechugas de polio Asado Bajo 2 o 3 Alto Ase del lado de tapiet hacia abajo primero Preste aten deshuesadas Hornear ci6n a la comida al asarla Para un mejor rendimiento centre la comida debajo del elemento cal...

Page 40: ... o una soluci6n de vinagre y agua Enjuague con agua timpia y seque con una teta seca AI limpiar supeficies asegQrese de que esten a temperatura ambiente y fuera det contacto con la tuz solar Si las manchas en el borde de la ventana de ta puerta son persistentes use un timpiador abrasivo suave o una esponja con estropajo para obtener un mejor resultado Et derrame de adobo jugos de fruta salsas de t...

Page 41: ...pt6culo Cubeta de goteo Lengt eta de bloqueo Cubetas de Goteo Retire tas unidades de ta superficie Luego retire tas cubetas de goteo Para obtener mejores resultados timpie las cubetas de goteo en forma manual Cotoque tas mismas en un envase cubierto o en una bolsa plastica con de taza de amoniaco para aflojar ta suciedad Enjuague con agua limpia y pula con una tecla suave y limpia Las cubetas de g...

Page 42: ...usar et tiempo por omisi6n presione la tecla Start Iniciar inmediatamente luego de presionar ta tecta Self Clean Limpieza Automatica El homo se apagara de forma automatica cuando et ciclo de limpieza automatica sea comptetado Una vez que el homo se haya enfdado limpie cualquier ceniza que haya quedado en et homo Recomendamos ventitar su cocina con una ventana abierta o utitizando un ventitador o c...

Page 43: ...ranuras de ta ficha Si usa guantes de latex tendra un mejor agarre 2 Retire la lampara girando la misma en direcci6n contraria a las agujas det retoj Para volver a colocar la tapa 1 Reemplace la lampara por una para etectrodomestico de 40 watts Inserte la lampara y gire ta misma en direcci6n de las agujas det retoj hasta que quede ajustada 2 Coloque tas teng0etas de la tapa de vidrio en las ranura...

Page 44: ...en et mismo angulo de la posici6n de retiro apoye ta hendidura det brazo de ta bisagra en et extremo inferior de ta ranura de la bisagra La abertura en el brazo de la bisagra debera estar totalmente apoyada en ta parte inferior de ta ranura Repita el procedimiento det lado derecho 3 Abra la puerta totalmente Si ta puerta no se abre totalmente ta hendidura no esta correctamente apoyada en et extrem...

Page 45: ...ue el control correcto este configurado para la unidad de la superficie que este usando Con el control apagado asegQrese de que la cubeta de goteo se encuentre en el hueco de la estufa y que la abertura de la cubeta quede alineada con los receptaculos Cambie el fusible o vuelva a configurar el interruptor de circuitos Use s61o recipientes de base plana para minimizar el encendido y apagado Su homo...

Page 46: ...da para mantener un control m s ajustado sobre la temperatura del homo El fusible puede haberse quemado o el interruptor de circuitos puede haber saltado El enchufe de la cocina no est introducido del todo en el tomacorriente Los controles del homo est n mal configurados El cable de energia puede estar obstruyendo el caj6n en la parte trasera inferior de la cocina El soporte de caj6n trasero se en...

Page 47: ...tiempo mas prolongado Cierre la puerta del homo Presione la tecla Cancel Off Cancelar Apagar Deje que el homo se enfde F y un n_mero o Tiene un c6digo de error de funci6n Presione la tecla Cancel Off Cancelar Apagar Permita letra titila en la pantalla que el homo se enfde durante una hora Vuelva a poner el homo en funcionamiento Si el c6digo de funci6n se repite Desconecte totalmente la corriente ...

Page 48: ...El caj6n est muy cargado o la carga Reduzca el peso Redistribuya el contenido del caj6n no est equilibrada Emisi6n de vapor desde la Cuando se utilizan los hornos es Esto es normal ventilaci6n normal ver una emisi6n de vapor de la ventilaci6n del horno A medida que el n_mero de bandejas o la cantidad de alimentos a cocinar se incrementa la cantidad de vapor visible se elevar_ No funcionan el caj6n...

Reviews: