background image

Use and Care &Installation Guide

Self-Cleaning Radiant Range

Safety 

 5

Anti-Tip Device .................................3, 29,35

Operating Instructions, Tips

Aluminum Foil . . . . . . . . . . . . . . . . . . . . . . . . . . . . . . . 18, 

22–24

Clock and Timer . . . . . . . ...........................15

 . . . . .   .........................6,7

Oven . . . . . . . . . . . . . . . . . . . ..................16-29

 ............17, 

Broiling . . . . . . . . . . . . . . . . . 

..............24,25

Control Panel . . . . . . . . . . ......................14

Control Settings . . . . . . . . .....................15

Roasting . . . . . . . . . . . . . . . . 

..............22,23

Self-Cleaning Instructions ..............26-29

Timed Baking . . . . . . . . . . . . 

.............19,20

Power Outage . . . . . . . . . ..........................15

Surface Cooking . . . . . . . .....................8-13

Canning Tips . . . . . . . . . . . . . ...................12

Control Settings . . . . . . . . ........................8

Cooktop Comparison ................................8

Cookware Tips . . . . . . . . . ..............10,11

Surface Cleaning . . . . . . . ......................13

 Light . . . . . . . . . . . . . . ....................9

Care and Cleaning 

...................29-32

Anti-Tip Device . . . . . . . .............................29

Problem Solver

......................36-38

ThermostatAdjustment–

Dolt Yourself . . . . . . . . . . . . . ..................21

More 


 ..33-35

Anti-Tip Device . . . . . . . .....................33,35

Flooring Under the Range .........................34

 . . . . . . . . . . . . . . .   .........................35

Consumer Services . . ..

..........39

Appliance Registration ...............................2

Important Phone Numbers .......................39

Model and Serial Location ...........................2

Warranty . . . . . . . . . . . . . . . . 

........Back Cover

I


Surface Light . . . . . . . . . . . . . 

......................30

Door Removal . . . . . . . . . . . ........................31

Oven Light . . . . . . . . . . . . . . . .......................32

Radiant Cooktop . . . . . . . . ........................13

Self-Cleaning Instructions ..................26-29

GE 

Summary of Contents for JBP79

Page 1: ... 12 Control Settings 8 CooktopComparison 8 Cookware Tips 10 11 Surface Cleaning 13 Sutiace Light 9 Care and Cleaning 29 32 Anti Tip Device 29 Problem Solver 36 38 ThermostatAdjustment Dolt Yourself 21 More questions call GEAnswerCenter 817L1626 2171 M InstallationMm Hm wm H_ m 33 35 Anti Tip Device 33 35 Flooring Under the Range 34 Levehng 35 Consumer Services 39 Appliance Registration 2 Important...

Page 2: ...face unit is turned on or still too hot to touch Soft Sure Grip Handle The cushioned handle enhances the styling of the range while providing a comfortable grip and feel Big View Window An exclusive feature from GE the big window makes it easy to check baking progress without opening the door Questions Call the GE Answer Center consumer information service The GE Answer Center is there to help 24 ...

Page 3: ...oor by installing the Anti Tip device supplied To check if the device is installed and engaged properly remove the kick panel or toiage drawer and inspect the rear leveling leg Make sure it fits securely into the slot If you pull the range out from the wall for any reason make sure the device is properly engaged when you push the range back against the wall If it is not there is a possible risk of...

Page 4: ...ly and always cook the meat to an internal temperature of at least 170 F This assures that in the remote possibility that trichina may be present in the meat it will be killed and the meat will be safe to eat Oven Stand away from the range when opening the oven door 130t air or steam which escapes can cause burns to hands face and or eyes Do not heat unopened food containers Pressure could build U...

Page 5: ...without extending over nearby surface units Always turn the surface units off before removing the cookware Keep an eye on foods being fried a high or medium high heat settings When flaming foods are under the hood turn the fan off The fan if operating may spread the flame Foods for frying should be as dry as possible Frost on frozen foods or moisture on fresh foods can cause hot fat to bubble up a...

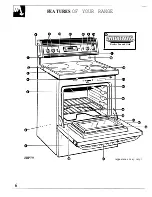
Page 6: ...FEATURES OF YOUR RANGE e Broiler Pan and Grid 1 JBP79 appearance may vary 6 ...

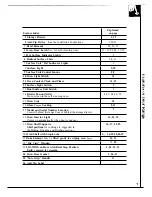
Page 7: ...nd Grid Do not clean in the self cleaning oven 4 22 24 26 32 15 Oven Vent 30 16 Glass Ceran Cooktop 5 13 17 Model and Serial Number Location 2 Located behind the range door or behind the storage drawer 18 Oven Interior Light 16 26 32 Comes on automatically when door is opened 19 Oven Shelf Supports 16 17 22 25 Shelf positions for cooking are suggested in the Baking Roasting and Broiling sections 2...

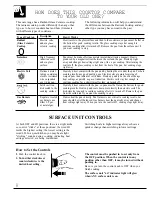
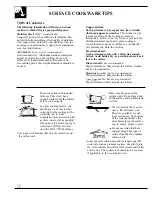
Page 8: ...For best cooking results use good quality pans Electric coils are more forgiving of warped pans than radiant or solid disks Heats up quickly but does not change heat settings as quickly as gas or induction Electric coils stay hot enough to continue cooking for a short time after they are turned off Heats by direct contact with the pan so pans must be flat on the bottom for good cooking results Hea...

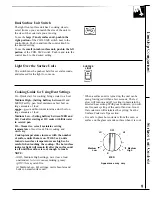
Page 9: ...LO Cook after starting at HI cooks with little water in covered pan LO Steam rice cereal maintains serving temperature of most foods Slow cooking and simmering Cooktop temperatures increase with the number of surface units that are on With 3 or 4 units turned on surface temperatures are high so be careful when touching the cooktop The hot surface indicator light will remain lit after the surface u...

Page 10: ...ded Poor performance May scratch the surface Usable but not recommended Stoneware usable but not recommended Poor performance May scratch the surface Cast Iron usable but not recommended Poor performance May scratch the surface n Do not use pans with rounded bottoms They don t have enough contact with the surface unit to cook properly For best cooking results you should use a pan that is sized cor...

Page 11: ...ater in the pan Bring the water to a boil and observe the location of bubbles as the water starts to boil Good flat cookware will have an even distribution of bubbles over the bottom surface area of the pan Bubbles localized in only a portion of the bottom indicate uneven contact of the pan to the surface unit uneven heat transfer or an unsuitable pan Use pans that match the diameter of the surfac...

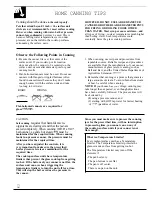
Page 12: ...or heat be careful when canning too long to boil water NOTE If your house has low voltage canning may RIGHT WRONG take longer than expected even though directions have been carefully followed The process time will n be shortened by 1 using a pressure canner and 2 starting with HOT tap water for fastest heating of larsze quantities of water Flat bottomed canners are required for U1 glass cooktops C...

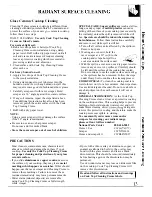
Page 13: ...he spill in a cool area use a dry paper towel to remove any excess Any spillover re maining should be left until the surface of the cooktop has cooled Do not continue to use the soiled surface unit until all of the spillover has been removed Follow the steps under Heavy Soil to continue the cleaning process COOKTOP SEAL To clean the cooktop seal let a wet cloth rest on it for a few minutes then wi...

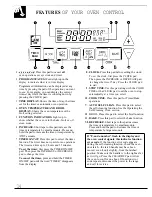
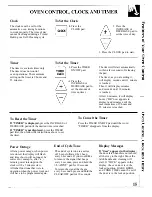
Page 14: ...nge the time To cancel the timer press and hold the TIMER ON OFF pad until the word TIMER disappears from the display A d fib 8 CLOCK Press this pad before setting the clock 9 10 11 12 13 14 To set the clock first press the CLOCK pad Then press the INCREASE or DECREASE pad to change the time of day Press the CLOCK pad to start STOP TIME Use this pad along with the COOK TIME or the CLEAN pad to set...

Page 15: ... If TIMER is displayed press the INCREASE or Press the TIMER ON OFF pad until the word DECREASE pad until the desired time is reached TIMER disappears from the display If TIMER is not displayed press the TIMER pad first then follow the instructions above to set the timer Power Outage After a power outage when power is restored the display will flash and time shown will no longer be correct for exa...

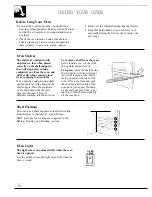
Page 16: ...elf pull the shelf out to the bump on the shelf support Place the cookware on the shelf then slide the shelf back into the oven This will eliminate reaching into the hot oven To remove a shelf from the oven pull it towards you tilt the front end upward and pull it out To replace place the shelf on the shelf support with the stop locks curved extension of the shelf facing up toward the rear of the ...

Page 17: ...change the oven temperature during the BAKE cycle press the BAKE pad and then the INCREASE or DECREASE pad to get the new temperature Oven Shelves Arrange the oven shelf or shelves in the desired locations while the oven is cool The correct shelf position depends on the kind of food and the browning desired As a general rule w Type of Food Shelf Position Angel food cake A Biscuits or muffins B or ...

Page 18: ...en baking cookies flat cookie sheets without sides produce better looking cookies Cookies baked in a jelly roll pan short sides all around may have darker edges and pale or light browning may occur Do not use a cookie sheet so large that it touches the walls or the door of the oven Never entirely cover a shelf with a large cookie sheet For best results use only one cookie sheet in the oven at a ti...

Page 19: ... of time At the end of Cook Time the oven will turn off automatically n 1 Press the BAKE pad BAKE A 2 F7 c1 3 COOK TIME Press the INCREASE or DECREASE 5 pad until the desired temperature is displayed 6 Press the INCREASE or DECREASE pad until the desired length of baking time is displayed The oven will start automatically The word ON and 100 will be displayed The Cook Time will begin to count down...

Page 20: ...ly sets the Stop Time by adding the Cook Time to the time of day In this example the time of day is 2 00 and the Cook Time is 3 hours Adding 3 hours to the time of day equals 5 00 A 6 Change Stop Time from 5 00 to 7 00 by pressing the INCREASE pad until 7 00 and Stop Time appear in the display The words DELAY TIMED BAKE appear in the display At 4 00 the oven will turn on automatically The word ON ...

Page 21: ...the temperature setting of your new oven These thermometers may vary 20 40 degrees To Adjust the Thermostat 1 Press the BAKE pad 1 BAKE 2 n oven temperature between 500 F and 550 F 3 Immediately before ON appears press and hold the BAKE pad for about 4 seconds The time display will change to the oven adjustment display 4 The oven temperature can be adjusted up to 35 F hotter or 35 F cooler Use the...

Page 22: ...emoved when the desired internal temperature has been reached 1 2 Place the shelf in A or B position No preheating is necessary Check the weight of the II A 4 I II meat Place it fat side up or for poultry breast d be side up on a roasting grid in a shallow pan The melting fat will baste the meat Select a pan as close to the size of the meat as possible The broiler pan with grid is a good pan for t...

Page 23: ...n does not cook evenly pound additional time 10 minutes per pound for Some commercial frozen poultry can be cooked roasts under 5 pounds more time for larger roasts successfully without thawing Follow the directions given on the package label Oven Approximate Roasting Time Internal Type Temperature Doneness in Minutes per Pound Temperature F Meat Tender cuts rib high quality sirloin tip rump or to...

Page 24: ...asiest cleaning Use of Aluminum Foil You can use aluminum foil to line your broiler pan and broiler grid However you must mold the foil tightly to the grid and cut slits in it just like the grid Without the slits the foil will prevent fat and meat juices from draining to the broiler pan The juices could become hot enough to catch on fire If you do not cut the slits you are frying not broiling Ques...

Page 25: ...ck cook through before browning Pan frying is recommended 1 X inch thick 2 to 2X lbs 10 15 25 Slash fat Reduce time about 5 to 10 minutes 1 whole 2 to 2X lbs split lengthwise 35 10 15 A per side for cut up chicken Brush each side with melted butter Broil skin side down first Bakery Products Bread Toast or Toaster Pastries English Muffins Space evenly Place English muffins cut side up and brush wit...

Page 26: ... spills on the oven front frame and the oven door outside the gasket with a dampened cloth The oven front frame and the oven door outside the gasket do not get cleaned by the self clean cycle On these areas use detergent and hot water or a soap filled steel wool pad Rinse well with a vinegar and water solution This will help prevent a brown residue from forming when the oven is heated Buff these a...

Page 27: ... off slide the latch handle to the left as far as it will go and open the door The word door will be displayed the word LOCK will flash and the oven control will signal if you set the clean cycle or forget to close the oven door After a Clean Cycle After cleaning is complete the door latch must be returned to its original position before you can use the oven The oven door will stay locked until th...

Page 28: ... if desired For example If you set Stop Time at 11 00 oven will start clean cycle automatically at a later time than the present time of day NOTE Before beginning make sure the oven clock shows the correct time of day 1 Follow steps to prepare the oven for cleaning 2 Slide the latch handle to the right as far as it will go Never force the latch handle Forcing the handle x t will damage the door lo...

Page 29: ... can be removed with a damp sponge or cloth My oven shelves do not slide easily What is the matter After many cleanings the oven shelves will lose their luster and become hard to slide To make shelves slide more easily wipe the shelf supports with cooking oil My oven shelves have become gray after the self clean cycle Is this normal Yes After the self clean cycle the shelves will lose some luster ...

Page 30: ...snap into place pull the plug to the range or disconnect the power at the main fuse or circuit breaker panel To remove Lift the 1 ight cover by pulling the bottom edge toward you and then up Place fingers on top near each end of the light Roll the top of the light gently toward the front of the range and gently pull the light from the socket making sure it does not hit the light cover Metal Parts ...

Page 31: ...sket is essential for energy efficient oven operation and good baking results If you notice the gasket becoming worn frayed or damaged in any way or if it has become displaced on the door you should have it replaced J Inside Gasket 1 J Gasket Outside Gasket I I NOTE The gasket is designed with a gap at the bottom to allow for proper air circulation Outside of the door Q Use soap and water to thoro...

Page 32: ...o Remove the Storage Drawer or Kick Panel to Clean Under the Range The area under the range can be reached easily for To clean under models cleaning by removing the bottom drawer on some with a front kick panel models To remove pull the drawer out all the way remove the panel by pulling tilt up the front and remove it To replace insert glides it straight out at the bottom at the back of the drawer...

Page 33: ...n approved outiet Be use range terrninds are not accessible after the range is in position flexible service conduit or cord must be used STEP 1 PREPARE THE OPENING 1 inch spacing is recommended from the range to adjacent vertical walls above cooktop surface Alow 30 inches minimum clearance between surface units and bottom of unprotected wood or metal top cabinet and 15 inches minimum between count...

Page 34: ...s to be used when the appliance is installed in a mobile home or where local codes do not permit grounding through the neutral STEP 3 1 hcate connector block at the bottom rear of range and remove rear wiring cover 2 Directly below the connector block is a hole with a knockout ring for accommodating conduit fittings Brackets provided are used to support the flexible cord strain relief which must b...

Page 35: ...WARNING 1 Range must be secured by TI TIP bracket supplied 2 See instructions to install supplied with bracket 3 Unless properly installed range could be tipped by stepping or sitting on door Injury might result from spilled hot liquids or from range itseti Typical installation of Anti Tip bracket Attachment to Wall Bracket STEP 7 LEVELING THE RANGE The range must be level Leveling feet are locate...

Page 36: ... switch operating the fight is broken Call for service The oven is not set at BROE The door was not left open to the broil stop position as recommended Q Improper shelf position being used See the Broiling Guide Food is being cooked on hot pan Cookware is not suited for broi ng Auminum foil used on the broi pan rack has not been fitted properly and slit as recommended The oven is not set at BAKE S...

Page 37: ...e surface unit selec d SURFACE UNITS DO NOT o Diff culty may be in the main distribution panel ofyo house causdby a WORK PROPE Y bIown oven iircuit fuse a tripped oven c ctit bre er the main fuse o the main circuit breaker depending on the nature of the power supply If a circuit breaker is involved reset it If the control box uses fuses the oven fuse a cartridge type should be changed BUT ONLY EY ...

Page 38: ...me reason you are not happy with details including your phone number to the service you receive here are three steps to follow for further help Manager Consumer Relations GE Appliances FIRST contact the people who serviced your Appliance Park appliance Explain why you are not pleased Louisville KY 40225 In most cases this will solve the problem FINALLY if your problem is still not resolved write M...

Page 39: ...w w For Customer W SpecialNeeds Upon request GE will provide Consumers with impaired hearing or speech who have Braille controls for a variety of access to a TDD or a conventional teletypewriter may GE appliances and a brochure to call 800 TDD GEAC 800 833 4322 to request assist in planning a barrier free information or service kitchen for persons with limited mobility To obtain these items free o...

Page 40: ... material If you then have any questions about operating the product please contact your dealer or our Consumer Affairs office at the address below or call toll free GE Answer Cente 800 626 2000 consumer information service Improper installation If you have an installation problem contact your dealer or installer You are responsible for providing adequate electrical gas exhausting and other connec...

Reviews: