background image

Safety Instructions

Operating Instructions

Safety Instructions

Operating Instructions

Care and Cleaning

Tr

oubleshooting T

ips

Consumer Support

GEAppliances.com

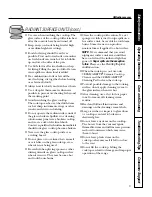
Use care when touching the cooktop. The
glass surface of the cooktop will retain heat
after the controls have been turned off.

Keep an eye on foods being fried at high
or medium high heat settings.

Foods for frying should be as dry as
possible. Frost on frozen foods or moisture
on fresh foods can cause hot fat to bubble
up and over the sides of the pan.

Use little fat for effective shallow or deep
fat frying. Filling the pan too full of fat can
cause spillovers when food is added.

If a combination of oils or fats will be 
used in frying, stir together before heating,
or as fats melt slowly.

Always heat fat slowly, and watch as it heats.

Use a deep fat thermometer whenever
possible to prevent overheating fat beyond
the smoking point.

Avoid scratching the glass cooktop. 
The cooktop can be scratched with items
such as sharp instruments, rings or other
jewelry, and rivets on clothing.

Do not operate the radiant surface units if
the glass is broken. Spillovers or cleaning
solution may penetrate a broken cooktop
and create a risk of electrical shock.
Contact a qualified technician immediately
should your glass cooktop become broken.

Never use the glass cooktop surface as 
a cutting board.

Do not place or store items that can melt
or catch fire on the glass cooktop, even
when it is not being used.

Be careful when placing spoons or other
stirring utensils on glass cooktop surface
when it is in use. They may become hot
and could cause burns.

Clean the cooktop with caution. If a wet
sponge or cloth is used to wipe spills on a
hot surface unit, be careful to avoid steam
burns. Some cleaners can produce
noxious fumes if applied to a hot surface.

NOTE:

We recommend that you avoid

wiping any surface unit areas until they
have cooled and the indicator light has
gone off. 

Sugar spills are the exception 

to this.

Please see the 

Cleaning the glass

cooktop 

section.

When the cooktop is cool, use only
CERAMA BRYTE

®

Ceramic Cooktop

Cleaner and the CERAMA BRYTE

®

Cleaning Pad to clean the cooktop.

To avoid possible damage to the cooking
surface, do not apply cleaning cream to 
the glass surface when it is hot. 

After cleaning, use a dry cloth or paper
towel to remove all cleaning cream
residue.

Read and follow all instructions and
warnings on the cleaning cream labels.

Large scratches or impacts to glass doors
or cooktops can lead to broken or
shattered glass.

Do not leave any items on the cooktop.
The hot air from the vent may ignite
flammable items and will increase pressure
in closed containers, which may cause
them to burst.

Do not leave plastic items on the
cooktop—they may melt if left too close 
to the vent.

Do not lift the cooktop. Lifting the
cooktop can lead to damage and improper
operation of the range.

RADIANT SURFACE UNITS (cont.)

5

Summary of Contents for JBP80

Page 1: ...Radiant Safety Instructions 2 6 Operating Instructions Clock and Timer 14 Oven 10 20 Broiling Broiling Guide 13 Controls 10 11 Sabbath Feature 17 18 Self Cleaning 19 20 Special Features 16 Thermostat 18 Timed Baking and Roasting 15 Surface Units 7 9 Care and Cleaning Broiler Pan Grid 23 Control Knobs 21 Glass Cooktop 24 25 Lift Off Oven Door 22 Light 23 Shelves 23 Troubleshooting Tips 26 29 Access...

Page 2: ... not there is a possible risk of the range tipping over and causing injury if you or a child stand sit or lean on an open door Please refer to the Anti Tip device information in this manual Failure to take this precaution could result in tipping of the range and injury WARNING ANTI TIP DEVICE IMPORTANT SAFETY NOTICE The California Safe Drinking Water and Toxic Enforcement Act requires the Governor...

Page 3: ...ols if the glass is broken Food splatter or cleaning solution may penetrate a broken control panel and create a risk of electrical shock Contact a qualified technician immediately should your glass control panel become broken Do not store flammable materials in an oven or near the cooktop CAUTION Items of interest to children should not be stored in cabinets above a range or on the backsplash of a...

Page 4: ... and other linens a safe distance from your range Always keep wooden and plastic utensils and canned food a safe distance from your range Always keep combustible wall coverings curtains or drapes a safe distance from your range WARNING SAFETY PRECAUTIONS Cook meat and poultry thoroughly meat to at least an INTERNAL temperature of 160 F and poultry to at least an INTERNAL temperature of 180 F Cooki...

Page 5: ...rd Do not place or store items that can melt or catch fire on the glass cooktop even when it is not being used Be careful when placing spoons or other stirring utensils on glass cooktop surface when it is in use They may become hot and could cause burns Clean the cooktop with caution If a wet sponge or cloth is used to wipe spills on a hot surface unit be careful to avoid steam burns Some cleaners...

Page 6: ...use aluminum foil to line oven bottoms except as suggested in this manual Improper installation of aluminum foil may result in a risk of electric shock or fire Stand away from the range when opening the oven door Hot air or steam which escapes can cause burns to hands face and or eyes WARNING OVEN READ AND FOLLOW THIS SAFETY INFORMATION CAREFULLY SAVE THESE INSTRUCTIONS Do not use oven cleaners No...

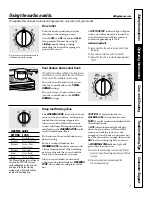
Page 7: ...nter of the glass surface will keep hot cooked food at serving temperature Always start with hot food Do not use to heat cold food Placing uncooked or cold food on the WARMING ZONE could result in food borne illness Push and turn the control knob to any desired setting For best results all foods on the WARMING ZONE should be covered with a lid or aluminum foil When warming pastries or breads the c...

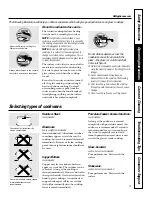
Page 8: ...o prevent burns from steam or heat use caution when canning Use recipes and procedures from reputable sources These are available from manufacturers such as Ball and Kerr and the Department of Agriculture Extension Service Flat bottomed canners are recommended Use of water bath canners with rippled bottoms may extend the time required to bring the water to a boil Use only flat bottomed woks Wok Co...

Page 9: ...on Don t store heavy items above the cooktop If they drop onto the cooktop they can cause damage Do not use the surface as a cutting board DRAGGING SURFACE COOKING OFF CENTER Always place the pan in the center of the surface unit you are cooking on Safety Instructions Operating Instructions Safety Instructions Operating Instructions Care and Cleaning Troubleshooting Tips Consumer Support 9 Selecti...

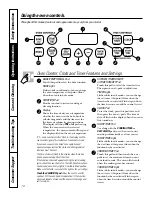
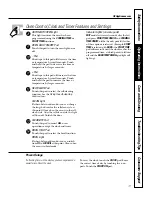
Page 10: ...tched position Make sure the latch is moved to the right as far as it will go Touch the CLEAR OFF pad Allow the oven to cool for one hour Put the oven back into operation If the function error code repeats disconnect the power to the range and call for service KITCHEN TIMER ON OFF or TIMER ON OFF Pad Touch this pad to select the timer feature Then press and pads to adjust time TIMER Light Flashes ...

Page 11: ...ou can change the length of time for the self clean cycle at this point Glows when the oven is in the self clean cycle After the self clean cycle the light will turn off Unlatch the door CLEAR OFF Pad Touch this pad to cancel ALL oven operations except the clock and timer BROIL HI LO Pad Touch this pad to select the broil function BROIL Light Flashes while in edit mode you can switch from HI to LO...

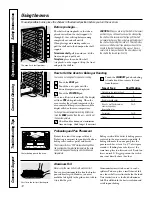
Page 12: ...areful not to burn your hand on the door when using the shelf in the lowest position A The oven has 6 shelf positions How to Set the Oven for Baking or Roasting Your oven is not designed for open door cooking Touch the BAKE pad Touch the or pads until the desired temperature is displayed Touch the START ON pad The oven will start automatically The display will show PRE while preheating When the ov...

Page 13: ...D 10 8 Medium 2 to 21 2 lbs D 15 10 12 Well Done E 20 20 Chicken 1 whole cut up C 25 25 Brush each side with 2 to 21 2 lbs melted butter split lengthwise Broil skin side down Breast C 25 15 first Bakery Product Bread toast 2 to 4 slices E 3 1 Space evenly Place English Muffin 2 split F 3 4 English muffins cut side up and brush with butter if desired Lobster Tails 2 4 C 18 20 Do not Cut through bac...

Page 14: ... twice Touch the or pads If the or pads are not touched within one minute after you touch the CLOCK pad the display reverts to the original setting If this happens touch the CLOCK pad twice and reenter the time of day Touch the START ON pad until the time of day shows in the display This enters the time and starts the clock To check the time of day when the display is showing other information sim...

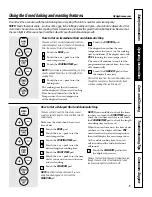
Page 15: ...th PRE if showing the oven temperature The oven will continue to cook for the programmed amount of time then turn off automatically Touch the CLEAR OFF pad to clear the display if necessary Remove the food from the oven Remember even though the oven shuts off automatically foods continue cooking after controls are off How to Set a Delayed Start and Automatic Stop The oven will turn on at the time ...

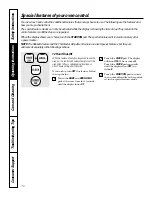
Page 16: ...he Thermostat Adjustment feature are also Special Features but they are addressed separately in the following sections Special features of your oven control 12 Hour Shut Off With this feature should you forget and leave the oven on the control will automatically turn off the oven after 12 hours during baking functions or after 3 hours during a broil function If you wish to turn OFF this feature fo...

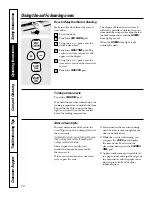
Page 17: ...at Step 7 To adjust the oven temperature touch the BAKE pad and tap the or pads to increase or decrease the temperature in 25 increments Touch the START ON pad When cooking is finished the display will change from to indicating that the oven has turned OFF but is still set in Sabbath Remove the cooked food Using the Sabbath Feature Designed for use on the Jewish Sabbath and Holidays GEAppliances c...

Page 18: ... results with your old favorite recipes use margarine butter or stick spreads containing at least 70 vegetable oil Using the Sabbath Feature Designed for use on the Jewish Sabbath and Holidays How to Exit the Sabbath Feature Touch the CLEAR OFF pad If the oven is cooking wait for a random delay period of approximately 30 seconds to 1 minute until only is in the display Touch and hold both the BAKE...

Page 19: ...ight is off IMPORTANT The health of some birds is extremely sensitive to the fumes given off during the self cleaning cycle of any range Move birds to another well ventilated room Wipe up heavy soil on the oven bottom How to Set the Oven for Cleaning Follow the directions in the Before a Clean Cycle section Latch the door NOTE Never force the latch If the oven is too hot you will not be able to sl...

Page 20: ... damp cloth after the oven cools If white spots remain remove them with a soap filled scouring pad and rinse thoroughly with a vinegar and water mixture These deposits are usually a salt residue that cannot be removed by the clean cycle If the oven is not clean after one clean cycle repeat the cycle You cannot set the oven for cooking until the oven is cool enough for the door to be unlatched Whil...

Page 21: ...lect underneath it when the oven is in use The vent is important for proper air circulation Never block this vent Control Knobs The control knobs may be removed for easier cleaning To remove a knob pull it straight off the stem If a knob is difficult to remove place a towel or dishcloth between the knob and control panel and pull gently Wash the knobs in soap and water or a vinegar and hot water s...

Page 22: ...de of the door Use soap and water to thoroughly clean the top sides and front of the oven door Rinse well You may also use a glass cleaner to clean the glass on the outside of the door Do not let water drip into the vent openings If any stain on the door vent trim is persistent use a soft abrasive cleaner and a sponge scrubber for best results Spillage of marinades fruit juices tomato sauces and b...

Page 23: ... be cleaned with a commercial oven cleaner Both the broiler pan and grid can also be cleaned in a dishwasher After broiling remove the broiler pan from the oven Do not store a soiled broiler pan and grid anywhere in the range Storage Drawer Removal To remove the drawer Pull the drawer out until it stops Lift the front of the drawer until the stops clear the guides Remove the drawer To replace the ...

Page 24: ...al protection after all residue has been removed polish the entire surface with CERAMA BRYTE Ceramic Cooktop Cleaner and a paper towel The CERAMA BRYTE Ceramic Cooktop Scraper and all recommended supplies are available through our Parts Center See instructions under To Order Parts section on next page NOTE Do not use a dull or nicked blade Heavy Burned On Residue Use a CERAMA BRYTE Cleaning Pad fo...

Page 25: ...e These marks are removable using the CERAMA BRYTE Ceramic Cooktop Cleaner with the CERAMA BRYTE Cleaning Pad for Ceramic Cooktops If pots with a thin overlay of aluminum or copper are allowed to boil dry the overlay may leave black discoloration on the cooktop This should be removed immediately before heating again or the discoloration may be permanent WARNING Carefully check the bottom of pans f...

Page 26: ...salt or sand were between before use and use cookware with smooth bottoms the cookware and the surface of the cooktop Cookware has been slid across the cooktop surface Areas of discoloration Food spillovers not cleaned See the Cleaning the glass cooktop section on the cooktop before next use Hot surface on a model This is normal The surface may appear discolored with a light colored glass when it ...

Page 27: ... See the Using the oven section the broiling pan and grid has not been fitted properly and slit as recommended In some areas the power Preheat the broil element for 10 minutes voltage may be low Broil for the longest period of time recommended in the Broiling Guide Oven temperature too Oven thermostat See the Adjust the oven thermostat Do it yourself hot or too cold needs adjustment section Oven w...

Page 28: ...ols improperly set See the Using the self cleaning oven section Oven door is not in the Make sure you move the door latch handle all the locked position way to the right Crackling or This is the sound of the This is normal popping sound metal heating and cooling during both the cooking and cleaning functions Excessive smoking Excessive soil Press the CLEAR OFF pad Open the windows during a clean c...

Page 29: ...r blown or the circuit breaker tripped The clock is turned off See the Using the clock and timer section from showing in the display Display flashes Power failure Reset the clock Unable to get the Oven control pads were The BAKE and BROIL HI LO pads must be pressed display to show SF not pressed properly at the same time and held for 3 seconds Power outage Power outage or surge Reset the clock If ...

Page 30: ...ring normal business hours Have your model number ready Tired of discolored racks Wishing you had extra heavy duty oven racks NOW AVAILABLE for your range GE s innovative self cleanable porcelain coated oven racks Heavy Duty Durable Able to be cleaned in a self cleaning oven Visit www GEAppliances com for more information Surface Elements Drip Pans Oven Racks Broiler Pan Oven Elements Light Bulbs ...

Page 31: ...om the date of the rubber seal between the glass cooktop and the porcelain edge or if the pattern wears off original purchase A replacement radiant surface unit if it should burn out During this limited additional four year warranty you will be responsible for any labor or in home service Service trips to your home to teach you how to use the product Improper installation delivery or maintenance F...

Page 32: ...tended warranty and learn about special discounts that are available while your warranty is still in effect You can purchase it on line anytime or call 800 626 2224 during normal business hours GE Consumer Home Services will still be there after your warranty expires Parts and Accessories GEAppliances com Individuals qualified to service their own appliances can have parts or accessories sent dire...

Reviews: