background image

49-88056-1   07-13   GE

GEAppliances.com

Write the model and serial  

numbers here:

Model #  ________________
Serial #   ________________

You can find them on a label 

behind the drawer or behind the 

lower oven door on the front of 

the range frame.

Owner’s Manual

Ranges


Safety Instructions

  . . . . . . . . .

2–6

Operating Instructions


Clock and Timer . . . . . . . . . . . . . . . . . . . 17 

Control  Lock  Out  . . . . . . . . . . . . . . . . . . 18 

Energy  Saver  Mode  . . . . . . . . . . . . . . . 18 

Oven  . . . . . . . . . . . . . . . . . . . . . . . . . . 11–20

    Controls . . . . . . . . . . . . . . . . . . . . . . . . . . 11
  Power Outage . . . . . . . . . . . . . . . . . . . 12

  Aluminum Foil . . . . . . . . . . . . . . . . . . . 13

    Broiling  Guide . . . . . . . . . . . . . . . . . . .   14

  Clock and Timer  . . . . . . . . . . . . .   15-16 

  Adjust the Oven Thermostat . . . . . 17

    Special  Features  . . . . . . . . . . . . . . . . . 17

  Sabbath Feature . . . . . . . . . . . . . . . . . 18

  Self-Cleaning. . . . . . . . . . . . . . . . . 19, 20

Surface Units . . . . . . . . . . . . . . . . . . . . . .7,8

Glass  Cooktop   . . . . . . . . . . . . . . . . . . 9,10 

Care and Cleaning


Control  Knobs . . . . . . . . . . . . . . . . . . . .   21

Coil Surface Units . . . . . . . . . . . . . . . . . 22 

Drip  Pans   . . . . . . . . . . . . . . . . . . . . . . . .   22

Lift-Up Cooktop . . . . . . . . . . . . . . . . . . . 22

Standard-Clean Oven Interior . . . .   23 

Oven  Vent . . . . . . . . . . . . . . . . . . . . . . . .   23

Porcelain  Oven  Interior . . . . . . . . . . .   23

Lift-Off Oven Door . . . . . . . . . . . . . . . .   24

Oven  Heating  Elements . . . . . . . . . . . 24

Oven Racks . . . . . . . . . . . . . . . . . . . . . .   24

Storage Drawer Removal . . . . . . . .   24

Light  . . . . . . . . . . . . . . . . . . . . . . . . . . . . .   25

Stainless Steel Handles . . . . . . . . . .   25 

Glass  Cooktop   . . . . . . . . . . . . . . . .  26,  27 

Troubleshooting Tips

  . . . . .  28–31

Accessories

  . . . . . . . . . . . . . . . . . . .   32

Consumer Support


Consumer Support . . . . . .   Back Cover 

Warranty . . . . . . . . . . . . . . . . . . . . . . . . .   35

Printed on 

Recycled Paper

Electric Free-Standing

In Canada contact us at: 
www.GEAppliances.ca

For a Spanish version of this 

manual, visit our Website at 

GEAppliances.com.
Para consultar una version  

en español de este manual de 

instrucciones, visite nuestro sitio 

de internet GEAppliances.com.

Summary of Contents for JBS10 series

Page 1: ...ing 19 20 Surface Units 7 8 Glass Cooktop 9 10 Care and Cleaning Control Knobs 21 Coil Surface Units 22 Drip Pans 22 Lift Up Cooktop 22 Standard Clean Oven Interior 23 Oven Vent 23 Porcelain Oven Interior 23 Lift Off Oven Door 24 Oven Heating Elements 24 Oven Racks 24 Storage Drawer Removal 24 Light 25 Stainless Steel Handles 25 Glass Cooktop 26 27 Troubleshooting Tips 28 31 Accessories 32 Consume...

Page 2: ...ns shipped with the bracket for complete details before attempting to install For Freestanding and Slide In Ranges To check if the bracket is installed and engaged properly look underneath the range to see that the rear leveling leg is engaged in the bracket On some models the storage drawer or kick panel can be removed for easy inspection If visual inspection is not possible slide the range forwa...

Page 3: ...eas nearby the surface units or any interior area of the oven allow sufficient time for cooling first Other surfaces of the appliance may become hot enough to cause burns Potentially hot surfaces include the cooktop areas facing the cooktop oven vent opening surfaces near the opening and crevices around the oven door Do not heat unopened food containers Pressure could build up and the container co...

Page 4: ...n fire that may spread to surrounding cabinets Use a deep fat thermometer whenever possible to monitor oil temperature To avoid oil spillover and fire use a minimum amount of oil when shallow pan frying and avoid cooking frozen foods with excessive amounts of ice 8VH SURSHU SDQ VL H VHOHFW FRRNZDUH KDYLQJ IODW bottoms large enough to cover the surface heating element The use of undersized cookware...

Page 5: ...nd rivets on clothing Do not place or store items that can melt or catch fire on the glass cooktop even when it is not being used If the cooktop is inadvertently turned on they may ignite Heat from the cooktop or oven vent after it is turned off may cause them to ignite also Use CERAMA BRYTE ceramic Cooktop Cleaner and CERAMA BRYTE Cleaning Pad to clean the cooktop Wait until the cooktop cools and...

Page 6: ...acks may be left in the oven Do not use self clean to clean other parts such as drip pans or bowls Before operating the self clean cycle wipe grease and food soils from the oven Excessive amount of grease may ignite leading to smoke damage to your home If the self cleaning mode malfunctions turn the oven off and disconnect the power supply Have it serviced by a qualified technician Do not clean th...

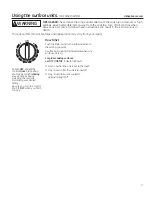
Page 7: ...How to Set Push the knob in and turn in either direction to the setting you want A surface ON indicator light will glow when any surface unit is on For glass cooktop surfaces A HOT COOKTOP indicator light will come on when the unit is hot to the touch stay on even after the unit is turned off stay on until the unit is cooled to approximately 150 F At both OFF and HI the control clicks into positio...

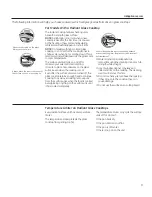
Page 8: ...nd procedures from reputable sources These are available from manufacturers such as Ball and Kerr and the Department of Agriculture Extension Service Flat bottomed canners are recommended Use of water bath canners with rippled bottoms may extend the time required to bring the water to a boil 8 Using the surface units Throughout this manual features and appearance may vary from your model ...

Page 9: ... glass cooktop retains enough heat to continue cooking To avoid overcooking remove pans from the surface units when the food is cooked Avoid placing anything on the surface unit until it has cooled completely Do not slide cookware across the cooktop because LW FDQ VFUDWFK WKH JODVV WKH JODVV LV VFUDWFK UHVLVWDQW not scratchproof Water stains mineral deposits are removable using the cleaning cream ...

Page 10: ...UHFRPPHQGHG XQOHVV GHVLJQHG VSHFLILFDOO for glass cooktops Poor conductivity and slow to absorb heat Will scratch the cooktop surface Check pans for flat bottoms by using a straight edge Pans with rounded curved ridged or warped bottoms are not recommended The following information will help you choose cookware which will give good performance on glass cooktops Do not place wet pans on the glass c...

Page 11: ...CLOCK pad twice or for models without a CLOCK pad hold the and pads for 3 seconds See the Using the clock and timer section Automatic Oven Light This lights anytime the oven has been programmed using the Cooking Time or Start Time Delay Start functions Oven Light On Off Pad Touch this pad to turn the oven light on or off Pad Short taps to this pad will decrease the time or temperature by small amo...

Page 12: ...Flashing Display Power Outage If a flashing time is in the display you have experienced a power failure Reset the clock See the Using the clock and timer section If your oven was set for a timed oven operation and a power outage occurred the clock and all programmed functions must be reset Do not place foods or baking stone directly on the oven floor To avoid possible burns place the racks in the ...

Page 13: ...the shaft and check performance Turn the OVEN TEMP knob to the setting you want Preheat the oven for 10 minutes for baking The oven on light comes on when the burner is on It will cycle on and off during cooking Using the oven GEAppliances com 13 Aluminum Foil Do not use aluminum foil to line oven bottoms The foil will trap heat below and upset the performance of the oven Foil can melt and permane...

Page 14: ...from broil element Steakslessthan1 thickare difficult to cook rare They cookthrough before browning To prevent curling of meat slash fat at 1 intervals Medium Steaks 3 4 to 1 thick E food should be 3 to 4 from broil element Well Done Steaks 3 4 to 1 thick or Ground Beef Patties D or E food should be 3 to 5 from broil element Chicken Breast boneless C food should be 8 to 9 from broil element Broil ...

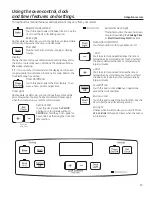
Page 15: ...ay This enters the time and starts the clock To check the time of day when the display is showing other information simply touch the Clock pad The time of day shows until another pad is touched Make sure the clock is set to the correct time of day To Turn Off the Clock Display If you have several clocks in your kitchen you may wish to turn off the time of day clock display on your range Touch the ...

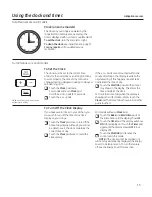
Page 16: ...ll start counting down although the display does not change until one minute has passed When the timer reaches 00 the control will beep 3 times followed by one beep every 6 seconds until the Kitchen Timer On Off pad is touched To Reset the Timer If the display is still showing the time remaining you may change it by touching the Kitchen Timer On Off pad then touching the or pads until the time you...

Page 17: ...se thermometers such as those found in grocery stores to check the temperature setting of your oven These thermometers may vary 20 40 degrees NOTE This adjustment will not affect the broiling or the self cleaning temperatures The adjustment will be retained in memory after a power failure To Adjust the Thermostat Touch the Bake and Broil Hi Lo pads at the same time until the display shows SF Touch...

Page 18: ...ut is still set in Sabbath Remove the cooked food Using the Sabbath feature on some models Designed for use on the Jewish Sabbath and Holidays How to Set Sabbath Feature for Regular Baking NOTE To understand how the oven control works practice using regular baking non Sabbath before entering Sabbath mode Make sure the clock shows the correct time of day and the oven is off TouchandholdboththeBake ...

Page 19: ...mely sensitive to the fumes given off during the self cleaning cycle of any range Move birds to another well ventilated room Wipe up heavy soil on the oven bottom How to Set the Oven for Self Cleaning Follow the directions in the Before a Self Clean Cycle section Latch the door NOTE Never force the latch If the oven is too hot you will not be able to slide the latch Allow the oven to cool Turn kno...

Page 20: ...for the door to be unlatched While the oven is self cleaning you can press the Clock pad to display the time of day To return to the clean countdown press the Self Clean pad Apply a small amount of vegetable oil to a paper towel and wipe the edges of the oven racks with the paper towel Do not spray with Pam or other lubricant sprays To Stop a Self Clean Cycle Turn knob to off position and wait for...

Page 21: ...leaners cleaning powders steel wool or harsh abrasives on any painted surface How to Remove Protective Shipping Film and Packaging Tape Carefully grasp a corner of the protective shipping film with your fingers and slowly peel it from the appliance surface Do not use any sharp items to remove the film Remove all of the film before using the appliance for the first time To ensure no damage is done ...

Page 22: ...se with clean water and polish with a clean soft cloth The drip pans may also be cleaned in a dishwasher Clean the area under the drip pans often Built up soil especially grease may catch fire Do not cover the drip pans with foil Using foil so close to the receptacle could cause shock fire or damage to the range NOTE If your cooktop is equipped with shiny silver colored drip pans do not clean them...

Page 23: ...mproperly The sensor is located at the top of the oven Carefully wipe the sensor clean after each oven cleaning being careful not to move the sensor as a change in its position could affect how the oven bakes Do not spray any oven cleaner on the oven door handles or any exterior surface of the oven cabinets or painted surfaces The cleaner can damage these surfaces 23 The gasket is designed with a ...

Page 24: ...e locks down to the locked position Close the oven door Removal position Oven Heating Elements Do not clean the bake element or the broil element Any soil will burn off when the elements are heated To clean the oven floor gently lift the bake element On some models the bake element is not exposed and is under the oven floor Clean with warm soapy water Oven Racks All oven racks may be cleaned by ha...

Page 25: ...ulb To replace the cover Place it into groove of the light receptacle Pull wire forward to the center of the cover until it snaps into place Connect electrical power to the range For models JBS27DI and JBS27RI Replace oven lamp with 240 volts lamp only Wire cover holder The stainless steel handles on some models can be cleaned with a commercially available stainless steel cleaner Cleaners with oxa...

Page 26: ... BRYTE Ceramic Cooktop Cleaner and a paper towel The CERAMA BRYTE Ceramic Cooktop Scraper and all recommended supplies are available through our Parts Center See instructions under To Order Parts section on next page NOTE Do not use a dull or nicked blade Heavy Burned On Residue Use a CERAMA BRYTE Cleaning Pad for Ceramic Cooktops Normal Daily Use Cleaning ONLY use CERAMA BRYTE Ceramic Cooktop Cle...

Page 27: ...ill have to be replaced In this case service will be necessary Damage from Sugary Spills and Melted Plastic Our testing shows that if you are cooking high sugar mixtures such as jelly or fudge and have a spillover it can cause permanent damage to the glass surface unless the spillover is immediately removed Be careful not to slide pots and pans across your cooktop It will leave metal markings on t...

Page 28: ...oloration Food spillovers not cleaned See the Cleaning the glass cooktop section on the radiant glass before next use cooktop Hot surface on a model This is normal The surface may appear discolored with a light colored glass when it is hot This is temporary and will disappear cooktop as the glass cools Plastic melted to Hot cooktop came into 6HH WKH ODVV VXUIDFH SRWHQWLDO IRU SHUPDQHQW GDPDJH the ...

Page 29: ... to the broil stop See the Using the oven section broil properly position as recommended Oven controls improperly set Make sure you touch the Broil Hi Lo pad Improper rack position See the Broiling Guide being used Cookware not suited For best results use a pan designed for broiling for broiling In some areas the power Preheat the broil element for 10 minutes voltage may be low Broil for the longe...

Page 30: ...perly set See the Using the self cleaning oven section Oven door is not in the locked Make sure you move the door latch handle all the position way to the right Crackling or This is the sound of the This is normal popping sound metal heating and cooling during both the cooking and cleaning functions Excessive smoking Excessive soil Touch the Clear Off pad Open the windows to during a clean cycle r...

Page 31: ...e clock and timer and or the Energy showing in the display Saver Mode section Unable to get the Oven control pads were The Bake and Broil Hi Lo pads must be touched display to show SF not pressed properly at the same time and held for 3 seconds Clock flashes Power outage or surge Reset the clock If the oven was in use you must reset power outage it by touching the Clear Off pad setting the clock a...

Page 32: ...ntity____________________ Part Number __________________________________________________ ____________________ ______________________________________________________________ ____________________ ______________________________________________________________ Model Number______________ Serial Number __________________ Brand _______________ Date of Purchase __________ First Name ______________________...

Page 33: ...Notes GEAppliances com 33 ...

Page 34: ...34 Notes ...

Page 35: ...EXCLUSION OF IMPLIED WARRANTIES Your sole and exclusive remedy is product repair as provided in this Limited Warranty Any implied warranties including the implied warranties of merchantability or fitness for a particular purpose are limited to one year or the shortest period allowed by law This warranty is extended to the original purchaser and any succeeding owner for products purchased for home ...

Page 36: ...your warranty is still in effect You can purchase it on line anytime or call 800 626 2224 during normal business hours GE Consumer Home Services will still be there after your warranty expires Parts and Accessories GEAppliances com Individuals qualified to service their own appliances can have parts or accessories sent directly to their homes VISA MasterCard and Discover cards are accepted Order o...

Reviews: