background image

12

49-80689-9

Special Features

USING THE RANGE:

 Special Features

There are several different special features on your range. To change the settings of these special features:

Ŷ 3UHVVWKH

Bake

 and 

Broil

 pads at the same time and hold for three seconds.

Ŷ ³6)´ZLOODSSHDULQWKHGLVSOD\
Ŷ 6HOHFWWKHIHDWXUH\RXZDQWWRFKDQJH
Ŷ :KHQWKHFKDQJHKDVEHHQPDGHSUHVVWKH

Start

 key to save the change and return to the time of day.

Adjust the Oven Temperature

This feature allows the oven baking and convection 
baking temperature to be adjusted up to 35ºF hotter 

RUGRZQWRž)FRROHU8VHWKLVIHDWXUHLI\RXEHOLHYH

your oven temperature is too hot or too cold and wish to 
change it. This adjustment affects Bake and Convection 
Bake modes. No other cooking modes are affected.

Press the 

Bake

 pad to enter the temperature adjustment 

PRGH$QXPEHUEHWZHHQDQGZLOOGLVSOD\8VH

the 

+

-

 pads to set the desired temperature adjustment 

and use the 

Bake

 pad to change between negative and 

positive. Press the 

Start

 pad to save the temperature 

adjustment.

Clock Display

This feature can turn off the time of day display. Press 
the 

Timer On/Off

 pad to display the time of day (on) or 

turn off the time of day display (oFF).

NOTE:

 For models with a clock pad, the time of day 

display cannot be turned off in special features. Exit 
special features. To turn the time of day display off on 
these models, just press the clock pad once and then the 
start pad. To have the display turned back on, press the 
clock pad again and then the start pad.

12-hour auto shut-off and Sabbath

2SWLRQVIRUWKLVIHDWXUHDUH³6+GQ´³QR6+GQ´DQG
³6$E´

12-hour auto shut-off turns off the oven after 12 hours of 
continuous operations.

Sabbath mode disables all sounds (the control will not 
beep when a button is pressed), Convection, Broil, Cook 

7LPH7LPHU&ORFNDQG'HOD\7LPHIXQFWLRQV6DEEDWK

mode can only be used with Bake. This feature conforms 

WRWKH6WDU.-HZLVK6DEEDWKUHTXLUHPHQWV

NOTE:

 The oven light comes on automatically (on some 

models) when the door is opened and goes off when the 
door is closed. The bulb may be removed. See the Oven 
Light Replacement section. On models with a light switch 
on the control panel, the oven light may be turned on 
and left on.

Press the 

Set Clock

 pad to view the current setting and 

then to change the setting.

For models that do not have a 

Set Clock

 pad, press the 

Cook Time

 pad to view the current setting and then to 

change the setting.

7RXVH6DEEDWKPRGHVHOHFW³6$E´DQGSUHVV

Start

. A 

]


will appear in the display and the clock will not display. 

Once in Sabbath mode, at any time you can press 

Bake


to start the oven. Note that when programming a bake 
in Sabbath mode, the preset starting temperature will 
automatically be set to 350°F. Press the + or - pads to 
increase or decrease the temperature in 25°F increments 
for temperatures between 170°F and 550°F and then 
press 

Start

.

No sound will be given when the keys are pressed. At a 
random time between 30 seconds and 1 minute, 

][

, will 

appear in the display indicating the oven is running.

If you need to adjust the temperature while baking, 
press 

Bake

 again. Press the 

+

 or 

-

 pads to increase 

or decrease the temperature in 25°F from the previous 
temperature you set to the new baking temperature and 
then press 

Start

.

To exit Sabbath mode, make sure that the oven is turned 
off. To turn the oven off, press 

Cancel/Off

. The oven will 

immediately turn off and 

][

 will change to 

]

 indicating that 

the oven has turned off. Press and hold the 

Bake

 and 

Broil

 pads for 3 seconds to enter special features then 

press 

Delay Time

 until either "12 Shdn" or "no Shdn" is 

in the display and press 

Start

.

NOTE:

 If power outage occurs, the Sabbath mode will 

not resume when power is restored.

If you wish to use the Cook Time feature (if available) to 
bake in the oven and then have the oven automatically 
turn off, you will need to press the 

Cook Time

 pad, 

enter a cooking time duration, and press 

Start

. Then 

enter special features to start Sabbath mode as detailed 
above.

Summary of Contents for JBS65

Page 1: ...NGE Surface Units 7 Cookware for Radiant Glass Cooktop 10 Oven Controls 11 Special Features 12 Oven Racks 13 Aluminum Foil and Oven Liners 13 Cookware 13 Cooking Modes 14 Cooking Guide 15 CARE AND CLE...

Page 2: ...nto every GE Appliances product and we think you will too Among other things registration of your appliance ensures that we can deliver important product information and warranty details when you need...

Page 3: ...8VH WKLV DSSOLDQFH RQO IRU LWV LQWHQGHG SXUSRVH DV described in this Owner s Manual H VXUH RXU DSSOLDQFH LV SURSHUO LQVWDOOHG DQG grounded by a qualified installer in accordance with the provided inst...

Page 4: ...from the oven Failure to follow this instruction may result in severe burns IMPORTANT SAFETY INFORMATION READ ALL INSTRUCTIONS BEFORE USING THE APPLIANCE WARNING COOKTOP SAFETY INSTRUCTIONS 1HYHU OHDY...

Page 5: ...ay cause them to ignite also 8VH 5 0 5 7 ceramic Cooktop Cleaner and CERAMA BRYTE Cleaning Pad to clean the cooktop Wait until the cooktop cools and the indicator light goes out before cleaning A wet...

Page 6: ...MATION READ AND SAVE THESE INSTRUCTIONS IMPORTANT SAFETY INFORMATION READ ALL INSTRUCTIONS BEFORE USING THE APPLIANCE WARNING SELF CLEANING OVEN SAFETY INSTRUCTIONS The self cleaning feature operates...

Page 7: ...unit is on For glass cooktop surfaces A HOT COOKTOP indicator light will FRPH RQ ZKHQ WKH XQLW LV KRW WR WKH WRXFK VWD RQ HYHQ DIWHU WKH XQLW LV WXUQHG RII VWD RQ XQWLO WKH XQLW LV FRROHG WR approxima...

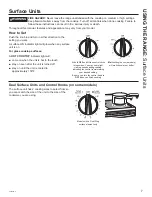
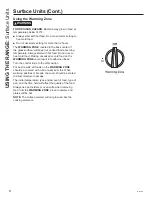
Page 8: ...VH WR heat cold food Placing uncooked or cold food on the WARMING ZONE could result in foodborne illness Turn the control knob to the ON position For best results all foods on the WARMING ZONE should...

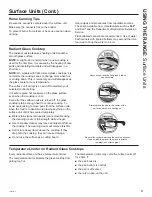
Page 9: ...ear in a short time NOTE On models with light colored glass cooktops it is normal for the cooking zones to change color when hot or cooling down This is temporary and will disappear as the glass cools...

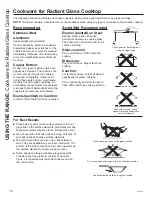
Page 10: ...pans can cause permanent damage to cooktop glass The enamel can melt and bond to the ceramic cooktop Glass ceramic Poor performance Will scratch the surface Stoneware Poor performance May scratch the...

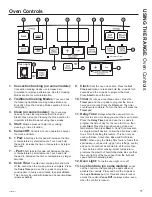
Page 11: ...ress and hold the pads for 3 seconds and the pads to program the clock Press Start to save the time 10 Timer Works as a countdown timer Press the Timer pad and the pads to program the time in hours an...

Page 12: ...WKH 6WDU HZLVK 6DEEDWK UHTXLUHPHQWV NOTE The oven light comes on automatically on some models when the door is opened and goes off when the door is closed The bulb may be removed See the Oven Light R...

Page 13: ...crust If using dark and coated cookware check food earlier than minimum cook time If undesirable results are obtained with this type of cookware consider reducing oven temperature by 25 F next time S...

Page 14: ...a single rack To use this mode press the Convection Bake pad enter a temperature and then press Start Always preheat when using this mode Broiling Modes Always broil with the door open Monitor food c...

Page 15: ...void Broil Hi modes Broil skin side down first Watch food closely when broiling For best performance when broiling center food below the broil heating element Broil Lo Bake 2 or 3 Boneless chicken bre...

Page 16: ...the oven Clean with a mild soap and water or vinegar and water solution Rinse with clean water and dry with a soft cloth When cleaning surfaces make sure that they are at room temperature and not in...

Page 17: ...ve a self clean feature With proper care the porcelain enamel finish on the LQVLGH RI WKH RYHQ WRS ERWWRP VLGHV EDFN DQG LQVLGH RI WKH GRRU ZLOO VWD QHZ ORRNLQJ IRU HDUV Let the oven cool before clean...

Page 18: ...an cycle Soil on the front frame of the range and outside the gasket on the door will need to be cleaned by hand Clean these areas with hot water soap filled steel wool pads or cleansers such as Soft...

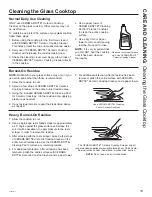
Page 19: ...0 5 7 Cleaning Pad for Ceramic Cooktops rub the residue area applying pressure as needed 4 If any residue remains repeat the steps listed above as needed 5 For additional protection after all residue...

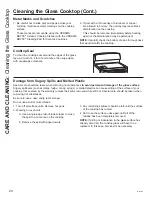
Page 20: ...lastics can cause pitting of the surface of your cooktop not covered by the warranty unless the spill is removed while still hot Special care should be taken when removing hot substances Be sure to us...

Reviews: