


4
PREPARING THE OPENING
B
Installation Instructions
13
″
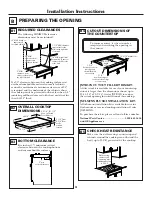
MAX. depth of
unprotected
overhead cabinets
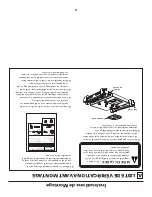
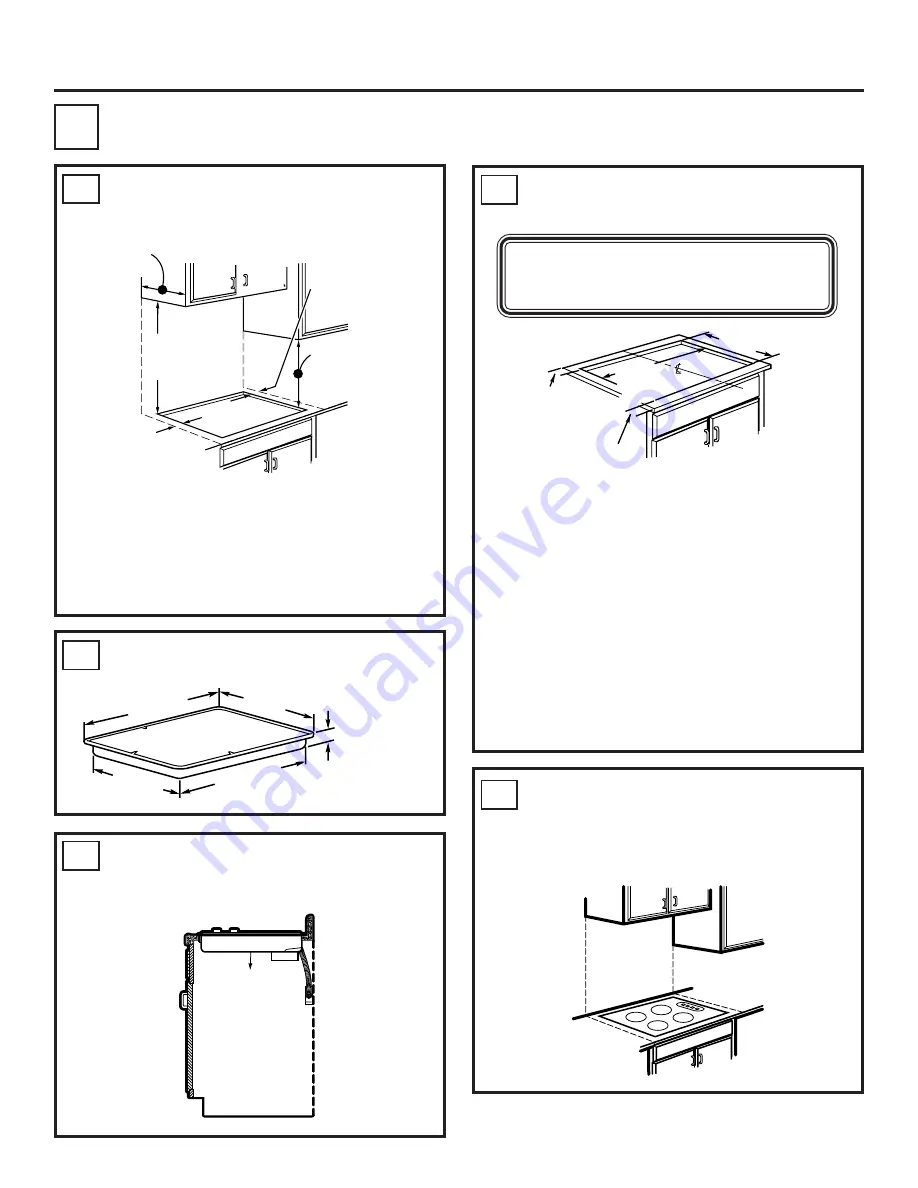
B1 REQUIRED CLEARANCES
The following MINIMUM clearance
dimensions must be maintained.
30
″
MIN.
clearance from
countertop to
overhead surface
2
″
MIN.
clearance from
cutout to side wall on
the left of the unit
18
″
MIN. height from
countertop to nearest
cabinet on either side
of the unit
1 1/2
″
MIN. clearance
from cutout to side
wall on the right side
of the unit
B2 OVERALL COOKTOP
DIMENSIONS
B3 BOTTOM CLEARANCE
Five inches (5
″
) minimum vertical
clearance between the cooktop bottom
and any combustible surfaces.
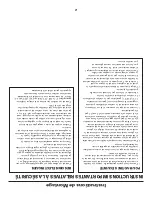
B4 CUTOUT DIMENSIONS OF
THE COUNTERTOP
1 3/4
″
between cooktop
rear edge and
the wall behind
the cooktop
To insure accuracy, it is best to make a
template when cutting the opening in
the counter.
2 1/2
″
from front edge of
cooktop to front edge
of countertop
28 9/16
″
length
of cut
19 9/16
″
width of cut
B5 CHECK HEAT RESISTANCE
Make sure the wall coverings, countertop and
cabinets around the cooktop can withstand the
heat (up to 200
°
F) generated by the cooktop.
Wall covering,
cabinets and
countertop must
withstand heat up
to 200
°
F
If a 30
″
clearance between the cooking surface and
overhead combustible materials or metal cabinets
cannot be maintained, a minimum clearance of 24
″
is required and the underside of the cabinets above
the cooktop must be protected with not less than 1/4
″
insulating millboard covered with sheet metal not less
than 0.0122
″
thick.
5
″
min.
vertical clearance
29 3/4
″
19 1/4
″
28
″
3 1/4
″
Front
4 5/8
″
Rear
at the
conduit
location
Cooktop
20 7/8
″
(21 1/2
″
Max. on Curved
Front Models)
JXTR32X CUTOUT FILLER TRIM KIT:
A filler trim kit is available for use if your countertop
cutout is larger than the dimensions shown, up to
29-13/16
″
x 20-7/16
″
. Order JXTR32X to reduce
the cutout opening for installation of this cooktop.
JXFLM2XX FLUSH INSTALLATION KIT:
A flush mount installation kit is available for use in a
flush mount or recessed cooktop installation. Order
JXFLM2XX.
To purchase these kits, please call our toll-free number:
National Parts Center ............................. 1.800.661.1616
www.GEAppliances.ca


