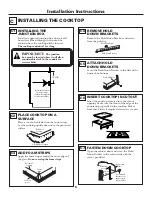
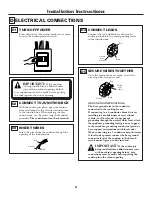
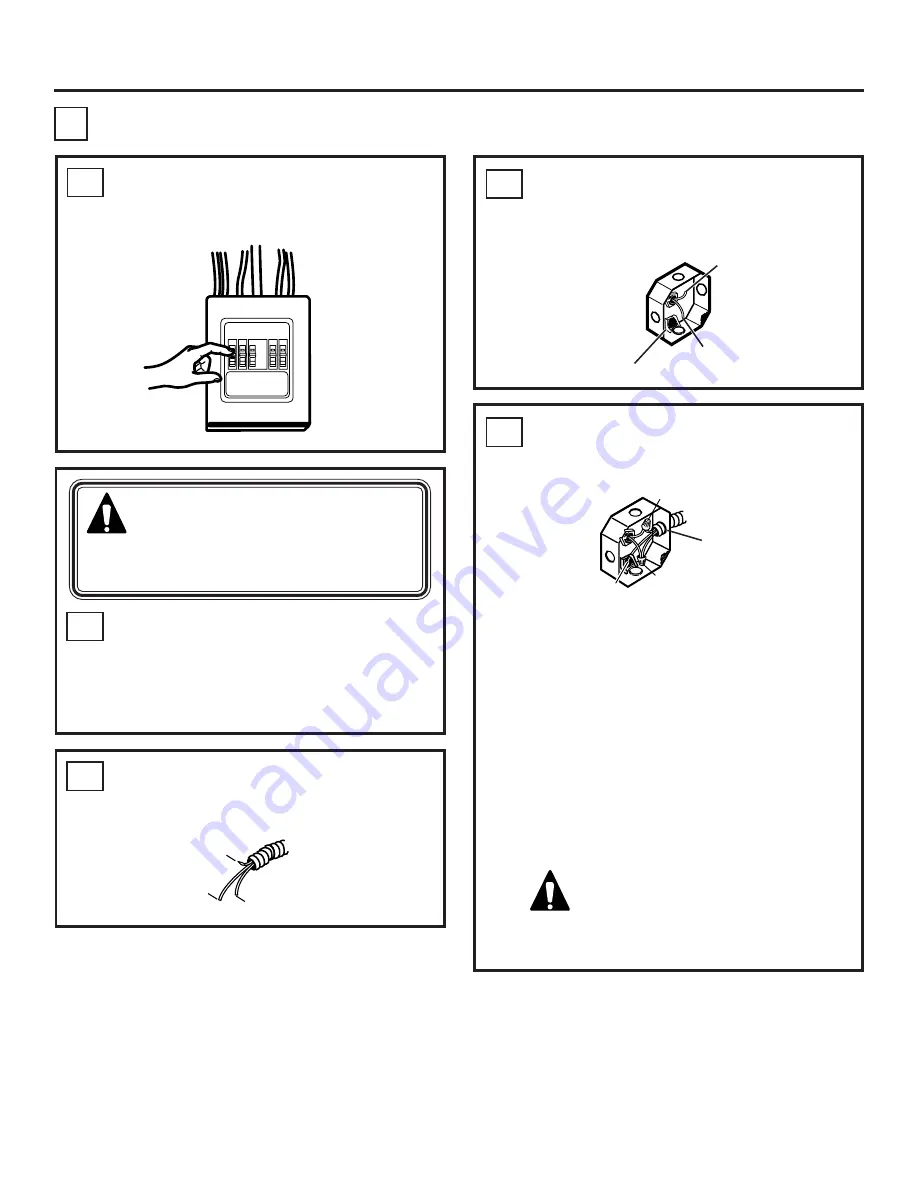
background image

TURN OFF POWER

Turn off power at the circuit breaker or remove
fuses to the cooktop branch circuit.

CONNECT TO JUNCTION BOX

With the cooktop in place, open the cabinet
door and complete the electrical connections
to the junction box. When making the wire
connections, use the entire length of conduit
provided. 

The conduit must not be shortened.

CONNECT LEADS

Connect the red and black leads from the
cooktop conduit to the corresponding leads
in the junction box.

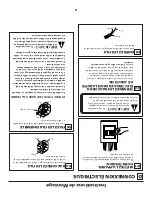
ELECTRICAL CONNECTIONS

6

Installation Instructions

D

D2

D4

D1

Ground

Red

Black

INSERT WIRES

Insert the wires from the conduit through the
opening of the junction box.

D3

IMPORTANT:


If the cooktop

is being installed into a blind counter
(one with no cabinet opening below),

wire connections must be made before putting
the cooktop into the cutout opening.

Red

Ground

wire

location

Black

SECURE WIRES TOGETHER

Once the connections are made, secure the
wires together using wire nuts.

D5

GROUNDING INSTRUCTIONS:
The bare ground wire in the conduit is
connected to the cooktop frame.
If connecting to a 4-conductor branch circuit,
installing in a mobile home or recreational
vehicle, or if local codes do not permit
grounding through the neutral white lead, attach
the appliance grounding lead (green or copper)
to the residence grounding conductor (green or
bare copper) in accordance with local codes.
When connecting to a 3 conductor branch circuit,
if local codes permit, connect the bare ground
connector lead of the cooktop to the branch
circuit neutral (gray or white in color).

IMPORTANT:


If the cooktop is

being installed into a blind counter (one
with no cabinet opening below), wire

connections must be made before putting the
cooktop into the cutout opening.

Red

Black

Ground

Strain

relief

clamp

Summary of Contents for JCP910

Page 1: ...e must be properly grounded Skill level Installation of this appliance requires basic mechanical and electrical skills Completion time 2 3 hours Proper installation is the responsibility of the instal...

Page 2: ...circuit breaker Failure to do so could result in a dangerous or fatal shock Know where your main disconnect switch is located If you do not know have your electrician show you ELECTRICAL REQUIREMENTS...

Page 3: ...n Be sure to place all literature Owner s Manual Installations etc in a safe place for future reference ON ON HOT HOT Packaging Literature Package Cooktop TOOLS YOU WILL NEED CAUTION BEFORE YOUBEGIN R...

Page 4: ...coverings countertop and cabinets around the cooktop can withstand the heat up to 200 F generated by the cooktop Wall covering cabinets and countertop must withstand heat up to 200 F If a 30 clearance...

Page 5: ...g Make sure the front of the edge of the countertop is parallel to the cooktop Make a final check that all required clearances are met C7 FASTEN DOWN COOKTOP Open the cabinet door and screw the Hold D...

Page 6: ...ing the cooktop into the cutout opening Red Ground wire location Black SECURE WIRES TOGETHER Once the connections are made secure the wires together using wire nuts D5 GROUNDING INSTRUCTIONS The bare...

Page 7: ...TEST CHECKLIST Remove all protective film if present and any stickers Check to be sure that all wiring is secure and not pinched or in contact with moving parts Check level of appliance Check that the...

Page 8: ...ehold wiring The insulation of these leads is rated at temperatures much higher than the temperature rating of household wiring The current carrying capacity of a conductor is governed by the wire gau...

Page 9: ...ces fils a une notation de temp ratures beaucoup plus lev es que la notation de temp rature du c blage m nager La capacit actuelle de transport d un conducteur est r gie par le diam tre du fil et par...

Page 10: ...l e sur la surface de cuisson V rifiez que tout le c blage soit s curitaire ne soit pas pinc et n entre pas en contact avec des pi ces en mouvement V rifiez l horizontalit de l appareil lectro m nager...

Page 11: ...faire tous les raccords de fils avant de mettre la surface de cuisson dans l ouverture d coup e INS REZ LES FILS Ins rez les fils du conduit par l ouverture de la bo te de jonction D3 Collier de serra...

Page 12: ...e la surface de cuisson Faites une v rification finale pour vous assurer de bien respecter tous les espaces libres C7 FIXEZ LA SURFACE DE CUISSON Ouvrez la porte de l armoire et vissez le support de f...

Page 13: ...espace libre de 30 pouces entre la table de cuisson et les armoires en m tal ou les mat riaux inflammables situ s au dessus d elle vous avez besoin d un espace libre d au moins 24 pouces et vous deve...

Page 14: ...a documentation dans un endroit s r pour la consulter dans l avenir OUTILS N CESSAIRES MISE EN GARDE AVANT DE COMMENCER Lisez compl tement et soigneusement les instructions suivantes IMPORTANT Consult...

Page 15: ...ouvrant le disjoncteur de circuit Si vous ne le faites pas vous pouvez causer des secousses dangereuses ou m me mortelles Vous devez savoir o votre disjoncteur principal d alimentation est situ Si vou...

Page 16: ...8 po et perceuse lectrique ou manuelle Tournevis Phillips Bandes de mousse 4 vis Pub No 31 10602 01 05 JR Imprim aux tats Unis 1 Des questions Appelez le 1 800 361 3400 ou consultez notre site Web ww...

Reviews: