background image

We’ll Be There

With the purchase 

 new GE appliance, receive the assurance that 

 ever need

information or assistance from GE, we’ll be there. All you have to do   call—toll-free!


AGE consumer service professional will provide expert repair service,

scheduled at   time that’s convenient for you. Many GE Consumer Service
company-operated locations offer you service today or tomorrow, or at your
convenience 

 a.m. to 

 p.m. weekdays, 

 a.m. to 

 p.m. Saturdays).

Our factory-trained technicians know your appliance inside and out–so most
repairs can be handled in just one visit.

Whatever your question about any GE major appliance, GE Answer Center”
information service is available to help. Your call—and your question—will be
answered promptly and courteously, And you can call any time. GE Answer

 service is open 

 hours a day,   days a week.

 With Special Needs...

Upon request, GE will provide

Consumers with impaired hearing or speech who have

Braille controls 

 a variety of GE

access to a 

 or a conventional teletypewriter may

appliances, and a brochure to

call 

 (800-833-4322) to request

assist in planning a barrier-free

information or service.

kitchen for persons with limited
mobility. To obtain these items,

free of charge, call 800.626.2000.

Service Contracts

You can have the secure feeling that GE Consumer Service will still be there

after your warranty expires. Purchase a GE contract while your warranty is still
in effect and you’ll receive a substantial discount. With a multiple-year contract,

you’re assured of future service at today’s prices.


80&62&2002


 to service their 

 appliances

User maintenance 


 in 


can have needed parts or accessories sent directly to

cover procedures intended to be performed 

by any user.

their home. The GE parts system provides access to over

Other servicing 

 be referred to 

 parts... and all GE Genuine Renewal Parts are

service 

personnel. Caution must be exercised, since

fully warranted. VISA, MasterCard and Discover cards

improper servicing may cause unsafe operation.

are accepted.

Summary of Contents for JGBC15GER

Page 1: ...Burner Assembly 2 1 22 23 DoorRemoval 25 Lift up Cooktop 24 Oven Bottom 2 3 Oven Vents 2 5 Storage Drawer 27 Problem Solver 45 46 Thermostat Adjustment Do It Yourself 46 More questions call GE Answer Center 80 626 2000 Preparation 28 44 Flame Size 10 35 37 45 46 Flooring Under the Range 30 Installation Instructions 28 44 Leveling 39 Consumer Services 47 Appliance Registration 2 Important Phone Num...

Page 2: ...NSTRUCTIONS W YOU NED SERVICE To obtain service see the FIRST contact the people who FINALLY if your problem is still Consumer Services page in the serviced your appliance Explain not resolved write back of this book why you are not pleased In most Major Appliance Consumer To obtain replacement parts contact cases this will solve the problem Action Panel GE Hotpoint Service Centers NEXT if you are...

Page 3: ...y recommended in this guide All other servicing shodd be referred to a qutified technician Be sure M packing materi are removed from the r nge before operating it to prevent fire or smoke damage should the packing material ignite Loeat the range out of kitchen tra ic path and out of drafty locations to prevent ptiot outage on models with standing pilots and poor air cimtiation Be sure your range i...

Page 4: ... high flame settings Boilover causes smoking and greasy spillovers that may catch on fire 4 Adjust top burner flame size so it does not extend beyond the edge of the cookware Excessive flame is hazardous Use only dry pot holde moist or damp potholders on hot surfaces may result in burns from steam Do not let pot holders come near open flames when lifting cookware Do not use a towel or other bulky ...

Page 5: ...Do not use oven for a storage area Items stored in the oven can ignite Stand away from the range when opening the door of a hot oven The hot air and steam that escapes can cause burns to hands face and eyes Keep the oven free from grease buildup Place the oven shelves in desired position while oven is cool Pulling out the shelf to the shelf stop is a convenience in lifting heavy foods It is dso a ...

Page 6: ...FEATu s OF YOUR RANGE p i e d L i s B S m r Your range is equipped with one of the two types of surface burners shown above 6 ...

Page 7: ...Oven Shelf Supports Shelf positions for cooking are suggested in the 13 14 Baking Roasting and Broiling sections 14 Air Vent in Oven Door Located at top of Oven Door 4 25 15 Broiler Drawer or Storage Drawer on some models I 27 16 Air Intake 4 27 17 Model and Serial Numbers Located on front frame of range 2 30 behind either Broiler Drawer or Storage Drawer 18 Removable Oven Door 25 19 Anti Tip Devi...

Page 8: ...y To light them 1 Be sure surface burner control knobs are in the 0 position 2 Remove the grates and lift the cooktop up see the Lift Up Cooktop section 3 Locate the two pilot ports and light each of them with a match Surface Burner Controls Knobs that turn the surface burners on and off are marked as to which burners they control The two knobs on the left control the left front and left rear burn...

Page 9: ...ze Flame will be almost horizontal and will lift slightly away from the burner when the burner is first turned on A blowing or hissing sound may be heard for 30 to 60 seconds This normal sound is due to improved injection of gas and air into the burner Put a pan on the burner before lighting it or adjust the flame to match pan size as soon as it lights and the blowing or hissing sound will be much...

Page 10: ...wly and cools very slowly Check cookware manufacturer s directions to be sure it can be used on gas ranges Stainless Steel This metal alone has poor heating properties and is usually combined with copper aluminum or other metals for improved heat distribution Combination metal skillets usually work satisfactorily if they are used with medium heat as the manufacturer recommends Wok Cooking Use of S...

Page 11: ...a time Short taps on the UP and hold the UP pad until 6 3 10 appears and then tap DOWN pads will always change the setting by l minute increments The timer can be set for a the UP pad until 3 15 is displayed maximum of 9 hours and 45 minutes 3 Press the CLOCK pad and the clock will be set If 3 To start the timer press the TIMER pad you do not press the CLOCK pad the clock will If the TIMER pad is ...

Page 12: ...ew range Oven Control Your oven is controlled either by a single OVEN CONTROL knob or by a BA ROIL switch and an OVEN CONTROL knob It will normally take 30 90 seconds before the flame comes on After the oven reaches the selected temperature the oven burner cycles ff completely then on with a full flame to maintain the selected temperature If your range is equipped with a separate BAKE ROIL switch ...

Page 13: ...f pots and pans on the cooktop may become hot if left too close to the vent Metal items will become very hot if they are left on the cooktop and could cause burns Do not leave any items on the cooktop The hot air from the vent may ignite flammable items and will increase pressure in closed containers which may cause them to burst Oven Shelves The shelves are 1 II To remove a II designed with stop ...

Page 14: ...usual Your oven has been set correctly at the factory and is more likely to be accurate than the oven which it replaced We do not recommend the use of inexpensive thermometers such as those found in the grocery store to check the temperature setting of your new oven These thermometers can vary by 2040 degrees To decide how much to change the temperature set the oven temperature 25 F higher or lowe...

Page 15: ... shells B or C I Frozen pies I A oncookie sheet I I Casseroles I Bor C I 1 Roasting 1 B orR I Preheating Preheat the oven if the recipe calls for it Preheat means bringing the oven up to the specified temperature before putting in the food To preheat set the oven at the correct temperature selecting a higher temperature does not shorten preheat time Preheating is necessary for good results when ba...

Page 16: ...an the recipe for baking since the shiny foil pan reflects heat away recommends will usually be crisper thinner and drier from the pie crust the cookie sheet helps retain it than it should be If baked in a pan smaller than recommended it may be undercooked and batter may oveflow Check the recipe to make sure the pan size used is the one recommended Baking Pans Use the proper baking pan The type of...

Page 17: ...sier to carve Internal temperature will rise about 5 to 10 F If you wish to compensate for temperature rise remove the roast from the oven when its internal temperature is 5 to 10 F less than temperature shown in the Roasting Guide NOTE Remember that food will continue to cook in the hot oven and therefore should be removed when the desired internal temperature has been reached the meat fat side u...

Page 18: ...irculate and brown the meat ROAST G GU E pe Meat Tender cuts rib high quality sirloir tip rump or top round Lamb leg or bone in shoulder Veal shoulder leg or loin Pork loin rib or shoulder Ham precooked Poultry Chicken or Duck Chicken pieces Turkey Oven rem erature 325 325 325 325 325 325 350 325 Doneness Rare Medium Well Done Rare Medium Well Done Well Done Well Done To Warm Well Done Well Done W...

Page 19: ... of food but also increases spattering and the possibility of fats and meat juices igniting 4 Close the oven or broiler door 5 Turn the OVEN CONTROL knob and the BAKE BROIL switch on some models to BROIL 6 Turn most foods once during cooking the exception is thin fillets of fish oil orie side place that side down on broiler rack and cook without turning until done Time foods for about one half the...

Page 20: ...6 25 30 A 30 35 25 30 Bakery Producti Bread Toast or Toaster Pastries 2 to 4 slices 1 pkg 2 1 2 1 Do not turn over c c A 2 3 3 5 13 16 5 1 2 1 Space evenly Place English muffins cut side up and brush with butter if desired English Muffins 2 split Lobster Tails 2 to 4 6 to 8 oz each c Do not urn over 5 Cut through back of shell and spread open Brush with melted butter before broiling and after half...

Page 21: ...e burners from range Burners lift out for cleaning Lift up the cooktop and then lift out the surface burners To remove burned on food soak the surface burner in a solution of mild liquid detergent and hot water Soak the surface burner for 20 to 30 minutes For more stubborn stains use a cleanser like Soft Scrub brand or Bon Ami brand Rinse well to remove any traces of the cleanser that might clog t...

Page 22: ... mtiels Gra e n j Q h o Sutiace Burner G On models with dual burners the cooktop lifts up for easy access rn all controls OFF before removing burner parts and drip pans if so equipped The burner grates and drip pans if so equipped can be lifted off making them easy to clean The holes in the surface burners of your range must be kept clean at all times for proper ignition and an even unhampered fla...

Page 23: ...cooled Then rinse and polish with a dry cloth Be careful when you clean the cooktop because the area over the pilot will be hot on models with standing pilots Cooktop Surface To avoid damaging the porcelain enamel surface on some models of the cooktop and to prevent it 3 from becoming dull clean up spills right away Foods with a lot of acid tomatoes sauerkraut fruit juices 6 a Do not store flammab...

Page 24: ... bulb with a damp cloth as the bulb will break Control Panel and Knobs It s a good idea to wipe the control panel after each use of the oven Clean with mild soap and water or vinegar and water rinse with clean water and polish dry with a soft cloth Do not use abrasive cleansers strong liquid cleaners plastic scouring pads or oven cleaners on the control panel they will damage the finish The contro...

Page 25: ...f the door Porcelain Oven Interior on all models except Continuous Cleaning models With proper care the porcelain enamel interior will Cautions about using spray on oven cleaners retain its attractive finish for many years Be careful where the oven cleaner is sprayed Soap and water will normally do the job Heavy Do not spray oven cleaner on the electrical controls spattering or spillovers may requ...

Page 26: ...d by operating the oven at 400 F Close the door and turn the OVEN CONTROL knob to 400 F Time for at least 4 hours Repeated cycles may be necess before improvement in appearance is apparent Remember During the operation of the oven the door and other range surfaces will get hot enough to cause burns Do not touch Let the range cool before replacing oven shelves 4 If a spillover or heavy soiling occu...

Page 27: ...ble Broiler Drawer on some models To remove To replace 1 When the broiler is cool remove rack and pan 2 Pull the broiler drawer out until it stops then push it back in about 1 inch G 1 Hold the broiler 3 Grasp handle lift and pull broiler drawer out Clean the broiler drawer with hot soapy water kd drawer in the raised 2 position as you slide it partway into the range Then lower the drawer and push...

Page 28: ...ation adjustment alteration service or maintenance can cause injury or property damage Refer to this manual For assistance or additiond information consult a qualified installer service agency manufacturer dealer or the gas supplier I UTION I Do not attempt to operate the oven of this range during a power failure lMPO ANT Remove all pacting material and literature from oven before connecting gas a...

Page 29: ...etal cabinet The hood must beat least as wide as the appliance and centered over the appliance Clearance between the cooking surface and the ventilation hood surface MU NQWR BE USS 24 INCHES If cabinets are placed above t e ran e allow a i minimum clearance of 30 between the cooking surface and the bottom of unprotected cabinets E a 30 clearance between cooking surface and overhead combustible mat...

Page 30: ... or higher than the floor covering This will allow the range to be moved for cleaning or servicing MODEL AND SERIAL NUMBER LO TION Depending on your range you ll find the model and serial numbers on a label on the front frame of the range behind the storage drawer kick panel or broiler drawer TOOLS YOU WILL NEED Phillips and flat blade screwdrivers Pencil and ruler Two pipe wrenches one for backup...

Page 31: ...d to connect the range to the gas supply line should have an I D of 1 2 and be 5 feet in length for ease of installation In Canada flexible connectors must be single wall metal connectors no longer than 6 feet in length CONFECT THE RANGE TO GAS Shut off the main gas supply valve before disconnecting the old range and leave it off until new hook up has been completed Don t forget to relight the pil...

Page 32: ...t max Adapter l a Gas Shut off Valve Rigid Pipe Hookup for Models Equipped with Sealed Burners Q Pressure Regulator o 90 Elbow_ Ü provided t T 90 Elbow Nipple Union Black Iron Pipe Union b Nipple FE i Gas Shut off Valve Flexible Connector and Rigid Pipe Hookups for Models Equipped with Dual Burners Flexible Connector Rigid Pipe Hookup Manifold Pipe Adapter t n Nipple 32 ...

Page 33: ...g test pressures of 1 2 psig or less to test the gas supply system simply isolate the range from the gas supply system by closing the individual shut off valve ELECIRl L CONNECTIONS Electrical Requiremen 120volt 60 Hertz properly grounded branch circuit protected by a 15 amp or 20amp circuit breaker or time delay fuse Efiension Cord Cautions Because of potential safety hazards associated with cert...

Page 34: ...dapter ground terminal is very likely to break with repeated use Should this happen DO N USE the appliance until a proper ground has again been established Usage Situations where Appliance Power Cord be Disconnected Frequen Do not use an adapter plug in these situations because disconnecting of the power cord places undue strain on the adapter and leads to eventual failure of the adapter ground te...

Page 35: ...the upper tip is normal If you find pilot adjustment is necessary follow instructions at right Adiust the Sutiace Burner Pilots if Necessary 1 Raise the cooktop 3 To adjust use a bladetype screwdriver with a shaft diameter of less than 3 16 Turn pilot adjustment screw until pilot is 5 16 high Do not reduce the flame to less than 5 16 or pilot outage may occur A pilot flame burning higher than reco...

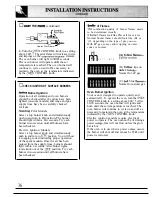
Page 36: ... module Once the air has been purged from the supply lines burners should light within 4 seconds After burner lights rotate knob out of the LITE position Try each burner in succession until all burners have been checked Quali of Flames me combustion quality of burner flames needs to be determined visually Hburner flames look like A call for service Normal burner flames should look like B or C depe...

Page 37: ...bottom burner flames are burning properly remove the oven bottom and the burner baffle see below Flames should have approximately 1 blue cones and if range is supplied with natural gas should burn with I yellow tipping with most LP gas small yellov tips at the end of outer cones are normal Flames should not lift off burner ports If liftin is observed gradually reduce air shutter opening until flam...

Page 38: ...imately 1 blue cones and if range is supplied with natural gas should burn with no yellow tipping with most LP gas small yellow tips at the end of outer cones are normal Flames should not lift off burner ports If lifting is observed gradually reduce air shutter opening until flames are stabilized With the baffle in place or with the oven bottom in place on models not equipped with a burner baffle ...

Page 39: ...this device does not preclude tipping of the range when not properly installed If the Anti Tip device supplied with the range does not fit this application use the universal Anti Tip device WB02X7909 1 Mark the wall where the NGHT EDGE of the range is to be located Be sure to allow for the countertop overhang if you intend to install the range next to cabinets toward the center of the range from t...

Page 40: ...ve an access cover also For models equipped with dual burners remove the cooktop and locate the pressure regulator at right rear of range n 2 Follow the directions in A or B that match your regulator type Is the e in a ation If it is this regulator 1 Use a coin to remove the cap from the pressure regulator 2 Turn the cap over and hook it into the slots The type of gas to be used should now be visi...

Page 41: ...emoving spud to prevent the aluminum tube horn twisting 4 Install or lce spuds accordin to one of the d following diagrams see or B for LP gas or natural gas depending on which you are converting to orifice Spuds for Conve ingto LpGas LP orifice spuds are in a small plastic bag packed with this Use and Care book LP orifice spuds have a 2 digit number and the Letter L on one side Each ofilce spud w...

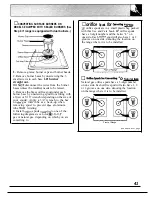
Page 42: ...NVERTING SURFACE BURNERS OH MODELS EQUIPPED WITH DUAL BURNERS See Step 3 if range is equipped with sealed burners 1 Lift cooktop 2 Lift burner assemblies straight up and set aside to gain access to surface burner spuds 3 With a 7mm or 5 16 wrench depending on the size of your spuds remove each of the four spuds on the surface burner gas inlet tubes and replace them with the correct gas spuds mount...

Page 43: ...ate the shutter to the Screw full open position With Air Shutter baffle in place flames should have approximately l inch blue cones and should not extend beyond the edges of the burner baffle After 30 seconds of burner operation check for flames lifting off burner ports If lifting is observed gradually reduce air shutter opening until flames are stabilized For natird gas the shutter should be open...

Page 44: ...quipped with standing pilots b accessed through the small hole near the center of the manifold panel 3 To adjust use a blade type screwdriver with a shaft diameter of less than 3 16 Turn pilot adjustment screw until pilot is 5 16 high DO not reduce the flame to less than 5 16 or pilot outige may occur A pilot flame burning higher than recommended may generate soot carbon black on the bottom of you...

Page 45: ...ural gas If burner flames look like A cdl for service Normal burner flames should look like B or C depending on the type of gas you use With LP gas some yellow tipping on outer cones is norm If range is connected to LP gas check all steps in the Installation Instructions Make sure thermostat capillary bulb located in upper portion of oven is in correct position not touching oven sides and not coat...

Page 46: ...ng or moving To check the oven gas shutoff valve raise the cooktop and look for the gas shut off lever either on the front large tube or at the extreme right rear corner Make sure the lever is turned so that it is parallel to the gas tube The oven thermostat needs adjustment See the Do It YourseZf Adjust the Oven Thermostat section If you need more help call toll free GE Answer Center 800 626 2000...

Page 47: ...ng or speech who have Braille controls f r a variety of GE access to a TDD or a conventional teletypewriter may appliances and a brochure to call 800 TDD GEAC 800 833 4322 to request assist in planning a barrier free information or service kitchen for persons with limited mobility To obtain these items free of charge call 800 626 2000 Service Contracts 80M2 2224 You can have the secure feeling tha...

Page 48: ...t the address below or call toll free GE Answer CenteP 800 626 2000 consumer information service Improper installation If you have an installation problem contact your dealer or installer You are responsible for providing adequate electrical gas exhausting and other connecting facilities as described in the Installation Instructions provided with the product Replacement of house fuses or resetting...

Reviews: