background image

26

49-2000316   Rev. 6

6WDSOH\RXUUHFHLSWKHUH3URRIRIWKHRULJLQDOSXUFKDVH

date is needed to obtain service under the warranty

.

LIMITED W

ARRANTY

GE Appliances Gas Range Limited Warranty

GEAppliances.com

All warranty service is provided by our Factory Service Centers, or an authorized Customer Care

®

 technician. To schedule 

service online, visit us at 

GEAppliances.com/service

RUFDOO*($SSOLDQFHVDW*(&$5(63OHDVH

have your serial number and your model number available when calling for service.

Servicing your appliance may require the use of the onboard data port for diagnostics. This gives a GE Appliances factory 
service technician the ability to quickly diagnose any issues with your appliance and helps GE Appliances improve its 
products by providing GE Appliances with information on your appliance. If you do not want your appliance data to be 
sent to GE Appliances, please advise your technician not to submit the data to GE Appliances at the time of service.

What GE Appliances will not cover:

Ŷ


Service trips to your home to teach you how to use 
the product. 

Ŷ ,PSURSHULQVWDOODWLRQGHOLYHU\RUPDLQWHQDQFH
Ŷ )DLOXUHRIWKHSURGXFWLILWLVDEXVHGPLVXVHG

modified, or used for other than the intended purpose 
or used commercially. 

Ŷ 5HSODFHPHQWRIKRXVHIXVHVRUUHVHWWLQJRIFLUFXLW

breakers. 

Ŷ 'DPDJHWRWKHSURGXFWFDXVHGE\DFFLGHQWILUH

floods, or acts of God.

Ŷ 'DPDJHWRILQLVKVXFKDVVXUIDFHUXVWWDUQLVKRU

small blemishes not reported within 48 hours of 
delivery.

Ŷ ,QFLGHQWDORUFRQVHTXHQWLDOGDPDJHFDXVHGE\

possible defects with this appliance. 

Ŷ 'DPDJHFDXVHGDIWHUGHOLYHU\
Ŷ 3URGXFWQRWDFFHVVLEOHWRSURYLGHUHTXLUHGVHUYLFH
Ŷ 6HUYLFHWRUHSDLURUUHSODFHOLJKWEXOEVH[FHSWIRU/('

lamps.

EXCLUSION OF IMPLIED WARRANTIES

Your sole and exclusive remedy is product repair as provided in this Limited Warranty. Any implied warranties, 
including the implied warranties of merchantability or fitness for a particular purpose, are limited to one year or 
the shortest period allowed by law. 

This limited warranty is extended to the original purchaser and any succeeding owner for products purchased for 

KRPHXVHZLWKLQWKH86$,IWKHSURGXFWLVORFDWHGLQDQDUHDZKHUHVHUYLFHE\D*($SSOLDQFHV$XWKRUL]HG6HUYLFHU

is not available, you may be responsible for a trip charge or you may be required to bring the product to an Authorized 
GE Appliances Service location for service. In Alaska, the limited warranty excludes the cost of shipping or service 
calls to your home.
Some states do not allow the exclusion or limitation of incidental or consequential damages. This limited warranty 
gives you specific legal rights, and you may also have other rights which vary from state to state. To know what your 
legal rights are, consult your local or state consumer affairs office or your state’s Attorney General. 

Warrantor: GE Appliances, a Haier company

/RXLVYLOOH.<

Extended Warranties:

3XUFKDVHD*($SSOLDQFHVH[WHQGHGZDUUDQW\DQGOHDUQDERXWVSHFLDOGLVFRXQWVWKDWDUH

available while your warranty is still in effect. You can purchase it online anytime at

GEAppliances.com/extended-warranty

RUFDOOGXULQJQRUPDOEXVLQHVVKRXUV*($SSOLDQFHV6HUYLFHZLOOVWLOOEHWKHUHDIWHU\RXUZDUUDQW\H[SLUHV

For the period of

GE Appliances will replace

One year 

From the date 
of the original 
purchase

Any part

 of the range which fails due to a defect in materials or workmanship. During this 

limited one-year warranty

, GE Appliances will provide, 

free of charge

, all labor and in-home 

service to replace the defective part.

Summary of Contents for JGBS61

Page 1: ...er Failure 7 Surface Burners 7 Griddle 9 Oven Controls 10 Special Features 12 Sabbath Mode OU and CRC 12 Sabbath Mode Standard 13 Cooking Modes 14 Oven Racks 15 Aluminum Foil and Oven Liners 15 Cookwa...

Page 2: ...s into every GE Appliances product and we think you will too Among other things registration of your appliance ensures that we can deliver important product information and warranty details when you n...

Page 3: ...t be secured to the anti tip device properly WARNING If the information in this manual is not followed exactly a fire or explosion may result causing property damage personal injury or death Do not st...

Page 4: ...VFUDWFKLQJ RU LPSDFWLQJ JODVV GRRUV cooktops or control panels Doing so may lead to glass breakage Do not cook on a product with broken glass Shock fire or cuts may occur R QRW OHDYH FKLOGUHQ DORQH R...

Page 5: ...department DO NOT ATTEMPT TO EXTINGUISH AN OIL GREASE FIRE WITH WATER 1HYHU OHDYH WKH VXUIDFH EXUQHUV XQDWWHQGHG DW medium or high heat settings Foods especially oily foods may ignite resulting in fi...

Page 6: ...cause carbon monoxide poisoning Never place foil or oven liners on the oven bottom They can trap heat causing risk of smoke or fire 6WDQG DZD IURP WKH UDQJH ZKHQ RSHQLQJ WKH RYHQ door Hot air or stea...

Page 7: ...b remains at LITE Once gas is ignited turn the knob to adjust the flame size Using the Surface Burners NOTES R QRW RSHUDWH WKH EXUQHU IRU DQ H WHQGHG SHULRG RI time without cookware on the grate The f...

Page 8: ...d evenly Most foods brown HYHQO LQ DQ DOXPLQXP VNLOOHW 8VH VDXFHSDQV ZLWK WLJKW fitting lids when cooking with minimum amounts of water Stainless Steel This metal alone has poor heating properties and...

Page 9: ...e nonstick coating For instructions on how to clean the griddle see the Cleaning the Cooktop section of this manual WARNING Fire Hazard Use care when cooking greasy foods Spilled grease may result in...

Page 10: ...49 2000316 Rev 6 USING THE RANGE Oven Controls Convection Non Convection 2 3 1 7 8 4 5 6 9 10 Oven Controls 2 4 7 8 3 5 6 9 11 10 or...

Page 11: ...VV Start to save the time 8 Timer RUNV DV D FRXQWGRZQ WLPHU 3UHVV WKH Timer pad and the and pads to program the WLPH LQ KRXUV DQG PLQXWHV 3UHVV WKH Start pad The oven will continue to operate when the...

Page 12: ...tructions on adjusting the display If your model does not have a Set Clock pad enter into the special features PHQX DV RXWOLQHG DERYH 3UHVV WKH Timer pad to see the FXUUHQW VHWWLQJ 3UHVV WKH Timer pad...

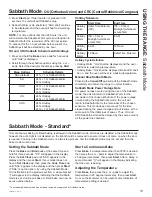
Page 13: ...ycle shall start SAb shall continue to be displayed and the oven will heat to a warming temperature NOTE For time options less than 24 hours the unit will complete the Sabbath Warm cycle and transitio...

Page 14: ...ly while also browning the VXUIDFH 8VH URLO R IRU WKLFNHU FXWV RI PHDW DQG RU IRRGV that you would like cooked all the way through To use this mode press the Broil pad twice and then press Start It is...

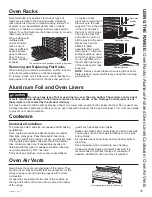
Page 15: ...readily can result in a browner crisper and thicker crust If using dark and coated cookware check food earlier than minimum cook time If undesirable results are obtained with this type of cookware con...

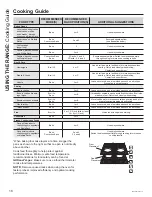
Page 16: ...roil pan Bone in chicken breasts legs thighs Broil Lo Bake 4 or B If breaded or coated in sauce avoid Broil Hi modes Broil skin side down first Watch food closely when broiling Boneless chicken breast...

Page 17: ...r and water solution Rinse with clean water and dry with a soft cloth When cleaning surfaces make sure that they are at room temperature and not in direct sunlight If stain on the door vent trim is pe...

Page 18: ...il from the oven walls and door Self Clean Mode on some models Read Self Cleaning Oven Safety Instructions at the beginning of this manual before using the Self Clean Mode Self Clean uses very high te...

Page 19: ...r parts as these may clog the openings Never wash burner heads in your dishwasher as dishwasher Doing so may cause them to discolor The ports in the burner heads must be kept clean at all times for an...

Page 20: ...cycle Do not attempt to clean your grates in the oven if your grates have rubber bumpers Doing so will destroy the rubber bumpers and may affect the function of your surface burners 3RUFHODLQ FRDWHG J...

Page 21: ...steel surface use warm sudsy water or a stainless steel cleaner or polish Always wipe the surface in the direction of the grain Follow the cleaner instructions for cleaning the stainless steel surfac...

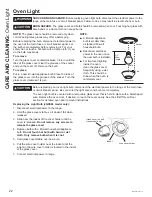
Page 22: ...KROG DSSOLDQFH bulb Do not touch hot bulb with hand or wet cloth Only remove bulb when it is cool 5 Hold glass cover stable over new bulb 3XOO WKH ZLUH FRYHU KROGHU QHDU WKH LQGHQW XQWLO WKH indent in...

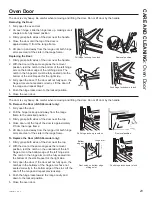
Page 23: ...ocked position 5 Close the oven door Removal position 3XOO KLQJH ORFNV XS WR XQORFN 3XVK KLQJH ORFNV GRZQ WR ORFN Rest notch on bottom edge of hinge slot Notch Bottom edge of slot Hinge arm CARE AND C...

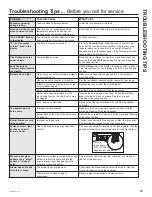
Page 24: ...racket to the time of day The clock is turned off See the Oven Controls or Special Features section Crackling or popping sound This is the sound of the metal heating and cooling during both the cookin...

Page 25: ...the circuit breaker tripped Replace the fuse or reset the circuit breaker Burner parts not replaced correctly See the Care and Cleaning of the range section Burner slots near the electrode or the roun...

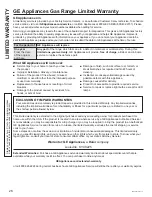
Page 26: ...U RU UHSODFH OLJKW EXOEV H FHSW IRU lamps EXCLUSION OF IMPLIED WARRANTIES Your sole and exclusive remedy is product repair as provided in this Limited Warranty Any implied warranties including the imp...

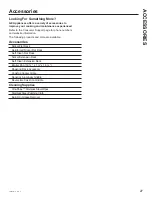
Page 27: ...site information The following products and more are available Accessories Accessories Nickel Flat Rack Reinforced Nickel Flat Rack Self Clean Flat Rack Nickel Extension Rack Self Clean Extension Rack...

Page 28: ...FLDO GLVFRXQWV WKDW DUH DYDLODEOH ZKLOH RXU warranty is still in effect You can purchase it on line anytime GE Appliances Services will still be there after your ZDUUDQW H SLUHV Q WKH 86 GEAppliances...

Page 29: ...riente 7 Quemadores 7 Plancha 8 Controles del Horno 10 Funciones especiales 12 Modo Sab tico OU y CRC 12 Modo Sab tico Est ndar 13 Modos de Cocci n 14 Estantes del Horno 15 Papel de Aluminio y Coberto...

Page 30: ...y creemos que usted tambi n Entre otras cosas el registro de su electrodom stico asegura que podamos entregarle informaci n importante del producto y detalles de la garant a cuando los necesite Regis...

Page 31: ...ea todas las instrucciones de seguridad antes de utilizar este producto No seguir estas instrucciones puede generar un incendio una descarga el ctrica lesiones corporales o la muerte LEA Y GUARDE ESTA...

Page 32: ...cto con un vidrio roto Es posible que se produzcan descargas incendio o cortes 1R GHMH D ORV QLxRV VRORV R IXHUD GH VX UDGLR GH DWHQFLyQ en el rea donde el electrodom stico se encuentre en uso Nunca s...

Page 33: ...El anillo podr atrapar calor y bloquear el aire hacia el quemador produciendo el riesgo de emisi n de mon xido de carbono 1R LQWHQWH HOHYDU OD HVWXID DFHU HVWR SRGUtD GDxDU la tuber a de gas hasta lo...

Page 34: ...mon xido de carbono Nunca coloque papel de aluminio o cobertores de horno en el fondo del horno Podr n atrapar el calor ocasionando riesgos de humo o incendio 0DQWpQJDVH DOHMDGR GH OD HVWXID DO DEULU...

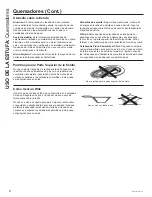
Page 35: ...de la llama Uso de los Quemadores NOTAS No utilice el quemador durante un per odo de tiempo prolongado sin un utensilio de estufa sobre la parrilla El acabado de la parrilla se puede resquebrajar si n...

Page 36: ...UWH VXSHULRU GH OD HVWXID FDFHURODV FDIp WHWHUDV RV FRQGXFWRUHV GH YLGULR FDOLHQWDQ GH IRUPD PX OHQWD Cer mica de Vidrio Resistente al Calor Se pueden usar para cualquier superficie o para cocci n en...

Page 37: ...a posible para evitar la suciedad de la comida horneada 1R SHUPLWD TXH VH DFXPXOH JUDVD GHEDMR GH OD SODQFKD D que puede haber riesgo de incendio Limpie debajo de la plancha con agua caliente y jab n...

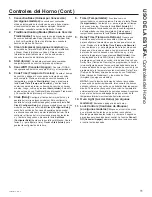
Page 38: ...10 49 2000316 Rev 6 USO DE LA ESTUFA Controles del Horno Convection Convecci n Non Convection Sin Convecci n 2 3 1 7 8 4 5 6 9 10 Controles del Horno 2 4 7 8 3 5 6 9 11 10 or...

Page 39: ...ara ajustar el reloj Presione Start Iniciar para guardar la configuraci n de la hora 8 Timer Temporizador Funciona como un temporizador con cuenta regresiva Presione la tecla Timer Temporizador y las...

Page 40: ...e la tecla Timer Temporizador para visualizar la configuraci n actual Presione la tecla Timer Temporizador nuevamente para cambiar la configuraci n Presione la tecla Start Iniciar para guardar la conf...

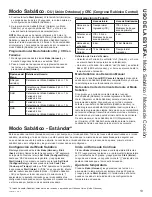
Page 41: ...hasta la temperatura de calentamiento NOTA Para opciones de tiempo inferiores a 24 horas la XQLGDG FRPSOHWDUi HO FLFOR 6DEEDWK DUP DOHQWDU FRQ 0RGR 6DEiWLFR SDVDUi D 6DEEDWK GOH 0RGR 6DEiWLFR QDFWLYR...

Page 42: ...OD IXQFLyQ URLO R VDGR DMR SDUD FRUWHV GH FDUQH PiV JUXHVRV R FRPLGDV que desee que queden completamente cocinadas Para usar este modo presione la tecla Broil Asar dos veces y luego presione Start In...

Page 43: ...tar m s doradas crocantes y con una capa m s gruesa Si utiliza utensilios oscuros y revestidos controle la comida antes del tiempo m nimo de cocci n Si se obtienen resultados no deseados con este tipo...

Page 44: ...ife y Cerdo Hamburguesas Asar Alto 6 o C 8VH XQD EDQGHMD SDUD DVDU PXHYD OD FRPLGD PiV DEDMR para que quede m s preparada y menos soasada Preste atenci n a la comida al asarla Centre la comida debajo...

Page 45: ...y seque con una tela seca Al limpiar supeficies aseg rese de que est n a temperatura ambiente y fuera del contacto con la luz solar Si las manchas en el borde de la ventana de la puerta son persisten...

Page 46: ...Seguridad del Horno con Limpieza Autom tica en el comienzo de este manual antes de usar HO PRGR 6HOI OHDQ LPSLH D XWRPiWLFD VWH PRGR XVD temperaturas muy altas para limpiar el interior del horno S lo...

Page 47: ...las cabezas de los quemadores en el lavavajillas Esto podr hacer que se descoloren Las hendiduras de las cabezas de los quemadores se deben mantener limpias en todo momento para obtener una llama par...

Page 48: ...res de goma afectando el funcionamiento de los quemadores Las rejillas cubiertas de porcelana se podr n volver gradualmente speras si son expuestas de forma continua a las temperaturas de limpieza aut...

Page 49: ...agua tibia con jab n o un limpiador o pulidor para acero inoxidable Siempre limpie la superficie en la direcci n del veteado Siga las instrucciones del limpiador para limpiar la superficie de acero in...

Page 50: ...a para electrodom sticos de ZDWWV No toque la l mpara caliente con la mano o una WHOD K PHGD 6yOR UHWLUH OD OiPSDUD FXDQGR HVWp IUtD 5 Mantenga la tapa de vidrio estable sobre la l mpara nueva 6 Empuj...

Page 51: ...loqueos de las bisagras hacia arriba para desbloquearlos Empuje trabas de la bisagra hacia abajo para bloquear Apoye la abertura en el extremo inferior de la ranura de la bisagra Abertura Empuje el bl...

Page 52: ...les del Horno o Funciones Especiales Sonido de chisporroteo o traqueo ste es el sonido de metal calent ndose o enfri ndose durante las funciones de cocci n y limpieza Esto es normal Por qu la estufa h...

Page 53: ...r se haya desconectado Reemplace el fusible o reinicie el disyuntor Las piezas del quemador no fueron reemplazadas correctamen Lea la secci n Cuidado y limpieza de la estufa Es posible que las hendidu...

Page 54: ...mparas excepto las l mparas LED GARANT A LIMITADA Garant a Limitada de la Estufa a Gas de GE Appliances EXCLUSI N DE GARANT AS IMPL CITAS Su nica y exclusiva alternativa es la reparaci n del producto...

Page 55: ...disponibles Accesorios Accesorios Estante Plano de N quel Estante Plano Reforzado de N quel Estante Plano con Limpieza Autom tica Estante Extensible de N quel Estante Extensible con Limpieza Autom ti...

Page 56: ...mientras su garant a a n est vigente La puede adquirir en cualquier momento a trav s de Internet Los servicios de GE Appliances a n estar n all cuando su garant a caduque Q 88 GEAppliances com extende...

Reviews: