background image

10

Consumer Support

Tr

oubleshooting T

ips

Care and Cleaning

Operating Instructions

Safety Instructions

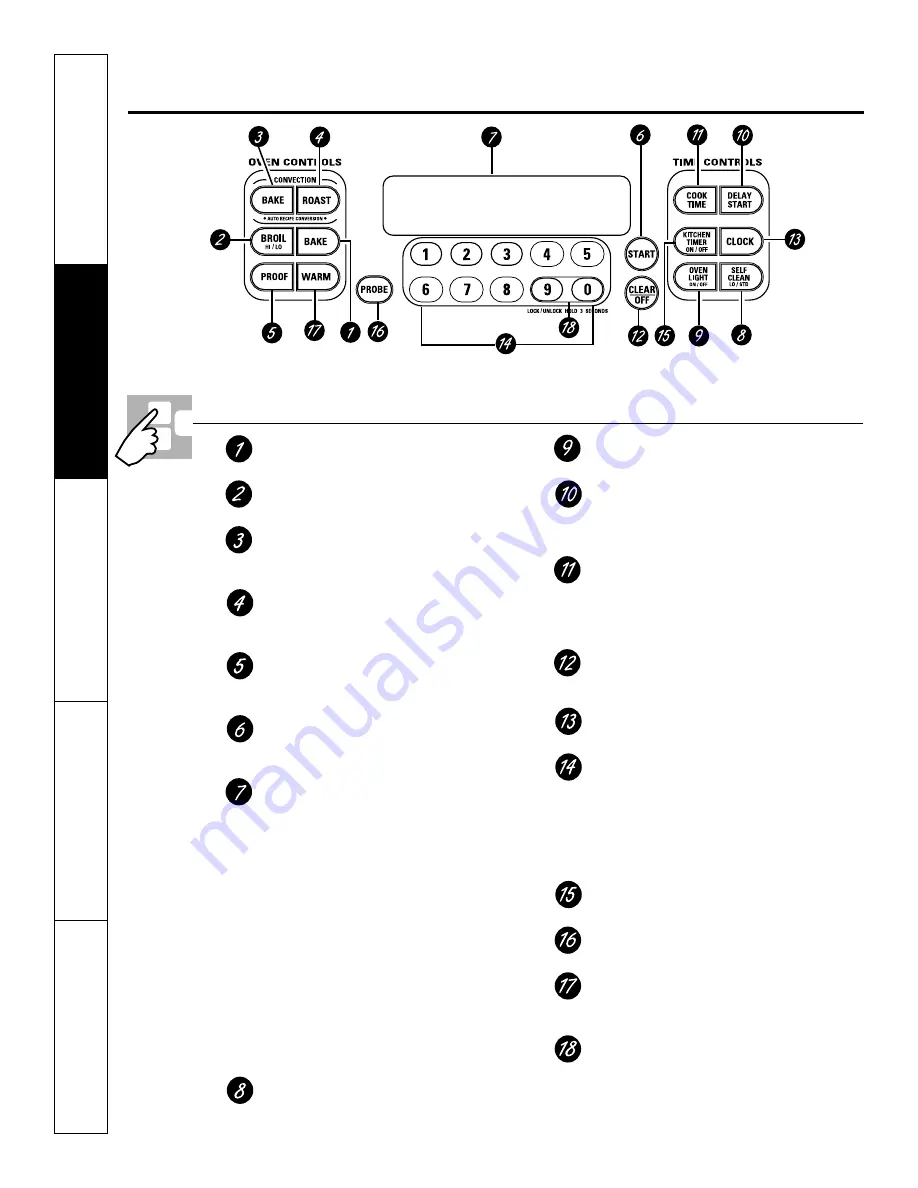
BAKE Pad

Touch to select the bake function.

BROIL HI/LO Pad

Touch to select the broil function.

CONVECTION BAKE Pad

Touch to select baking with the convection
function.

CONVECTION ROAST Pad

Touch to select roasting with the convection
function.

PROOF Pad

Touch to select a warm environment useful
for rising yeast-leavened products.

START Pad

Must be touched to start any cooking or
cleaning function.

Display

Shows the time of day, oven temperature,
whether the oven is in the bake, broil or 
self-cleaning mode and the times set for 
the timer or automatic oven operations.

If “F– and a number or letter” flash in the display and
the oven control signals, this indicates a function error
code.

Touch the 

CLEAR/OFF

pad. Allow the oven to cool for

one hour. Put the oven back into operation. If the function error
code repeats, disconnect the power to the oven and call for
service.

If your oven was set for a timed oven operation and a
power outage occurred,

the clock and all programmed

functions must be reset. 

The time of day will flash in the display when there has
been a power outage.

SELF CLEAN LO/STD Pad

Touch to select self-cleaning function. See the

Using the self-cleaning oven

section.

OVEN LIGHT ON/OFF Pad

Touch to turn the oven light on or off.

DELAY START Pad

Use along with 

COOK TIME

or 

SELF CLEAN

LO/STD

pads to set the oven to start and stop

automatically at a time you set.

COOK TIME Pad

Touch and then touch the number pads to set
the amount of time you want your food to
cook. The oven will shut off when the
cooking time has run out.

CLEAR/OFF Pad

Touch to cancel 

ALL

oven operations except

the clock, timer and control lockout.

CLOCK Pad

Touch before setting the clock.

Number Pads

Use to set any function requiring numbers
such as the time of day on the clock, the
timer, the oven temperature, the internal
food temperature, the start time and
length of operation for timed baking 
and self-cleaning.

KITCHEN TIMER ON/OFF Pad

Touch to select the timer feature.

PROBE Pad

Touch when using the probe to cook food.

WARM Pad

Touch to keep cooked foods warm. See the

How to Set the Oven for Warming

section.

CONTROL LOCKOUT

The control lockout is 

9

and 

0

. Touch and

hold the 

9

and 

0

pads at the same time for 3

seconds.

Using the oven controls. 

(Throughout this manual, features and appearance may vary from your model.)

Oven Control, Clock and Timer Features and Settings

Features and appearance may vary.

Summary of Contents for JGSP48

Page 1: ...ooktop 36 37 Knobs 31 Lift Off Oven Door 34 Light Bulbs 32 33 Packaging Tape 31 Painted Surfaces 35 Racks 33 Stainless Steel Surfaces 35 Storage Drawer 33 Vent 32 35 Troubleshooting Tips 38 42 Accesso...

Page 2: ...e any phone in your building Immediately call your gas supplier from a neighbor s phone Follow the gas supplier s instructions If you cannot reach your gas supplier call the fire department Installati...

Page 3: ...ring the cleaning cycle Exposure can be minimized by venting with an open window or using a ventilation fan or hood 3 WARNING For your safety the information in this manual must be followed to minimiz...

Page 4: ...ating it to prevent fire or smoke damage should the packaging material ignite Do not leave children alone or unattended where a range is hot or in operation They could be seriously burned Do not attem...

Page 5: ...if brought in contact with flame or hot oven surfaces and may cause severe burns Do not store flammable materials in an oven a range storage drawer or near a cooktop Do not store or use combustible ma...

Page 6: ...ite flammable items and will increase pressure in closed containers which may cause them to burst If a combination of oils or fats will be used in frying stir together before heating or as fats melt s...

Page 7: ...the oven follow the manufacturer s directions Pulling out the rack to the stop lock is a convenience in lifting heavy foods It is also a precaution against burns from touching hot surfaces of the door...

Page 8: ...than the bottom of the cookware is wasted and only serves to heat the handle In Case of Power Failure In case of a power failure you can light the gas surface burners on your range with a match Hold a...

Page 9: ...dous to your health Top of Range Cookware Aluminum Medium weight cookware is recommended because it heats quickly and evenly Most foods brown evenly in an aluminum skillet Use saucepans with tight fit...

Page 10: ...there has been a power outage SELF CLEAN LO STD Pad Touch to select self cleaning function See the Using the self cleaning oven section OVEN LIGHT ON OFF Pad Touch to turn the oven light on or off DEL...

Page 11: ...en using two pot holders pull the rack out by holding the sides of it The rack is low and you could be burned if you place your hand in the middle of the rack and pull all the way out Be very careful...

Page 12: ...on a lower rack several inches below the food Cut slits in the foil just like the grid Preheating and Pan Placement Preheat the oven if the recipe calls for it Preheating is necessary for good results...

Page 13: ...d operating temperature Oven Vent Your oven is vented through one vent located toward the rear of the range Do not block this vent when cooking in the oven it is important that the flow of hot air fro...

Page 14: ...1 lb D 15 5 Lamb Chops Medium 2 1 thick about 10 E 7 4 Slash fat Well Done to 12 oz E 10 9 Medium 2 11 2 thick about 1 lb E 9 6 Well Done E 14 10 Using the oven Broiling Guide The size weight thickne...

Page 15: ...e 6 second tone can be canceled by following the steps in the Special features of your oven control section under Tones at the End of a Timed Cycle The timer is a minute timer only The timer does not...

Page 16: ...section or the Special features of your oven control section Touch the CLEAR OFF pad to clear the display How to Set a Delayed Start and Automatic Stop You can set the oven control to delay start the...

Page 17: ...e and Cleaning Troubleshooting Tips Consumer Support Using the probe on some models www GEAppliances com For many foods especially roasts and poultry internal food temperature is the best test for don...

Page 18: ...ecommended Some package instructions for frozen casseroles or main dishes have been developed using commercial convection ovens For best results in this oven preheat the oven and use the temperature o...

Page 19: ...in your convection oven However metal pans heat the fastest and are recommended for convection baking Darkened or matte finished pans will bake faster than shiny pans Glass or ceramic pans cook more s...

Page 20: ...VECTION ROAST pad Touch the number pads to set the desired oven temperature Touch the COOK TIME pad NOTE If your recipe requires preheating you may need to add additional time to the length of the coo...

Page 21: ...e times you have set touch the DELAY START pad to check the start time you have set or touch the COOK TIME pad to check the length of cooking time you have set Touch the START pad NOTE An attention to...

Page 22: ...one will sound and the display will flash until the probe is removed from the oven You will hear a fan while cooking with this feature The fan will stop when the door is opened but the heat will not t...

Page 23: ...erate when oven is above 125 F HOT will show in the display How to Set the Oven For Warming on some models The WARM feature keeps cooked foods hot This feature is not designed to reheat cold food To u...

Page 24: ...sing and decreasing the oven temperature The oven temperature can be adjusted up to 35 F hotter or 35 F cooler Touch the number pads the same way you read them For example to change the oven temperatu...

Page 25: ...ht bulb cover is in place and the oven light is off IMPORTANT The health of some birds is extremely sensitive to the fumes given off during the self cleaning cycle of any range Move birds to another w...

Page 26: ...towel and wipe the edges of the oven racks with the paper towel The oven door must be closed and all controls must be set correctly for the cycle to work properly How to Delay the Start of Cleaning To...

Page 27: ...s until the display shows SF Touch the DELAY START pad until no shdn no shut off appears in the display Touch the START pad to activate the no shut off and leave the control set in this special featur...

Page 28: ...control 12 Hour 24 Hour or Clock Blackout Your control is set to use a 12 hour clock If you would prefer to have a 24 hour military time clock or black out the clock display follow the steps below Tou...

Page 29: ...egular recipe temperature of 350 F and touch the START pad the display will show CON and the converted temperature of 325 F NOTE This feature only converts cooking temperatures not cooking times To tu...

Page 30: ...he same time Touch the CLEAR OFF pad and begin again Tap the DELAY START pad until SAb bAtH appears in the display Touch the START pad and will appear in the display Touch the COOK TIME pad Touch the...

Page 31: ...ecaution could result in tipping of the range and cause injury Safety Instructions Operating Instructions Care and Cleaning Troubleshooting Tips Consumer Support Burner Assembly The burner assemblies...

Page 32: ...ating Instructions Safety Instructions Burner Grates and Vent Grille Porcelain enamel burner grates and the vent grille should be washed regularly and of course after spillovers Wash them in hot soapy...

Page 33: ...40 watt appliance bulb or two prong halogen bulb as appropriate To replace the cover Line up tabs of lens in front of tabs on housing and rotate clockwise to engage Connect electrical power to the ra...

Page 34: ...ining acids may cause discoloration and should be wiped up immediately When surface is cool clean and rinse Do not use oven cleaners cleaning powders or harsh abrasives on the outside of the door Lift...

Page 35: ...shing liquid and water use a generous amount of CERAMA BRYTE Stainless Steel Appliance Cleaner to clean the appliance To Order To order CERAMA BRYTE Stainless Steel Appliance Cleaner please call our t...

Page 36: ...moved polish the entire surface with CERAMA BRYTE Ceramic Cooktop Cleaner and a paper towel The CERAMA BRYTE Ceramic Cooktop Scraper and all recommended supplies are available through our Parts Center...

Page 37: ...a Use a single edge razor blade scraper CERAMA BRYTE Ceramic Cooktop Scraper to move the spill to a cool area on the cooktop b Remove the spill with paper towels Any remaining spillover should be left...

Page 38: ...allation Instructions that came with your or turned on range A fuse in your home may be Replace the fuse or reset the circuit breaker blown or the circuit breaker tripped Burner parts not replaced See...

Page 39: ...as not been fitted properly and slit as recommended In some areas the power Preheat the broil element for 10 minutes voltage may be low Broil for the longest period of time recommended in the Broiling...

Page 40: ...up the excess soil and reset the clean cycle Oven door will not Oven too hot Allow the oven to cool below locking temperature open after a clean cycle Oven not clean after a Oven controls not properl...

Page 41: ...dels after plugging in the probe Power outage Power outage or surge Reset the clock If the oven was in use you must reset clock flashes it by touching the CLEAR OFF pad setting the clock and resetting...

Page 42: ...cookware with smooth bottoms the cookware and the surface of the cooktop Cookware has been slid across the cooktop surface Areas of discoloration Food spillovers not cleaned See the Cleaning the glas...

Page 43: ...tection or you may request your money back on the remaining value of your contract No questions asked It s that simple Protect your refrigerator dishwasher washer and dryer range TV VCR and much more...

Page 44: ...place It contains information you will need should you require service Our service number is 800 GE CARES 800 432 2737 Read your Owner s Manual carefully It will help you operate your new appliance p...

Page 45: ...or 888 261 3055 Canada during normal business hours Have your model number ready Tired of discolored racks Wishing you had extra heavy duty oven racks NOW AVAILABLE for your range GE s innovative sel...

Page 46: ...al or consequential damages This warranty gives you specific legal rights and you may also have other rights which vary from state to state To know what your legal rights are consult your local or sta...

Page 47: ...aused by accident fire floods or acts of God Incidental or consequential damage caused by possible defects with this appliance Damage caused after delivery What Camco Will Not Cover For The Period Of...

Page 48: ...still in effect You can purchase it on line anytime or call 800 626 2224 during normal business hours GE Consumer Home Services will still be there after your warranty expires In Canada call 1 888 26...

Reviews: