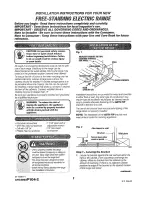
CONVERTING TO PROPANE
GAS (OR CONVERTING
BACK TO NATURAL GAS
FROM PROPANE)
This range leaves the factory set for use with
natural gas. If you want to convert to propane
gas, the conversion must be performed by a
qualified propane gas installer.
The conversion orifices and instructions can
be found on back of the range.
Keep these instructions and all orifices in case
you want to convert back to natural gas.
DIMENSIONS AND
CLEARANCES
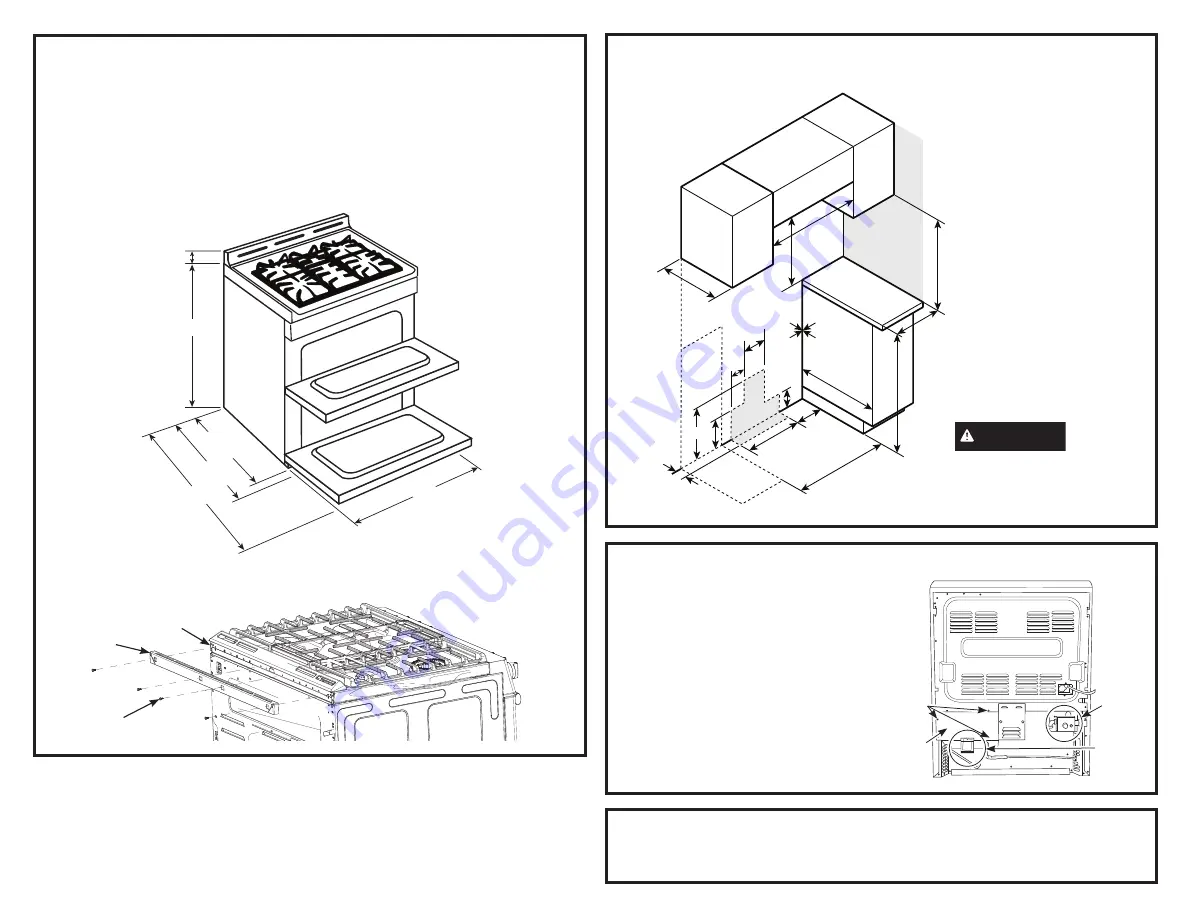
Provide adequate clearances between the
range and adjacent combustible surfaces.
These dimensions must be met for safe use of
your range.
Allow 30” (76.2 cm) minimum clearance
between burners and bottom of unprotected
wood or metal cabinet, or allow a 24” (61 cm)
minimum when bottom of wood or metal cabinet
is protected by no less than 1/4” (6.4 mm) thick
flame-retardant millboard covered with no less
than No. 28 MSG sheet metal (.015” [.38 mm]
thick), .015” (.38 mm) thick stainless steel, .025”
(0.64 mm) aluminum or .020” (0.5 mm) copper.
Installation of a listed microwave oven or
cooking appliance over the cooktop shall
conform to the installation instructions packed
with that appliance.
For island installation, maintain 2-1/2” minimum
from cutout to back edge of countertop and
3” minimum from cutout to side edges of
countertop.
DIMENSIONS AND CLEARANCES (CONT.)
GAS PIPE AND ELECTRICAL OUTLET LOCATIONS
CAUTION
To prevent
drafts from affecting burner
operation, seal all openings
in floor under appliance and
behind appliance wall.
INSTALLATION AT HIGH ALTITUDE
Over 6000ft, product configured for natural gas or propane requires installation of kit (WB28X29254 for natural
gas and WB28X29255 for propane gas). Follow the instructions included with the kit.
18”
Minimum
to cabinets
above counter
0”
Minimum
to cabinets
below
cooktop
30”
Minimum
30”
16”
Max to
cabinets
above
counter
6” Right side
6” Left side
Minimum
to side wall
36”
30”
2”
5”
4”
9”
13”
14 1/2”
24”
4 1/2”
12 1/2”
Side Wall
Gas
and
electrical
supply
1 1/8"
26 7/8"
30"
43 7/8"
29 1/2"
w/ handle
w/o handle
36 1/4" ± 1/4
For all installations, install the required rear trim to back of range with 4 screws provided.
Screws
Rear Trim
Back of
Range
Rear of Range
Pressure
Regulator
Location
Screws to
Remove
Terminal
Block
Terminal
Block
Cover
Propane
Conversion
Kit


