background image

Summary of Contents for JKP44GP

Page 1: ...tructions 18 20 Broiling Broiling Guide 15 16 Shelves 8 21 Care and Cleaning 17 21 Thermostat Adjustment 20 Clock Timer 7 Warranty Back Cover Consumer Services 23 Energy Saving Tips 4 Features 5 6 Light Bulb Replacement 17 22 Model and Serial Numbers 2 Oven Control 6 7 Probe 13 14 21 GE Answer Cente Problem Solver 22 800 020 2000 ModelsJKP44GP JKP45WP GE Appliances ...

Page 2: ...s to follow for further help FIRST contact the people who serviced your appliance Explain why you are not pleased In most cases this will solve the problem NEXT if you are still not pleased write all the details including your phone number to Manager Consumer Relations GE Appliances Appliance Park Louisville KY 40225 FINALLY if your problem is still not resolved write Major Appliance Consumer Acti...

Page 3: ...mable materials accumulate in or near the oven Do not use water on grease fires Flame in oven can be smothered by completely closing door and touching the CLEAR OFF pad or use dry chemical or foam type extinguisher Do not touch heating elements or interior surface of oven These surfaces may be hot enough to burn even though they are dark in color During and after use do not touch or let clothing o...

Page 4: ...lified technician If You Need Service Read the Problem Solver in the back of this book Don t attempt to repair or replace any part of your oven unless it is specifically recommended in this book All other servicing should be referred to a qualified technician SAVE THESE INSTRUCTIONS Energy Saving Tips Preheat oven only when necessary Most foods will cook satisfactorily without preheating If you fi...

Page 5: ...cation 2 5 Oven Vent j 6 Automatic Oven Door Latch 18 19 7 Oven Control Clock I 6 7 and Minute Timer Feature Index 8 Oven Light Switch Lets you control interior oven lights 9 Grille 10 Oven Interior Light 11 Probe Receptacle 12 Oven Shelf Supports 13 Oven Shelves 14 Bake Unit 15 Broiler Pan and Rack Do not clean in self clean oven Explained on page 6 17 22 13 14 21 8 8 21 21 15 17 21 ml t_ t _ r_ ...

Page 6: ... self cleaning function See Self Cleaning Instructions in this book 10 DECREASE Short taps to this pad decrease time or temperature by small amounts Press and hold pad to decrease time or temperature by larger amounts 11 STOP TIME Use this pad along with COOK TIME or CLEAN and INCREASE or DECREASE pad to set the oven to start automatically and stop automatically at a time you select 12 COOK TIME T...

Page 7: ...e 5 minutes slow All other functions that were in operation when the power went out will have to be programmed again To Set the Clock Timer The timer does not control oven operations The maximum setting on the timer is 9 hours and 55 minutes Step 1 Touch the CLOCK pad To Set the Timer Step 2 Press the INCREASE or DECREASE pad to set the time of day Step 1 Touch the TIMER ON OFF pad Step 2 Press th...

Page 8: ...s The shelves are designed with stop locks so that when placed correctly on the shelf supports they will stop before coming completely from the oven and will not tilt when you are removing food from them or placing food on them When placing cookware on a shelf pull the shelf out to the stop position Place the cookware on the shelf then slide the shelf back into the oven This will eliminate reachin...

Page 9: ...rature Step 5 Touch the CLEAR OFF pad when baking is finished and then remove food from oven How to Time Bake The oven control allows you to turn the oven on automatically at specific times that you set Foods that are highly perishable such as milk eggs fish stuffings poultry and pork should not be allowed to sit out for more than one hour before or after cooking Room temperature promotes the grow...

Page 10: ...ress the INCREASE pad until 3 00 appears in the display Cook Time of 3 hours now appears in display Step 7 Touch the STOP TIME pad SET STOP TIME and the earliest stop time you can set appear on display In this example 5 00 and COOK STOP TIME appear on display The control automatically sets Stop Time by adding the Cook Time to the time of day In this example the time of day is 2 00 and the Cook Tim...

Page 11: ...l Pan Metal or Ceramic Pan A B B Metal or Ceramic Pan A B Shiny Metal Muffin Pans B Metal or Glass Loaf or Tube Pan A B Shiny Metal Pan with satin finish bottom Metal or Glass Loaf Pans Metal or Glass Pans B C Cookie Sheet B C Cookie Sheet B C Cookie Sheet B C Glass or Metal Pans B C Glass Custard Cups or Casserole B set in pan of hot water Glass Custard Cups or Casserole B Foil Pan on Cookie Shee...

Page 12: ...is finished and then remove food from oven Step 6 Most meats continue to cook slightly while standing after being removed from the oven Standing time recommended for roasts is 10 to 20 minutes This allows roasts to firm up and makes them easier to carve Internal temperature will rise about 5 to 10 F to compensate for temperature increase if desired remove the roast from oven sooner at 5 to 10 F le...

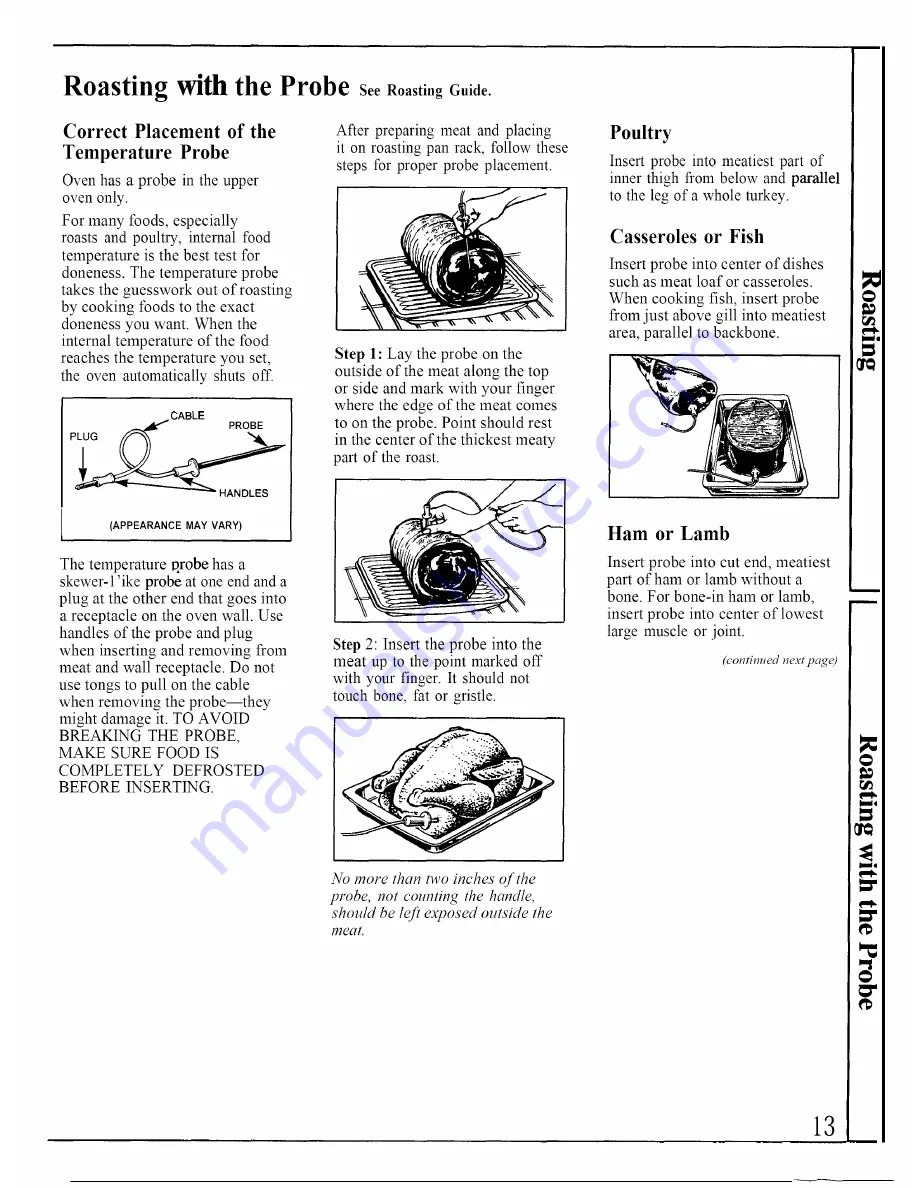
Page 13: ...ELY DEFROSTED BEFORE INSERTING After preparing meat and placing it on roasting pan rack follow these steps for proper probe placement Step 1 Lay the probe on the outside of the meat along the top or side and mark with your finger where the edge of the meat comes to on the probe Point should rest in the center of the thickest meaty part of the roast Step 2 Insert the probe into the meat up to the p...

Page 14: ...t be able to use the probe in the upper oven during timed oven operations Roasting Guide Type Meat Tender cuts rib high quality sirloin tip rump or top round Lamb leg or bone in shoulder Veal shoulder leg or loin Pork loin rib or shoulder Ham precooked Ham raw Oven temperature 325 325 325 325 325 Doneness Rare Medium Well Done Rare Medium Well Done Welt Done Well Done To Warm Approximate Roasting ...

Page 15: ... pad Serve food immediately and leave pan outside oven to cool during meal for easiest cleaning Use of Aluminum Foil You can use aluminum foil to line your broiler pan and broiler rack However you must mold the foil tightly to the rack and cut slits in it just like the rack Without the slits the foil will prevent fat and meat juices from draining to the broiler pan The juices could become hot enou...

Page 16: ...precooked sausages bratwurst Quantilff aml _to Thickness 1 2 lb about 8 thin slices 1llg 4_lomties 1 2 to 3 4 in thick 1in thick 1 to 1X lbs 1 in thick 2 to 2 lbs 1 x_ hole 2 to 2 lbs split lengthwise 2 to 4 slices l pkg 2 2 split 2 4 6 to 8 oz each 1 lb fillets 1 4 tc 1 2 in thick l in thick 2 1 2 in 2 1 in thick about 1 lb 2 1 in thick about 10 to 12 oz 2 1 in thick about 1 lb l lb pkg 10 Shelf ...

Page 17: ...oven at the main fuse or circuit breaker panel Let the bulb cool completely before removing it Do not touch a hot bulb with a damp cloth If you do the bulb will break The oven lamp bulb is covered with a removable glass cover which is held in place with a bail shaped wire Remove oven door if desired to reach cover easily To remove Hold hand under cover so it doesn t fall when released With fingers...

Page 18: ...ater from getting in these slots when cleaning open the door as far as it will go Clean the door gasket C using a clean sponge to soak the soiled area with hydrogen peroxide Repeated soaking may be needed depending on the amount of soil Frequent cleaning will prevent excessive soil buildup Do not rub the door gasket the fiberglass material of the gasket has an extremely low resistance to abrasion ...

Page 19: ...EASE pad to enter Clean Time 4 Touch STOP TIME pad SET STOP TIME and the earliest stop time you can set wil appear on di sp aT The earliest stop time wi be the clean time selected plus the time of day For exam e if the clean time is three hours and the time of day is 6 00 the stop time tbat appears on display will be 9 00 5 Toucb INCREASE pad to change tbe stop time to a later time of day if desir...

Page 20: ...th a damp sponge or cloth Q My oven shelves do not slide easily What is the matter A After many cleanings oven shelves may become so clean they do not slide easily If you wish shelves to slide more easily dampen fingers with a small amount of cooking oil and rub lightly over sides of shelf where they contact shelf supports Q My oven shelves have become gray after the self clean cycle Is this norma...

Page 21: ... is automatically cleaned if the oven is in the self cleaning cycle DO NOT allow water to run down inside the surface of the glass door while cleaning DO NOT rub or damage the gasket Avoid getting soap and water on the gasket or in any openings on the door Rinse well NOTE Soap left on liner causes additional stains when oven is reheated OUTSJDE OF DOOR Use soap and water to thoroughly clean the to...

Page 22: ...ng Roasting and Broiling Guides Oven temperature is too high to set self clean operation Allow the oven to cool to room temperature and reset the controls Probe is in oven Oven must cool below locking temperature approximately 30 minutes after the clean cycle is complete Oven controls not set properly Heavily soiled ovens require 3 to 4 hour Clean Time Heavy spillovers should be cleaned up before ...

Page 23: ...rts or accessories sent directly to their home The GE parts system pro vides access to over 47 000 parts and all GE Genuine Renewal Parts are fully warranted VISA MasterCard and Discover cards are accepted User maintenance instructions contained in this booklet cover proce dures intended to be performed by any user Other servicing generally should be referred to qualified ser vice personnel Cautio...

Page 24: ...are material If you then have any questions about operating the product please contact your dealer or our Consumer Affairs office at the address below or call toll free GE Answer Center_ 800 626 2000 consumer information service Improper installation If you have an installation problem contact your dealer or installer You are responsible for providing adequate electrical gas exhausting and other c...

Reviews: