background image

14

49-80815-1

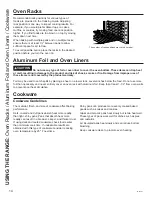
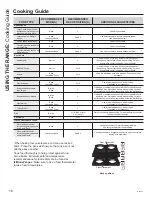
Recommended rack positions for various types of 

foods are provided in the Cooking Guide. Adjusting 

rack position is one way to impact cooking results. For 

example, if you would prefer darker tops on cakes, 

muffins, or cookies, try moving food one rack position 

higher. If you find foods are too brown on top try moving 

them down next time.
When baking with multiple pans and on multiple racks, 

ensure there is at least 1½" between pans to allow 

sufficient space for air to flow.
To avoid possible burns, place the racks in the desired 

position before you turn the oven on.

USING THE RANGE:

 Oven

 Racks

 / 

Aluminum

 Foil

 and

 Oven

 Liners

 / 

Cookware

Oven Racks

Cookware

Cookware Guidelines

The material, finish, and size of cookware affect baking 

performance.

Dark, coated and dull pans absorb heat more readily 

than light, shiny pans. Pans that absorb heat more 

readily can result in a browner, crisper, and thicker crust. 

If using dark and coated cookware check food earlier 

than minimum cook time. If undesirable results are 

obtained with this type of cookware consider reducing 

oven temperature by 25º F next time.

Shiny pans can produce more evenly cooked baked 

goods such as cakes and cookies.
Glass and ceramic pans heat slowly but retain heat well. 

These types of pans work well for dishes such as pies 

and custards.
Air insulated pans heat slowly and can reduce bottom 

browning.

Keep cookware clean to promote even heating.

CAUTION


Do not use any type of foil or oven liner to cover the oven bottom. These items can trap heat 

or melt, resulting in damage to the product and risk of shock, smoke or fire. Damage from improper use of 

these items is not covered by the product warranty. 

Foil may be used to catch spills by placing a sheet on a lower rack, several inches below the food. Do not use more 

foil than necessary and never entirely cover an oven rack with aluminum foil. Keep foil at least 1-1/2” from oven walls 

to prevent poor heat circulation.

Aluminum Foil and Oven Liners

The number of rack positions may vary by model.

Summary of Contents for JS760BL2TS

Page 1: ...HE RANGE Surface Units 7 Cookware for Radiant Glass Cooktop 10 Oven Controls 11 Special Features 12 Sabbath Mode 13 Oven Racks 14 Aluminum Foil and Oven Liners 14 Cookware 14 Cooking Modes 15 Cooking...

Page 2: ...nto every GE Appliances product and we think you will too Among other things registration of your appliance ensures that we can deliver important product information and warranty details when you need...

Page 3: ...Slide In Ranges WARNING GENERAL SAFETY INSTRUCTIONS Use this appliance only for its intended purpose as described in this Owner s Manual Be sure your appliance is properly installed and grounded by a...

Page 4: ...e burns IMPORTANT SAFETY INFORMATION READ ALL INSTRUCTIONS BEFORE USING THE APPLIANCE WARNING COOKTOP SAFETY INSTRUCTIONS Never leave the surface units unattended at medium or high heat settings Boilo...

Page 5: ...e also Use CERAMA BRYTE ceramic Cooktop Cleaner and CERAMA BRYTE Cleaning Pad to clean the cooktop Wait until the cooktop cools and the indicator light goes out before cleaning A wet sponge or cloth o...

Page 6: ...FORMATION READ AND SAVE THESE INSTRUCTIONS IMPORTANT SAFETY INFORMATION READ ALL INSTRUCTIONS BEFORE USING THE APPLIANCE WARNING SELF CLEANING OVEN SAFETY INSTRUCTIONS The self cleaning feature operat...

Page 7: ...setting you want A surface ON indicator light will glow when any surface unit is on For glass cooktop surfaces A HOT COOKTOP indicator light will come on when the unit is hot to the touch stay on even...

Page 8: ...rne illness To turn the WARMING ZONE on press Warming Zone ON OFF select Lo Med or Hi with the number pads and press Start To turn the WARMING ZONE off press the Warming Zone ON OFF pad For best resul...

Page 9: ...ar in a short time NOTE On models with light colored glass cooktops it is normal for the cooking zones to change color when hot or cooling down This is temporary and will disappear as the glass cools...

Page 10: ...s can cause permanent damage to cooktop glass The enamel can melt and bond to the ceramic cooktop Glass ceramic Poor performance Will scratch the surface Stoneware Poor performance May scratch the sur...

Page 11: ...n hours and minutes Press the Start pad The timer countdown is complete To turn the timer off press the Timer pad 11 Delay Time Delays when the oven will turn on Use this to set a time when you want t...

Page 12: ...This feature allows the oven tone volume to be adjusted between high Hi medium rEg low Lo and off OFF The control will sound the oven tone at the new volume level each time the sound level is changed...

Page 13: ...lect a different preset cooking temperature and press Start 2 Since no feedback is given during temperature change an oven thermometer can be used to confirm temperature changes Starting a Timed Bake...

Page 14: ...st If using dark and coated cookware check food earlier than minimum cook time If undesirable results are obtained with this type of cookware consider reducing oven temperature by 25 F next time Shiny...

Page 15: ...owning and reduce cooking time It is not necessary to convert temperature Check food earlier than the recipe suggested time when using this mode or use a meat probe To use this mode press the Convecti...

Page 16: ...food closely when broiling For best performance when broiling center food below the broil heater Boneless chicken breasts Broil Lo Bake 3 If breaded or coated in sauce avoid Broil Hi modes Broil skin...

Page 17: ...vinegar and water rinse with clean water and polish dry with a soft cloth Do not use abrasive cleansers strong liquid cleansers plastic scouring pads or oven cleaners on the control panel they will da...

Page 18: ...default time press the Start pad immediately after pressing the Clean pad The oven will turn off automatically when the self clean cycle is complete The door will stay locked until the oven has coole...

Page 19: ...been removed polish the entire surface with CERAMA BRYTE Ceramic Cooktop Cleaner and a paper towel Heavy Burned On Residue 1 Allow the cooktop to cool 2 Use a single edge razor blade scraper at approx...

Page 20: ...tting of the surface of your cooktop not covered by the warranty unless the spill is removed while still hot Special care should be taken when removing hot substances Be sure to use a new sharp razor...

Page 21: ...nge locks down toward the door frame to the unlocked position A tool such as a small flat blade screwdriver may be required 3 Firmly grasp both sides of the door at the top 4 Close door to the door re...

Page 22: ...tached from the oven Replacing the Storage Drawer 1 Rest the left drawer rail inside the inner left rail guide channel at the bottom and slide it in slightly 2 Place the right drawer rail inside the i...

Page 23: ...ning the glass cooktop section as there is potential for permanent damage without proper care Pitting or indentation of the cooktop Hot sugar mixture spilled on the cooktop Call a qualified technician...

Page 24: ...section Oven light does not work Light bulb is loose or defective Tighten or replace bulb Pad operating light is broken Call for service Oven is in Sabbath mode Verify that the oven is not in Sabbath...

Page 25: ...oven will cause the oven to take longer to preheat Remove items to reduce preheat time Number of racks in oven Adding more racks to the oven will cause the oven to take longer to preheat Remove some r...

Page 26: ...amps EXCLUSION OF IMPLIED WARRANTIES Your sole and exclusive remedy is product repair as provided in this Limited Warranty Any implied warranties including the implied warranties of merchantability or...

Page 27: ...r Pan 8 x 1 x 13 Large Broiler Pan 12 x 1 x 16 XL Broiler Pan 17 x 1 x 19 1 4 Parts Oven racks Oven elements Light bulbs Cleaning Supplies CitruShine Stainless Steel Wipes CERAMA BRYTE Stainless Steel...

Page 28: ...available while your warranty is still in effect You can purchase it on line anytime GE Appliances Services will still be there after your warranty expires In the US GEAppliances com extended warrant...

Reviews: