❒
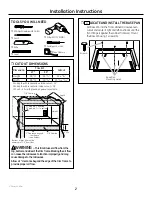
1 lOCATe And InSTAll The BASe PAn
Set Base Pan into the front cabinet microwave oven
cutout and center it right and left. Push back until the
front flange is against the cabinet front wall. Mount
the Base Pan using 3 screws (A).
❒
CuTOuT dIMenSIOnS
WArnIng
—
This trim kit uses air flow from the
top, bottom and sides of the trim frame. Blocking the air flow
can cause the microwave to function improperly and may
cause damage to the microwave.
Allow a 1” clearance beyond the edge of the trim frame to
provide proper air flow.
2
Installation Instructions
Min. depth with receptacle outside cutout – 16”
Min. depth with receptacle inside cutout – 18”
120 volt – 60 Hertz grounded power receptacle.
Screw A
TOOlS YOu WIll need
❒
2 Phillips Screwdrivers (#1 & #2)
❒
Drill with 3/32” Drill Bit
❒
Centerpunch or nail
❒
Pencil
❒
Knife
❒
Level
❒
Tape Measure
Depth
Height
5/8” Overlap
Width
7/8” Overlap
1” Clearance beyond
trim frame
(on all sides)
3” Min.
27”models: 1” overlap
30”models: 2
1
/
2
” overlap
Bottom of trim kit must be
minimum of 36” from floor
dimension
Trim Kit
Cutout
27”
30”
Height
16
1
/
2
”
16
1
/
2
”
15 ±
1
/
16
”
Width
26
7
/
8
”
29
7
/
8
”
24
7
/
8
±
1
/
16
”
Base Plan
Mounting Holes
1” 2.5 cm; 1’ = 0.3 m


