background image

Technical Publication

Direction 5610736-100

Rev. 9

LOGIQ V2/LOGIQ V1


User Guide

R1.X.X

Operating Documentation

Copyright 2015-201

7

 By General Electric Co.

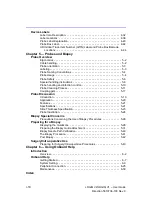
Summary of Contents for LOGIQ V2

Page 1: ...Technical Publication Direction 5610736 100 Rev 9 LOGIQ V2 LOGIQ V1 User Guide R1 X X Operating Documentation Copyright 2015 2017 By General Electric Co...

Page 2: ...is a reference for the LOGIQ V2 LOGIQ V1 It applies to all versions of the R1 x x for the LOGIQ V2 LOGIQ V1 ultrasound system GE P O Box 414 Milwaukee Wisconsin 53201 U S A Asia Pacific Latin America...

Page 3: ...er Center at 1 800 682 5327 or 1 262 524 5698 REV DATE YYYY MM DD REASON FOR CHANGE Rev 1 2015 07 14 Initial release Rev 2 2015 10 14 Add onboard help Rev 3 2015 11 23 Remove secure wipe information R...

Page 4: ...i 2 LOGIQ V2 LOGIQ V1 User Guide Direction 5610736 100 Rev 9 This page intentionally left blank...

Page 5: ...rding to IEC 60529 The footswitch rate is IPX8 Probe head immersible portion and cable are IPX7 Probe connector is not waterproof This product complies with the regulatory requirement of the following...

Page 6: ...agnostic and monitoring equipment International Organization of Standards ISO ISO 10993 1 Biological evaluation of medical devices ANSI AAMI ES60601 1 Medical Electrical Equipment Part 1 General Requi...

Page 7: ...LOGIQ V2 LOGIQ V1 User Guide i 5 Direction 5610736 100 Rev 9 Country Specific Approval JAPAN Certified Number Importer Information Turkey...

Page 8: ...i 6 LOGIQ V2 LOGIQ V1 User Guide Direction 5610736 100 Rev 9...

Page 9: ...quirements 1 7 Console Graphics 1 11 Peripheral Accessory Connector Panel 1 22 Control Panel Map 1 32 Monitor Display 1 37 LCD Monitor Locking unlocking the LCD monitor 1 40 Adjusting the LCD monitor...

Page 10: ...ols 2 7 M Color Flow Mode 2 7 Doppler Mode Controls 2 8 Easy 3D Mode option 2 10 Other Controls Zoom 2 11 Split Screen 2 14 Freezing an Image 2 14 Activating CINE 2 14 Body Patterns 2 15 Annotating an...

Page 11: ...g 3 44 System Software Updates Software Download 3 45 Quality Assurance Introduction 3 53 Typical Tests to Perform 3 54 Baselines 3 57 Periodic Checks 3 57 Results 3 58 System Setup 3 59 Test Procedur...

Page 12: ...l 5 10 Probe Cleaning Process 5 11 Coupling gels 5 17 Probe Discussion Introduction 5 19 Application 5 20 Features 5 21 Specifications 5 21 Slice Thickness Specification 5 23 Probe Illustration 5 24 B...

Page 13: ...LOGIQ V2 LOGIQ V1 User Guide 1 1 Direction 5610736 100 Rev 9 Chapter 1 Getting Started Console Overview Moving the System System Start up Probes and Beginning an Exam...

Page 14: ...n Online Help and Basic User Manual User Guide please refer to Basic User Manual User Guide for the only right version Disregarding information on safety is considered abnormal use Not all features pr...

Page 15: ...YYYY format throughout the manual Information on how to change the system s date can be found in Customizing Your System NOTE The screen graphics in this manual are only for illustrational purposes Ac...

Page 16: ...ions transforming the high frequency electrical signals into a series of digital image signals which are stored in memory Once in memory the image can be displayed in real time on the image monitor Al...

Page 17: ...eral Vascular Musculoskeletal Conventional Superficial Urology Transrectal Transvaginal imaging guidance of interventional procedures e g Nerve Block Vascular Access Tissue Biopsy Fluid Drainage Frequ...

Page 18: ...ge Acquisition is for diagnostic purposes including measurements on acquired images Contraindication The LOGIQ V2 LOGIQ V1 ultrasound system is not intended for ophthalmic use or any use causing the a...

Page 19: ...y operator serviceable internal components Ensure that unauthorized personnel do not tamper with the unit Maintain a clean environment Turn off the system and disconnect the power cord before cleaning...

Page 20: ...may cause some electronic interference to radios and televisions around the equipment Ensure that the following is provided for the new system Take precautions to ensure that the console is protected...

Page 21: ...China Denmark India South Africa Switzerland United Kingdom Europe the United States Israel Brazil and Japan WARNING To avoid risk of fire the system power must be supplied from a separate properly r...

Page 22: ...und the ultrasound unit when installed in a fixed location Table 1 1 System Environmental Requirements Operational with probes Storage LOGIQ V2 LOGIQ V1 Transport LOGIQ V2 LOGIQ V1 Temperature 10 40 C...

Page 23: ...User Guide 1 11 Direction 5610736 100 Rev 9 Console Graphics The following are illustrations of the console Figure 1 2 LOGIQ V2 LOGIQ V1 System an example 1 Handle 2 LCD 3 Primary Menu keys 4 Alphanu...

Page 24: ...to air vents and openings of LOGIQ V2 LOGIQ V1 Doing so can cause fire or electric shock by shorting out interior components WARNING DO NOT touch the patient and any of the connectors on the ultrasoun...

Page 25: ...stem The lithium ion technology used in your system s battery is significantly less hazardous to the environment than the lithium metal technology used in some other batteries such as watch batteries...

Page 26: ...the battery to an electrical power outlet WARNING If the LOGIQ V2 LOGIQ V1 is not being used on a monthly basis the battery needs to be removed during the lengthy non use period CAUTION To avoid the b...

Page 27: ...mended that the customer perform one full discharge charge cycle If the battery has not been used for 2 months the customer is recommended to perform one full discharge charge cycle It is also recomme...

Page 28: ...there is no battery the AC plug Icon is displayed in the system status bar Figure 1 4 Battery icon Figure 1 5 Low Power Battery Icon Figure 1 6 Warning Battery Icon If the battery is in charge the ba...

Page 29: ...bottom of the screen Figure 1 10 Low battery power warning on status bar When the estimated current power remaining time is less than 3 minute the below warning message appears on the screen to warn t...

Page 30: ...eps to resolve the issue 1 Shutdown the system and disconnect AC power cable if it is connected 2 Remove and install the battery 3 Connect the AC power cable 4 Power on the system with AC power supply...

Page 31: ...of the system 1 Shut down the system and disconnect the AC DC power cord 2 Put the battery into the battery box through the opening place Figure 1 13 Place the battery on the bottom cover 3 Push the...

Page 32: ...ct the AC DC power cord 2 Push up the battery lock to another end of the slot While hold on to the lock without release put another hand at the embossed position on the battery and push the battery in...

Page 33: ...d where it can be tripped over or stepped on Place the AC adapter in a ventilated area such as a desk when you use it to run LOGIQ V2 LOGIQ V1 Do not cover the AC adapter with paper or other items tha...

Page 34: ...or accessories without approval by GE CAUTION The connection of equipment or transmission networks other than as specified in these instructions can result in electric shock hazard Alternate connectio...

Page 35: ...ssory Connector Panel 1 LCD Monitor Locker 2 Security lock 3 Port for DC In AC Adapter 4 Composite out port 5 S Video out port 6 HDMI Port 7 Network Port 8 1 Isolated USB printer port 9 2 general USB...

Page 36: ...ection 5610736 100 Rev 9 Peripherals Connection 1 Connect the printer to the system The printer can be properly connected using the Isolated USB printer port Table 1 2 Printers Connection Printers Ill...

Page 37: ...Overview LOGIQ V2 LOGIQ V1 User Guide 1 25 Direction 5610736 100 Rev 9 Sony UP D25MD printer HP Officejet 100 printer HP Officejet Pro 8100 printer Table 1 2 Printers Connection Printers Illustration...

Page 38: ...using general USB ports Table 1 3 Peripherals Connection Peripherals Illustration 1 Pedal Footswitch 3 Pedal Footswitch You can configure 3 pedal Footswitch functionality via the Utility Applications...

Page 39: ...Overview LOGIQ V2 LOGIQ V1 User Guide 1 27 Direction 5610736 100 Rev 9 Wireless Card USB Flash Drive USB Hard Disk Table 1 3 Peripherals Connection Peripherals Illustration...

Page 40: ...User Guide Direction 5610736 100 Rev 9 Peripherals Connection continued 3 Other peripheral ports connection Table 1 4 Other Peripheral ports connection Peripherals Illustration SD Card connection Eth...

Page 41: ...om HDMI Composite out port You can configure the output format via the Utility System Peripherals S Video out port You can configure the output format via the Utility System Peripherals Table 1 4 Othe...

Page 42: ...oved from the premises attach the security cable 1 Wrap the cable around an immovable object Figure 1 18 Security Cable 2 Be sure to rotate the key to the unlocked position to the right 3 Insert the l...

Page 43: ...ions Settings Footswitch parameters For 3 pedal footswitch you can configure its functionality from the pull down menu list of Left Middle and Right Figure 1 20 3 footswitch setting For 1 pedal footsw...

Page 44: ...0 Preset key 11 Worksheet key 12 End Exam key 13 Archive key 14 Gain AO key 15 Scan Coach keys 16 Mode keys 17 Cursor key 18 Clear key 19 Comment key 20 Active key 21 Measure key 22 Body Pattern key 2...

Page 45: ...ween user text annotation overlays Grab Last F9 Key Activate the last selected data for edit Word Delete F10 Key Erase word associated with comment cursor If you encounter a problem and cannot collect...

Page 46: ...ey caps of user defined key on the control panel to match with the assigned function Figure 1 23 User Configurable Key Preset Menu Primary Menu keys The Primary Menu keys contain exam function and mod...

Page 47: ...d image See Split Screen on page 2 14 for more information Gain AO is used to Gain rotate to adjust gain AO press to initiate turn off auto optimize Depth Zoom Ellipse controls the image depth width a...

Page 48: ...y Pattern control it enables the Body Pattern and displays the default pattern on the screen When body patterns are active the knob rotates the probe position indicator Press Set to fix the measuremen...

Page 49: ...controls 8 Primary Menu 9 Trackball Functionality Status 10 System messages 11 Caps Lock lit when on network connection indicator PC connected PC with X not connected Battery Icon Plug Icon InSite sta...

Page 50: ...Delete You can use this to delete an image from the clipboard To delete an image from the clipboard 1 Select the Cursor key to obtain a cursor arrow 2 Place the cursor on the clipboard image you want...

Page 51: ...ious Arrow or Ctrl Next Arrow Each image recalls for three seconds or the length of the loop whichever is longer You can manually skip to a new image during the slide show by recalling it as usual To...

Page 52: ...e LCD LCD monitor can be opened Figure 1 27 Unlock the LCD Monitor Adjusting the LCD monitor The LCD monitor position can be adjusted for easy viewing Tilt the LCD monitor for the optimum viewing angl...

Page 53: ...le The lowest level of black should just disappear into the background and the highest white should be bright but not saturated To adjust the brightness On the alphanumeric keyboard adjust brightness...

Page 54: ...etting Started 1 42 LOGIQ V2 LOGIQ V1 User Guide Direction 5610736 100 Rev 9 Volume To adjust the volume On the alphanumeric keyboard adjust volume with the Fn Up Down keys Figure 1 29 Volume 1 Volume...

Page 55: ...n 3 Disconnect all cables from off board peripheral devices external printer etc and the ethernet connection from the console NOTE To prevent damage to the Power Cord DO NOT pull excessively on the co...

Page 56: ...dition to the instructions used when moving the system see Before moving the system on page 1 43 for more information also perform the following 1 Before transporting place the system in its special s...

Page 57: ...rs is not necessary in most cases and is only recommended for situations involving multiple equipment in a high risk patient environment to provide assurance that all equipment is at the same potentia...

Page 58: ...VAC 10A Plug a and Outlet b Configuration example NOTE Country specific power cords are currently available for Argentina Australia New Zealand China Denmark India South Africa Switzerland United Kin...

Page 59: ...ush the power plug securely into the wall outlet NOTE Do not use an extension cord or adapter plug Figure 1 31 Connect the system to the electrical supply CAUTION Use the appropriate power cord provid...

Page 60: ...ystem 1 Check the rating label on the bottom of the system Check the voltage range indicated on the label 2 Momentarily press the On Off switch to turn the power on 3 The system should now go through...

Page 61: ...time The system boots up and the status is reflected on the monitor Probes are initialized for immediate operation NOTE If no probe is connected the system goes into freeze mode Peripheral devices are...

Page 62: ...from the hard disk Color Green 2 Indicates battery status When the battery is charged the LED is green When battery power is low the LED is orange Color Green and Orange Keyboard Backlight The keyboar...

Page 63: ...t Shutdown The shutdown process takes a few seconds and is completed when the Power On Off switch illumination turns from green to off NOTE DO NOT select Exit for Shutdown Exit is only available to Se...

Page 64: ...1 Press the On Off switch and select Sleep 2 One minute after the monitor goes black unplug the power cord from the wall 3 To exit out of Sleep Mode press the On Off switch CAUTION You need to wait a...

Page 65: ...by 24 hours earlier than the current system time of last boot up This warning message is to remind the user to check the system date in case the system date and time is incorrect Figure 1 34 Check sys...

Page 66: ...for damage or degradation to the housing strain relief lens seal cable and connector DO NOT use a transducer which appears damaged until functional and safe performance is verified A thorough inspecti...

Page 67: ...Figure 1 35 Probe connection to LOGIQ V2 LOGIQ V1 4 Flip the connector locking lever up Figure 1 36 Probe connector locking lever 5 Carefully position the probe cord so it is free to move and is not...

Page 68: ...les between probes Disconnecting the Probe Probes can be disconnected at any time However the probe should not be active when disconnecting the probe 1 Press the connector locking lever down 2 Pull th...

Page 69: ...2 LOGIQ V1 1 Turn over LOGIQ V2 LOGIQ V1 and 2 Probe Port Adapter to let the back upward Figure 1 37 2 Probe Port Adapter connection Step 1 2 Align the 2 location pins of 2 Probe Port Adapter with the...

Page 70: ...be Port Adapter to LOGIQ V2 LOGIQ V1 continued 3 Flip the connector locking lever down Figure 1 39 2 Probe Port Adapter connection Step 3 4 Turn over the system with 2 Probe Port Adapter now the 2 Pro...

Page 71: ...bes to the 2 Probe Port Adapter Follow the probe connection procedure to connect the probe to the 2 Probe Port Adapter Figure 1 41 2 probe Port Adapter connection Step 5 Selecting the probe Press Pati...

Page 72: ...r R1 0 x Figure 1 43 Archive view Screen 1 1 Image Management Select to manage the images 2 EZBackup EZMove One step method to backup move patient images to an external media 3 Review Select to review...

Page 73: ...splays the Exam History of the selected patient 7 Dataflow Selection Select the appropriate patient dataflow 8 Delete Select to delete the selected patient 9 Delete All Select to delete all the patien...

Page 74: ...base perform EZbackup and Backup Patient Archive and Report Archive then delete the patient from the system WARNING Imaging functions may be lost without warning Develop emergency procedures to prepar...

Page 75: ...a flat surface in the patient environment WARNING Ensure that the hands of the patient are away from the system during the exam The position of the operator and the patient vary by scan region In most...

Page 76: ...Select the probe and application 4 Select Scan to start scanning 5 Perform the exam If the patient information needs to change while scanning select Patient again If the probe or preset needs to chan...

Page 77: ...irection 5610736 100 Rev 9 Patient Screen For R1 1 x Figure 1 46 Patient Screen 1 Image Management 2 Function Selection 3 EZBackup EZMove 4 Dataflow Selection 5 Scan 6 Patient Information 7 Category S...

Page 78: ...when the patient is registered to No Archive if the Warn register to No Archive preset is selected in the Utility Connectivity Miscellaneous menu a warning displays Please select a different dataflow...

Page 79: ...ore the cineloop press Freeze and run the cineloop using the Trackball Select the start end frame and run the selected loop Press Store 10 When you have completed the study press End Exam The Active I...

Page 80: ...2 Press New Patient to erase the current patient data 3 Select Store All if data from previous patient was not saved 4 Enter the Patient ID 5 Enter the patient and exam information 6 Press Register 7...

Page 81: ...needs to change while scanning select Preset again 5 Press the Store key to store the static image or cineloop saved in the exam to the clipboard 6 When you have completed the study select End Exam on...

Page 82: ...The system displays a warning message Warning A patient must be selected for permanent storage of image Select OK 3 Select Patient on the control panel to create a new patient the following dialog dis...

Page 83: ...sage is also displayed at the bottom of the image monitor in red 2 When the scanning is finished press Patient to display the Patient Search screen 3 Enter the Patient ID patient data and exam informa...

Page 84: ...rchive Screen and select the existing patient Figure 1 49 Unsaved Exam Data Archive 3 The option is different if the current patient is with or without patient ID a With Patient ID Store All xxx Store...

Page 85: ...age page Then Select Scan to begin scanning on the current patient 5 Delete All Delete all the unsaved images Then Select Scan to begin scanning a dialog displays Do you really want to delete all temp...

Page 86: ...m the patient list the following dialog displays Figure 1 50 Unsaved Exam Data 1 Store All All the unsaved images will be saved to the current patient 2 Review Images Review the unsaved images in Acti...

Page 87: ...ut patient ID to an existing patient when there are some unsaved images on the clipboard for the current patient Select the existing patient from the patient list the following dialog displays Figure...

Page 88: ...the current patient information continue Select OK to save the images Auto Generate The system will generate a new patient ID and the unsaved images will be saved to this new patient automatically 2 R...

Page 89: ...automatically store all images of current patient permanently The system creates the new patient and the new folder to store all images in the archive screen Each patient has only one folder per day...

Page 90: ...ey and selecting patients one by one or holding down the Shift key to select a group of patients 2 Select Delete The confirmation dialog box displays OR Press the Cursor key A pop up menu displays Sel...

Page 91: ...tient in the patient list under patient screen 2 Select Exam View The patient exam screen displays 3 Select the exam which contains the image to be deleted 4 Select Active Images to display the image...

Page 92: ...Getting Started 1 80 LOGIQ V2 LOGIQ V1 User Guide Direction 5610736 100 Rev 9...

Page 93: ...LOGIQ V2 LOGIQ V1 User Guide 2 1 Direction 5610736 100 Rev 9 Chapter 2 Performing an Exam Optimizing the Image Measurement and Analysis...

Page 94: ...e focal zone position s appears on the right edge of the image Auto Optimize No Auto Optimize Auto lets you optimize the image based upon the actual B mode image data Auto Tissue Optimize ATO The pres...

Page 95: ...vert No Flips the image 180 degrees left right Dynamic Range No Dynamic Range controls how echo intensities are converted to shades of gray thereby increasing the adjustable range of contrast Line Den...

Page 96: ...h Definition is an adaptive algorithm to reduce the speckle in the ultrasound image LOGIQ View Option No LOGIQ View provides the ability to construct and view a static 2D image which is wider than the...

Page 97: ...pective e g red away negative velocities and blue toward positive velocities You can invert a real time or frozen image NOTE Invert reverses the color map NOT the color PRF Baseline No Changes the Col...

Page 98: ...Doppler signal coming from the tissue rather than the frequency shift of the signal Using this technique the ultrasound system plots color flow based on the number of reflectors that are moving regard...

Page 99: ...Mode image using velocity and variance color maps The Color Flow wedge overlays the B Mode image and M Mode time line See Color Flow Mode Controls on page 2 5 for more information Table 2 3 M Mode Con...

Page 100: ...elocity scale to accommodate faster slower blood flow velocities Velocity scale determines pulse repetition frequency If the sample volume gate range exceeds single gate Scale capability the system au...

Page 101: ...he menu to select which calculations are automatically calculated Auto Calcs No Activates the calculation automatically which you select in the Modify Auto Calculation when the system is in a state of...

Page 102: ...scan evenly across anatomy keeping probe perpendicular to anatomy being scanned To perform a sweep fan scan plant the probe and then rock it across the desired anatomy Note the distance of the scan 5...

Page 103: ...e frozen cine or recalled raw data image Write Zoom With Write Zoom the Ultrasound line density and or sampling frequency increases giving a better resolution Available only in pre processing NOTE Wri...

Page 104: ...knob once the zoom status is indicated on the system status bar To zoom an image rotate Depth Zoom Ellipse knob clockwise A reference image appears in the down left hand section of the display Figure...

Page 105: ...e knob again the zoom status is indicated on the system status bar To zoom an image rotate Depth Zoom Ellipse knob clockwise A reference image appears in the down left hand section of the display Figu...

Page 106: ...FM or PDI press the L and R keys simultaneously to display B and B CFM or B and B PDI in real time on the left and right side It is useful to observe the ROI in B Mode Freezing an Image To freeze an i...

Page 107: ...Pattern Position is reset to factory default when patient is changed e g End Exam A probe mark is associated with the body patterns and illustrates the probe position on the body pattern This marker c...

Page 108: ...ivating the comment mode a vertical bar type cursor appears on the screen Use the Trackball to move the cursor To delete comments by character press the Backspace key To delete all comments and arrow...

Page 109: ...DY RECEIVED EDUCATION AND TRAINING Scan Coach IS AN ON DEMAND REFRESHER AND REMINDER TOOL WHICH DISPLAYS INFORMATION IN THE FORM OF DICOM IMAGES AND ANIMATIONS THE PROVIDED REFERENCE MATERIAL MAY HELP...

Page 110: ...RTS ANATOMICAL MEASUREMENTS AND CLINICAL DIAGNOSIS LIES WITH YOU THE ULTRASOUND USER TO THE FULLEST EXTENT PERMISSIBLE PURSUANT TO APPLICABLE LAW GE AND ITS AFFILIATES DISCLAIM ALL LIABILTY AND RESPON...

Page 111: ...the image initiates measurements and assigns the measurements to the worksheet report Scan Coach is an extension of the utility of Scan Assistant Scan Coach leverages the built in examination script o...

Page 112: ...stant Manager select the protocol from the left column and select to move it to the Program Selections column Then select Exit to the Scanning page 2 Press Patient key on the control panel to register...

Page 113: ...ch on the control panel The Scan Coach addendum displays refer to See Scan Coach on page 2 17 for more information for detailed information Select Acknowledge to continue Figure 2 4 Scan Coach Addendu...

Page 114: ...rforming an Exam 2 22 LOGIQ V2 LOGIQ V1 User Guide Direction 5610736 100 Rev 9 Using Scan Coach For R1 0 x continued b Then select the protocol from the list and select Start Figure 2 5 Select protoco...

Page 115: ...rk indicates that this step has been completed You can also manually check the box to bypass this step c Step Number Step Name d Select this icon to view the reference image e This column indicates th...

Page 116: ...active step 4 Select or press the button to activate the probe position and schema image along with the reference image It displays reference image probe position and schema to guide the user to acqui...

Page 117: ...5610736 100 Rev 9 Using Scan Coach For 1 1 x 1 Go to Utility Scan Coach Scan Coach Manager select the protocol from the left column and select to move it to the Program Selections column Then select E...

Page 118: ...panel to activate the Scan Coach function The Scan Coach addendum displays refer to See Scan Coach on page 2 17 for more information for detailed information Select Acknowledge to continue Figure 2 9...

Page 119: ...For 1 1 x continued 3 Select the protocol from the pull down menu and then select Start NOTE If there is only one program in the current application the system will display the Scan Coach screen direc...

Page 120: ...ntinued Figure 2 11 Scan Coach Display Description 1 Program step number and step name Note The user is also able to select the program step by pressing the corresponding numeric key on the control pa...

Page 121: ...Guide 2 29 Direction 5610736 100 Rev 9 Using Scan Coach For 1 1 x continued 4 Select program for example LIVER LENGTH then select the button L1 or press REF key on the control panel to review the refe...

Page 122: ...Coach For 1 1 x continued 5 The reference image is displayed Then select the button L2 marked as 2 or press Hard Key R on the control panel to view the probe position and schema also You can also pres...

Page 123: ...splays reference image probe position and schema to guide the user acquire the right scan plane Select the button marked as 1 to stop restart the video that demonstrates the probe position Figure 2 14...

Page 124: ...V2 LOGIQ V1 User Guide Direction 5610736 100 Rev 9 Setting up Scan Coach For R1 0 x Go to Utility Scan Assistant Scan Assistant Manager to create import export and manage the Scan Coach programs Figu...

Page 125: ...2 LOGIQ V1 User Guide 2 33 Direction 5610736 100 Rev 9 Setting up Scan Coach For R1 1 x Go to Utility Scan Coach Scan Coach Manager to create import export and manage the Scan Coach programs Figure 2...

Page 126: ...OGIQ V2 LOGIQ V1 User Guide Direction 5610736 100 Rev 9 Edit Scan Coach Protocol 1 To edit Scan Coach protocols For R1 0 x Go to Utility Scan Assistant Scan Assistant Manager and select Creator Figure...

Page 127: ...irection 5610736 100 Rev 9 Edit Scan Coach Protocol continued For R1 1 x software go to Utility Scan Coach Scan Coach Manager and select Creator Figure 2 18 Scan Coach Manager Or Select the button mar...

Page 128: ...ed Then select Edit and the system will lead to the Scan Coach Edit page Figure 2 20 Edit the Protocol 2 The Scan Coach Creator is used to build customized programs that can be imported onto the LOGIQ...

Page 129: ...n Plane Select Browse to upload the reference image Figure 2 22 Select Scan Plane 4 Select Upload to Upload the reference image from the folder called Reference Images of the corresponding application...

Page 130: ...riate image to upload Figure 2 24 Upload Reference Image 2 5 Upload Probe Position Image and Schema Image from the folder called Other Images of the corresponding application or from the external devi...

Page 131: ...by the user or can be changed manually AFB is Auto Fetal Biometry Table 2 6 List of Abbreviations Abbreviation Full Form Definition AC Abdominal Circumference Measure of fetal growth in pregnancy BPD...

Page 132: ...under SonoBiometry Option Selection to enable system suggested measurements Figure 2 25 SonoBiometry checkboxes For R1 0 x Figure 2 26 SonoBiometry checkboxes For R1 1 x 3 Select Exit to return to sca...

Page 133: ...Accept if you accept the current measurement The system completes the measurement 2 Edit Press Edit to get into the edit mode and make the required changes 3 Manual Press Manual to ignore the auto me...

Page 134: ...to proceed on the image supplied NOTE If a particular scanned image does not have valid fetus data a warning message appears No valid auto measurement found proceed with a manual measurement You can n...

Page 135: ...st Key to a numeric key NOTE Enable Numeric Hot key or Enable Alphabet Hot Key in Utility System User Configurable Key should be selected before you create a Fast Key NOTE There is no distinction betw...

Page 136: ...ss the key assigned to the Fast Key macro The message Fast Key playback is finished displays on the status bar when the macro is finished To stop the Fast Key during the operation press F6 The message...

Page 137: ...recall a desired cine loop from the stored images NOTE QAnalysis is only available when the system is in CINE mode NOTE Images from the current scan session acquired in the desired analysis mode alre...

Page 138: ...bases used within the system software that are associated with specific investigators are so noted Be sure to refer to the original article describing the investigator s recommended clinical procedure...

Page 139: ...otations body markers arrows hold down the Clear button 2 Measure Activates a measurement caliper and the calculation package associated with the currently selected preset 3 Set B Pause Set fixes the...

Page 140: ...uide Direction 5610736 100 Rev 9 B Mode Measurements Distance Circumference and Area Ellipse Method Trace Method Spline Method Intensity Echo level Method NOTE The following instructions assume that y...

Page 141: ...the end point move the Trackball A dotted line connects the measurement points if preset accordingly 5 To complete the measurement press Set The system displays the distance value in the Results Windo...

Page 142: ...ys a second active caliper 5 To position the second caliper move the Trackball 6 Rotate Ellipse control on the control panel an ellipse with an initial circle shape displays 7 To position the ellipse...

Page 143: ...rimary Menu to Trace NOTE The available values for Caliper Change menu can be set in Utility Measure Advanced preset Measure Key Sequence 2 To position the caliper at the start point move the Trackbal...

Page 144: ...e start point move the Trackball 4 To fix the trace start point press Set The caliper changes to an active caliper 5 To trace the measurement area move the Trackball around the anatomy A dotted line s...

Page 145: ...green NOTE When pressing the Clear key once the second caliper disappears and the first caliper is activated If Clear is pressed again the first caliper disappears and the Spline trace is cancelled 5...

Page 146: ...ts including the pick caliper are removed If the previous next fixed caliper exists on the image it is activated NOTE Pressing Clear at this time removes all points and the trace graphic 2 Move the pi...

Page 147: ...hange menu can be set in Utility Measure Advanced preset 3 To position the caliper at the start point move the Trackball 4 To fix the trace start point press Set The caliper changes to an active calip...

Page 148: ...do the following 1 In the B Mode part of the display scan the anatomy you want to measure 2 Go to the Doppler Mode part of the display 3 Press Freeze Velocity To measure velocity 1 Press Measure key...

Page 149: ...r into measure mode if necessary Adjust Caliper Change in the Primary Menu to S D Trace In the Utility Measure Advanced preset menu set Trace preset to Manual 2 To position the caliper at the trace st...

Page 150: ...y Adjust Caliper Change in the Primary Menu to S D Trace In the Utility Measure Advanced preset menu set Trace preset to Auto 2 To position the caliper at the trace start point in the Doppler spectrum...

Page 151: ...t the end point move the Trackball 5 To complete the measurement press Set The system displays the two peak end point velocities the time interval and the acceleration in the Results Window Time inter...

Page 152: ...distance measurement in B Mode It measures the vertical distance between calipers 1 Press Measure key to enter into measure mode if necessary Adjust Caliper Change in the Primary Menu to MM Distance...

Page 153: ...rackball 5 To complete the measurement press Set The system displays the time interval between the two calipers in the Results Window Slope Time interval and Velocity To measure time and velocity betw...

Page 154: ...tic Wide Screen portion of the Utility System System Imaging 2 Press Measure on the control panel the Result window displays at the left bottom of the screen To perform measurement select measurement...

Page 155: ...stem crashes As you complete measurements the system puts measurement data in the appropriate worksheets To view a worksheet To view a worksheet select Worksheet The system displays the worksheet for...

Page 156: ...sheet key for the desired worksheet To view worksheet data for a particular mode select that mode To view a worksheet with data for more than one mode select Expand When Expand is selected it defaults...

Page 157: ...elete the field select Delete Value To exclude the field select Exclude Value The data in the field is not visible and is not included in worksheet calculations To include a value that you previously...

Page 158: ...ete All Worksheet Values You can delete all worksheet values on a worksheet 1 When the Worksheet is displayed on the monitor press the Clear key the following warning message appears Figure 2 32 Delet...

Page 159: ...surements 1 In the Hot Key field select the desired hot key Z X C V B N M or for the appropriate Measure Study by pressing the up down arrow key on the monitor display 2 Ensure that the Enable Hot Key...

Page 160: ...le equipment malfunctions that could affect measurement accuracy a quality assurance QA plan should be established for the equipment that includes routine accuracy checks with tissue mimicking phantom...

Page 161: ...s Sector Probes Circumference Trace mm Full Screen 10 Linear Probes Convex Probes Sector Probes Ellipse mm Full Screen 5 Linear Probes Convex Probes Sector Probes Area Trace mm2 Full Screen 5 Linear P...

Page 162: ...rear of the system WHILE the LOGIQ V2 LOGIQ V1 is NOT powered up If you plug in a device while the LOGIQ V2 LOGIQ V1 is powered on your system may become unusable CAUTION DO NOT place an off line pape...

Page 163: ...Guide 3 1 Direction 5610736 100 Rev 9 Chapter 3 After the Exam is Over System Presets DataBackup Configuring Connectivity Electronic Documentation Contact Information System Data System Care and Maint...

Page 164: ...patterns Presets Helps configure system settings Connectivity Setup Define connection and communication setup including exam dataflow information Measurement and Analysis presets Customize exam studie...

Page 165: ...the changes on each setup page before moving to the next page 1 In Utility System General Location select Regional Options Figure 3 1 Regional Options 2 The Regional and Language Options Screen displ...

Page 166: ...LOGIQ V1 User Guide Direction 5610736 100 Rev 9 Foreign Language and Keyboard Setup For R1 0 x continued 3 Select the Advanced tab then select the language in the Language for non Unicode programs pul...

Page 167: ...tab select Details b Select desired language under Default input language c Under Installed Services select input method If necessary select Add or Remove to add or remove input method Figure 3 4 Sel...

Page 168: ...tup For R1 0 x continued 6 In the Regional and Language Options screen select OK select No in the following pop up message Figure 3 6 Restart Message 7 In Utility System General Location Language set...

Page 169: ...change the input language NOTE To have the settings take effect you MUST turn off the system and turn it back on NOTE Service password does not work for Greek and Russian language settings Change the...

Page 170: ...After the Exam is Over 3 8 LOGIQ V2 LOGIQ V1 User Guide Direction 5610736 100 Rev 9 Figure 3 10 Formats selection...

Page 171: ...3 9 Direction 5610736 100 Rev 9 Foreign Language and Keyboard Setup For R1 1 x continued 3 Under Location select desired location Figure 3 11 Regional Options 4 Under Administrative select Change syst...

Page 172: ...gn Language and Keyboard Setup For R1 1 x continued 5 Select Apply when below message displays Figure 3 13 Change Regional Options 6 Select the language under Current system locale then select OK Figu...

Page 173: ...rection 5610736 100 Rev 9 Foreign Language and Keyboard Setup For R1 1 x continued 8 In the Keyboards and Languages tab then select Change keyboards Figure 3 16 Change Keyboard 9 Select Add to add the...

Page 174: ...up For R1 1 x continued 10 Select the language using the checkbox before the language and then select OK Or select Preview to review the keyboard layout Figure 3 18 Add Input Language 11 Select the la...

Page 175: ...then select Save Figure 3 20 Change the System Language 13 The system will indicate to restart the system select OK to continue Figure 3 21 Information Window 14 When the system boots up the system ap...

Page 176: ...ts have the same software version Depending on the system you can use either a CD R DVD R USB Flash Drive or USB Hard Disk for system backup restore For the sake of simplicity we have used the CD R in...

Page 177: ...ort Archive User defined configuration Service CAUTION Archived data is managed at the individual sites Performing data backup to any device is recommended CAUTION Make sure to verify the media after...

Page 178: ...nage the backup media by keeping a log and by creating a media filing system For example if you need to back up 500 MB day or 2 5 GB week then you need to back up 5 CDs week or 250CDs year Generally s...

Page 179: ...ZBackup wizard screen if the last time you were performing EZBackup you selected Cancel CAUTION If you use EZBackup or EZMove as a true patient archive you must maintain a separate backup of the patie...

Page 180: ...ingle image across two 2 or more media Therefore if EZBackup EZMove encounters an image that is greater than the capacity of the media it skips the oversized image NOTE EZBackup EZMove does not store...

Page 181: ...me NOTE EZBackup EZMove can take up to 20 minutes or longer depending on the size of the backup Make sure to schedule this at the same time daily when no patients are scheduled 1 Prepare unformatted m...

Page 182: ...of the EZBackup wizard If you want to backup all of the exams in the range even if the exam was previously backed up check this option If you uncheck this option the system only backs up exams which h...

Page 183: ...to do this backup After you have gathered the media allow for one extra media just in case you are ready to begin the backup Press Next If the storage capacity of the USB HD is insufficient you will...

Page 184: ...abel the media with not only the volume name indicated on the Insert Media Message but with the name of the LOGIQ V2 LOGIQ V1 system where this backup move procedure was done b Update the EZBackup EZM...

Page 185: ...ZMove continued 7 The status menu appears When the backup move has been completed press Next Figure 3 25 EZBackup Wizard Page 3 NOTE When if you need to insert the next media a message appears providi...

Page 186: ...Move continued 8 When the backup is complete the completed wizard page appears Press Finish Figure 3 26 EZBackup EZMove Wizard Page 4 9 Do a patient archive after each EZBackup EZMove move We recommen...

Page 187: ...Insert the media volume indicated on the Patient Menu 3 View the exam from the media NOTE You may need to insert a media volume prior to or after the recommended media NOTE If the patient is split ov...

Page 188: ...a into the drive or USB device into a USB port 2 On the Archive screen under dataflow select Local Archive Int HD 3 Go to Utility System Backup Restore 4 In the Backup list Select Patient Archive and...

Page 189: ...tore Service Settings 3 In the Media field select the appropriate Source device 4 Select Restore The system performs the restore As it proceeds status information is displayed on the Backup Restore sc...

Page 190: ...Q V2 LOGIQ V1 systems with identical presets preset synchronization Preset synchronization The procedure for preset synchronization of several scanners is as follow 1 Make a backup of the user defined...

Page 191: ...w allows you to adjust the settings of the selected dataflow and associated services Selecting a dataflow customizes the ultrasound system to work according to the services associated with the selecte...

Page 192: ...s required by system application software are enabled Software programs CANNOT be loaded onto the LOGIQ V2 LOGIQ V1 e g email web browser etc An auto executable file CANNOT be run automatically on the...

Page 193: ...user documentation on a PC 1 Insert the media into the media drive 2 Open the media drive on your desktop 3 Select and open the item you want to view To close the window click on the X in the upper ri...

Page 194: ...ted SDD type HDD Integrated speakers User adjustable audio output control on keyboard USB flash drive HDD DVD RW SD card as option to archive patient data Lithium Ion Battery Laptop Style Console Elec...

Page 195: ...utomatic Optimization ATO ASO Auto Depth Virtual Convex Zoom Other ID Biopsy Patient information database Image Archive integrated on CD DVD and Hard Drive Real time automatic Doppler calcs General B...

Page 196: ...ode Length and Depth Velocity Scale Color Flow CFM Gain CFM Velocity Range Acoustic Output Wall Echo Filter Packet Size Frame Rate Control CFM Spatial Filter CFM Frame Averaging CFM Line Resolution Fr...

Page 197: ...rogrammable OB Tables Over 20 selectable OB Calcs Expanded Worksheets Gynecology Measurements Calculations Right Left Ovary Length Width Height Uterus Length Width Height Cervix Length Trace Ovarian V...

Page 198: ...guidance Only trained persons are allowed to perform the safety inspections mentioned above Technical descriptions are available on request To ensure that the unit constantly operates at maximum effi...

Page 199: ...ol panel and keyboard for defects Trackball movement If the trackball is dusty please clean it CAUTION To avoid electrical shock hazard do not remove panels or covers from console This servicing must...

Page 200: ...0 Rev 9 Weekly Maintenance The system requires weekly care and maintenance to function safely and properly Clean the following LCD Monitor System Cabinet Operator control panel Footswitch Printers Fai...

Page 201: ...nd both sides of the system cabinet Be careful with the output and input ports of the system and do not allow anything especially liquid enter into the ports 3 Wipe off excess cleaning agents NOTE Do...

Page 202: ...spray any liquid on the controls into the system cabinet or in the probe connection receptacle NOTE In case of SARS use bleach alcohol or Cidex in a normal diluted form for cleaning disinfecting the...

Page 203: ...iner Wipe off any oil or dust from the trackball retainer and the trackball housing using a cleaner or cotton swab 3 Assemble the trackball and retainer then put it into the housing and rotate it cloc...

Page 204: ...ill be discarded appropriately by GE NOTE Disposing of the battery should meet local law and regulatory requirements Prevention of static electricity interference Interference from static electricity...

Page 205: ...this product shall not be treated as household waste Instead it shall be handed over to the applicable collection point for the recycling of electrical and electronic equipment By ensuring this produc...

Page 206: ...Representative for information System voltage fault System will shut down 1 Select OK and reboot the system 2 If the same message appears after reboot shut down the system then turn on the system 3 If...

Page 207: ...turn off system power or the system can be left in a unusable mode For this reason you may want to perform the software download one evening and then install the software the next evening After the s...

Page 208: ...onitor NOTE To update the software you must login with administrator privileges 1 Press the on off button on the control panel The Exit dialog window with software download displays Figure 3 28 System...

Page 209: ...s begun the system is not usable until the software installation is done While installing DO NOT turn off system power NOTE A typical software update of about 600 Mb may take up to 60 minutes to downl...

Page 210: ...e DO NOT install the downloaded software no software upgrade will be performed If you decline this installation you WILL NOT be offered the chance to install this software package again You can contac...

Page 211: ...nued 4 After the installation complete select Shutdown and then press Power On Off button to reboot the system Figure 3 31 Shutdown after Software Installation 5 When the system starts up after the so...

Page 212: ...d installing the new software Figure 3 33 New Software Verification Checklist CAUTION Perform a check for all the features listed which is supported in the system You MUST ensure that the entire syste...

Page 213: ...ev 9 Software download and installation continued 7 As you verify that each feature works correctly select Passed If all features work correctly and Passed is filled in for all features type your sign...

Page 214: ...nd installation continued WARNING However if any of the features DO NOT function as expected you need to select Failed for this feature Type your signature and press OK Then the System Exit Window is...

Page 215: ...interests of every ultrasound user to routinely monitor equipment performance The frequency of Quality Assurance evaluations should be based on user s specific needs and clinical practice Periodic mon...

Page 216: ...o the baseline in order to maintain a record of system performance trends Frequency of tests Quality assurance tests are used to determine whether a scanner is providing the same level of performance...

Page 217: ...omposed of material that acoustically mimic human tissue Pins anechoic and echogenic targets are physically positioned to provide information for a variety of tests Doppler phantoms are currently expe...

Page 218: ...10736 100 Rev 9 Phantoms continued Figure 3 35 Phantoms 1 Penetration 2 Axial Distance Measurement 3 Functional Resolution 4 Lateral Resolution 5 Lateral Distance Measurement 6 Axial Resolution 7 Cont...

Page 219: ...itor should be recorded for the permanent record Periodic Checks Periodic checks should be performed in accordance with your facility s quality assurance requirements For the data to be valid periodic...

Page 220: ...lity Assurance Evaluation results should be compared to previously recorded results Performance trends can then be detected Unacceptable performance or diminishing trends should be identified for main...

Page 221: ...ontrast should be set to the normal viewing of a good gray scale image 2 Check all recording devices for proper duplication of image monitor Ensure that what is seen is what is recorded 3 Annotate non...

Page 222: ...ifferent depths or fields of view can be tested Procedure 1 Scan a test phantom with precisely spaced vertical pin targets Adjust all scan controls as necessary for the best image of the pin targets t...

Page 223: ...of view can be tested Procedure To measure lateral distance 1 Scan a test phantom with precisely spaced horizontal pin targets Adjust all scan controls as necessary for the best image of the pin targ...

Page 224: ...terpretation of the ultrasound image Procedure To measure Axial resolution 1 Scan a test phantom with precisely spaced vertical pin targets 2 Adjust all scan controls as necessary for the best image o...

Page 225: ...le dot This may lead to improper interpretation of the ultrasound image Procedure To measure lateral resolution 1 Scan a test phantom with precisely spaced horizontal pin targets 2 Adjust all scan con...

Page 226: ...Scan a phantom to see how echoes begin to fade as depth is increased The maximum depth of penetration is the point at which homogeneous material in the phantom begins to lose brightness Procedure To...

Page 227: ...the smallest structure the system is capable of resolving at a given depth Procedure To measure functional resolution 1 Set the front panel TGC slide pots to their center detent position 2 Gain and ac...

Page 228: ...rom normal surrounding tissue Method A phantom with echogenic targets of different sizes and depths should be used Procedure To measure contrast resolution 1 Set the front panel TGC slide pots to thei...

Page 229: ...facturer s instructions until the hard copy and video display are equal 2 Scan the phantom and it s echogenic contrast targets 3 Make a hard copy photograph of the display and compare it to the image...

Page 230: ...t Gain Depth Probe Dynamic Range Set up new patient to be the name of the test Annotate the following Any control where its value is NOT displayed Significant phantom information Record Keeping Comple...

Page 231: ...Serial Number Room Temperature Acoustic Output Gain Focal Zone Gray Map TGC Depth Monitor Setting Peripheral Settings Other Image Processing Control Settings Table 3 11 Part 2 Test Baseline Value Rang...

Page 232: ...resentative to get the latest information Contact the distributor GE affiliate or sales representative for approved peripherals For HCATs contact your sales person CAUTION DO NOT connect any probes or...

Page 233: ...Printer Each Sony UP D898MD Printer Each HP Officejet 100 Printer Each HP Officejet Pro8100 Printer Each Wireless Network USB Adapter Each 2 Probe Ports Adapter Each Table 3 13 Probes and Accessories...

Page 234: ...cket H46222LC 4C RS Convex H4000SR Multi angle disposable needle guide with a reusable plastic bracket E8385NA LK760 RS Linear H44901AF Not Available N A N A 12L RS Linear H40402LY Multi angle in plan...

Page 235: ...Answer Center TEL 1 800 682 5327 or 1 262 524 5698 In other locations contact your local Applications Sales or Service Representative Service Questions For service in the United States call GE CARES...

Page 236: ...P 05425 070 C N P J 02 029 372 0001 40 TEL 3067 8010 FAX 011 3067 8280 CANADA GE Ultrasound 9900 Innovation Drive Wauwatosa WI 53226 TEL 1 800 668 0732 Customer Answer Center TEL 1 262 524 5698 LATIN...

Page 237: ...o 1 Yongchang North Road Beijing Economic Technology Development Area Beijing 100176 China TEL 8610 5806 8888 FAX 8610 6787 1162 Service 4008108188 24h INDIA Wipro GE Healthcare Pvt Ltd No 4 Kadugodi...

Page 238: ...LUXEMBURG GE Healthcare BVBA SPRL Kouterveldstraat 20 1831 DIEGEM TEL 32 2 719 7204 FAX 32 2 719 7205 CZECH REPUBLIC GE Medical Systems Cesk Republika s r o Vyskocilova 1422 1a 140 28 Praha 4 TEL 420...

Page 239: ...2 Buda rs 2040 Hungary TEL 36 23 410 314 FAX 36 23 410 390 IRELAND NORTHERN IRELAND GE Healthcare Victoria Business Park 9 Westbank Road Belfast BT3 9JL TEL 44 028 90229900 REPUBLIC OF IRELAND GE Hea...

Page 240: ...land TEL 48 22 330 83 00 FAX 48 22 330 83 83 PORTUGAL General Electric Portuguesa SA Avenida do Forte 6 6A Edif cio Ramazzotti 2790 072 CARNAXIDE TEL 351 21 425 1300 FAX 351 21 425 1343 RUSSIA GE Heal...

Page 241: ...L 90 212 398 07 00 FAX 90 212 284 67 00 UNITED ARAB EMIRATES UAE GE Healthcare Dubai Internet City Building No 18 First Floor Dubai UAE TEL 971 4 429 6101 or 4 429 6161 FAX 971 4 429 6201 UNITED KINGD...

Page 242: ...After the Exam is Over 3 80 LOGIQ V2 LOGIQ V1 User Guide Direction 5610736 100 Rev 9...

Page 243: ...LOGIQ V2 LOGIQ V1 User Guide 4 1 Direction 5610736 100 Rev 9 Chapter 4 Safety Describes the safety and regulatory information pertinent for operating this ultrasound system...

Page 244: ...personnel are authorized to operate the system Before authorizing anyone to operate the system it should be verified that the person has read and fully understands the operating instructions containe...

Page 245: ...ltrasound system specifically Maintaining an optimum system environment Using this Manual Notes to emphasize or clarify a point DANGER Indicates that a specific hazard is known to exist which through...

Page 246: ...Describes precautions necessary to prevent the risk of injury through moving or tipping hazard Console accessories or optional storage devices that can fall on patient user or others Collision with p...

Page 247: ...precautions are not observed Additional precautions may be provided throughout the manual CAUTION Improper use can result in serious injury The use of the system outside the described conditions or in...

Page 248: ...ors could result in an incorrect diagnosis The ultrasound system is not meant to be long term storage for patient data or images The customers are responsible for the data on the system and a regular...

Page 249: ...measurement errors or failure to detect details within the image The equipment user must become thoroughly familiar with the equipment operation in order to optimize its performance and recognize poss...

Page 250: ...ase the risk of electric shock if conductive solutions come in contact with internal live parts Inspect probes often for cracks or openings in the housing and holes in and around the acoustic lens or...

Page 251: ...the ESU cables away from the transducers CAUTION Ultrasound can produce harmful effects in tissue and potentially result in patient injury Always minimize exposure time and keep ultrasound levels low...

Page 252: ...tient Inform a qualified service person and contact a Service Representative for information There are no user replaceable or serviceable components inside the console Refer all servicing to qualified...

Page 253: ...rmation or for lost images Explosion Hazard Risk of explosion if used in the presence of flammable anesthetics Explosion Hazard Never operate the equipment in the presence of flammable or explosive li...

Page 254: ...sy for probe use and care instructions Follow all infection control policies established by your office department or institution as they apply to personnel and equipment CAUTION To avoid injury or sy...

Page 255: ...re Enable the following checkboxes under Backup Patient Archive Report Archive User defined configuration Service CAUTION DO NOT scratch or press on the panel with any sharp objects such as a pencil o...

Page 256: ...ining latex natural rubber the FDA advises health care professionals to identify latex sensitive patients and be prepared to treat allergic reactions promptly Latex is a component of many medical devi...

Page 257: ...pt to correct the problem by one or more of the following measure s reorient or relocate the affected device s increase the separation between the equipment and the affected device power the equipment...

Page 258: ...uipment may characteristically cause electromagnetic interference with other equipment either transmitted through air or connecting cables The term EMC Electromagnetic Compatibility indicates the capa...

Page 259: ...wing method Table 4 2 Portable and mobile radio communications equipment distance requirements Frequency Range 150 kHz 80 MHz 80 MHz 800 MHz 800 MHz 2 5 GHz Calculation Method d 3 5 V1 square root of...

Page 260: ...uld be observed to verify normal operation If abnormal operation is observed additional measures may be necessary such as re orienting or relocating the ultrasound system or using an RF shielded exami...

Page 261: ...esult in poor EMC performance of the product 2 Notice against User Modification The user should never modify this product User modifications may cause degradation in EMC performance Modification of th...

Page 262: ...D RW via the system USB port provided the DVD RW is IEC EN 60950 compliant A Wireless LAN option is available The LOGIQ V2 LOGIQ V1 may also be used safely while connected to devices other than those...

Page 263: ...with IEC EN 60601 1 6 Electromagnetic emissions and immunity of the combination must conform to IEC EN 60601 1 2 General precautions for installing an alternate on board device would include 1 The add...

Page 264: ...y for its internal function Therefore its RF emissions are very low and are not likely to cause any interference in nearby electronic equipment RF Emissions CISPR 11 Class A This system is suitable fo...

Page 265: ...radio communication equipment must be maintained according to the method below Interference may occur in the vicinity of equipment marked with the symbol IEC 61000 4 4 Electrical fast transient burst...

Page 266: ...ability to display B mode image as input for diagnosis The ability to display M mode image as input for diagnosis The ability to display Doppler mode image as input for diagnosis The ability to displa...

Page 267: ...al Devices for LOGIQ V2 LOGIQ V1 1 Rear panel Port for DC In AC Adapter Composite out S Video Out 1 HDMI Port 1 Network Port 1 Security Lock 2 Left side 1 Isolated USB printer port 2 general USB ports...

Page 268: ...ON DO NOT use unapproved devices If devices are connected without the approval of GE the warranty will be INVALID Any device connected to the LOGIQ V2 LOGIQ V1 must conform to one or more of the requi...

Page 269: ...m is operating within the range of available output Always be aware of the acoustic output level by observing the Acoustic Output Display In addition become thoroughly familiar with the Acoustic Outpu...

Page 270: ...and increments do not exceed 0 2 for the entire range of display When display MI 0 6 TI 3 6 the displayed values of MI and TI is not lower than 50 or higher than 150 of the measured value When displa...

Page 271: ...takes effect when the system is powered on or Patient is selected To modify acoustic output adjust the Power Output level HINTS Raise the Acoustic Output only after attempting image optimization with...

Page 272: ...products will not leak or mutate under normal operating conditions so that the use of such electronic information products will not result in any severe environmental pollution any bodily injury or da...

Page 273: ...ndicates that hazardous substance contained in all of the homogeneous materials for this part is below the limit requirement in GB T 26572 X Indicates that hazardous substance contained in at least on...

Page 274: ...ing Location Identification and Rating Plate Manufacture s name and address Rating Plate labels Identification and Rating Plate Date of manufacture The date could be a year year and month or year mont...

Page 275: ...protection IP Code IPX8 IPX8 FSU 1000 MKF 2 MED GP26 Indicates the degree of protection provided by the enclosure per IEC60 529 Bottom of footswitch Authorized European Representative address Bottom p...

Page 276: ...s the name and or logo of the testing laboratory product category safety standard to which conformity is assessed and a control number Bottom Do not use the following devices near this equipment cellu...

Page 277: ...mbol is affixed to a battery or its packaging to advise you that the battery must be recycled or disposed of in accordance with local or country laws The letters below the separate collection symbol i...

Page 278: ...indicates the period during which the hazardous substances contained in electrical and electronic products will not leak or mutate under normal operating conditions so that the use of such electrical...

Page 279: ...calregulations of the CustomsUnion Bottom This machine should be used in compliance with law Some jurisdictions restrict certain uses such as gender determination Bottom of the system Note For China K...

Page 280: ...els are provided in English The labels are at the bottom of the system The label content may be different for different regions Please refer to the labels on the system for the actual content Figure 4...

Page 281: ...abels LOGIQ V2 LOGIQ V1 User Guide 4 39 Direction 5610736 100 Rev 9 Label Locations continued Figure 4 3 LOGIQ V2 Label Location 1 Warning label 2 Rating Plate 3 Gender Caution For China Korea and Ind...

Page 282: ...GIQ V2 LOGIQ V1 User Guide Direction 5610736 100 Rev 9 Label Locations continued Figure 4 4 LOGIQ V2 LOGIQ V1 Label Locations for China 1 Warning label 2 Rating Plate 3 Gender Caution For China Korea...

Page 283: ...Device Labels LOGIQ V2 LOGIQ V1 User Guide 4 41 Direction 5610736 100 Rev 9 Label Locations continued Figure 4 5 AC Adapter label...

Page 284: ...in fire 2 Do not disassemble or mistreat the battery CAUTION Do not disassemble or mistreat the battery Do not put the battery in fire Replace the battery with the same battery type only Failure to f...

Page 285: ...rmation Figure 4 7 Probe label NOTE Non GE probes will also have a UDI symbol and equivalent information 1 GE Logo 2 Probe Model Name 3 UDI Symbol and Data Matrix 4 UDI Human Readable Label Text Globa...

Page 286: ...probe box label displayed in this manual is only for illustrational purposes Refer to the actual probe box label for the specific information Figure 4 8 Probe box label UDI Global Trade Item Number GT...

Page 287: ...abels LOGIQ V2 LOGIQ V1 User Guide 4 45 Direction 5610736 100 Rev 9 UDI Global Trade Item Number GTIN Label and Probe Box Barcode Locations continued Figure 4 10 Probe Box Label UDI GTIN and Barcode L...

Page 288: ...Safety 4 46 LOGIQ V2 LOGIQ V1 User Guide Direction 5610736 100 Rev 9...

Page 289: ...6 100 Rev 9 Chapter 5 Probes and Biopsy This chapter consists of the information of each probe and describes some special concerns biopsy kits and accessories as well as basic procedures for attaching...

Page 290: ...with one hand Be lightweight and balanced Have rounded edges and smooth surfaces Stand up to typical wear by cleaning and disinfectant agents contact with approved gel etc Cables have been designed to...

Page 291: ...lay Figure 5 1 Orientation Marking on Probe Example 1 Orientation Mark Labeling Each probe is labeled with the following information Seller s name and manufacturer GE part number Probe serial number M...

Page 292: ...cal damage Inspect probes for cracks or openings in the housing and holes in and around the acoustic lens or other damage that could allow liquid to enter the probe 2 Test the functionality of the pro...

Page 293: ...Manual CAUTION Ensure that the probe face temperature does not exceed the normal operation temperature range Table 5 2 Probe Environmental Requirements Operational Storage Transport Temperature 10 40...

Page 294: ...r probe adaptors into any liquid DO NOT drop the probes or subject them to other types of mechanical shock or impact Degraded performance or damage such as cracks or chips in the housing may result Pr...

Page 295: ...patient injury or probe damage Observe depth markings and do not apply excessive force when inserting or manipulating intercavitary probes Inspect probes for sharp edges or rough surfaces that could...

Page 296: ...sheaths please contact your local distributor or the appropriate support resource CAUTION Protective barriers may be required to minimize disease transmission Probe sheaths are available for use with...

Page 297: ...ent e g Cidex Contact with a sterilant to the patient s skin or mucous membrane may cause an inflammation If this happens refer to the sterilant s instruction manual Sterilant Exposure from Probe Hand...

Page 298: ...devices However ultrasound transducers are complex and expensive devices that must be reused between patients It is very important therefore to minimize the risk of disease transmission by using barri...

Page 299: ...ith a dry cloth 3 Soak the probe head in water Scrub the probe as needed using a soft sponge gauze or cloth to remove all visible residue from the probe surface 4 Rinse the probe with enough clean pot...

Page 300: ...5 12 LOGIQ V2 LOGIQ V1 User Guide Direction 5610736 100 Rev 9 Cleaning probes continued Figure 5 3 Probe Immersion Levels Table 5 3 Description of Pictogram for Probe Immersion Levels Pictogram Descri...

Page 301: ...tor manual or other instructions when complete information cannot be provided on the label CAUTION Dangerous voltage the lightning flash with arrowhead is used to indicate electric shock hazards Bioha...

Page 302: ...er Guide Direction 5610736 100 Rev 9 Consult accompany document Refer to the ultrasound system user manual for important probe care and cleaning instruction Table 5 4 Description of Pictogram on Probe...

Page 303: ...probe care card for GE approved probe disinfectants CAUTION In order for liquid chemical germicides to be effective all visible residue must be removed during the cleaning process Thoroughly clean the...

Page 304: ...precautions can result in serious injury and equipment damage Do not immerse the probe into any liquid beyond the level specified for that probe Never immerse the transducer connector or probe adapte...

Page 305: ...ing ingredients as they are known to cause probe damage Methanol ethanol isopropanol or any other alcohol based product Mineral oil Iodine Lotions Lanolin Aloe Vera Olive Oil Methyl or Ethyl Parabens...

Page 306: ...cking and shipping the equipment Ensure that you follow probe cleaning and disinfection instructions provided in the Basic User Manual This ensures that employees in the transportation industry as wel...

Page 307: ...probes Micro Convex Array Micro Convex Array probes Linear Array Linear Array probes Sector Phased Array Sector Phased Array probes CAUTION Probes for transvaginal and transrectal applications require...

Page 308: ...dications for Use Probe Application 4C RS 8C RS 3Sc RS L6 12 RS E8C RS LK760 RS 12L RS Abdominal X X Obstetrics X X Gynecological X X Cardiac X X Vascular X X X Transcranial X X Musculoskeletal X X X...

Page 309: ...6 12 RS E8C RS LK760 RS 12L RS LOGIQ View X X X X X X X Easy 3D X X X X X X X CWD X TVI TVD X CrossXBeam X X X X X X SRI HD X X X X X X X Scan Coach X X X X X X Virtual Convex X X X X B Harmonic X X X...

Page 310: ...S 7 75 6 00 13 00 4 00 6 00 E8C RS 6 50 6 00 10 00 4 20 6 30 8C RS 6 50 6 00 10 00 4 20 6 30 LK760 RS 7 15 5 00 10 00 NA 12L RS 7 75 6 00 13 00 4 20 7 70 Table 5 8 Probe Specifications Continued Probe...

Page 311: ...tion 5610736 100 Rev 9 Slice Thickness Specification Table 5 9 Probe Slice Thickness Specification Probe Designation Probe Slice Thickness Specification mm 8C RS 13 0mm E8C RS 13 0mm L6 12 RS 15 0mm 3...

Page 312: ...irection 5610736 100 Rev 9 Probe Illustration Convex Probe Linear Probe Table 5 10 Convex Probe Illustration Probe Illustration Probe 4C RS 8C RS E8C RS Table 5 11 Linear Probe Illustration Probe Illu...

Page 313: ...Probe Discussion LOGIQ V2 LOGIQ V1 User Guide 5 25 Direction 5610736 100 Rev 9 Sector Probe Table 5 12 Sector Probe Illustration Probe Illustration 3Sc RS...

Page 314: ...bject mass during the procedure CAUTION The use of biopsy devices with accessories that have not been evaluated for use with this equipment may not be compatible and could result in injury CAUTION The...

Page 315: ...er cleaning methods and the use of certain cleaning and disinfecting agents can cause damage to the plastic components that will degrade imaging performance or increase the risk of electric shock See...

Page 316: ...y kit to the B mode menu controls in Utility Application Imaging Controls Primary Menu Figure 5 4 Biopsy Guidezones example The available biopsy options appear when Biopsy Kit is selected There are fi...

Page 317: ...onitored during a biopsy for any needle deviation from the center line or guidezone The Biopsy Guidezone adjusts along with image adjustments such as image inversion rotations zoom and depth changes T...

Page 318: ...ezone displayed to the guide may cause the needle to track a path outside the zone It is extremely important that when using the adjustable angle biopsy guides the angle displayed on the screen matche...

Page 319: ...for a variety of needle sizes The bracket is packaged non sterile and is reusable To avoid possible patient contaimination ensure bracket is properly cleaned sterilized or disinfected before each use...

Page 320: ...tachment area on the probe head Figure 5 5 Attachment Filling Removal a Probe Head b Attachment c Filling Removal Tool 3 Clean then disinfect the probe NOTE Ensure that protective gloves are worn WARN...

Page 321: ...ace an adequate amount of ultrasound gel inside the sheath tip the gel is between the sheath inner surface and the probe aperture NOTE Ensure that only acoustic coupling gel is used for this purpose 3...

Page 322: ...ure 5 8 Reusable Biopsy Guide a Fix with a screw 2 Place an adequate amount of ultrasound gel on the gel filled sheath tip s outer surface 3 Ensure the guide is properly seated and secure by pushing f...

Page 323: ...e best angle setting for needle path Figure 5 9 Example 2 Pull up on the knob to freely move the needle guide attachment Align the knob with the selected position of the needle guide attachment from M...

Page 324: ...Fit a convex piece of the biopsy bracket a into the concave position of the probe b Figure 5 11 Probe Bracket Alignment Hold the side a and tuck down the needle guide side b until it clicks or locks i...

Page 325: ...le Biopsy Guide Assembly continued 5 Place the proper sanitary sheath tightly over the probe and biopsy bracket Use the rubber bands supplied to hold the sheath in place Figure 5 13 Applying Sanitary...

Page 326: ...lock a Make sure the needle guide is firmly attached to the bracket Figure 5 15 Lock the Needle guide 8 Choose the desired gauge size needle barrel Twist it back and forth to remove it from the plast...

Page 327: ...5610736 100 Rev 9 Multi Angle Biopsy Guide Assembly continued Remove the biopsy needle 1 Hold the other side and push out the needle clip attachment side See Figure 5 18 Figure 5 18 Remove the biopsy...

Page 328: ...tion of the arrow b The needle is released from the assembly c Push the probe and the assembly in the direction of the larger arrow to remove the needle Biopsy Needle Path Verification To verify that...

Page 329: ...proper guidezone angle is displayed 3 Scan to locate the target Center the target in the electronic guidezone path NOTE Enabling color flow would allow for visualization of the vascular structure arou...

Page 330: ...and probe sheath Properly dispose of these items in accordance with current facility guidelines Clean and disinfect the probe The biopsy bracket can be cleaned and disinfected in a recommended disinfe...

Page 331: ...page 5 31 for more information Sterile gel is applied to the transducer face and a sterile sheath completely covers the transducer and cable which has first undergone a thorough cleaning and high lev...

Page 332: ...tion of the probe 2 The scanner surgeon sonographer etc should be sterile and gloved 3 Place an adequate amount of sterile coupling gel on the face of the probe 4 Place the proper sterile sheath over...

Page 333: ...LOGIQ V2 LOGIQ V1 User Guide 6 1 Direction 5610736 100 Rev 9 Chapter 6 Using Onboard Help Getting Started System Setting Peripheral Connection and Maintenance...

Page 334: ...ystem General In the portion of General User Interface select Onboard Help in the Help field Figure 6 1 Set Onboard Help 2 Press F1 Help key on the keyboard to access Onboard Help There are four secti...

Page 335: ...n to show the list of subsections 3 Subsections 4 The highlighted subsection shows this subsection is currently opened and displayed on the right side 5 The left number shows the current page of the s...

Page 336: ...the list of sections with bookmark 3 The section with bookmark is marked with a star icon 4 The title of current section 5 The left number shows the current page of the subsection The right number sh...

Page 337: ...of subsections 10 Illustration with graphic 11 Select the left single arrow to go to the previous page Select the right single arrow to move to the next page Select the left double arrow to go to the...

Page 338: ...section title Figure 6 5 Add Bookmark Select Bookmark button to display the list of sections with bookmark Figure 6 6 Display sections in Bookmark list To delete bookmark for a section use the trackb...

Page 339: ...Started This section includes three subsections 1 Power Cord Connection 2 Probe Connection 3 Console Buttons Figure 6 8 Getting Started Power Cord Connection Figure 6 9 Power Cord Connection Make sure...

Page 340: ...n Console Buttons Figure 6 11 Console Buttons Align the connector with the probe port and carefully push into place with the cable facing the front of the system Next flip the connector locking lever...

Page 341: ...set up 2 Date time set up 3 Enable options 4 Language selection 5 User defined keys set up 6 User preset set up Figure 6 12 Getting Started Facility name set up Figure 6 13 Facility name set up Press...

Page 342: ...re 6 14 Date Time set up For R1 0 x software Press Utility key and then select General tab To set the Date Time press the Date Time button within the Date Time category For R1 1 x software Press Utili...

Page 343: ...er Guide 6 11 Direction 5610736 100 Rev 9 Enable options Figure 6 15 Enable options Press Utility key and then select Admin tab Within the System menu select Admin and System Admin tabs to see which s...

Page 344: ...Regional and Language Options in the first tab named Regional Options the third tab named Advanced scroll down choose the identical language Here we choose Chinese PRC China In the second tab named La...

Page 345: ...6 An indication for re start is followed Click No 5 6 Press Utility and then select the System tab Next select the General Tab Select Language under Location This is where the language from English t...

Page 346: ...pop up named Region and Language in the first tab named Formats scroll down choose the identical language Here we choose Chinese Simplified PRC 2 9 In the second tab named Location scroll down choose...

Page 347: ...ick Cancel 5 9 In the Keyboards and Languages tab select Change keyboards A pop up dialog will appear Click Add under Installed services 6 9 There will be a pop up named Add Input Language select the...

Page 348: ...r Default input language Select OK and then select Apply 8 9 Press Utility and then select the System tab Next select the General Tab Select Language under Location This is where the language from Eng...

Page 349: ...er Defined keys One example is the Numeral 1 key can be configured to activate the biopsy guideline Select the box next to Enable Numeric Hot Key Select the pull down menu for the number 1 and select...

Page 350: ...be configured and are displayed in the Libraries section 5 9 Select Comments tab The alphabet keys of ASDFGHJKL can be configured 6 9 Press the A Alphanumeric key The Comments list appears on the left...

Page 351: ...then select System tab and User Configurable Key tab There is a section labeled User Defined Key To select a function to be assigned to the respective User Defined key U1 U2 U3 or U4 select the pull...

Page 352: ...urer Presets can be customized by a user based on his her imaging needs and preferences 2 6 The E8C probe has been selected The manufacturer preset Frequency displayed is 10MhZ the Depth is 8cm Gain i...

Page 353: ...control panel 5 6 Click user preset menu A pop up menu appears on the monitor Enter the name of the new preset and click to highlight the User1 Click on Save when finished The menu will automatically...

Page 354: ...be customized by a user based on his her imaging needs and preferences 2 8 The E8C probe has been selected The manufacturer preset Frequency displayed is 10MHz the Depth is 8cm Gain is 56 and Dynamic...

Page 355: ...Onboard Help LOGIQ V2 LOGIQ V1 User Guide 6 23 Direction 5610736 100 Rev 9 4 8 To save this as a default preset press the Preset key on the control panel 5 8 Click New...

Page 356: ...p menu appears on the monitor The user defined preset of Gyn01 will be displayed under Available Imaging Presets and Imaging Preset Selections confirming it was successfully created and saved The arro...

Page 357: ...Network Connectivity 3 Connect to a Printer 4 Dicom Setting 5 Back up Restore the patient information 6 Software Version Figure 6 21 Peripheral Connection Back Panel Ports Figure 6 22 Back Panel Ports...

Page 358: ...er or the monitor there is an icon for Network Connection This icon will display the current connection status 2 9 The connection status can be confirmed in Utility Press Utility on the control panel...

Page 359: ...nsure a wireless Network WLAN is available in your working environment Connect a wireless net card to the machine 5 9 Press Utility on the control panel and click on the Connectivity tab Next select t...

Page 360: ...V1 User Guide Direction 5610736 100 Rev 9 6 9 For R1 0 x software Select the wireless network you prefer then Connect For R1 1 x software Select the wireless network you prefer then Connect A pop up m...

Page 361: ...29 Direction 5610736 100 Rev 9 7 9 For R1 0 x software Input the network key to connect For R1 1 x software Choose the identical Security type and Encryption type in the drop down list then input the...

Page 362: ...y Wireless or Direct Connect 8 9 For R1 0 x software A progress bar will display the system s attempt to connect For R1 1 x software Connected displayed at the end of status bar shows the connection i...

Page 363: ...o be completed First press Utility on control panel and click on the Connectivity tab Next select the Service tab In the service category select Standard Print Using the Properties category select the...

Page 364: ...eripherals tab Select the HP Universal Printing PCL6 as the default printer Click Save and Exit Utility 4 5 The first time the Print button that was configured is pressed a HP Universal Printing PCL6...

Page 365: ...us There is an active connection 2 6 Press Utility on control panel then select Connectivity tab Next select the Device tab Click Add to add a server name and IP address For example we added the devic...

Page 366: ...AE title and port number For example AE Title JRS and Port number 6104 Click on the yellow face to ping and check the connection If the face smiles that means the ultrasound system is successfully con...

Page 367: ...ent list will be refreshed Select the ID s to be transferred and click on Transfer tab This current example shows Patient ID 94035091 has been selected For R1 1 x software Press Patient on the control...

Page 368: ...610736 100 Rev 9 Peripheral Connection continued Back Up Restore the Patient Information 1 4 In the event a system upgrade is required these steps will show how to back up important information such a...

Page 369: ...ve connected with the system For this example we have selected a formatted CD DVD disk connected to the device Click Backup to start process 3 4 A notification displays next to items selected confirm...

Page 370: ...e 6 27 Software Version 1 2 Software version and series number information is helpful when communicating with a GE service center or field engineer Press Utility and then select System tab Next click...

Page 371: ...board Help LOGIQ V2 LOGIQ V1 User Guide 6 39 Direction 5610736 100 Rev 9 Maintenance This section includes four subsections 1 Trackball 2 Contact GE Service 3 InSite 4 Log Export Figure 6 28 Maintenan...

Page 372: ...the retainer counterclockwise until the trackball can be removed from the groove 2 2 Take the trackball out wipe off oil or dust from the trackball retainer and the trackball housing by using a cotton...

Page 373: ...nter by phone or directly from the ultrasound device if a network connection is available There is a Contact GE logo in the lower left hand corner of monitor Click on this icon and a pop up menu will...

Page 374: ...up a screen will appear as seen in the picture in which you can configure the network configuration Note Contact your regional online center tech support to get online support to do this configuratio...

Page 375: ...736 100 Rev 9 Log Export 1 4 The system has the ability to collect a screen capture of the image monitor system presets and the logs to be shared with GE support Make sure a formatted USB stick is con...

Page 376: ...ort 2 4 A pop up menu will appear and allow a description of the problem to be entered 3 4 Select the destination for the information to be stored For example select USB Drive and Click Store 4 4 Afte...

Page 377: ...ng the system 3 37 maintenance schedule 3 38 Caution icon defined 4 3 CINE mode activating 2 14 circumference measurements ellipse 2 50 spline 2 53 trace 2 51 2 52 2 53 cleaning probes 5 11 Clinical m...

Page 378: ...g probes 5 3 LOGIQ system contraindications 1 6 Indications for Use 1 6 M measurement controls location 2 47 M Mode measurements mode time interval 2 61 time interval and velocity 2 61 tissue depth 2...

Page 379: ...rds 4 8 patient identification 4 6 patient training ALARA 4 9 personnel 4 10 precaution icons defined 4 3 precaution levels defined 4 3 probes 5 6 handling precautions 5 10 service requesting 3 73 sit...

Page 380: ...Index 4 LOGIQ V2 LOGIQ V1 User Guide Direction 5610736 100 Rev 9...

Page 381: ......

Reviews: