background image

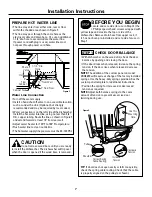
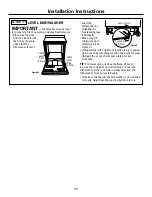
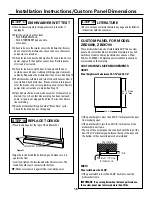
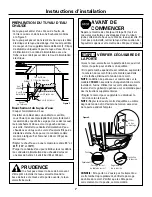
INSTALL DRAIN HOSE,
GUIDE THROUGH CABINET

• Remove tape and wire tie holding the clamp to the

drain hose. 

Be careful not to damage the drain hose.

• Stand the dishwasher upright. 
• Slip the supplied 

hose clamp over 
the large end of 
the hose. Do not 
tighten.

• Push hose over the drain outlet on the back side of 

the dishwasher. See illustration. Push the hose over
the outlet and against the shoulder stop.

• Tighten the hose clamp with a 1/4" nut driver.

• Position the dishwasher in front of the opening. 

Insert drain hose into the cabinet side. If power cord 
is used, guide the end through a separate hole. 

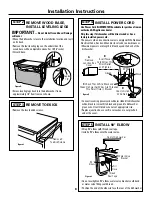
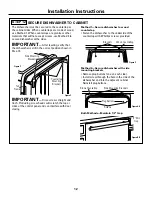
STEP 7

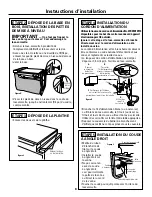
INSTALL TRIM PIECES

Skip this step if trim is not supplied with the 
dishwasher.

• Locate trim strips inside dishwasher.
• Press trim onto the tub flange on each side. Start 

with the top edge, pressing on as you move towards 
the bottom.

• Press the two top trim pieces on each side of 

the latch.

• Open and close the door to check that trim does not

bind and does not interfere with door latch.

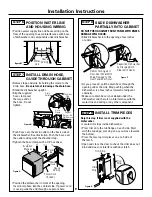
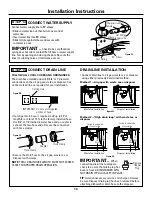
STEP 9

POSITION WATER LINE
AND HOUSING WIRING

• Position water supply line and house wiring on the

floor of the opening to avoid interference with base 
of dishwasher and components under dishwasher. 

STEP 6

9

Figure Q

Trim Strip

Trim

Strip

Trim

Strip

Water

Line

House

Wiring

5"

5" 4"

6"

4"

Installation Instructions

Figure M

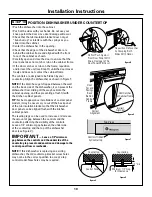
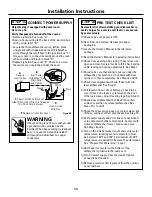
SLIDE DISHWASHER
PARTIALLY INTO CABINET

DO NOT PUSH AGAINST FRONT PANEL WITH KNEES.
DAMAGE WILL OCCUR.

• Slide dishwasher into the opening a few inches 

at a time.

• As you proceed, pull the drain hose through the 

opening under the sink. Stop pushing when the
dishwasher is a few inches forward of adjacent
cabinetry. 

• Make sure drain hose is not kinked under the 

dishwasher and there is no interference with the 
water line and wiring or any other component. 

STEP 8

Do Not Push Against
Front Door Panel With 
Knee. Damage to The 
Door Panel Will Occur.

Reposition Dishwasher
by Grasping Both
Sides With Hands

Figure P

Power Cord

(If Used)

Water

Line

House

Wiring

Drain 

Hose

Insulation 

Blanket

Figure O

Figure N

Drain

Outlet

Hose

Clamp

Shoulder

Stop

Flapper

Valve—Do

Not Remove

Summary of Contents for Monogram ZBD0700

Page 1: ...t www monogram com Monogram Installation Instructions Built In Dishwashers ZBD6800 ZBD6880 ZBD6890 ZBD0700 ZBD0710 Design Guide with Installation Instructions For ZBD6890 and ZBD0700 also refer to the...

Page 2: ...structions completely and carefully IMPORTANT Save these instructions for local inspector s use Observe all governing codes and ordinances Note to Installer Be sure to leave these instructions with th...

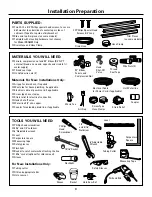
Page 3: ...ction Hand shut off valve Water line 3 8 min copper Coupler for extending drain line if applicable PARTS SUPPLIED Two 8 18 x 5 8 Phillips special head screws to secure dishwasher to underside of count...

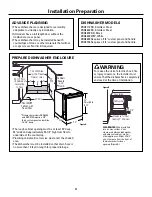
Page 4: ...4 Min 5 5 4 4 6 24 24 34 Adjustable to 35 Figure B Installation Preparation CLEARANCES When installed into a corner allow 2 min clearance between dishwasher and adjacent cabinet wall or other applianc...

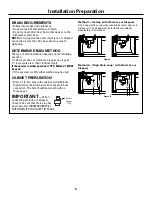
Page 5: ...e used If the answers are NO either method may be used CABINET PREPARATION Drill a 1 1 2 dia hole in the cabinet wall within the shaded areas shown in Figure A for the drain hose connection The hole s...

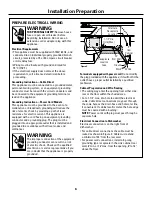
Page 6: ...let that is installed and grounded in accordance with all local codes and ordinances WARNING The improper connection of the equipment grounding conductor can result in a risk of electric shock Check w...

Page 7: ...ready to install the dishwasher The dishwasher will tip over when the door is opened if the wood base is removed BEFORE YOU BEGIN Locate and set aside for use in Step 12 the 2 Phillips special head sc...

Page 8: ...with the National Electrical Code Section 422 and or local codes and ordinances Maximum power cord length is 4 feet beyond the back of the dishwasher Connect incoming power cord white or ribbed to di...

Page 9: ...not bind and does not interfere with door latch STEP 9 POSITION WATER LINE AND HOUSING WIRING Position water supply line and house wiring on the floor of the opening to avoid interference with base of...

Page 10: ...P For best appearance installations of custom panel models it may be necessary to cut off the back panel of the tub insulation blanket so that the dishwasher door panel can be aligned flush with the k...

Page 11: ...eling leg is required gain access by loosening junction box bracket screw through the access hole and rotate bracket clockwise TIP Pull lower rack out about halfway Check to be sure the rack does not...

Page 12: ...eads will scratch the top or sides of the control panel and can interfere with door closing Method 1 Secure dishwasher to wood countertop Fasten the dishwasher to the underside of the countertop with...

Page 13: ...be sure that drain plug has been removed DISHWASHER WILL NOT DRAIN IF PLUG IS LEFT IN PLACE TIP Avoid unnecessary service call charges Always be sure disposer drain plug has been removed before attach...

Page 14: ...sink hot water faucet and verify water temperature Incoming water temperature must be between 120 F and 150 F A minimum of 120 F temperature is required for best wash performance See Prepare Hot Wate...

Page 15: ...If leaks are found turn power off at the breaker and correct plumbing as necessary Restore power after corrections are made See Step 15 Open dishwasher door and make sure most of the water has drained...

Page 16: ...described in this book safety glasses or goggles should be worn For Monogram local service in your area call 1 800 444 1845 NOTE Product improvement is a continuing endeavor at General Electric There...

Page 17: ...b www monogram com Monogram Instructions d installation Lave vaisselle encastr ZBD6800 ZBD6880 ZBD6890 ZBD0700 ZBD0710 Guide de conception Instructions d installation Pour ZBD6890 et ZBD0700 consulter...

Page 18: ...nde pour mod les ZBD6890 ZBD0700 15 AVANT DE COMMENCER Il faut lire soigneusement toutes ces instructions IMPORTANT Conserver ces instructions afin que l inspecteur local s en serve Il faut respecter...

Page 19: ...cuivre de 3 8 po minimum Manchon pour allonger le tuyau de vidange si n cessaire PI CES FOURNIES Deux vis cruciformes sp ciales 8 18 x 5 8 po envelopp es dans du ruban adh sif sur le c t sup rieur du...

Page 20: ...CATION PR ALABLE Ces lave vaisselle sont con us afin d tre polyvalents et de pouvoir s adapter pour ainsi dire n importe quelle installation Tous les mod les ont une porte pleine longueur sans le pann...

Page 21: ...rte laquelle des deux m thodes PR PARATION DE L ARMOIRE Percer un trou de 38 mm 1 1 2 po de diam tre dans le mur de l armoire dans les zones hachur es montr es la figure A pour le passage du tuyau de...

Page 22: ...e mauvais branchement du conducteur de mise la terre peut causer des risques de choc lectrique En cas de doute sur la mise la terre de l appareil consulter un lectricien agr e ou un technicien de r pa...

Page 23: ...NCE Il ne faut pas enlever la base de bois avant d tre pr t installer le lave vaisselle Quand la base de bois est enlev e et la porte ouverte le lave vaisselle bascule AVANT DE COMMENCER Rep rer et me...

Page 24: ...ricit et aux codes et r glements actuelles locaux La longueur du cordon d alimentation ne doit pas d passer 1 2 m 4 pi l arri re du lave vaisselle Brancher le fil d alimentation blanc ou nervures au f...

Page 25: ...pas avec le verrouillage de la porte TAPE 9 MISE EN PLACE DU TUYAU D EAU ET DES FILS DE LA MAISON Mettre en place le tuyau d eau et les fils de la maison sur le sol de l ouverture afin d viter toute...

Page 26: ...tallation des mod les du panneau sur commande peut n cessiter le d coupage du panneau arri re de la couverture d isolant afin que le panneau de la porte du lave vaisselle puisse s aligner fleur des pa...

Page 27: ...ied arri re droit de mise niveau obtenir acc s en desserrant la vis de la patte de bo tier de branchement travers le trou d acc s et tourner la patte dans le sens des aiguilles d une montre CONSEIL So...

Page 28: ...s du panneau de commande et peuvent interf rer avec la fermeture de la porte M thode 1 Fixation du lave vaisselle au plan de travail en bois Avec les deux vis Phillips fournies visser le lave vaissell...

Page 29: ...e bouchon de vidange a t enlev LE LAVEVAISSELLE NE SE VIDE PAS SI LE BOUCHON EST EN PLACE CONSEIL Il faut viter les frais d intervention inutiles Il faut toujours s assurer que le bouchon de vidange a...

Page 30: ...l eau L eau d alimentation doit avoir une temp rature entre 49 et 65 C 120 et 150 F Il faut une temp rature d au mois 49 C 120 F pour obtenir le meilleur rendement du lave vaisselle Consulter Pr parat...

Page 31: ...fuites mettre le circuit hors tension au coupecircuit et corriger la plomberie selon le besoin Remettre sous tension apr s avoir corrig les probl mes Consulter l tape 15 Ouvrir la porte du lave vaiss...

Page 32: ...faut porter des lunettes de s curit Pour un service local Monogram dans votre r gion appeler le 1 800 444 1845 NOTE Chez General Electric nous nous effor ons continuellement d am liorer les produits...

Reviews: