background image

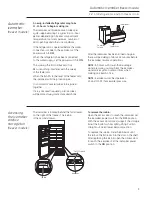
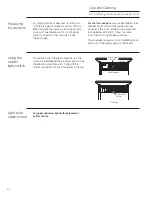
The water filter cartridge is located in the top
machine compartment of the freezer.

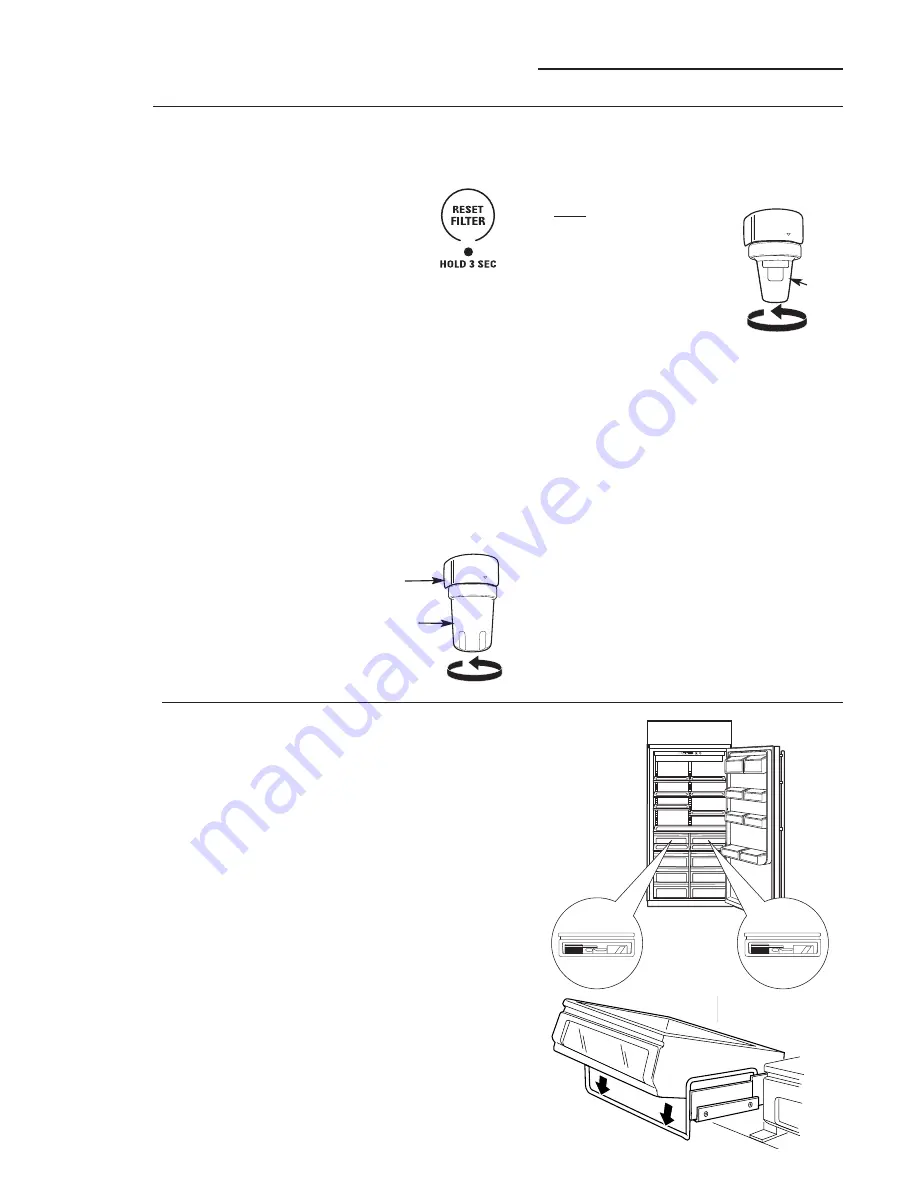
To Replace the Filter:

The filter cartridge is designed 
to filter 300 gallons of water 
(lasting approximately 12 months).

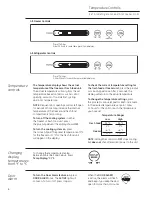
There is a replacement indicator light 
for the water filter cartridge on the temperature
control panel. This light will turn yellow to tell you
that you need to replace the filter soon. The filter
cartridge should be replaced when the replacement
indicator light turns red or if the flow of water to the
dispenser or icemaker decreases.

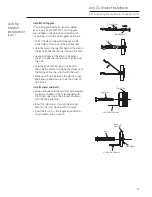
Installing the Filter Cartridge:
1. 

Remove the old cartridge by slowly turning 
it to the left. A small amount of water may 
drip down. 

Do not 

pull down on the cartridge. 

2. 

Fill the new cartridge with water from the tap to
allow for better flow immediately after installation.

3.

Line up the arrow on the cartridge with the center
of the holder. 

Do not 

push it up into the holder.

4. 

Slowly turn it to the right
until the cartridge stops. 
It will rotate about 
1/4 turn. 

DO NOT

OVERTIGHTEN. 

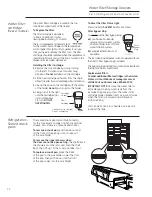
To Reset the Filter Status Light:

Press and hold the 

RESET 

pad for 3 seconds.

Filter Bypass Plug:

You 

must

use the filter bypass plug:

a)

if you have a household 
reverse osmosis water system
and/or another form of home 
water filtration system

b) 

if a replacement filter is not 
available.

The icemaker and dispenser will not operate without
the filter or filter bypass plug installed.

The bypass plug and and mini manual are located in
the top machine compartment.

Replacement filters:
To order additional filter cartridges in the United
States, visit our Website at monogram.com, or
call GE Parts and Accessories, 800.626.2002.

IMPORTANT NOTE:

Remove the water filter to

immediately stop any water leak from the
Icemaker/Dispenser system. The water filter
cartridge holder (bracket) acts as a cut-off valve
when the filter is removed and will prevent
further leaking.

Call 1.800.844.1845 to schedule a service call 
to repair the leak.

10

Water Filter/Storage Drawers
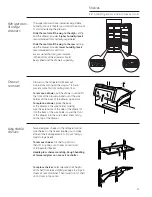
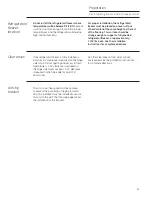
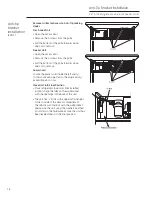
Refrigerator—
Sealed snack
pans

The sealed snack pans retain high humidity 
for the convenient storage of lunch meats and
cheese, hors d’oeuvres, spreads and snacks.

To remove a snack pan, 

pull the pan out and 

lift the front of the pan up until it snaps out 
of the wire holder.

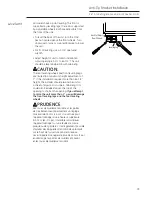
To remove the upper drawers when 
the door cannot be opened fully, 

the shelf above

the drawers must be removed. Push the shelf
back, then lift up. Tilt the cover and take it out.

To replace a snack pan, 

place the back 

of the pan in the wire holder. Lower the front 
of the pan, then push down until the front 
of the pan snaps into the wire holder.

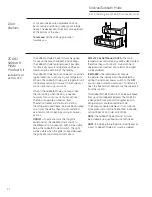
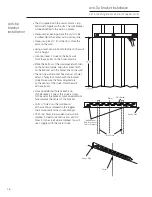
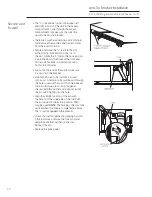
36” All-Refrigerator and All-Freezer Units

Water filter
cartridge

(freezer models)

Cartridge
Holder

Slowly turn it to the right.
Do not overtighten.

Filter
Cartridge

Filter 
Bypass 
Plug

Summary of Contents for Monogram ZIF360NX

Page 1: ...Owner s Manual 36 Built In All Refrigerators and All Freezers 06 09 JR monogram com 49 60562 2 224D2602P001 ...

Page 2: ...ti Tip Bracket Installation 16 20 Automatic Icemaker 9 Sabbath Mode Product 12 Shelves 11 12 Storage Drawers 10 11 Temperature Controls 8 Water Filter Accessory 10 Preparation Anti Tip Bracket 15 Clearances 15 Location 15 Before using your refrigerator freezer Read this manual carefully It is intended to help you operate and maintain your new refrigerator freezer properly Keep it handy for answers...

Page 3: ...mer Services page in the back of this manual We re proud of our service and want you to be pleased If for some reason you are not happy with the service you receive here are steps to follow for further help For customers in the USA FIRST contact the people who serviced your appliance Explain why you are not pleased In most cases this will solve the problem NEXT if you are still not pleased write a...

Page 4: ...le the freezer is plugged in Unplug your refrigerator freezer before cleaning and making repairs NOTE We strongly recommend that any servicing be performed by a qualified individual Before replacing a burned out light bulb the refrigerator freezer should be unplugged in order to avoid contact with a live wire filament A burned out light bulb may break when being replaced NOTE Turning control to OF...

Page 5: ...votre réfrigérateur congélateur avant de le nettoyer et de le réparer REMARQUE Nous vous recommandons vivement de confier toute réparation à un technicien qualifié Avant de remplacer une ampoule grillée le réfrigérateur congélateur doit être débranché afin d éviter tout contact avec un fil sous tension Une ampoule grillée peut se briser pendant l opération REMARQUE Lorsque vous placez la commande ...

Page 6: ...or freezer should always be plugged into its own individual electrical outlet which has a voltage rating that matches the rating plate DO NOT USE AN ADAPTER PLUG TO CONNECT THE REFRIGERATOR FREEZER TO A 2 PRONG OUTLET DO NOT USE AN EXTENSION CORD WITH THIS APPLIANCE This provides the best performance and also prevents overloading house wiring circuits which could cause a fire hazard from overheate...

Page 7: ... dans sa propre prise de courant dont la tension nominale est identique à celle indiquée sur la plaque signalétique N UTILISEZ PAS UNE FICHE D ADAPTATION POUR RACCORDER LE RÉFRIGÉRATEUR CONGÉLATEUR DANS UNE PRISE MURALE À 2 ALVÉOLES N UTILISEZ PAS DE CORDONS PROLONGATEURS AVEC CET APPAREIL Cette précaution est recommandée pour garantir un rendement optimum et éviter une surcharge des circuits élec...

Page 8: ...e cooling system in either the freezer or fresh food unit press the plus pad until the display shows OFF To turn the cooling system on press the minus pad The preset temperature of 0 F for the freezer or 37 F for the fresh food unit will appear in the display To check the current temperature setting for the fresh food or freezer unit press the plus or minus pad once After 5 seconds the display wil...

Page 9: ...oduce seven cubes per cycle approximately 15 cycles in a 24 hour period depending on freezer compartment temperature room temperature number of door openings and other use conditions If the refrigerator is operated before the water connection is made to the icemaker set the power switch to OFF When the refrigerator has been connected to the water supply set the power switch to ON Throw away the fi...

Page 10: ...er is not available The icemaker and dispenser will not operate without the filter or filter bypass plug installed The bypass plug and and mini manual are located in the top machine compartment Replacement filters To order additional filter cartridges in the United States visit our Website at monogram com or call GE Parts and Accessories 800 626 2002 IMPORTANT NOTE Remove the water filter to immed...

Page 11: ... amount of cold air entering the drawers Slide the control all the way to the High setting and the drawer provides higher humidity levels recommended for most leafy vegetables Slide the control all the way to the Low setting and the drawer provides lower humidity levels recommended for most fruits Excess water that may accumulate in the bottom of the drawers should be emptied and the drawers wiped...

Page 12: ... door openings or any consumer actions ON OFF To activate raise the top grille panel and set the Sabbath Mode switch to the ON position A green LED light will be visible below the Sabbath Mode Kit switch The light will be visible when the grille is closed between the grille door and compartment doors DISPLAYS ALARMS and LIGHTS The main temperature control displays will be deactivated therefore the...

Page 13: ...less steel Cleaning inside To help prevent odors leave an open box of baking soda in the refrigerator freezer Turn off power at the circuit breaker or fuse box before cleaning If this is not practical wring excess moisture out of sponge or cloth when cleaning around switches lights or controls Use warm water and baking soda solution about a tablespoon 15 ml of baking soda to a quart 1 liter of wat...

Page 14: ...pected to drop below 60 F 16 C follow the same instructions as for extended vacations Move icemaker power switch to the OFF position and shut off the water supply to the freezer Light bulb replacement For upper and lower light bulb replacement call for service Master Light Switch 36 All Refrigerator and All Freezer Units Using the master light switch This feature turns off the lights inside the un...

Page 15: ...lation Instructions for complete directions Clearances If the refrigerator freezer is to be installed in a corner a 4 clearance is required on the hinge side for a 90 door opening and access to fresh food drawers A 15 clearance is required on the hinge side to remove pans A 25 clearance is required on the hinge side for a full 130 door swing No other clearances at top sides or back are required Se...

Page 16: ...lign the center notch on the bracket with the center line on the wall The anti tip wall bracket has a series of holes Select 2 holes that match with the located studs Make sure the holes selected are on the center of the studs Mark the wall at these points Mark an additional hole at each end of the bracket If one of the studs is closer to the end of the bracket mark an additional hole towards the ...

Page 17: ...the channel rest flush behind the wall Hold the ends of the straps in one hand and slide the plastic cap along the straps until the flange of the cap is flush with the wall Place your thumb between the plastic straps and bend up and down to snap the straps off at the wall Install Screws and Bolts Have someone hold the wall bracket centered in place with each of the holes aligned with the correct o...

Page 18: ... forward down and out to remove Power Cord Locate the power cord inside the left cavity If it has not been adjusted so the plug is easily accessible do so now Move Unit into Final Position Move refrigerator toward its final installed location Align the tabs on the wall bracket with the openings in the back of the unit The unit has L bolts in the upper left and right corners inside of the access co...

Page 19: ...requires more than 84 1 2 height the installer should elevate the unit on a sheet of plywood or runners Cabinetry trim could also be added across the top of the opening to shorten the opening If you attempt to raise the unit more than 1 you will damage the front leveling legs and the rear leveling wheels PRUDENCE Les roues de nivellement arrière et les pattes de nivellement avant permettent un rég...

Page 20: ...al position Do this to both sides Pull out on the end of the rod to make sure it is secure in the bracket Locate the hole on the rod that is closest to the unit A hair pin cotter will be put through this hole to secure the rod If this hole appears to be too far away for a snug fit against the unit add the washers one at a time until the pin will fit tightly into the hole Align the straight section...

Page 21: ...essor motor SOUNDS Normal fan air flow multiple fans blow cold air through the fresh food and freezer compartments another fan cools the compressor motor The fans change speeds in order to provide optimal cooling and energy savings These NORMAL sounds will also be heard from time to time You may hear a whooshing or gurgling sound when the door closes This is due to pressure equalizing within the r...

Page 22: ...rior of freezer needs cleaning See Care and Cleaning Poor tasting incoming water Change the water filter AUTOMATIC Icemaker power switch is in the O off position ICEMAKER Water supply turned off or not connected DOES NOT WORK Freezer too warm Piled up cubes in storage bin may cause icemaker to shut off too soon Level cubes by hand MOISTURE FORMS Not unusual during periods of high humidity Wipe sur...

Page 23: ...23 Notes 36 All Refrigerator and All Freezer Units ...

Page 24: ...24 Notes 36 All Refrigerator and All Freezer Units ...

Page 25: ...25 Notes 36 All Refrigerator and All Freezer Units ...

Page 26: ...ty Code for the following health related contaminants Cysts Turbidity Asbestos Lead Mercury Alachlor Atrazine Benzene Carbofuran Lindane Mercury Toxaphene 1 4 dichlorobenzene 2 4 D Microbiological Contaminants and Turbidity Inorganic Radiological Contaminants Organic Contaminants Do not use where water is microbiologically unsafe or with water of unknown quality except that systems certified for c...

Page 27: ...224 In Canada 1 800 561 3344 You can have the secure feeling that GE Consumer Service will still be there after your warranty expires Purchase a GE contract while your warranty is still in effect and you ll receive a substantial discount With a multiple year contract you re assured of future service at today s prices Parts and Accessories In the USA 800 626 2002 In Canada 1 800 561 3344 Individual...

Page 28: ...oduct to the service shop or for the service technician s travel costs to your home All warranty service will be provided by our Factory Service Centers or by our authorized Customer Care servicers during normal working hours Should your appliance need service during warranty period or beyond in the USA call 800 444 1845 In Canada 800 561 3344 Please have your serial number and model number availa...

Reviews: