Installation Instructions
24
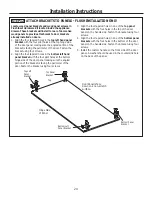
STEP 12 ATTACH BRACKETS TO PANELS - FLUSH INSTALLATION ONLY
Locate wood panel brackets and wood panel screws in
Flush Inset Hardware Kit located inside the appliance
drawer. These brackets will install to rear of decorative
wood panels to provide attachment to door brackets
already installed on doors.
1. Align the four tapered holes in the top left hand panel
bracket with the four pilot holes at the top hinge side
of the door panel making sure the angled portion of the
bracket is facing the perimeter of the door. Fasten the
bracket using four screws.
2. Align the four tapered holes in the bottom left hand
panel bracket with the four pilot holes at the bottom
hinge side of the door panel making sure the angled
portion of the bracket is facing the perimeter of the
door. Fasten the bracket using four screws.
3. Align the four tapered holes in one of the top panel
brackets with the four holes in the top of the door
panel on the handle side. Fasten the bracket using four
screws.
4. Align the four tapered holes in one of the bottom panel
brackets with the four holes in the bottom of the door
panel on the handle side. Fasten the bracket using four
screws.
5. Install the custom handle on the front side of the door
panel. A washer should be used in the countersink hole
on the back of the panel.
Top Panel
Bracket
Top Left
Panel
Bracket
Bottom Panel
Bracket
Top
Bottom Left
Panel Bracket
Door Panel is face
down on a non-scratch
surface.
Hinge Side
of Panel
Summary of Contents for Monogram ZIRS360NNLH
Page 30: ...Notes 30...
Page 31: ...Notes 31...


