background image

 49-1000713  Rev. 0

17

USING THE FREEZER:

 Automatic 

Icemaker

Automatic Icemaker

A newly installed refrigerator may take 12 to 24 hours to 
begin making ice.

Automatic Icemaker

The icemaker will produce seven cubes per cycle 
approximately 100–130 cubes in a 24-hour period, 

GHSHQGLQJRQIUHH]HUFRPSDUWPHQWWHPSHUDWXUHURRP

temperature, number of door openings and other use 
conditions.

7KHLFHPDNHUZLOOILOOZLWKZDWHUZKHQLWFRROVWRƒ)

(-10°C). A newly installed refrigerator may take 12 to 24 
hours to begin making ice cubes.

If the refrigerator is operated before the water line 
connection is made to the unit or if the water supply to 
an operating refrigerator is turned off, make sure that 
the icemaker is turned off. Once the water has been 
connected to the refrigerator, the icemaker may be 
turned on using the controls.

<RXPD\KHDUDEX]]LQJVRXQGHDFKWLPHWKHLFHPDNHU

fills with water.

Allow 1-2 days for the bucket to completly fill with ice.

Throw away the first few batches of ice to allow the 
water line to clear.

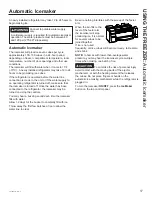
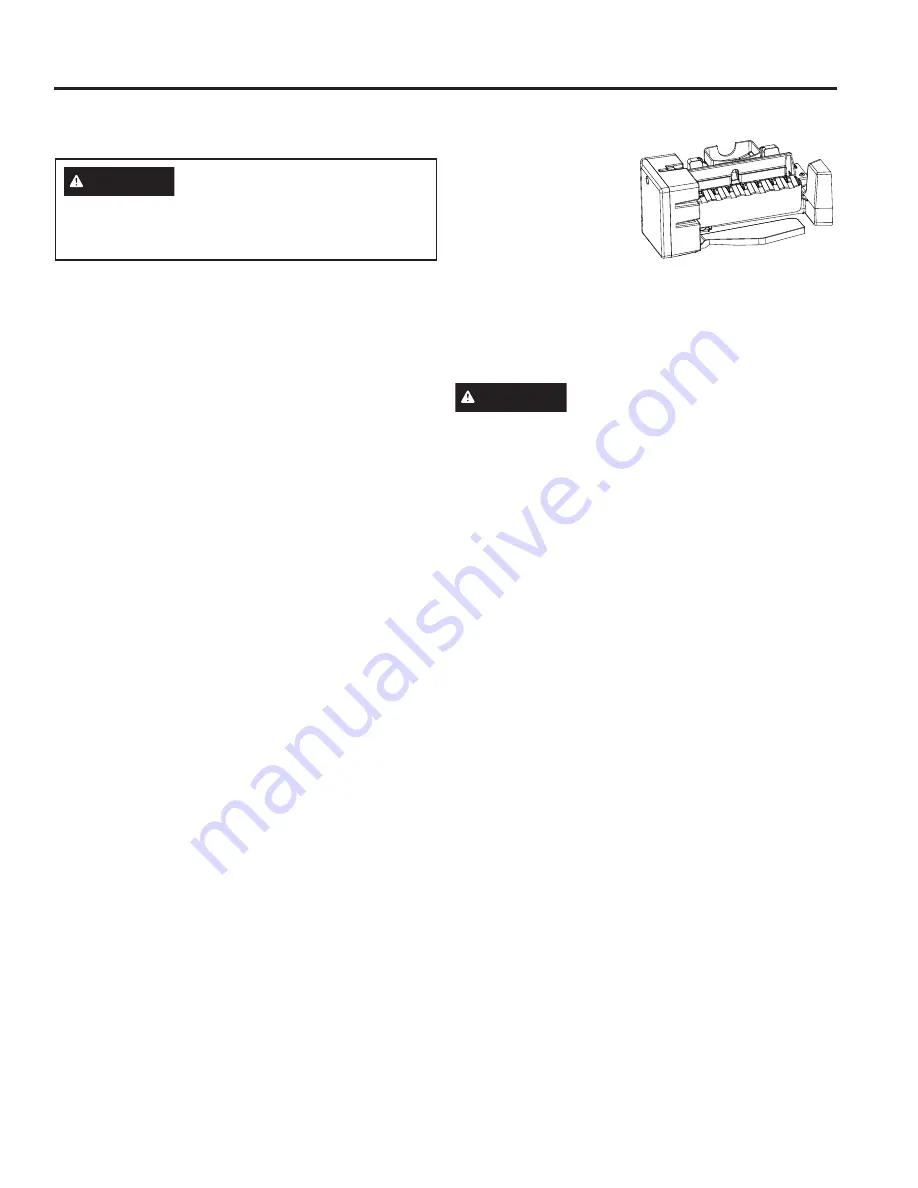
Be sure nothing interferes with the sweep of the feeler 
arm.

When the bin fills to the 
level of the feeler arm, 
the icemaker will stop 
producing ice. It is normal 
for several cubes to be 
joined together.

If ice is not used 
frequently, old ice cubes will become cloudy, taste stale 
and shrink. 

NOTE: 

In homes with lower-than-average water 

pressure, you may hear the icemaker cycle multiple 
times when making one batch of ice.

CAUTION

7RPLQLPL]HWKHULVNRISHUVRQDOLQMXU\

avoid contact with the moving parts of the ejector 
mechanism, or with the heating element that releases 

WKHFXEHV'RQRWSODFHILQJHUVRUKDQGVRQWKH

automatic ice making mechanism while the refrigerator is 
plugged in.

To turn the icemaker 

ON/OFF

, press the 

Ice Maker


button on the top control panel.

WARNING

  Connect to potable water supply 

only.

A cold water supply is required for automatic icemaker 
operation. The water pressure must be between 40 
and 120 psi (275-827 kilopascals).

Summary of Contents for PGD Series

Page 1: ...SAFETY INFORMATION 3 OPERATING INSTRUCTIONS Features 6 Controls 7 Sabbath Mode 7 Autofill 9 WiFi 10 Demand Response 11 Water Filter 12 Refrigerator Storage Options 13 Climate Zone 15 Convertible Drawe...

Page 2: ...s into every GE Appliances product and we think you will too Among other things registration of your appliance ensures that we can deliver important product information and warranty details when you n...

Page 3: ...retail applications RQQHFW WR SRWDEOH ZDWHU VXSSO RQO FROG ZDWHU supply is required for automatic icemaker operation The water pressure must be between 40 and 120 psi 275 827 kilopascals R QRW DSSO K...

Page 4: ...y from the wall be careful not to roll over or damage the power cord CONNECTING ELECTRICITY WARNING ELECTRICAL SHOCK HAZARD Plug into a grounded 3 prong outlet R QRW UHPRYH WKH JURXQG SURQJ R QRW XVH...

Page 5: ...still dangerous even if they will sit IRU MXVW D IHZ GD V I RX DUH JHWWLQJ ULG RI RXU ROG refrigerator please follow the instructions below to help prevent accidents Before You Throw Away Your Old Ap...

Page 6: ...tall items below Spillproof shelves HVLJQHG WR FDSWXUH RXU VSLOOV IRU HDVLHU FOHDQ XS Removable door bin Can be removed for those with a wall limiting the door opening Climate zone bin Separate bins f...

Page 7: ...RU UHH HU EXWWRQ WR GLVSOD WHPS WKHQ SUHVV DQG KROG UHH HU DQG FH 0DNHU EXWWRQV IRU VHFRQGV WR WRJJOH EHWZHHQ HOVLXV DQG DKUHQKHLW Volume Control 3UHVV DQG KROG UHH HU DQG XWR LOO 3LWFKHU EXWWRQV IRU...

Page 8: ...hen the filter has been in use for 6 months Err when no filter is present or the wrong filter is installed RU DOO FRQGLWLRQV WKH GLVSOD ZLOO DXWRPDWLFDOO UHVHW ZKHQ IDXOW FRQGLWLRQ LV FRUUHFWHG Model...

Page 9: ...se door with excessive force to avoid some water sloshing out of the pitcher spout The easiest method to remove the lid is to push up on the back overhanging edge of the lid near the handle To Clean t...

Page 10: ...tee that interference will not occur in a particular installation If this equipment does cause harmful interference to radio or television reception which can be determined by turning the equipment of...

Page 11: ...sired Please note that there are many different HPDQG 5HVSRQVH SURJUDPV DQG PDQ DUH QRW compatible with kitchen appliances Please check with your local utility The demand response level is displayed i...

Page 12: ...lter it will automatically adjust itself into position The filter will move about a turn or 90 degrees until the filter cannot be turned and the label faces outward 4 Slowly push the filter up into th...

Page 13: ...ing the shelf up insert the top hook at the back of the shelf in a slot on the track Lower the front of the shelf until the bottom of the shelf locks into place Spillproof Shelves Spillproof shelves h...

Page 14: ...upon removal and replace the bin in its proper location Right Door Bins on some models FIXED BINS can easily be carried from refrigerator to work area To remove Lift bin straight up then pull out ROTA...

Page 15: ...e the convertible drawer basket by lifting while rotating the basket upward To replace 1 Place drawer back in first and rotate drawer front down to seat on slide 2 Push the drawer in to closed positio...

Page 16: ...Slide bin into location until it locks into place Basket Removal To remove 3XOO WKH WRS IUHH HU GUDZHU EDVNHW IRUZDUG XQWLO LW LV RXW RI WKH WUDFN LQ WKH IUHH HU FRPSDUWPHQW LIW ZKLOH rotating the bas...

Page 17: ...ter Allow 1 2 days for the bucket to completly fill with ice Throw away the first few batches of ice to allow the water line to clear Be sure nothing interferes with the sweep of the feeler arm When t...

Page 18: ...propriate items below to clean your appliance surfaces OHDQ LQWHULRU H WHULRU VXUIDFHV ZLWK ZDUP ZDWHU PLOG VRDS RU GHWHUJHQW DQG D VRIW RU PLFURILEHU FORWK WR DYRLG damage LSH WKH DSSOLDQFH VXUIDFH G...

Page 19: ...technician drain the water supply system to prevent serious property damage due to flooding 1 Turn refrigerator off see CONTROLS page 7 or unplug the refrigerator 2 Empty ice bucket 3 Turn water suppl...

Page 20: ...gerator doors see the Installing the Refrigerator section 7R UHPRYH WKH IUHH HU GUDZHU VHH WKH 5HPRYLQJ WKH UHH HU UDZHU VHFWLRQ WATER SUPPLY TO THE ICEMAKER AND DISPENSER If the refrigerator has an i...

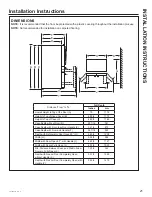
Page 21: ...KH RRU 70 1778 Height to Top of Hinge Cover B 69 3 4 1772 Height to Top of Case C 68 5 8 1742 DVH HSWK ZLWKRXW RRU 29 7 16 747 DVH HSWK ZLWK RRU OHVV RRU DQGOH 34 1 4 870 DVH HSWK ZLWK RRU DQG DQGOH 3...

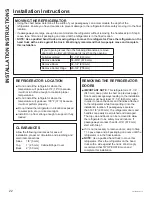
Page 22: ...XUH ZLOO JR DERYH EHFDXVH it will not perform properly R QRW LQVWDOO WKH UHIULJHUDWRU LQ D ORFDWLRQ H SRVHG to water rain etc or direct sunlight Install it on a floor strong enough to support it fully...

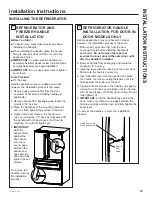
Page 23: ...NT Hold the handle firmly against the door make sure there are no gaps between the handle end caps and the door and fully tighten the set screws To remove the handles reverse the installation process...

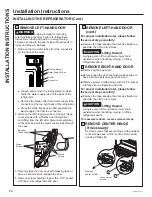
Page 24: ...VFUHZV KROGLQJ KLQJH ZLWK D VRFNHW Lift hinge from refrigerator and door Collar Connector Water Supply Tubes Tubing Clamp Electrical Connections Hinge Screws Ground Screws 3 REMOVE LEFT HAND DOOR con...

Page 25: ...t with masking tape or have a second person support the door 4 Reinstallation is the reverse of the removal instructions 5 Be sure to reinstall the ground wire and strain relief to the top hinge 6 Rei...

Page 26: ...WKH ULJKW VLGH EUDFNHW WR UHPRYH WKH IUHH HU GRRU ELQ 3XOO WKH IUHH HU GUDZHU WR IXOO H WHQVLRQ LIW WKH ERWWRP IUHH HU GUDZHU EDVNHW VOLJKWO EDFN WKHQ up and out of the drawer 9 REMOVE THE FREEZER DR...

Page 27: ...he lower basket slide mechanism to full extension with both hands LIW WKH IUHH HU GRRU DQG DOLJQ WKH KRRNV ZLWK WKH notches on the slide mechanisms NOTE Place one side in first then align the other si...

Page 28: ...ing coming from the house cold water supply If you are using the SmartConnect tubing the nuts are already assembled to the tubing If you are using copper tubing insert the end of the tubing into the r...

Page 29: ...so the refrigerator is firmly positioned on the floor and does not wobble HYHOLQJ OHJV VHUYH DV D VWDELOL LQJ EUDNH to hold the refrigerator securely in position during operation and cleaning The leve...

Page 30: ...hinge screws by opening the convertible drawer QVHUW OOHQ ZUHQFK LQWR WKH VKDIW RI the center hinge C Adjust the height by turning clockwise or counterclockwise When you turn counterclockwise the door...

Page 31: ...LLING THE REFRIGERATOR Cont Installation Instructions To place bins into doors Match your bin with the letter shown Position the bins over the bin locator and push forward until inserted fully Push bi...

Page 32: ...Position the bins over the bin locators and push down until locked in position To place rotating bin into door 1 Slide bin base assembly onto the bracket on the door 2 Slide the bin onto the bin base...

Page 33: ...DFWXUHU ROORZ WKHVH LQVWUXFWLRQV FDUHIXOO WR PLQLPL H WKH ULVN RI expensive water damage Water hammer water banging in the pipes in house plumbing can cause damage to refrigerator parts and lead to wa...

Page 34: ...e cutter and then use a FRPSUHVVLRQ ILWWLQJ R QRW FXW IRUPHG HQG IURP SmartConnect Refrigerator tubing Shutoff valve to connect to the cold water line The shutoff valve should have a water inlet ZLWK...

Page 35: ...E Cont 5 TIGHTEN THE PIPE CLAMP Tighten the clamp screws until the sealing washer begins to swell NOTE R QRW RYHU WLJKWHQ RU RX PD FUXVK the tubing Washer Inlet End Pipe Clamp Clamp Screw 4 FASTEN THE...

Page 36: ...the refrigerator cools to the correct temperature The compressor may cause a clicking or chirping sound when attempting to restart this could take up to 5 minutes Expansion and contraction of cooling...

Page 37: ...occurred KHFN WKH XWR LOO SLWFKHU IRU ZDWHU OHDNV Removing and reinstalling the pitcher will reset the alarm 5HIULJHUDWRU OLJKWV RII DQG 6 shown in display 8QLW LV LQ 6DEEDWK PRGH Simultaneously hold...

Page 38: ...ubricant such as silicone based non stick cooking spray petroleum jelly or 16 DSSURYHG IRRG JUDGH OXEULFDQWV IMPORTANT R QRW XVH DV LW will remove any remaining grease in or around the hinge Improper...

Page 39: ...mine if the filter requires replacement 758 HFUHDVH LQ IORZ IURP WKH ZDWHU GLVSHQVHU RU GHFUHDVHG LFH production may indicate the need to replace the water filter Install the water filter bypass plug...

Page 40: ...tle bounce back is a designed feature on some models that gives a positive feedback to the user so that they can initiate and complete the door closing action There is an adjustment to rear wheels MYT...

Page 41: ...GEAppliances com For US Customers DOO ZDUUDQW VHUYLFH LV SURYLGHG E RXU DFWRU 6HUYLFH HQWHUV RU DQ DXWKRUL HG XVWRPHU Care technician To schedule service online visit us at geappliances com or call GE...

Page 42: ...ILUH IORRGV RU DFWV RI RG Incidental or consequential damage caused by possible defects with this appliance XWFE Water Filter Cartridge Limited Warranty This warranty is extended to the original purc...

Page 43: ...1 1 2 trichloroethane 0 150 0 0005 99 trichloroethylene 0 180 0 0010 99 bromoform 0 300 0 015 95 bromodichloromethane 0 300 0 015 95 chlorodibromomethane 0 300 0 015 95 xylenes 0 070 0 001 99 Meprobam...

Page 44: ...are available while your warranty is still LQ HIIHFW RX FDQ SXUFKDVH LW RQ OLQH DQ WLPH SSOLDQFHV 6HUYLFHV ZLOO VWLOO EH WKHUH DIWHU RXU ZDUUDQW H SLUHV Q WKH 86 GEAppliances com extended warranty or...

Page 45: ...19 INSTRUCTIONS D INSTALLATION Pr paration avant installation du r frig rateur 20 Installation du r frig rateur 23 Installation de l alimentation en eau 33 CONSEILS DE D PANNAGE 36 Bruits normaux de...

Page 46: ...GE Appliances et nous pensons que vous le serez aussi Dans cette optique nous vous rappelons que l enregistrement de votre lectrom nager vous assure la communication de renseignements importants sur...

Page 47: ...on de remplacer une ampoule ou de le nettoyer Remarque L alimentation du r frig rateur ne peut tre d connect e par aucune des fonctions sur le panneau de commande Remarque Les r parations doivent tre...

Page 48: ...x extr mit s Lorsque vous loignez votre r frig rateur du mur faites attention ne pas le faire rouler sur le cordon d alimentation afin de ne pas l endommager BRANCHEMENTS LECTRIQUES AVERTISSEMENT RISQ...

Page 49: ...que quelques jours pour s en d barrasser Si vous ne gardez pas votre ancien r frig rateur ou cong lateur veuillez suivre les directives ci dessous afin de pr venir les accidents Avant de vous d barra...

Page 50: ...HPSrFKHU OHV DOLPHQWV UHQYHUVpV GH FRXOHU et permettre ainsi un nettoyage facile Balconnet amovible On peut le retirer lorsque l ouverture de porte est limit e par un mur Bac climatis SBacs distincts...

Page 51: ...zer pour afficher la WHPSpUDWXUH SXLV PDLQWHQH OHV ERXWRQV UHH HU HW FH 0DNHU HQIRQFpV GXUDQW VHFRQGHV SRXU EDVFXOHU HQWUH HOVLXV HW Fahrenheit Contr le du volume sonore Maintenez les boutons Freezer...

Page 52: ...O IDXW SUHVVHU OH ERXWRQ GXUDQW VHFRQGHV SRXU GpYHUURXLOOHU Cartouche de filtre XWFE L cran des commandes sup rieures illumine les messages suivants Replace Filter O IDXW UHPSODFHU OH ILOWUH FDU LO QH...

Page 53: ...que de l eau ne s chappe du bec du pichet La m thode la plus simple pour retirer le couvercle consiste pousser vers le haut le bord arri re surplombant du couvercle pr s de la poign e Nettoyage du pi...

Page 54: ...QWLH TX XQ EURXLOODJH QXLVLEOH QH VH SURGXLUD SDV GDQV XQH installation donn e Si cet quipement cause un brouillage nuisible sur votre poste radio ou de t l vision ce que vous pouvez d terminer en tei...

Page 55: ...rents programmes de r ponse la demande plusieurs n tant pas compatibles avec les lectrom nagers de cuisine Veuillez v rifier aupr s de votre fournisseur d nergie local Le niveau de r ponse la demande...

Page 56: ...ltre va se lib rer automatiquement une fois tourn suffisamment vers la JDXFKH 8QH SHWLWH TXDQWLWp G HDX pourrait d goutter ATTENTION Si de l air est emprisonn dans le syst me la cartouche de filtre pe...

Page 57: ...me clayette dans une fente du rail Abaissez l avant de la clayette jusqu ce que le bas de celle ci se positionne correctement Clayettes anti d versement Les clayettes anti d versement ont des bords a...

Page 58: ...u m me endroit Bacs de la porte droite BACS FIXES pouvant facilement tre transport s du r frig rateur vers la surface de travail Pour retirer Soulevez le bac la verticale puis tirez le vers l ext rieu...

Page 59: ...H PRW HPERVVp 5217 GHYDQW SRXU faciliter la r installation UTILISATION DU R FRIG RATEUR Zone climatis e 7LURLU FRQYHUWLEOH Comment retirer et r installer la cloison s paratrice Pour retirer 1 Ouvrez l...

Page 60: ...ouille en place Paniers tiroirs et bacs Retrait du panier Pour retirer 7LUH OH SDQLHU GX WLURLU GH FRQJpODWHXU VXSpULHXU YHUV O DYDQW jusqu ce qu il sorte du rail du compartiment cong lateur Soulevez...

Page 61: ...llouez 1 2 jours pour que le bac se remplisse compl tement de gla ons Jetez les premiers bacs de gla ons pour bien nettoyer le conduit d eau V rifiez que rien n interf re avec le d placement du bras d...

Page 62: ...UHODWLI DX FRQWDFW GX plastique REMARQUE Ne laissez PAS un nettoyant pour acier inoxydable venir au contact de pi ces en plastique telles que garnitures quincaillerie de poign e ou doublures Si un con...

Page 63: ...des ampoules DEL doit tre effectu par un technicien autoris Si cet assemblage doit tre remplac visitez Electromenagersge ca fr soutien demande de service pour programmer une visite de service Derri re...

Page 64: ...e site internet Electromenagersge ca AVANT DE COMMENCER Lisez ces instructions enti rement et attentivement IMPORTANT 5HVSHFWH WRXV OHV FRGHV HW UqJOHPHQWV HQ YLJXHXU RQVHUYH FHV LQVWUXFWLRQV SRXU l i...

Page 65: ...MXVTX DX GHVVXV GX FRXYHUFOH GH FKDUQLqUH 1772 DXWHXU MXVTX DX GHVVXV GH OD FDUURVVHULH 1742 3URIRQGHXU GH FDUURVVHULH VDQV SRUWH 747 Profondeur carrosserie avec porte moins SRLJQpH SRUWH 34 1 4 870 P...

Page 66: ...mm si vous souhaitez les portes et les poign es sur le r frig rateur lors de son d placement Si la largeur des SDVVDJHV HVW LQIpULHXUH j SR PP OHV SRUWHV et les poign es du r frig rateur peuvent tre...

Page 67: ...mement la poign e contre la porte assurez vous qu il n y a pas d espace entre les capuchons d extr mit de la poign e et la porte et serrez compl tement les vis de pression Pour retirer les poign es in...

Page 68: ...ext rieures n cessitent une vis Phillips no 2 ou 7RXUQHYLV 7RU 7 Instructions d installation INSTALLATION DU R FRIG RATEUR suite 3 RETIRER LA PORTE GAUCHE AVERTISSEMENT Suivez toutes les tapes pour en...

Page 69: ...s effectue l inverse des instructions de retrait VVXUH YRXV GH UpLQVWDOOHU OH ILO GH WHUUH HW OH GpWHQGHXU VXU la charni re sup rieure 5pLQVWDOOH OH FRXYHUFOH GH FKDUQLqUH 5 0 548 Assurez vous que le...

Page 70: ...pJDJHU GHV crochets 8 RETRAIT CONG LATEUR INF RIEUR 7LUH OH SDQLHU GX WLURLU GH FRQJpODWHXU VXSpULHXU YHUV l avant jusqu ce qu il sorte du rail du compartiment cong lateur Soulevez tout en faisant piv...

Page 71: ...ble sera l che s il est r install O HQYHUV 5HSpUH OH PRW HPERVVp 5217 GHYDQW SRXU faciliter la r installation 12 REINSTALLATION DE LA PORTE DU CONG LATEUR ATTENTION Risque lors du levage de charge La...

Page 72: ...rou GH FRPSUHVVLRQ HW XQH EDJXH PDQFKRQ j O H WUpPLWp du tuyau qui vient de l alimentation d eau froide de la maison 6L YRXV XWLOLVH OH WX DX 6PDUW RQQHFW OHV pFURXV sont d j assembl s au tuyau 2 Si v...

Page 73: ...r frig rateur pour que celui ci soit correctement positionn sur le sol et ne vacille pas 2 de frein pour stabiliser le r frig rateur pendant son utilisation et son nettoyage Les pieds de mise niveau p...

Page 74: ...ertible B QVpUH XQH FOp OOHQ G SR GDQV O D H GH OD FKDUQLqUH centrale C Ajustez la hauteur en tournant dans le sens des aiguilles d une montre ou dans le sens inverse des aiguilles d une montre Lorsqu...

Page 75: ...Faites correspondre le bac avec la lettre indiqu e Placez les bacs au dessus du rep re de bac et poussez vers l avant jusqu insertion compl te Poussez le bac vers le bas jusqu ce qu il soit verrouill...

Page 76: ...ts de position et poussez vers le bas jusqu ce qu ils se verrouillent en position Pour placer le bac pivotant dans la porte 1 Glissez la base du bac sur le support de la porte 2 Glissez le bac sur sa...

Page 77: ...SHXW SURGXLUH GHV JODoRQV FUHX HUWDLQV PRGqOHV QH VRQW SDV pTXLSpV G XQ bouchon de d rivation de filtre Pour obtenir une prise de GpULYDWLRQ DSSHOH DX 5 6 HW GHPDQGH OD SULVH GH GpULYDWLRQ QR 5 X DQDG...

Page 78: ...vas l aide d un coupe tube puis utiliser un raccord compression Ne coupez jamais O H WUpPLWp ILQLH G XQ WX DX GH OD WURXVVH 6PDUW RQQHFW 5HIULJHUDWRU 7XELQJ 5RELQHW G DUUrW SRXU EUDQFKHU OH WX DX G H...

Page 79: ...in puis serrez d un tour suppl mentaire avec une cl Des fuites peuvent survenir si l crou est trop serr REMARQUE L installation sera conforme aux codes de SORPEHULH 05 GX RPPRQZHDOWK GX 0DVVDFKXVHWWV...

Page 80: ...g rateur se refroidit pour atteindre la bonne temp rature L expansion et la contraction des serpentins de refroidissement pendant et apr s le d givrage peuvent provoquer des craquements ou des claquem...

Page 81: ...eau V rifiez que le pichet ne pr sente pas de fuites d eau Le retrait et la r installation du pichet r initialiseront l alarme Lumi res du r frig rateur teintes et SA appara t sur l afficheur L appare...

Page 82: ...YDSRULVHU FHUWDLQV lubrifiants non toxiques tels que l enduit cuisson antiadh sif base de silicone la gel e de p trole ou un lubrifiant alimentaire approuv NSF IMPORTANT N utilisez pas le WD 40 car i...

Page 83: ...u de la production de glace SHXW LQGLTXHU OD QpFHVVLWp GH UHPSODFHU OH ILOWUH j HDX QVWDOOH OH ERXFKRQ de d rivation du filtre eau IRXUQL DYHF OH UpIULJpUDWHXU VXU FHUWDLQV mod les et v rifiez le d bi...

Page 84: ...qOHV VRQW GRWpV G XQH IRQFWLRQ procurant un l ger rebond qui g n re une r action positive de l utilisateur afin qu il puisse compl ter la fermeture de la porte Les roues arri re peuvent tre ajust es 0...

Page 85: ...a pi ce d fectueuse dans le syst me ferm du r frig rateur electromenagersge ca 7RXWHV OHV UpSDUDWLRQV HQ YHUWX GH OD JDUDQWLH VRQW IRXUQLV SDU QRV HQWUH GH 6HUYLFH G 8VLQH RX SDU XQ WHFKQLFLHQ DXWRULV...

Page 86: ...de la gamme de fonctionnement recommand e ou cause d une concentration excessive de s diments dans l eau d alimentation pWpULRUDWLRQ GX SURGXLW LPSXWDEOH j DFFLGHQW LQFHQGLH inondation ou catastrophe...

Page 87: ...e 200 20 30 EXSURIqQH 400 20 Naprox ne 140 20 20 Estrone 140 20 20 Bisph nol A 2000 20 300 Nonylph nol 1400 20 200 REMARQUE Bien que les tests aient t r alis s dans des conditions Bien que les tests a...

Page 88: ...t la dur e de votre garantie Vous pouvez vous la procurer en ligne en tout temps Les services GE Appliances seront toujours disponibles DSUqV O H SLUDWLRQ GH OD JDUDQWLH X eWDWV 8QLV GEAppliances com...

Page 89: ...para Instalar el Refrigerador 20 Instalaci n del Refrigerador 23 Instalaci n del Suministro de Agua 33 SOLUCI N DE PROBLEMAS 36 Condiciones de Funcionamiento Normal 36 Consejos para la Soluci n de Pr...

Page 90: ...y creemos que usted tambi n Entre otras cosas el registro de su electrodom stico asegura que podamos entregarle informaci n importante del producto y detalles de la garant a cuando los necesite Regis...

Page 91: ...de agua fr a para el funcionamiento de la m quina de hielos autom tica La presi n del agua deber estar entre 40 y 120 psi 275 827 kilopascales 1R DSOLTXH OLPSLDGRUHV iVSHURV VREUH HO UHIULJHUDGRU Cier...

Page 92: ...dos los cables de FRUULHQWH SHODGRV R FRQ FXDOTXLHU WLSR GH GDxR 1R XVH un cable con cortaduras o abrasi n sobre su extensi n o extremos Al alejar el refrigerador de la pared se deber tener cuidado de...

Page 93: ...osos incluso aunque VH FRQVHUYHQ SRU VyOR XQRV SRFRV GtDV 6L VH GHVKDUi GH su antiguo refrigerador siga las siguientes instrucciones a fin de evitar accidentes Antes de Descartar su Antiguo Aparato Re...

Page 94: ...de derrames LVHxDGRV SDUD FDSWXUDU GHUUDPHV SHUPLWLU XQD OLPSLH D m s f cil Recipiente con puerta desmontable Puede ser retirado cuando haya una pared que limite la apertura de la puerta Recipiente de...

Page 95: ...ne el bot n Ice Maker M quina de Hielo para alternar entre encendido apagado de la m quina de hielo Presione el bot n WiFi para activar el mismo Mantenga presionado el bot n WiFi durante 3 segundos pa...

Page 96: ...te 3 segundos para desbloquear esta funci n Cartucho del Filtro XWFE La Pantalla Superior de los Controles se iluminar de la siguiente manera Replace Filter Reemplazar el Filtro cuando quede un 10 de...

Page 97: ...piquee cierta cantidad de agua fuera de la boca de la jarra El m todo m s f cil para retirar la tapa es presionar hacia arriba sobre el extremo trasero que sobresale de la tapa cerca de la manija Para...

Page 98: ...ja al usuario que intente corregir la interferencia a trav s de una de las siguientes medidas Reoriente o reubique la antena receptora Aumente la separaci n entre el equipo y el receptor Conecte el eq...

Page 99: ...HPDQG 5HVSRQVH 5HVSXHVWD D OD HPDQGD y muchos no son compatibles con los electrodom sticos de cocina Por favor controle esto con su servicio local El nivel de respuesta a la demanda se exhibe en la ap...

Page 100: ...rotado lo suficiente hacia la izquierda Es posible que gotee una peque a cantidad de agua PRECAUCI N Si qued aire atrapado en el sistema es posible que el cartucho sea eyectado en el momento en que s...

Page 101: ...inserte el gancho superior en la parte trasera del estante en una ranura del soporte Incline hacia abajo la parte frontal del estante hasta que la parte inferior del mismo quede bloqueada Estantes a P...

Page 102: ...as en sus ubicaciones correctas Bandejas de la Puerta Derecha Las BANDEJAS FIJAS pueden ser llevadas f cilmente del refrigerador al rea de trabajo Para retirar Levante la bandeja de forma recta y lueg...

Page 103: ...mo ayuda para volver a UHDOL DU OD LQVWDODFLyQ REVHUYH HO HVWDPSDGR 5217 OPERACI N DEL REFRIGERADORE UHD OLPiWLFD Caj n Convertible C mo Retirar y Reemplazar el Organizador del Caj n Para retirar 1 Em...

Page 104: ...ORTXHDGR Cestos Cajones y Cubos Retiro de la Cesto Para retirar 1 Empuje la canasta del caj n superior del freezer hacia adelante hasta que est fuera del carril en el compartimiento del freezer Levant...

Page 105: ...en 12 y 18 horas Espere 1 o 2 d as hasta que el balde se llene completamente de hielo HVFDUWH ODV SULPHUDV FDQWLGDGHV GH KLHOR SDUD SHUPLWLU TXH HO suministro de agua se despeje Aseg rese de que nada...

Page 106: ...DX FRQWDFW GX plastique REMARQUE 1H ODLVVH 3 6 XQ QHWWR DQW SRXU DFLHU LQR GDEOH YHQLU DX FRQWDFW GH SLqFHV HQ SODVWLTXH WHOOHV TXH JDUQLWXUHV quincaillerie de poign e ou doublures Si un contact non...

Page 107: ...agua a fin de prevenir da os graves sobre la propiedad debido a una inundaci n 1 Apague el refrigerador o desenchufe el refrigerador RQVXOWH OD VHFFLyQ GH 21752 6 HQ OD SiJLQD 2 Vac e la hielera 3 Ci...

Page 108: ...ances ca ANTES DE COMENZAR Lea estas instrucciones en su totalidad y atentamente IMPORTANTE Cumpla con todos los c digos y ordenanzas gubernamentales Conserve estas instrucciones para uso del inspecto...

Page 109: ...a Carcasa C 68 5 8 1742 3URIXQGLGDG GH OD DMD VLQ 3XHUWD 29 7 16 747 Profundidad de la Carcasa con Puerta menos la Manija de la Puerta E 34 1 4 870 Profundidad de la Carcasa con Puerta y Manija F 36 7...

Page 110: ...ve 100 F 37 C because it will not perform properly R QRW LQVWDOO WKH UHIULJHUDWRU LQ D ORFDWLRQ H SRVHG to water rain etc or direct sunlight Install it on a floor strong enough to support it fully loa...

Page 111: ...E Sostenga la manija de manera firme contra la puerta aseg rese de que no haya brechas entre las tapas de terminaci n de la manija y la puerta y entonces ajuste completamente los tornillos Para retira...

Page 112: ...INSTALAR EL REFRIGERADOR Cont 3 RETIRE LA PUERTA DEL LADO IZQUIERDO ADVERTENCIA Siga todos los pasos para retirar y volver a instalar la puerta Si no se siguen estas instrucciones dejando piezas sin u...

Page 113: ...ion is the reverse of the removal instructions 5 Aseg rese de reinstalar el cable a tierra y el amortiguador de refuerzo a la bisagra superior 6 Vuelva a instalar la tapa de la bisagra NOTA Aseg rese...

Page 114: ...NFERIOR DEL FREEZER PSXMH OD FDQDVWD GHO FDMyQ VXSHULRU GHO IUHH HU hacia adelante hasta que est fuera del carril en el compartimiento del freezer Levante mientras gira la canasta hacia arriba para su...

Page 115: ...floja si se vuelve a instalar en la direcci n contraria Como ayuda para volver a realizar la instalaci n observe el estampado 5217 IURQWDO 12 Instrucciones de Instalaci n C MO INSTALAR EL REFRIGERADOR...

Page 116: ...eniente del suministro de agua fr a del hogar Si usar tuber as de SmartConnect las tuercas ya est n ensambladas en la tuber a 2 Si usar tuber as de cobre inserte el extremo de la tuber a en la conexi...

Page 117: ...modo que el refrigerador quede posicionado de manera firme en el piso y no se tambalee 2 Las patas niveladoras sirven como freno estabilizador para sostener el refrigerador de forma segura en su posi...

Page 118: ...la secci n previa sobre nivelaci n del refrigerador A Acceda a los tornillos de la bisagra abriendo el caj n convertible B Inserte una llave Allen de en el hueco de la bisagra central C3 Ajuste la alt...

Page 119: ...ont Coloque los recipientes en las puertas Enlace su recipiente con la letra mostrada Posicione los ganchos del recipiente sobre el ubicador del recipiente y empuje hacia adelante hasta que se inserte...

Page 120: ...Para colocar la bandeja giratoria en la puerta HVOLFH HO HQVDPEOH GH OD EDVH GH OD bandeja en el soporte de la puerta HVOLFH OD EDQGHMD VREUH OD EDVH GH OD bandeja Bandeja Porta bandejas Bandeja Base...

Page 121: ...lo huecos Algunos modelos no est n equipados con el tap n del bypass del filtro Para acceder a un tap n del bypass gratuito llame al 1 800 GE CARES y solicite el tap n del bypass del filtro WR17X33825...

Page 122: ...Q GH FRPSUHVLyQ 1R FRUWH ORV extremos con forma de la tuber a para refrigerador de SmartConnectTM Cierre la v lvula para conectar a la tuber a de agua fr a La v lvula de cierre deber a tener una entra...

Page 123: ...or SmartConnectTM inserte el extremo moldeado de la tuber a en la v lvula de cierre y ajuste la tuerca de compresi n hasta que quede ajustada manualmente y luego d un giro de ajuste adicional con una...

Page 124: ...escuche sonidos de roturas o estallidos cuando se enchufe el refrigerador por primera vez Esto sucede mientras el refrigerador se enfr a hasta la temperatura correcta El compresor puede causar un son...

Page 125: ...didas de agua Retirar y volver a colocar la jarra reiniciar la alarma Las luces del refrigerador se apagan y SA aparece en la pantalla La unidad est en modo sab tico H IRUPD VLPXOWiQHD PDQWHQJD SUHVLR...

Page 126: ...Es posible rociar un poco de lubricante no t xico tal como espr is de cocci n no adherente a base de silicona vaselina o lubricantes de grado alimenticio aprobados SRU 16 IMPORTANTE 1R XVH D TXH HVWH...

Page 127: ...de agua para determinar si el filtro requiere un reemplazo 9 5 52 Una reducci n en el flujo del dispensador de agua o una reducci n en la producci n de hielo podr n indicar la necesidad de reemplazar...

Page 128: ...que brinda una respuesta positiva al usuario de modo que pueda iniciar y completar la acci n del cierre de puertas Hay un ajuste a las ruedas traseras MITO Las patas niveladoras frontales son ajustab...

Page 129: ...o de la parte que presente defectos en el sistema de refrigeraci n sellado GEAppliances com Todo el servicio de garant a limitada es provisto por nuestros Centros de Servicio de Fabricaci n o un t cni...

Page 130: ...HVGH la fecha de compra original Cualquier parte del cartucho del filtro de agua que falle debido a un defecto en los materiales o la fabricaci n durante esta garant a limitada de treinta d as Comun...

Page 131: ...0 300 0 015 95 Bromodiclorometano 0 300 0 015 95 clorodibromometano 0 300 0 015 95 Xileno 0 070 0 001 99 Meprobamato 400 20 60 95 5 Atenolol 200 20 30 95 9 carbamazepina 1400 20 200 98 6 7 1400 20 200...

Page 132: ...era una garant a extendida de GE Appliances y conozca los descuentos especiales que est n disponibles mientras su garant a a n est vigente La puede adquirir en cualquier momento a trav s de Internet L...

Reviews: