background image

Write the model and serial  
numbers here:

Model # _________________

Serial # _________________

You can find them on a label 
behind the door or drawer.

ESPAÑOL

Para consultar una version en 

español de este manual de 

instrucciones, visite nuestro sitio de 

internet GEAppliances.com.

OWNER’S MANUAL

RANGES

Electric Induction Front Control 

49-2000990  Rev. 2   06-22   GEA

30" Induction Range

PHS930

GE is a trademark of the General Electric Company. Manufactured under trademark license.

SAFETY INFORMATION

  . . . . . . . . . . 3

USING THE RANGE

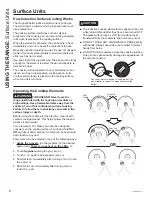
Surface Units . . . . . . . . . . . . . . . . . . . . . . . . . . . 8
Precision Cooking  . . . . . . . . . . . . . . . . . . . . . . 9
Cookware for Induction Cooktop . . . . . . . . . 11
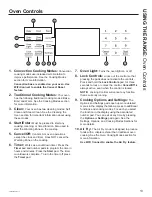
Oven Controls . . . . . . . . . . . . . . . . . . . . . . . . . .13
Cooking Options. . . . . . . . . . . . . . . . . . . . . . . .14
Settings  . . . . . . . . . . . . . . . . . . . . . . . . . . . . . . .14
Sabbath Mode . . . . . . . . . . . . . . . . . . . . . . . . . .16
Sabbath Mode - OU and CRC . . . . . . . . . . . . . 17
Oven Racks . . . . . . . . . . . . . . . . . . . . . . . . . . . .18
Aluminum Foil and Oven Liners . . . . . . . . . . .18
Cookware . . . . . . . . . . . . . . . . . . . . . . . . . . . . . .18
Cooking Modes . . . . . . . . . . . . . . . . . . . . . . . . .19
Oven Probe . . . . . . . . . . . . . . . . . . . . . . . . . . . .21
Cooking Guide  . . . . . . . . . . . . . . . . . . . . . . . . 22
Air Fry Cooking Guide . . . . . . . . . . . . . . . . . . 23

CARE AND CLEANING

Cleaning the Range – Exterior . . . . . . . . . . . 24
Cleaning the Range – Interior  . . . . . . . . . . . 25
Cleaning the Glass Cooktop . . . . . . . . . . . . . 26
Oven Probe . . . . . . . . . . . . . . . . . . . . . . . . . . . 27
Oven Light . . . . . . . . . . . . . . . . . . . . . . . . . . . . 28
Oven Door . . . . . . . . . . . . . . . . . . . . . . . . . . . . 29
Soft Close Drawer  . . . . . . . . . . . . . . . . . . . . . 29

TROUBLESHOOTING TIPS

 . . . . . . . 30

LIMITED WARRANTY

  . . . . . . . . . . . . 34

ACCESSORIES

  . . . . . . . . . . . . . . . . . . . . 35

CONSUMER SUPPORT

  . . . . . . . . . . . 36

Summary of Contents for Pofile PHS930BPTS

Page 1: ...ompany Manufactured under trademark license SAFETY INFORMATION 3 USING THE RANGE Surface Units 8 Precision Cooking 9 Cookware for Induction Cooktop 11 Oven Controls 13 Cooking Options 14 Settings 14 Sabbath Mode 16 Sabbath Mode OU and CRC 17 Oven Racks 18 Aluminum Foil and Oven Liners 18 Cookware 18 Cooking Modes 19 Oven Probe 21 Cooking Guide 22 Air Fry Cooking Guide 23 CARE AND CLEANING Cleaning...

Page 2: ...es into every GE Appliances product and we think you will too Among other things registration of your appliance ensures that we can deliver important product information and warranty details when you need them Register your GE appliance now online Helpful websites and phone numbers are available in the Consumer Support section of this Owner s Manual You may also mail in the pre printed registratio...

Page 3: ... B digital device pursuant to Part 18 of the FCC rules These limits are designed to provide reasonable protection against harmful interference in a residential installation This unit generates uses and can radiate radio frequency energy and if not installed and used in accordance with the instructions may cause harmful interference to radio communications However there is no guarantee that interfe...

Page 4: ...heat or melt resulting in damage to the product and risk of shock smoke or fire Ŷ Do not use the oven if a heating element develops a glowing spot during use or shows other signs of damage A glowing spot indicates the surface unit may fail and present a potential burn fire or shock hazard Turn the heating element off immediately and have it replaced by a qualified service technician Ŷ R QRW WRXFK ...

Page 5: ...arby surface units Ŷ KHQ SUHSDULQJ IODPLQJ IRRGV XQGHU D KRRG WXUQ WKH fan on Ŷ YRLG VFUDWFKLQJ WKH JODVV FRRNWRS 7KH FRRNWRS can be scratched with items such as knives sharp instruments rings or other jewelry and rivets on clothing Ŷ 8VH FHUDPLF FRRNWRS FOHDQHU DQG D QRQ VFUDWFK cleaning pad to clean the cooktop Wait until the cooktop cools and the indicator light goes out before cleaning A wet s...

Page 6: ... RQ D FLUFXLW different from that to which the receiver is connected Ŷ RQVXOW WKH GHDOHU RU DQ H SHULHQFHG UDGLR 79 technician for help b accept any interference received including interference that may cause undesired operation of the device Note that any changes or modifications to the wireless communication device installed on this oven that are not expressly approved by the manufacturer could ...

Page 7: ...However there is no guarantee that interference will not occur in a particular installation If this unit does cause harmful interference to radio or television reception which can be determined by turning the unit off and on the user is encouraged to try to correct the interference by one or more of the following measures Ŷ 5HRULHQW RU UHORFDWH WKH UHFHLYLQJ DQWHQQDH Ŷ QFUHDVH WKH GLVWDQFH EHWZHHQ...

Page 8: ...8 27 22 5 RU 3 16 GLUHFWO with hands Always use mitts or pot holders to protect hands from burns Ŷ 2 127 6 FRRNZDUH DFURVV WKH FRRNWRS VXUIDFH Doing so may permanently damage the appearance of the ceramic cooktop Operating the Cooktop Elements WARNING FIRE HAZARD Never leave the range unattended with the cooktop on medium or high settings Keep flammable items away from the cooktop Turn off all con...

Page 9: ...d type of pan and the time held will affect the quality of the food Always use pot holders or oven mitts when removing food from the WARMING ZONE since cookware and plates will be hot NOTE The surface warmer will not glow red How To Synchronize Left Elements To Turn On Hold the Sync Burners pad for about half a second to connect the two elements Operate either element as described in Operating the...

Page 10: ... this App Hestan Cue cookware Firmly double tap the black plastic endcap Hestan Cue by Hestan Smart Cooking Precision Probe Press side button once SmartHQ Use Precision Cooking with Compatible Bluetooth Precision Probe or Hestan Cue Cookware The range is able to communicate via Bluetooth with smart accessories such as Hestan Cue cookware or Precision Probe Each smart accessory must be paired with ...

Page 11: ...given setting Cookware Noise Slight sounds may be produced by different types of cookware Heavier pans such as enameled cast iron produce less sound than a lighter weight multi ply stainless steel pan The size of the pan and the amount of contents can also contribute to the sound level When using adjacent elements that are set at higher power level settings magnetic fields may interact and produce...

Page 12: ...ests on cooktop trim or does not rest completely on the cooktop surface Heavy handle tilts pan Pan is partially magnetic on the bottom Pan is completely magnetic on the bottom Pan bottom rests completely on the cooktop surface Pan is properly balanced Cookware recommendations The induction coils require a minimum pan size to function properly Cookware must fully contact the surface of the cooking ...

Page 13: ...program the time in hours and minutes Press the Start pad The timer countdown is complete To turn the timer off press the Timer pad 7 Oven Light Turns the oven light on or off 8 Lock Controls Locks out the control so that pressing the pads does not activate the controls Press and hold the Lock Controls pad for three seconds to lock or unlock the control Cancel Off is always active even when the co...

Page 14: ...ds open up more detailed menus in the display that allow access to additional functions For each you select the function in the display using the associated number pad You can exit at any time by pressing the Options or Settings pad again WiFi Connect Remote Enable Your oven is designed to provide you with two way communication between your appliance and smart device By using the WiFi Connect feat...

Page 15: ... range hood To pair those products to the range Press the Settings pad and select Bluetooth Select Pair and follow the corresponding instructions included with the mating Chef Connect enabled product The range will cancel pairing mode after two minutes if no mating device is detected Select Remove to confirm product is paired or to un pair from range The Precision Cooking Probe can also be paired ...

Page 16: ...en Bake for lower oven in a double oven unit use the 1 through 5 number pads to select a different preset cooking temperature and press Start Enter Starting a Timed Bake 1 Press the Bake pad 2 If the desired temperature is 350F use the 6 through 0 number pads to select a cooking time If a cooking temperature other than 350F is desired use the 1 through 5 number pads to select a preset cooking temp...

Page 17: ... 2YHQV 7KH 6KDEERV HHSHU FRQQHFWV WR RXU UDQJH WR automatically enable Shabbos compatible modes each ZHHN DQG EHIRUH HYHU KROLGD 8VLQJ WZR PRGHV Shabbos mode and Holiday mode the Shabbos HHSHU DOORZV IRU GRRU RSHQLQJV DQG FORVLQJV GLVDEOHV most of the buttons on the appliance and will adjust temperatures automatically during Shabbos and Yom Tov The appropriate mode will automatically activate base...

Page 18: ...able results are obtained with this type of cookware consider reducing oven temperature by 25º F next time Shiny pans can produce more evenly cooked baked goods such as cakes and cookies Glass and ceramic pans heat slowly but retain heat well These types of pans work well for dishes such as pies and custards Air insulated pans heat slowly and can reduce bottom browning HHS FRRNZDUH FOHDQ WR SURPRW...

Page 19: ...w traditional oven recipe or package guidelines for set temperatures and cook times adjust cook time to achieve your desired crispness Additional guidelines for using this mode can be found in the Cooking Guide Use WiFi connect to enable this feature Broiling Modes Always broil with the oven door drawer closed Monitor IRRG FORVHO ZKLOH EURLOLQJ 8VH FDXWLRQ ZKHQ EURLOLQJ placing food close to the b...

Page 20: ...e preheating the oven Food should be placed in the oven before or immediately upon starting this mode 8VH UR HQ 3L D 0XOWL ZKHQ FRRNLQJ RQ WZR UDFNV simultaneously This mode includes a preheating cycle to prepare the oven for multi rack baking Press Options and select Frozen then follow any display prompts to access this mode Use WiFi connect to enable this feature Pre Heat Proper preheating ensur...

Page 21: ...GLVKHV VXFK DV PHDWORDI LQVHUW WKH probe into the center of the dish Ŷ RU ILVK LQVHUW WKH SUREH IURP MXVW DERYH WKH JLOO LQWR the meatiest area parallel to the backbone Probe Usage The temperature probe can only be used with Bake Convection Bake and Convection Roast To use the probe with preheating 1 Select the desired cook mode Bake Convection Bake or Convection Roast pad and enter the desired co...

Page 22: ... broiling center food below the broil heater Boneless chicken breasts Broil Low Bake 3 Move food down for more doneness less searing and up for greater searing browning when broiling For best performance when broiling center food below the broil heater Whole turkey Bake Convection Roast 1 8VH D ORZ VLGHG SDQ VXFK DV D EURLO SDQ 3UHKHDWLQJ LV QRW QHFHVVDU Turkey Breast Bake Convection Roast 3 8VH D...

Page 23: ... cooking Arrange food in a single layer on the pan do not overload the pan Always check internal food temperature to confirm minimum safe temperatures have been reached Minimum safe food temperatures can be found on packages and at IsItDoneYet gov FOOD TYPE RECOMMENDED RACK POSITION S RECOMMENDED SET TEMPERATURES F RECOMMENDED COOK TIME MIN NOTES Fresh boneless fish or poultry pieces breaded such ...

Page 24: ...n the exterior of the oven Clean with a mild soap and water or vinegar and water solution Rinse with clean water and dry with a soft cloth When cleaning surfaces make sure that they are at room temperature and not in direct sunlight If stain on the door vent trim is persistent use a mild abrasive cleaner and a sponge scrubber for best results Spillage of marinades fruit juices tomato sauces and ba...

Page 25: ...n the oven during a self clean cycle the rack may become difficult to slide See the Oven Racks section for instructions on how to improve IMPORTANT The health of some birds is extremely sensitive to the fumes given off during the self cleaning cycle of any range Move birds to another well ventilated room To use the Self Clean feature 1 Start with the oven at room temperature 2 Wipe excess grease a...

Page 26: ...the broil element Any soil will burn off when the elements are heated The bake element is not exposed and is under the oven floor Clean the oven floor with warm soapy water Wipe up heavy soil on the oven bottom Clean your cooktop after each VSLOO 8VH D FHUDPLF FRRNWRS cleaner Ceramic Cooktop Cleaner Burned On Residue NOTE DAMAGE to your glass surface may occur if you use scrub pads other than thos...

Page 27: ...ooktop b Remove the spill with paper towels 3 Any remaining spillover should be left until the surface of the cooktop has cooled 4 Don t use the surface units again until all of the residue has been completely removed NOTE If pitting or indentation in the glass surface has already occurred the cooktop glass will have to be replaced In this case service will be necessary Cleaning the Glass Cooktop ...

Page 28: ...nterclockwise 1 4 turn until the tabs of the glass cover clear the grooves of the socket Wearing latex gloves may offer a better grip 2 Remove the bulb by turning it counter clockwise To replace 1 Replace bulb with a new 40 watt appliance bulb Insert the bulb and turn it clockwise until it is tight 2 Place the tabs of the glass cover into the grooves of the socket Turn the glass cover clockwise 1 ...

Page 29: ...the hinge locks up against the front frame of the oven cavity to the locked position 5 Close the oven door Removal position Hinge lock Slot Pull hinge locks down to unlock Push hinge locks up to lock Hinge lock Hinge arm Indentation Bottom edge of slot Hinge arm Oven Door The storage drawer is a good place to store cookware and bakeware Do not store plastics or flammable material in the drawer The...

Page 30: ...nd use cookware with smooth bottoms Areas of discoloration on the cooktop Food spillovers not cleaned before next use See the Cleaning the glass cooktop section Hot surface on a model with a light colored cooktop This is normal The surface may appear discolored when it is hot This is temporary and will disappear as the glass cools Plastic melted to the surface Hot cooktop came into contact with pl...

Page 31: ...ace the fuse or reset the circuit breaker Plug on range is not completely inserted in the electrical outlet Make sure electrical plug is plugged into a live properly grounded outlet Oven controls improperly set See the Oven Control section Storage drawer won t close Power cord may be obstructing drawer in the lower back of the range Reposition the drawer and power cord See the Storage Drawer Remov...

Page 32: ... it by pressing the Cancel Off pad setting the clock and resetting any cooking function Burning or oily odor emitting from the vent This is normal in a new oven and will disappear in time To speed the process set a self clean cycle for a minimum of 3 hours See the Cleaning the Oven section Strong odor An odor from the insulation around the inside of the oven is normal for the first few times the o...

Page 33: ...he range section Drawer is over loaded or load is unbalanced Reduce weight Redistribute drawer contents Steam from the vent When using the ovens it is normal to see steam coming out of the oven vents As the number of racks or amount of food being cooked increases the amount of visible steam will increase This is normal Water remaining on oven floor after Steam Clean cycle This is normal Remove any...

Page 34: ...LED lamps Ŷ IIHFWLYH DQXDU FRVPHWLF GDPDJH WR WKH glass cooktop such as but not limited to chips scratches or baked on residue not reported within 90 days of installation Ŷ IIHFWLYH DQXDU damage to the glass cooktop due to impact or misuse See example LIMITED WARRANTY GE Appliances Electric Range Limited Warranty EXCLUSION OF IMPLIED WARRANTIES Your sole and exclusive remedy is product repair as p...

Page 35: ...8 x 1 x 13 Large Broiler Pan 12 x 1 x 16 XL Broiler Pan 17 x 1 x 19 1 4 Parts Oven racks Oven elements Light bulbs Cleaning Supplies CitruShine Stainless Steel Wipes Stainless Steel Appliance Cleaner Non scratch Cleaning Pads for Ceramic Cooktops Ceramic Cooktop Cleaner Ceramic Cooktop Scraper LW LW LQFOXGHV FUHDP DQG FRRNWRS VFUDSHU The large broiler pan does not fit in 20 24 ranges The XL broile...

Page 36: ...bout special discounts that are available while your warranty is still in effect You can purchase it on line anytime GE Appliances Services will still be there after your ZDUUDQW H SLUHV Q WKH 86 GEAppliances com extended warranty or call 800 626 2224 during normal business hours Remote Connectivity For assistance with wireless network connectivity for models with remote enable visit our website a...

Page 37: ... de Estufa para Cocción por Inducción 11 Controles del Horno 13 Cooking Options Opciones de Cocción 14 Settings Configuraciones 14 Modo Sabático 16 Modo Sabático OU y CRC 17 Estantes del Horno 18 Papel de Aluminio y Cobertores del Horno 18 Utensilio del Horno 18 Modos de Cocción 19 Sonda del Horno 21 Guía de Cocción del Horno 22 Modo de Cocción para Freír con Aire 23 CUIDADO Y LIMPIEZA Limpieza de...

Page 38: ...s y creemos que usted también Entre otras cosas el registro de su electrodoméstico asegura que podamos entregarle información importante del producto y detalles de la garantía cuando los necesite Registre su electrodoméstico GE ahora a través de Internet Sitios Web y números telefónicos útiles están disponibles en la sección de Soporte para el Consumidor de este Manual del Propietario También pued...

Page 39: ...s límites establecidos para un dispositivo digital de clase B de acuerdo con la Parte 18 de la Normativa de la FCC Estos límites han sido diseñados para ofrecer una protección razonable contra interferencias perjudiciales en la instalación residencial Este equipo genera usa y puede emitir energía de radiofrecuencia y si no se instala y utiliza de acuerdo con las instrucciones puede ocasionar inter...

Page 40: ...e el producto y el riesgo de descarga humo o incendio Ŷ 1R XVH HO KRUQR VL XQ HOHPHQWR SDUD FDOHQWDU GHVDUUROOD una mancha brillante durante el uso o muestra otros VLJQRV GH GDxRV 8QD PDQFKD EULOODQWH LQGLFD TXH OD unidad de la superficie puede fallar y generar una posible quemadura incendio o descarga eléctrica Apague el elemento para calentar de inmediato y solicítele a un técnico calificado del...

Page 41: ...prenderse fuego Ŷ 1XQFD GHMH DFHLWH VLQ DWHQFLyQ PLHQWUDV IUtH 6L VH deja calentar más allá del punto de humeo el aceite puede encenderse provocando un incendio que SRGUtD SURSDJDUVH D ORV JDELQHWHV FHUFDQRV 8WLOLFH XQ termómetro para grasa cuando sea posible para controlar la temperatura del aceite Ŷ 3DUD HYLWDU HO GHUUDPH GH DFHLWH XQ LQFHQGLR XWLOLFH XQD cantidad mínima de aceite cuando fría en...

Page 42: ... de Acceso Remoto Instalado Este dispositivo cumple con la Parte 15 de la Normativa de la FCC Su funcionamiento está sujeto a las dos condiciones siguientes 1 Este dispositivo no podrá ocasionar interferencias nocivas y 2 este dispositivo debe aceptar cualquier interferencia recibida incluyendo interferencias que puedan ocasionar un funcionamiento no deseado El equipo de comunicación inalámbrica i...

Page 43: ...provocar una interferencia dañina a las comunicaciones de radio Sin embargo no hay garantía de que no haya interferencia en una instalación determinada Si la unidad provoca interferencia nociva a la recepción de radio y televisión lo que puede determinarse encendiendo y apagando la unidad el usuario puede corregir la interferencia a través de una o más de las siguientes medidas Ŷ 5HRULHQWH R FDPEL...

Page 44: ...bajo de la superficie de cocción producen un campo magnético que genera calor sobre las ollas de metal ferroso que se encuentran cerca La superficie de cocción misma no se calienta El calor se produce en el recipiente de cocción y no puede generarse hasta que se coloque el recipiente en la superficie de cocción Cuando se activa el elemento el recipiente comienza a calentarse de inmediato y a su ve...

Page 45: ...afectarán la calidad de la comida Siempre use las manijas de las ollas o guantes para horno al retirar comida del WARMING ZONE Área para Calentar ya que los utensilios y platos estarán calientes NOTA El calentador superficial emitirá un brillo rojo Cómo Sincronizar los Elementos Izquierdos Para Encender Mantenga la tecla Sync Burners Quemadores Sincronizados por aproximadamente medio segundo para ...

Page 46: ...onible en el área de calentamiento Sólo un quemador podrá funcionar en un modo de Cocción de Precisión por vez Use la función Precision Cooking Cocción de Precisión con la Sonda de Precisión o el Utensilio Hestan Cue 1 El quemador se deberá apagar para comenzar 2 Gire la perilla a la función Precision Cooking Cocción de Precisión sobre el quemador que desee usar 3 Active el utensilio de acuerdo co...

Page 47: ... 8VDU XQD ROOD PiV SHTXHxD VREUH XQ quemador más grande genera menos energía en cualquier configuración Ruidos de los recipientes de cocción Diferentes tipos de recipientes de cocción pueden producir sonidos suaves Los recipientes más pesados como los de hierro fundido esmaltado producen menos ruido que los recipientes más livianos de acero inoxidable de capas múltiples El tamaño del recipiente y ...

Page 48: ...ufa 8QD PDQLMD SHVDGD LQFOLQD HO recipiente La base del recipiente se apoya completamente sobre la superficie de la estufa El recipiente está bien equilibrado La cacerola es parcialmente magnética en su parte inferior La cacerola es completamente magnética en su parte inferior Recomendaciones sobre recipientes de cocción Las bobinas de inducción requieren un tamaño de olla mínimo para funcionar de...

Page 49: ...la tecla Start Iniciar La cuenta regresiva del temporizador se completó Para apagar el temporizador presione la tecla Timer Temporizador 7 Oven Light s Luz es del Horno Enciende o apaga la luz es del horno 8 Lock Controls Controles de Bloqueo Bloquean el control de modo que al presionar las teclas no se activen los controles Mantenga presionada la Lock Controls Controles de Bloqueo durante tres se...

Page 50: ...ons Opciones y Settings Configuraciones abren menús más detallados en la pantalla los cuales permiten acceso a funciones adicionales Para cada uno seleccione la función en la pantalla a través de la tecla numérica asociada Puede salir en cualquier momento presionando la tecla Options Opciones o Settings Configuraciones nuevamente Conexión WiFi y Acceso Remoto Su horno de está diseñado para brindar...

Page 51: ...r Emparejar y siga las instrucciones correspondientes incluidas con el producto de emparejamiento permitido por Chef Connect La estufa cancelará el modo de emparejamiento luego de dos minutos si no es detectado ningún dispositivo para emparejar Seleccione Remove Retirar para confirmar que el producto está emparejado o para desemparejar el mismo de su estufa La Sonda de Cocción de Precisión también...

Page 52: ... inferior en un unidad con horno doble use las teclas numéricas de 1 a 5 para seleccionar una temperatura de cocción actual diferente y presione Start Enter Iniciar Ingresar Inicie un Horneado por Tiempo 1 Presione la tecla Bake Hornear 2 Si la temperatura deseada es de 350ºF use las teclas numéricas de 6 a 0 para seleccionar un tiempo de cocción Si se desea una temperatura de cocción diferente a ...

Page 53: ...na para activar de forma automática modos compatibles con Shabbos FDGD VHPDQD R DQWHV GH FDGD IHULDGR 8VDQGR GRV PRGRV HO modo Shabbos y el Modo Holiday Feriado el Conservador de Shabbos permitirá la apertura y cierre de puertas desactivará la mayoría de los botones del electrodoméstico y ajustará las temperaturas de forma automática durante Shabbos y Yom Tov El modo apropiado se activará de forma...

Page 54: ... obtienen resultados no deseados con este tipo de utensilios considere la posibilidad de reducir la temperatura del horno en 25º F la próxima vez Las ollas brillantes pueden producir resultados de horneado más parejos en tortas y galletas Las ollas de vidrio y cerámica calientan con lentitud pero retienen bien el calor Estos tipos de ollas funcionan bien con platos tales como tartas y postres con ...

Page 55: ... F No es necesario precalentar en este modo Siga las pautas de la receta tradicional para horno o del paquete en UHODFLyQ D ORV DMXVWHV GH WHPSHUDWXUD WLHPSRV GH FRFFLyQ Modo para Asar Siempre ase con la puerta del horno cajón cerrados Monitoree OD FRPLGD GH FHUFD DO DVDU 7HQJD FXLGDGR DO DVDU SRVLFLRQDU la comida cerca del elemento para asar o del quemador incrementa el nivel de humo salpicaduras...

Page 56: ...D 6LQJOH 3L D RQJHODGD HQ XQ Estante cuando cocine en un solo estante Este modo no requiere el precalentamiento del horno La comida deberá ser colocada en el horno antes o inmediatamente al iniciar el modo 8VH HO PRGR UR HQ 3L D 3L D RQJHODGD DO FRFLQDU HQ dos estantes de forma simultánea Este modo incluye un ciclo de precalentamiento para preparar el horno para hornear en múltiples estantes Presi...

Page 57: ...galla en la zona más carnosa paralela a columna Uso de la Sonda La sonda de temperatura sólo puede ser usada con las funciones Bake Hornear Convection Bake Hornear por Convección y Convection Roast Dorar por Convección Para usar la sonda con precalentamiento 1 Configure el modo de cocción deseado Hornear Hornear por Convección o Dorar por Convección e ingrese la temperatura de cocción deseada con ...

Page 58: ... atención a la comida al asarla Para un mejor rendimiento al asar centre la comida debajo del elemento que emite calor para asar Pechugas de pollo deshuesadas Asado Bajo Hornear 3 Mueva la comida más abajo para que quede más preparada y menos soasada y más arriba para soasar dorar al asar Para un mejor rendimiento al asar centre la comida debajo del elemento que emite calor para asar Pavo entero H...

Page 59: ...te la cocción 8ELTXH OD FRPLGD HQ XQD VROD FDSD VREUH OD EDQGHMD VLQ sobrecargar la misma Siempre controle la temperatura interior de la comida a fin de confirmar que se hayan alcanzado las temperaturas mínimas seguras Las temperaturas mínimas seguras de la comida se podrán encontrar en los paquetes y en IsItDoneYet gov TIPO DE COMIDA POSICIÓN ES DE ESTANTES RECOMENDADAS CONFIGURACIÓN DE TEMPERATU...

Page 60: ...ni polvos limpiadores en el exterior del horno Limpie el mismo con agua y jabón o una solución de vinagre y agua Enjuague con agua limpia y seque con una tela seca Al limpiar supeficies asegúrese de que estén a temperatura ambiente y fuera del contacto con la luz solar Si las manchas en el borde de la ventana de la puerta son persistentes use un limpiador abrasivo suave o una esponja con estropajo...

Page 61: ...cción de Estantes del Horno IMPORTANTE Las emanaciones producidas por el ciclo de autolimpieza de cualquier horno afectan la salud de algunas aves de manera notoria Procure llevar sus aves a otra habitación bien ventilada Para usar la función Self Clean Limpieza Automática 1 Comience con el horno a temperatura ambiente 2 Limpie la grasa excesiva y las suciedades del horno y del interior de la puer...

Page 62: ...ie de vidrio si utiliza estropajos que no sean los recomendados 1 Deje enfriar la estufa 2 Coloque unas gotas del limpiador de estufas cerámicas sobre toda el área de residuos pegados 8WLOL DQGR XQ SDxR GH OLPSLH D SDUD VXSHUILFLHV GH FRFFLyQ de cerámica frote el área sucia aplicando presión según sea necesario 4 Si quedan restos repita los pasos indicados con anterioridad 5 Para protección adicio...

Page 63: ...debe dejarse hasta que la superficie de la estufa se haya enfriado 4 No use las unidades de superficie de nuevo hasta que todos los restos se hayan eliminado por completo NOTA Si la superficie de vidrio ya ha sufrido marcas o hendiduras el vidrio de la estufa deberá cambiarse En ese caso será necesaria la atención de un técnico Cómo limpiar la estufa de vidrio Continúa Sonda del Horno La sonda de ...

Page 64: ...tas de la tapa de vidrio limpien las ranuras de la ficha Si usa guantes de látex tendrá un mejor agarre 2 Retire la lámpara girando la misma en dirección contraria a las agujas del reloj Para volver a colocar la tapa 1 Reemplace la lámpara por una para electrodoméstico de 40 watts Inserte la lámpara y gire la misma en dirección de las agujas del reloj hasta que quede ajustada 2 Coloque las lengüet...

Page 65: ...del horno Puerta del Horno Posición de retiro Bloqueo de la bisagra Ranura Empuje los bloqueos de la bisagra hacia abajo para desbloquear Extremo inferior de la ranura Bloqueo de la bisagra Brazo de la bisagra Hendidura Empuje el bloqueo de la bisagra hacia arriba hasta que quede bloqueado Brazo de la bisagra El cajón de almacenamiento es un buen lugar para guardar utensilios de estufa y panadería...

Page 66: ...so y utilice recipientes con bases lisas Áreas de decoloración en la estufa No se limpiaron los derrames de alimentos antes del uso siguiente Ver la sección Cómo limpiar la estufa de vidrio Superficie caliente en un modelo con una estufa de color claro Esto es normal La superficie puede parecer decolorada cuando está caliente Esto es temporal y desaparecerá a medida que se enfría el vidrio Plástic...

Page 67: ...uptor de circuitos puede haber saltado Cambie el fusible o vuelva a configurar el interruptor de circuitos El enchufe de la estufa no está introducido del todo en el tomacorriente Verifique que el enchufe eléctrico esté conectado a un tomacorriente con tensión y adecuada conexión a tierra Los controles del horno están mal configurados Ver la sección Cómo usar el temporizador de estufa El cajón de ...

Page 68: ...cla Cancel Off Cancelar Apagar configurando el reloj y reiniciando cualquier función de cocción Olor a quemado o aceite desde la ventilación Esto es normal en un horno nuevo y desaparecerá con el tiempo Para acelerar el proceso configure un ciclo de limpieza automática por un mínimo de 3 horas Consulte la sección de Limpieza del Horno Olor fuerte 8Q RORU HQ OD DLVODFLyQ DOUHGHGRU GHO LQWHULRU GHO ...

Page 69: ...tilizan los hornos es normal ver una emisión de vapor de la ventilación del horno A medida que el número de bandejas o la cantidad de alimentos a cocinar se incrementa la cantidad de vapor visible se elevará Esto es normal Quedan restos de agua en la puerta del horno luego del ciclo Steam Cycle Limpieza al Vapor Esto es normal Retire el agua restante con una esponja o tela seca La pantalla da indi...

Page 70: ...6ROLFLWH HO VHUYLFLR WpFQLFR SDUD UHSDUDU R UHHPSOD DU ODV lámparas excepto las lámparas LED Ŷ SDUWLU GH HQHUR GDxRV HVWpWLFRV VREUH OD SODFD GH cocción de vidrio tales como pero sin limitarse a astillas rayones o residuos horneados que no se hayan reportado dentro de los 90 días desde el momento de la instalación Ŷ SDUWLU GH HQHUR GDxRV sobre la placa de cocción de vidrio debido a impactos o uso ...

Page 71: ...iezas Estantes del horno Elementos del horno Lámparas de luz Sonda Suministros de Limpieza Limpiadores de Acero Inoxidable CitriShine Limpiador para Electrodomésticos de Acero Inoxidable Almohadillas de Limpieza no Abrasivas para Superficies de Cocción de Cerámica Limpiador para Superficies de Cocción de Cerámica Espátula para Superficies de Cocción de Cerámica Kit el kit incluye crema y espátula ...

Page 72: ...tras su garantía aún está vigente La puede adquirir en cualquier momento a través de Internet Los servicios de GE Appliances aún estarán allí cuando su garantía caduque Q 88 GEAppliances com extended warranty o comuníquese al 800 626 2224 durante el horario de atención comercial Conectividad Remota Para solicitar asistencia para la conectividad de red inalámbrica para modelos con acceso remoto vis...

Reviews: