background image

Performance Data Sheet
SmartWater

 Filtration System―GE Appliances MWF Cartridge


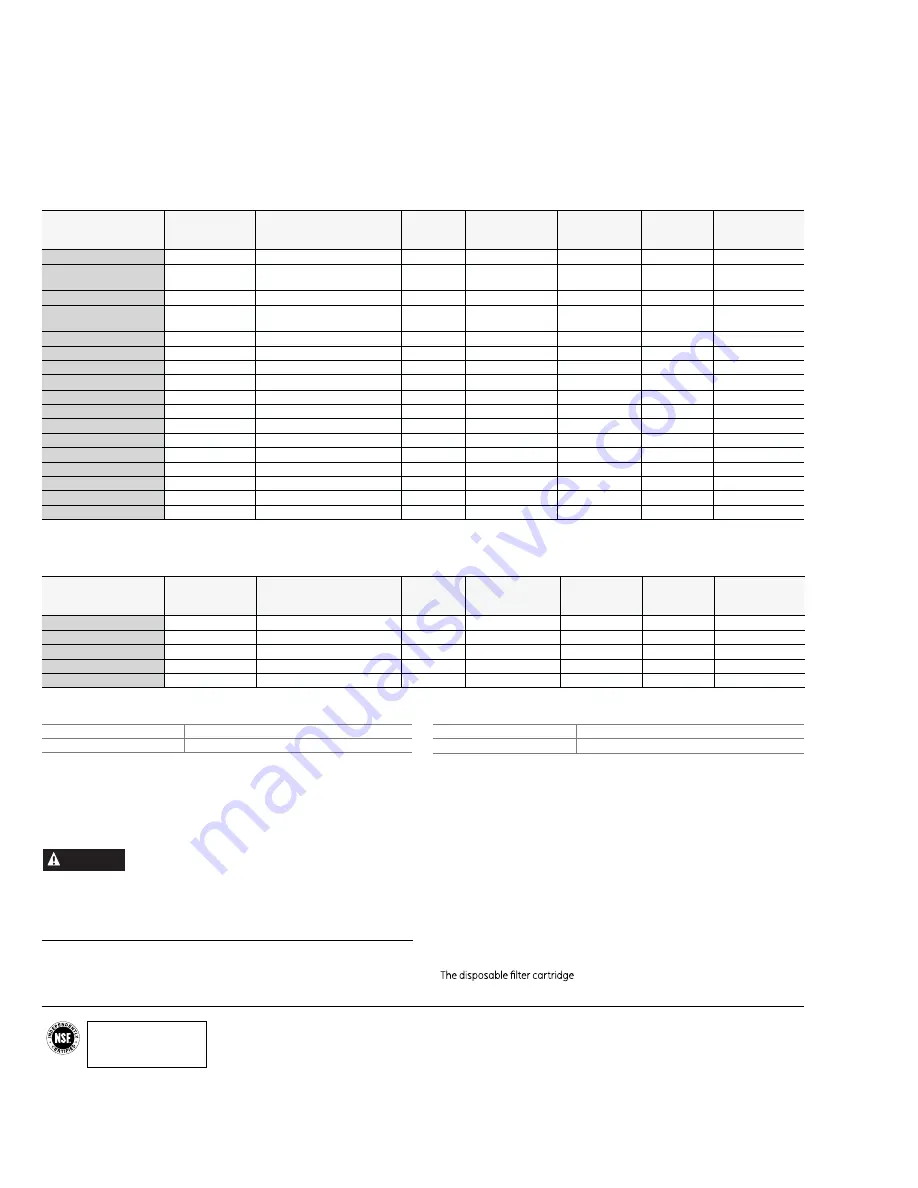
The concentration of the indicated substances in water entering the system was reduced to a concentration less than or equal to the permissible 
limit for water leaving the system as specified in NSF/ANSI Standard 42 and Standard 53. System tested and certified by NSF International against 
NSF/ANSI Standard 42 and Standard 53 for the reduction of substances listed below. 

The following pharmaceutical reduction claims have not been certified by NSF International or the state of California.  
Claims tested and verified by independent laboratory:

Contaminant  
Reduction

Average Influent

NSF specified 

 Challenge Concentration

Avg %  

Reduction

Average Product 

Water  

Concentration

Max Permissible  

Product Water  

Concentration

NSF Reduction 

Requirements

NSF  

Test Report

Atenolol

978 ng/L

N/A

99.5%

5.0 ng/L

N/A

N/A

J-00121587

Fluoxetine

907 ng/l

N/A

99.4%

5.4 ng/L

N/A

N/A

J-00121587

Ibuprofen

885 ng/L

N/A

94.1%

52.3 ng/L

N/A

N/A

J-00121588

Progesterone

1097 ng/L

N/A

99.5%

5.0 ng/L

N/A

N/A

J-00121589

Trimethoprim

415 ng/L

N/A

99.5%

2.0 ng/L

N/A

N/A

J-00121587

It is essential that the manufacturer’s recommended installation, maintenance and filter replacement requirements be carried out for the product to perform as advertised.  
See Installation Manual for Warranty information.

Application Guidelines/Water Supply Parameters

Service Flow

0.5 gpm  (21.9 lpm)

Water Supply

Potable Water

Water Pressure

40-120 psi (2.8-8.2 bar)

Water Temperature

33°F-100°F (0.6°C-38°C)

Note: 

While the testing was performed under standard laboratory conditions, 

actual performance may vary. 
Replacement Cartridge: MWF. For estimated costs of replacement elements  
please call 1-800-626-2002 or visit our website at www.geapplianceparts.com.

To reduce the risk associated with ingestion of contaminants:

• 

 Do not use with water that is microbiologically unsafe or of unknown quality 
without adequate disinfection before and after the system.

 Systems certified 

for cyst reduction may be used on disinfected water that may contain filterable 
cysts. EPA Establishment Number 10350-MN-005.

NOTICE

To reduce the risk associated with property damage due to water leakage:

• 

Read and follow 

use instructions before installation and use of this system.

• Installation and use 

MUST 

comply with all state and local plumbing codes.

•  

Do not

 install if water pressure exceeds 120 psi (8.2 bar). If your water pressure 

exceeds 80 psi, you 

must

 install a pressure-limiting valve. Contact a plumbing 

professional if you are uncertain how to check your water pressure. 

•  

Do not

 install where water hammer conditions may occur. If water hammer 

conditions exist you 

must

 install a water hammer arrester. Contact a plumbing 

professional if you are uncertain how to check for this condition.

•  

Do not 

install on hot water supply lines. The maximum operating water 

temperature of this filter system is 100º F (38º C).

• 


Protect filter from freezing. 

Drain filter when temperatures drop  

below 33ºF (0.6ºC).

•  

must

 be replaced every 

6

 months at the  

rated capacity, or sooner if a noticeable reduction in flow rate occurs.

For conditions of use, health claims certified by the California Department of Public 
Health, and replacements, see performance data sheet. California Department 
of Public Health Certification #05-1698. The contaminants or other substances 
removed or reduced by this water filter are not necessarily in all users’ water.

Capacity 300 Gallons (1,135 Liters).   Contaminant Reduction Determined by NSF testing.

Substance Tested  
for Reduction

Average Influent

NSF specified 

 Challenge Concentration

Avg %  

Reduction

Average Product 

Water  

Concentration

Max Permissible 

Product Water 

Concentration

NSF Reduction 

Requirements

NSF  

Test Report

Chlorine Taste and Odor

2.0 mg/L

2.0 mg/L ± 10%

97.5%

0.05 mg/L

N/A

≥ 50%

J-00077703

Nominal Particulate 
Class I, , ≥0.5 to < 1.0 μm 7,833,333 pts/mL

At least 10,000 particles/mL

99.7%

18,617 pts/mL

N/A

≥85%

J-00077704

Cyst*

101,000 cysts/L

Minimum 50,000 cysts/L

99.99%

1 cyst/L

N/A

≥99.95%

J-00100036

Asbestos

47 MF/L

107 to 108 fibers/L; fibers       

greater than 10 μm in length

>99%

<1 MF/L

N/A

≥99%

J-00077707

Atrazine

0.009 mg/L

0.009 mg/L ± 10%

94.5%

0.0005 mg/L

0.003 mg/L

N/A

J-00077708

Benzene

0.016 mg/L

0.015 mg/L ± 10%±

96.7%

0.0005 mg/L

0.005 mg/L

N/A

J-00077717

Carbofuran

0.08 mg/L

0.08 mg/L ± 10%

98.7%

0.001 mg/L

0.04 mg/L

N/A

J-00077718

Endrin

0.007 mg/L

0.006 mg/L ± 10%

97.1%

0.0002 mg/L 

0.002 mg/L

N/A

J-00100039

Lead @ pH 6.5

0.152 mg/L

0.15 mg/L ± 10%

99.3%

0.001 mg/L

0.010 mg/L

N/A

J-00077722

Lead @ pH 8.5

0.148 mg/L

0.15 mg/L ± 10%

99.3%

0.001 mg/L

0.010 mg/L

N/A

J-00077723

Lindane

0.002 mg/L

0.002 mg/L ± 10%

99.0%

0.00002 mg/L

0.0002 mg/L 

N/A

J-00077726

Mercury @ pH 6.5

0.0058 mg/L

0.006 mg/L ± 10%

93.2%

0.0004 mg/L

0.002 mg/L

N/A

J-00100037

Mercury @ pH 8.5

0.0061 mg/L

0.006 mg/L ± 10%

93.2%

0.0004 mg/L

0.002 mg/L

N/A

J-00092355

P-Dichlorobenzene

0.222 mg/L

0.225 mg/L ± 10%

99.8%

0.005 mg/L

0.075 mg/L

N/A

J-00077729

Tetrachloroethylene

0.015 mg/L

0.015 mg/L ± 10%

96.7%

0.0005 mg/L

0.005 mg/L

N/A

J-00082184

Toxaphene

0.015 mg/L

0.015 mg/L ± 10%

93.2%

0.001 mg/L

0.003 mg/L

N/A

J-00077730

2,4-D

0.218 mg/L

0.210 mg/L ± 10%

99.5%

0.0009 mg/L

0.07 mg/L

N/A

J-00085470

*Based on the use of Cryptosporidium parvum oocysts.

Tested and certified by NSF International 
against NSF/ANSI Standard 42 and  
Standard 53 in model GE Appliances MWF 
for the reduction of the claims specified  
on theperformance data sheet.

REPLACEMENT 

 ELEMENT

WARNING

42

Summary of Contents for Profile 24 CustomStyle

Page 1: ...ns 2 3 Operating Instructions Features 4 5 Controls 6 7 Dispenser 8 Water Filter 9 Shelves and Bins 10 Pans 11 Freezer 12 13 Automatic Ice maker 14 Care and Cleaning 15 Replacing the Lights 16 Install...

Page 2: ...hands are damp or wet skin may stick to these extremely cold surfaces In refrigerators with automatic icemakers avoid contact with the moving parts of the ejector mechanism or with the heating elemen...

Page 3: ...t from the outlet Repair or replace immediately all power cords that have become frayed or otherwise damaged Do not use a cord that shows cracks or abrasion damage along its length or at either end Wh...

Page 4: ...e pages 12 and 13 Full width drawer A full width drawer that can accommodate larger items is located at the bottom of the fresh food compartment QuickSpace shelf on some models Functions as a normal f...

Page 5: ...accommodate larger items Full width gallon door bins Nonadjustable full width door bins that will hold gallon containers Climate zone pans Separate bins for produce storage Water filter on some models...

Page 6: ...The fresh food temperature is preset in the factory at 37 F Allow 24 hours for temperature to stabilize to the preset recommended setting Water Filter Press and hold 3 seconds to reset the Water Filte...

Page 7: ...refrigerator compartment putting away foods after they have been sitting out at room temperature or when putting away warm leftovers It can also be used if the refrigerator has been without power for...

Page 8: ...dis penser for 2 3 seconds after releas ing the dispenser button Water may continue to dispense after the button is released If no water is dispensed when the refrigerator is first installed there may...

Page 9: ...owly turn it to the right until the filter cartridge stops DO NOT OVERTIGHTEN As you turn the cartridge it will automatically raise itself into position The cartridge will move about a 1 2 turn 4 Run...

Page 10: ...ns on some models To remove Lift the bin straight up then pull out To replace Engage the bin in the molded supports on the door and push down to lock in place Non Adjustable Gallon Door Bins on some m...

Page 11: ...slide the pan out to the stop position lift the pan up and past the stop position and lift it out Full Width Pan on some models To remove pan 1 Pull the pan out to the stop position 2 Lift the front o...

Page 12: ...e this basket Bottom Basket Removal To remove the bottom full width basket on freezer drawer models 1 Open the bottom freezer drawer until it stops 2 Remove the top freezer basket 3 The bottom freezer...

Page 13: ...of the basket and pull straight out to remove When replacing the basket insert the plastic basket into the lower liner rails and push back into place Fixed Shelf Removal NOTE The full width wire shel...

Page 14: ...cycle multiple times when making one batch of ice For Refrigerator Models with Ice Maker in the Door Ice Bucket and Dispenser Open the ice box door on inside of the left door Pull up and out on the i...

Page 15: ...oving the refrigerator in a side direction may result in damage to the floor covering or refrigerator Lower the leveling legs until they touch the floor When pushing the refrigerator back make sure yo...

Page 16: ...s LED lighting is located at the top of the fresh food compartment on the single door models LED lights are also located at the top of the left and right sides of the freezer in all models An authoriz...

Page 17: ...e Warranty PREPARATION MOVING THE REFRIGERATOR INDOORS If the refrigerator will not fit through a doorway the refrigerator door and freezer drawer or door can be removed To remove the refrigerator doo...

Page 18: ...Whichever Is Larger Plus Any Desired Clearance ITEM 21 cuft models with single door 21 cuft models with french doors 25 cuft models with single door 24 25 cuft models with french doors A 69 7 8 69 7 8...

Page 19: ...safely moved indoors If you need to remove the door and you have the french door model see Removing the French Doors on page 20 If you need to remove the door and you have the single fresh food door...

Page 20: ...refrigerator before proceeding Failure to follow these instructions can result in electrical shock REMOVING FRENCH DOORS on some models Tape the doors shut with adhesive tape 1 REMOVING RIGHT DOOR A R...

Page 21: ...s Only Pull the water line very carefully D Using a 5 16 socket ratchet driver remove the bolts securing the top hinge to the cabinet Wire Connectors Water Line Ice and Water Models Only Wire Connecto...

Page 22: ...ALLING CENTER HINGE BRACKETS AND HINGES A Using a 5 16 socket ratchet driver reinstall the bolts and center hinge brackets to the cabinet B Using a 1 4 Allen wrench reinstall the 2 hinge pins into the...

Page 23: ...e inside the plastic port 23 Installation Instructions Wire Connectors Water Line Ice and Water Models Only Wire Connectors Bolts Water Line Ice and Water Models Only F For Ice and Water Models Only P...

Page 24: ...The lower basket rests on a frame inside the freezer drawer Lift the front of the basket and pull it forward Release the pins from the slots on the frame to remove the basket 2 REMOVE THE DRAWER FRON...

Page 25: ...ooks on the ends of the drawer assembly extensions into the slots near the back of the slides D Lower the front end of the freezer drawer assembly so the side tabs fit into the front slots on the rail...

Page 26: ...door before lifting WARNING To eliminate the risk of electric shock or injury during installation you must first unplug the refrigerator before proceeding Failure to follow these instructions can res...

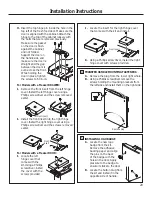
Page 27: ...hinge bracket and torque the screws to 60 in lb Remount the hinge and pin in the opposite hole on the cabinet Installation Instructions H Remove the button plugs on the left side of the cabinet acros...

Page 28: ...NSTALL FRESH FOOD DOOR A Using a Torx T 20 screwdriver remove the bolts securing the door stop on the bottom right of the door B Transfer the plastic thimble to the opposite hole Install the door stop...

Page 29: ...e cover using a Phillips screwdriver and the screws removed earlier For Models with a Freezer DOOR I Locate the left hinge cover that comes with the kit Using a Phillips screwdriver install the cover...

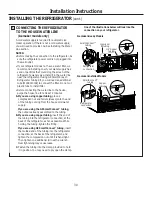
Page 30: ...ubing place a compression nut and ferrule sleeve onto the end of the tubing coming from the house cold water supply If you are using the GE SmartConnect tubing the nuts are already assembled to the tu...

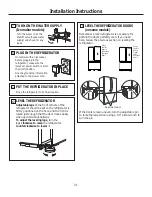
Page 31: ...gerator should be set so the refrigerator is firmly positioned on the floor and the front is raised just enough that the door closes easily when opened about halfway To adjust the leveling legs turn t...

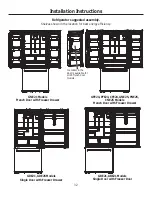
Page 32: ...nergy efficiency Ice maker in the door is available for all 24 french door models GBE21 ABE21 Models Single Door with Freezer Door GDE21 GDE25 Models Single Door with Freezer Drawer GNE21 Models Frenc...

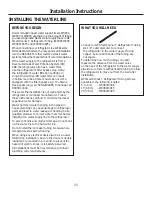
Page 33: ...hammer water banging in the pipes in house plumbing can cause damage to refrigerator parts and lead to water leakage or flooding Call a qualified plumber to correct water hammer before installing the...

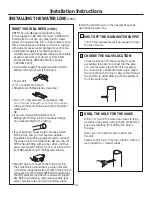
Page 34: ...ting with a tube cutter and then use a compression fitting Do not cut formed end from GE SmartConnect Refrigerator tubing Shutoff valve to connect to the cold water line The shutoff valve should have...

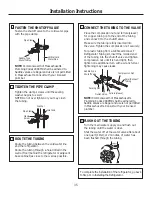
Page 35: ...bing until the water is clear Shut the water off at the water valve after about one quart 1 liter or 2 minutes of water has been flushed through the tubing FLUSH OUT THE TUBING 8 SmartConnect Tubing F...

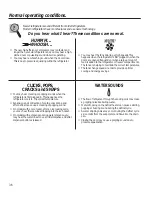
Page 36: ...CLICKS POPS CRACKS and SNAPS You may hear cracking or popping sounds when the refrigerator is first plugged in This happens as the refrigerator cools to the correct temperature Expansion and contract...

Page 37: ...a long time Dispense water until all water in system is replenished Water in glass is warm on some models Normal when refrigerator is first installed Wait 24 hours for the refrigerator to completely...

Page 38: ...from dispenser on some models Air may be present in the water line system causing water to drip after being dispensed Dispense water for at least 5 minutes to remove air from system Freezer cooling fr...

Page 39: ...um capacity I should dispense 12 and 18 hours after installation TRUE Dispensing 3 4 cubes 12 hours and 18 hours after installation allows ice to disperse within the ice bucket which in turns calls on...

Page 40: ...od door adjustment Check for leaks after all water connections are made TRUE While purging the air from the water system check all water line connections for leaks Check the connection to the househol...

Page 41: ...hich vary from state to state To know what your legal rights are consult your local or state consumer affairs office or your state s Attorney General Warrantor General Electric Company Louisville KY 4...

Page 42: ...ll where water hammer conditions may occur If water hammer conditions exist you must install a water hammer arrester Contact a plumbing professional if you are uncertain how to check for this conditio...

Page 43: ...43...

Page 44: ...ll in effect You can purchase it on line anytime or call 800 626 2224 during normal business hours GE Consumer Home Services will still be there after your warranty expires In Canada call 1 888 261 21...

Reviews: