background image

READ AND FOLLOW THIS SAFETY INFORMATION CAREFULLY.

SAVE THESE INSTRUCTIONS

Always use the 

LITE

position when igniting the

top burners and make sure the burners have
ignited.

Never leave the surface burners unattended at
high flame settings. Boilovers cause smoking
and greasy spillovers that may catch on fire.

Use only dry pot holders—moist or damp pot
holders on hot surfaces may result in burns from
steam. Do not let pot holders come near open
flames when lifting cookware. Do not use a towel
or other bulky cloth in place of a pot holder.
Such cloths can catch fire on a hot burner.

When using glass cookware, make sure it is
designed for cooktop cooking.

To minimize the possibility of burns, ignition 
of flammable materials and spillage, turn
cookware handles toward 
the side or center of the cooktop without
extending over adjacent burners.

Always turn the surface burner controls off
before removing cookware.

Carefully watch foods being fried at a high
flame setting.

Always heat fat slowly and watch as it heats.

Do not leave any items on the cooktop. The hot
air from the vent may ignite flammable items
and will increase pressure in closed containers,
which may cause them to burst.

If a combination of oils or fats will be used in
frying, stir together before heating or as fats
melt slowly.

Do not use a wok on the cooking surface 
if the wok has a round metal ring that is placed
over the burner grate to support the wok. This
ring acts as a heat trap, which may damage the
burner grate and burner head. Also, it may
cause the burner to work improperly. This may
cause a carbon monoxide level above that
allowed by current standards, resulting in a
health hazard.

Foods for frying should be as dry as possible.
Frost on frozen foods or moisture on fresh
foods can cause hot fat to bubble up and over
the sides of the pan.

Use the least possible amount of fat for effective
shallow or deep-fat frying. Filling the pan too
full of fat can cause spillovers when food is
added.

Use a deep fat thermometer whenever 
possible to prevent overheating fat beyond 
the smoking point.

Never try to move a pan of hot fat, especially a
deep fat fryer. Wait until the fat is cool.

Do not flame foods on the cooktop. If you do
flame foods under the hood, turn the fan on.

Do not leave plastic items on the cooktop— 
they may melt if left too close to the vent.

Keep all plastics away from the surface burners.

If you smell gas, turn off the gas to the cooktop
and call a qualified service technician. Never
use an open flame to locate a leak.

To avoid the possibility of a burn, always be
certain that the controls for all burners are at
the off position and all grates are cool before
attempting to remove them.

Never clean the cooktop surface when it is hot.
Some cleaners produce noxious fumes and wet
cloths could cause steam burns if used on a hot
surface. 

Never leave jars or cans of fat drippings on or
near your cooktop.

Do not use aluminum foil under burner grates.
Misuse could result in a fire hazard or damage
to the cooktop.

Do not cover or block the area around the
cooktop knobs. This area must be kept clear for
proper ventilation and burner performance.

Clean only parts listed in this Owner’s Manual.

Safety Instructions

Operating Instructions

Care and Cleaning

Tr

oubleshooting T

ips

Consumer Support

ge.com

5

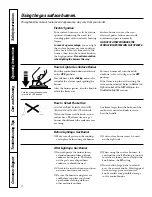
Use proper pan size—avoid pans that are unstable or easily tipped. Select cookware having flat
bottoms large enough to cover burner grates. To avoid spillovers, make sure cookware is large
enough to contain the food properly. This will both save cleaning time and prevent hazardous
accumulations of food, since heavy spattering or spillovers left on cooktop can ignite. Use pans 
with handles that can be easily grasped and remain cool.

WARNING!

SURFACE BURNERS

Summary of Contents for Profile JGP979BEF

Page 1: ...r 16 Grill Grates 16 Igniters 17 Porcelain Burner Basin 17 Porcelain Cooktop 15 Sealed Burner Modules 17 Stainless Steel Surfaces 15 Vent Grille and Filter 16 Installation Instructions Ductwork 22 25...

Page 2: ...ilding Immediately call your gas supplier from a neighbor s phone Follow the gas supplier s instructions If you cannot reach your gas supplier call the fire department Installation and service must be...

Page 3: ...ent poor burner performance Plug your cooktop into a 120 volt grounded outlet only Do not remove the round grounding prong from the plug If in doubt about the grounding of the home electrical system i...

Page 4: ...ease outside a pan can be put out by covering it with baking soda or if available by using a multipurpose dry chemical or foam type fire extinguisher WARNING To reduce the risk of fire electrical shoc...

Page 5: ...at to bubble up and over the sides of the pan Use the least possible amount of fat for effective shallow or deep fat frying Filling the pan too full of fat can cause spillovers when food is added Use...

Page 6: ...your cooktop Throughout this manual features and appearance may vary from your model 3 Feature Index Grill Module Vent fan operates automatically when grill is in use Vent Filters located below the ve...

Page 7: ...and a sealed burner module installed NOTE Optional surface burner module JXGB79 can replace the grill burner Burners supplied with cooktop and optional module air shutters have been adjusted for comp...

Page 8: ...ers are lit by electric ignition eliminating the need for standing pilots with constantly burning flames In case of a power outage you can light the surface burners on your cooktop with a match Hold a...

Page 9: ...to work improperly resulting in carbon monoxide levels above allowable current standards This could be dangerous to your health Use a flat bottomed wok Cookware Use large diameter cookware on rear bu...

Page 10: ...tubes and ignitor rods are fully engaged To Remove the Sealed Burner Module 1 Make sure that all control knobs are set to OFF and that the cooktop is cool 2 Lift up the edge of the burner module unti...

Page 11: ...or that smoked outdoor flavor However excessive fat can create cleaning and flare up problems Allowing excessive amounts of grease or drippings to constantly flame voids the warranty on the grill grat...

Page 12: ...til the juices appear on the top surface before turning Turn steaks and hamburgers just once Moving the food around causes loss of juices When basting meats or applying sauces to foods remember that e...

Page 13: ...ally Fresh sausages Links Medium 15 to 25 minutes Turn occasionally Patties 3 diameter Medium 15 to 20 minutes Turn after half the time Italian sausage Medium 25 to 30 minutes Pierce casing with a for...

Page 14: ...ater rinse and dry Then condition the surface by wiping on a thin coating of cooking oil or shortening Remove excess oil or shortening by wiping again with another paper towel 2 Insert grill burner DO...

Page 15: ...is broken replace with any heat tempered jar such as a canning jar which has a standard screw neck Porcelain Cooktop The porcelain enamel finish is sturdy but breakable if misused This finish is acid...

Page 16: ...nd dry thoroughly DO NOT clean in a dishwasher Grill Cover Vent Grille The vent grille lifts off easily Wipe clean or wash in the sink with mild household detergents NOTE On models with a white vent g...

Page 17: ...ealed Burners The sealed burners of your cooktop are secured to the cooktop module and are not designed to be removed Since the burners are sealed into the module boilovers or spills will not seep und...

Page 18: ...ulating millboard or gypsum board at least 3 16 thick covered with 28 gauge sheet steel or 0 020 thick copper Clearance between the cooking surface and protected cabinets MUST NEVER BE LESS THAN 24 Th...

Page 19: ...ons Appliance Pressure Regulator Grease Container Grease Container Pressure Regulator Wiring Box Cover 287 8 1 16 Blower can be swiveled 90 Blower may be rotated for horizontal or vertical direction b...

Page 20: ...PTION Installation of a listed microwave oven or cooking appliance over the cooktop shall conform to the installation instructions packed with that appliance Working areas adjacent to the cooktop shou...

Page 21: ...n in series with the supply line For proper operation the maximum inlet pressure to the regulator must be no more than 10 25 4 cm water column pressure for natural gas For checking the regulator the i...

Page 22: ...system CAUTION DO NOT USE A FLAME TO CHECK FOR GAS LEAKS IMPORTANT Disconnect the cooktop and the individual shut off valve from the gas supply piping system during any pressure testing of that system...

Page 23: ...n this number 6 Handmade crimps are likely to cause restrictions 7 If an alternate wall or roof cap is used be certain duct size is not reduced and that there is a backdraft damper It is best to use l...

Page 24: ...20 Total 63 Example 1 Duct Fitting Number Total Equivalent of Fittings Equivalent Length Length of Fittings 5 to 6 Transition 1 1 1 6 Straight 1 2 4 6 12 12 6 Elbow 5 2 10 6 Wall Cap 28 1 28 Total 51...

Page 25: ...0 30 m 31 4 x 10 to 6 Transition 4 5 ft 8 26 cm x 25 4 cm to 15 24 cm 1 37 m 5 to 31 4 x 10 90 Elbow 6 ft 12 7 cm to 8 26 cm x 25 4 cm 1 83 m 31 4 x 10 90 Elbow 5 ft 8 26 cm x 25 4 cm 1 52 m 31 4 x 10...

Page 26: ...rounded and has correct polarity Where a standard two prong wall receptacle is encountered it is the personal responsibility and obligation of the customer to have it replaced with a properly grounded...

Page 27: ...yellow tipped flames or burner flames needs to be flames are normal If burner flames look like A adjust flames lift off the port determined visually the air shutter Normal burner flames should look li...

Page 28: ...a counterclockwise direction When the knob is at any other position it can be turned in either direction without being pushed in Fan does not work Cord improperly connected Check connections Turn on p...

Page 29: ...tection or you may request your money back on the remaining value of your contract No questions asked It s that simple Protect your refrigerator dishwasher washer and dryer range TV VCR and much more...

Page 30: ...e of mind of knowing we can contact you in the unlikely event of a safety modification After mailing the registration below store this document in a safe place It contains information you will need sh...

Page 31: ...the exclusion or limitation of incidental or consequential damages This warranty gives you specific legal rights and you may also have other rights which vary from state to state To know what your leg...

Page 32: ...warranty and learn about special discounts that are available while your warranty is still in effect You can purchase it on line anytime or call 800 626 2224 during normal business hours GE Consumer...

Page 33: ...dulo de quemadores sellados 17 Parrillas del asador 16 Perillas de control y sello del panel de control 15 Quemador del asador 16 Recipiente para grasa 15 Rejilla y filtro de ventilaci n 16 Superfici...

Page 34: ...municarse con su abastecedor de gas llame al cuerpo de bomberos La instalaci n y el servicio deben ser efectuados por un instalador calificado la agencia de servicio o el abastecedor de gas ADVERTENCI...

Page 35: ...ra No quite la pata de conexi n a tierra de la clavija Si tiene alguna duda sobre el sistema el ctrico redondeada de conexi n a tierra de su casa es su responsabilidad y obligaci n personal cambiar la...

Page 36: ...pregunta p ngase en contacto con el fabricante B Antes de darle servicio o limpiar la unidad apague la unidad con el interruptor que se encuentra en el Panel de servicio C Cuando corte o perfore una p...

Page 37: ...n poco o bastante aceite de una manera m s eficaz Llenar el recipiente de grasa demasiado puede causar salpicaduras al a adir alimentos Use un term metro al fre r con bastante aceite cuando sea posibl...

Page 38: ...la de ventilaci n el ventilador funciona autom ticamente cuando el asador est en uso Filtros de ventilaci n al lado de la rejilla de ventilaci n Parrillas de los quemadores Quemadores de la superficie...

Page 39: ...suministran con la estufa como el m dulo opcional de persianas de ventilaci n se han ajustado para que sean compatibles en ambos lados Plancha Modelo JXGL89 Puede utilizarse nicamente con el m dulo de...

Page 40: ...con un cerillo Acerque un cerillo encendido al quemador y luego haga girar la perilla del quemador hasta la posici n HI alta Tome precauciones extremas cuando encienda los quemadores de este modo Los...

Page 41: ...ca de vidrio resistente al calor Puede usarse para cocinar en la estufa o en el horno Conduce el calor muy lentamente y se enfr a tambi n con gran lentitud Verifique las instrucciones del fabricante p...

Page 42: ...s perillas de control deber n estar en la posici n de OFF apagado y la estufa deber estar fr a 2 Levante el borde del m dulo de quemadores hasta que el fondo del m dulo despeje el borde del contenedor...

Page 43: ...rasa excesiva puede crear problemas de limpieza y llamaradas Permitir que haya cantidades excesivas de grasa o que se queme anula la garant a de las parrillas del asador Las llamaradas excesivas indic...

Page 44: ...s solamente una vez Estar moviendo la comida origina la p rdida de sus jugos Al rociar la carne o aplicar salsas a la comida recuerde que las cantidades excesivas se acumulan dentro de su asador y no...

Page 45: ...das 3 diameter 76 2 mm Medio 15 a 20 minutos Voltee a la mitad del tiempo Salchicha italiana Medio 25 a 30 minutos Pique la cubierta con un tenedor Voltee una sola vez Chuletas de cordero Medio 20 a 3...

Page 46: ...te el exceso de aceite o manteca limpi ndolo con una toalla de papel 2 Inserte el quemador del asador NO utilice las parrillas del asador 3 Coloque la plancha para asar sobre el quemador del asador de...

Page 47: ...Si se rompe el recipiente c mbielo por cualquier recipiente templado al calor por ejemplo frascos que tengan un cuello de rosca est ndar Cubierta de porcelana El acabado de porcelana esmaltada es resi...

Page 48: ...n La rejilla de ventilaci n puede levantarse f cilmente L mpiela con un pa o o l vela en el fregadero con detergentes caseros suaves NOTA En los modelos con una rejilla blanca de ventilaci n las manch...

Page 49: ...os quemadores est n sellados en el m dulo los hervores excesivos o los derramamientos no se filtrar n por debajo de la estufa Sin embargo despu s de cada uso se deben limpiar las cabezas de los quemad...

Page 50: ...menos de 1 4 6 4 mm de cart n y aislante o l mina de yeso de al menos 3 16 4 8 mm cubierta con una hoja de metal de calibre 28 o de cobre 0 020 0 5 mm de espesor La distancia entre la superficie para...

Page 51: ...xtremo Seleccione el corte apropiado para el tubo Consulte las instrucciones de instalaci n de la tuber a Regulador de presi n del aparato Recipiente contenedor de grasa Recipiente contenedor de grasa...

Page 52: ...el aparato Las reas de trabajo adyacentes a la estufa deber n tener una distancia m nima de 18 45 7 cm entre la estufa y la parte de abajo de los gabinetes Si la distancia es menor de 18 45 7 cm los g...

Page 53: ...l nea de abastecimiento Para una operaci n correcta la presion m xima de entrada hacia el regulador no debe ser superior a 10 25 4 cm de presi n de columna de agua para gas natural Para revisar el re...

Page 54: ...FUGAS DE GAS IMPORTANTE Desconecte la estufa y la llave de paso individual del sistema de la tuber a de abastecimiento de gas durante cualquier revisi n de presi n de ese sistema a presiones de prueba...

Page 55: ...ciones de bajada debe limitarse a tres La transici n recta de 5 a 6 12 7 cm a 15 2 cm en caso de usarse no necesita limitarse a esta cantidad 6 Los emboquillados hechos a mano quiz originen restriccio...

Page 56: ...o Total de equivalente de las longitud de las conexiones equivalente conexiones de las conexiones Transici n 5 a 6 1 1 1 Tuber a recta de 6 1 2 4 6 12 12 Codo de 6 5 2 10 Tapa de pared de 6 28 1 28 To...

Page 57: ...ci n de 31 4 x 10 a 6 4 5 8 26 cm x 25 4 cm a 15 24 cm 1 37 m Codo de 90 de 5 a 31 4 x 10 6 12 7 cm a 8 26 cm x 25 4 cm 1 83 m Codo de 90 de 31 4 x 10 5 8 26 cm x 25 4 cm 1 52 m Codo plano de 31 4 x 1...

Page 58: ...a tierra de manera correcta y de que tenga la polaridad correcta Donde haya una tomacorriente de pared de dos entradas es la responsabilidad y obligaci n personal del cliente cambiarla por una tomaco...

Page 59: ...uemador llamas de su quemador son normales Si las llamas del con puntas amarillas o se debe determinar quemador tienen el aspecto de A ajuste la persiana de las llamas se levantan visualmente aire Las...

Page 60: ...erilla est en otra posici n se puede girar en cualquier direcci n sin necesidad de empujarla El ventilador no El cable est conectado Revise las conexiones Conecte la electricidad en la funciona incorr...

Page 61: ...29 Apoyo al consumidor Solucionar problemas Operaci n Seguridad Cuidado y limpieza Notas...

Page 62: ...30 Notas Apoyo al consumidor Solucionar problemas Operaci n Seguridad Cuidado y limpieza...

Page 63: ...Durante esta garant a limitada de un a o GE tambi n proporcion sin de la compra original costo alguno toda la mano de obra y los servicios internos para reemplazar partes defectuosas Apoyo al consumid...

Page 64: ...talles sobre descuentos especiales disponibles mientras su garant a est a n activa Puede comprarla en l nea en cualquier momento o llamar al 800 626 2224 durante horas normales de oficina GE Consumer...

Reviews: