background image

49-9000044   Rev. 0

15

Using your Smart Mixer

Smart Features

Adjusting the Bowl Height

<RXU6PDUWPL[HULVHTXLSSHGZLWKVPDUWIHDWXUHVWRHQKDQFH\RXUEDNLQJDQGFRRNLQJ
H[SHULHQFH'RZQORDGW4

TM

 app from the App store or Google Play to 

access these features.

Auto Sense Technology

$FWLYHO\PRQLWRUVFKDQJHVLQWH[WXUHDQG

viscosity through motor torque feedback 

WRRSWLPL]HPL[LQJSHUIRUPDQFH2YHU
PL[LQJDQGXQGHUPL[LQJIDLOVDUHQR

longer a risk in recipes* that previously 

UHTXLUHGLQWXLWLRQDQGH[SHULHQFHDVDQ
DXWRPDWLFVKXWRႇIHDWXUHZLOOWXUQWKH
PL[HURႇZKHQFRPSOHWLRQLVUHDFKHG

(*Based on recipes available in the app. 
Recipes will continue to be added and 
updated over time.) Follow the directions 
provided in the SmartHQ

TM

 app.

Connected Guided Recipes

The

 Connected Guided Recipes 

feature 

provides recipes and steps on how to 
complete each recipe. 

Use the SmartHQ app for guided recipes.  

8QSOXJWKHPL[HUIURPWKHRXWOHW

2. Make sure the bowl arms are down.

3. Attach your desired attachment.

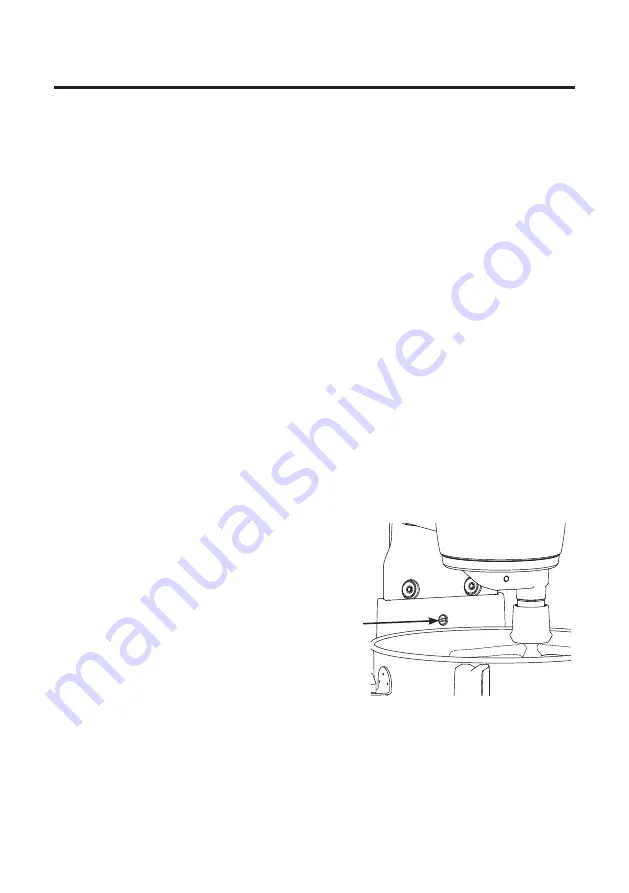
4.  Turn the bowl lift screw behind the bowl 

ZLWKDÀDWKHDGVFUHZGULYHUWRUDLVHDQG

lower the bowl height. You want your 
attachment to sit right above the bottom 
of the bowl. The attachment should not 
be touching the bowl. Turn the screw 
counterclockwise to raise the bowl and 
clockwise to lower the bowl.

5.  Once your bowl is in the desired 

position, push the bowl arms up. 

Bowl lift 
screw

Summary of Contents for PROFILE P8MSASS6TBB

Page 1: ...49 9000044 Rev 1 12 22 GEA GE PROFILE SMART MIXER WITH AUTO SENSE OWNER S MANUAL ENGLISH FRAN AIS P8MSASS6TBB P8MSASS6TOW P8MSASS6TGW...

Page 2: ...amily We take pride in the craftsmanship innovation and design that goes into every GE Appliances product and we think you will too Among other things registration of your appliance ensures that we ca...

Page 3: ...NTROLS 7 PARTS INCLUDED 8 SPEED CHART 9 TIPS 10 USING YOUR SMART MIXER 11 CARE AND CLEANING 16 TROUBLESHOOTING 17 LIMITED WARRANTY 18 CONSUMER SUPPORT 19 Write the model and serial numbers here Model...

Page 4: ...Use this product only for its intended purpose as described in this user manual The use of attachments not recommended or sold by the manufacturer may FDXVH UH HOHFWULF VKRFN RU LQMXU This appliance...

Page 5: ...DWHG RQ WKH DFFHVVRULHV ERZO ROORZ WKH TXDQWLWLHV SURFHVVLQJ WLPH DQG VSHHG ZKHQ XVLQJ WKH VPDUW PL HU tools as indicated in the user manual Do not lift the appliance from the Bowl Carrier when the Bo...

Page 6: ...iven in the user manual For household use only Electrical Requirements Voltage 120 A C only Frequency 60 Hz The wattage rating for the smart PL HU LV SULQWHG RQ WKH VHULDO SODWH R QRW XVH DQ H WHQVLRQ...

Page 7: ...ed in the middle NOTE Make sure the speed dial LV 2 ZKHQ QRW LQ XVH EHIRUH unplugging and before locking the bowl lift 6HH SDJH IRU PL LQJ FKDUW Rev Zero Scale Timer Stir 2 4 6 8 10 11 OLED Screen Rot...

Page 8: ...ed Settings 5 Accessory Port 6 Attachment output shaft 7 Bowl Pins 8 Bowl Lift Arms 9 Bowl Carrier 10 Power Cord 11 Bowl 12 11 Wire Whisk 13 Commercial Grade Stainless Steel Beater 14 Commercial Grade...

Page 9: ...Dough Hook Stir 2 0L DQG NQHDG GRXJKV NOTE DO NOT use the dough hook above speed 2 Doing so could result in product failure 11 Wire Whisk 6 11 For whipping cream or egg whites It is recommended to sl...

Page 10: ...SHDNV GXH WR PRLVWXUH LQ WKH DLU A great way to create whipping cream is to chill the 11 wire whisk and bowl in your refrigerator for 20 30 minutes before whisking Dough It is sometimes helpful to sta...

Page 11: ...This may require a slight turn to lock into place See the speed chart on page 9 for a guide on attachment use 2 Lower the bowl lift arms by pressing down on the lift arms 1 0DNH VXUH WKH PL HU LV XQS...

Page 12: ...ng up on arms until they lock into place Using your Smart Mixer 8 Use the speed dial and turn to your desired speed When finished turn back to the PL LQJ 2 SRVLWLRQ 9 Pull down on the quick change to...

Page 13: ...peed will appear on the screen when the speed dial is turned KHQ QLVKHG URWDWH WKH VSHHG GLDO EDFN WR WKH PL LQJ 2 SRVLWLRQ DQG 2 ZLOO appear on the screen Pause Press the center button to pause durin...

Page 14: ...PL time Press the center button to start the timer To cancel the timer when the unit is QRW PL LQJ URWDWH WKH VSHHG GLDO WR DQ position on the right and back quickly NOTE The Timer increases at 15 se...

Page 15: ...Based on recipes available in the app Recipes will continue to be added and updated over time Follow the directions provided in the SmartHQTM app Connected Guided Recipes The Connected Guided Recipes...

Page 16: ...UHPRYH DQ GXVW WKDW PLJKW UHPDLQ 3 For wet ingredients use a warm damp soapy cloth to gently ZLSH GRZQ WKH H WHULRU DQG DQ GRXJK WKDW PLJKW UHPDLQ 4 To ensure the full range of motion is cleaned pull...

Page 17: ...o idle mode Press any button to wake up the machine The scale is inaccurate while using Auto Sense or guided recipes 7KH FRQWDLQHU RU PL HU ERZO XVHG IRU weighing ingredients is removed during the wei...

Page 18: ...ted to one year or the shortest period allowed by law For US Customers 7KLV OLPLWHG ZDUUDQW LV H WHQGHG WR WKH RULJLQDO SXUFKDVHU IRU SURGXFWV purchased for home use within the USA In Alaska and Hawai...

Page 19: ...Appliances com register In Canada geappliances ca after sales support Contact Us If you are not satisfied with the service you receive from GE Appliances contact us on our website with all the details...

Page 20: ...20 49 9000044 Rev 0...

Page 21: ...49 9000044 Rev 1 12 22 GEA Batteur intelligent d tection automatique GE Profile ENGLISH FRAN AIS P8MSASS6TBB P8MSASS6TOW P8MSASS6TGW...

Page 22: ...otre famille Nous sommes fiers du savoir faire de l innovation et du design qui constituent chaque lectrom nager GE et nous pensons que vous le serez aussi Nous vous rappelons que l enregistrement de...

Page 23: ...ABLEAU DES VITESSES 9 CONSEILS 10 UTILISATION DE VOTRE BATTEUR SUR SOCLE 11 ENTRETIEN ET NETTOYAGE 16 D PANNAGE 17 GARANTIE LIMIT E 18 SOPORTE AL CLIENTE 19 Inscrivez les num ros de mod le et de s rie...

Page 24: ...uets crochet SpWULVVHXU HWF SHQGDQW OH IRQFWLRQQHPHQW D Q GH UpGXLUH OHV ULVTXHV GH EOHVVXUHV RX d endommagement du batteur N utilisez pas l appareil l ext rieur 8WLOLVH FH SURGXLW XQLTXHPHQW DX QV DX...

Page 25: ...c dez pas la capacit maximale indiqu e sur les accessoires bol Observez les quantit s les temps de pr paration et les vitesses recommand es dans le manuel de l utilisateur lorsque vous utilisez les ac...

Page 26: ...e du batteur sur socle est indiqu e sur la plaque de s rie N utilisez pas un cordon de rallonge La puissance lectrique maximale est bas e sur l accessoire qui utilise l intensit la plus lev e Remarque...

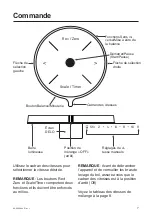
Page 27: ...errouiller les bras de levage du bol assurez vous que le cadran des vitesses est la position G DUUrW 2 Voyez le tableau des vitesses de m lange la page 8 Rev Zero Scale Timer Stir 2 4 6 8 10 11 cran D...

Page 28: ...ce d accessoire 6 Arbre de sortie d accessoire 7 Tiges de bol 8 Bras de levage du bol 9 Support du bol 10 Cordon lectrique 11 Bol 12 Fouet 11 broches 13 Qualit commerciale batteur en acier inoxydable...

Page 29: ...ochet p trisseur Brasser Stir 2 M langer et p trir la p te REMARQUE N utilisez PAS le crochet p trir au dessus de la vitesse 2 Cela pourrait entra ner une d faillance du produit Fouet 11 broches 6 11...

Page 30: ...LGLWp GH O DLU SHXW UHQGUH OD FUpDWLRQ GH SRLQWHV EODQFKHV SOXV GL FLOH Une bonne fa on de pr parer la cr me fouetter est de refroidir le fouet et le bol au r frig rateur durant 20 30 minutes avant le...

Page 31: ...ntenu en place Reportez vous au tableau des vitesses de la page 9 pour vous guider sur l utilisation des accessoires 2 Appuyez sur les bras de levage du bol pour les abaisser 1 Assurez vous que le bat...

Page 32: ...verrouillent en place Utilisation de votre batteur sur socle 8 Utilisez le cadran des vitesses et tournez le la vitesse d sir e Lorsque vous avez termin remettez le en position de m lange OFF arr t 9...

Page 33: ...YLWHVVH V D FKH j O pFUDQ ORUVTXH OH cadran des vitesses est activ Lorsque vous avez termin tournez le cadran des vitesses en position de PpODQJH 2 DUUrW V D FKHUD j l cran Pause Appuyez sur le bouto...

Page 34: ...ne m lange pas tournez le cadran des vitesses rapidement vers la droite et revenir REMARQUE La minuterie augmente par incr ments de 15 secondes d une simple pression Maintenez le bouton Scale Timer e...

Page 35: ...tion Les UHFHWWHV pYROXHURQW HW VH UDMRXWHURQW DX O GX temps Suivez les instructions fournies dans l application Smart HQ Recettes guid es en mode connect La fonction de recettes guid es en mode conne...

Page 36: ...ingr dients humides utilisez un linge chaud humide et savonneux pour essuyer d licatement l ext rieur et la p te qui pourrait subsister 4 Assurez vous que toute l tendue de mouvement est propre tirez...

Page 37: ...est impr cise avec l utilisation de recettes avec l autod tection ou guid es Le contenant ou le bol de m langeur utilis pour mesurer les ingr dients est retir pendant la proc dure de pes e ceci nuira...

Page 38: ...uit Ce que GE Appliances ne garantie pas Pour la vente dans les 50 tats et le district de Columbia des tats Unis seulement Clients des tats Unis Cette garantie limit e est tendue l acheteur d origine...

Page 39: ...m nager sur electromenagersge ca soutien apres vente Communiquez avec nous Si vous n tes pas satisfait du service re u de GE Appliances contactez nous via notre site Web avec tous les d tails y compri...

Page 40: ...20 49 9000044 Rev 0...

Page 41: ...49 9000044 Rev 1 12 22 GEA Batidora Profile Smart de GE con Sensor Autom tico ESPA OL P8MSASS6TBB P8MSASS6TOW P8MSASS6TGW...

Page 42: ...lia Sentimos orgullo por la creaci n innovaci n y dise o de cada producto de GE Appliances y creemos que usted tambi n Entre otras cosas el registro de su electrodom stico nos asegura que podamos entr...

Page 43: ...DE VELOCIDAD 9 CONSEJOS 10 USO DE LA BATIDORA DE PIE 11 CUIDADO Y LIMPIEZA 16 SOLUCI N DE PROBLEMAS 17 GARANT A LIMITADA 18 SOPORTE AL CLIENTE 19 Escriba los n meros de modelo y de serie aqu N de Mod...

Page 44: ...lo use en reas exteriores Use este producto s lo para su prop sito original como se describe en este manual del propietario El uso de accesorios no recomendados o que no sean vendidos por el fabricant...

Page 45: ...s accesorios recipiente Siga las instrucciones sobre cantidades tiempo y velocidad de procesamiento al usar las herramientas de la batidora de pie de acuerdo con lo indicado en el manual del propietar...

Page 46: ...D LPSUHVD HQ OD SODFD GH VHULH 1R XVH XQ FDEOH GH H WHQVLyQ D FDOL FDFLyQ HOpFWULFD Pi LPD VH EDVD HQ HO accesorio que usa mayor amperaje Notas sobre el Recipiente de la Batidora Gire el dial de veloc...

Page 47: ...FLGDG HVWp HQ 2 SDJDGR cuando no se encuentre en uso antes de desenchufarlo o antes de bloquear la elevaci n del recipiente Consulte el cuadro para batir en la p gina 8 Rev Zero Scale Timer Stir 2 4 6...

Page 48: ...ceso 6 Eje de salida del accesorio 7 Pernos del Recipiente 8 Brazos de Elevaci n del Recipiente 9 Transportador del Recipiente 10 Cable de Corriente 11 Recipiente 12 Batidor Montaclaras de 11 Alambres...

Page 49: ...Revolver 2 Mezclas y amasados NOTA NO use el gancho de amasar en una velocidad superior a 2 Hacer esto podr producir fallas sobre el producto Batidor Mon taclaras de 11 Alambres 6 11 Para batir crema...

Page 50: ...n de picos blancos y r gidos debido a la humedad en el aire Una gran forma de preparar crema batida es enfriar el batidor montaclaras y el recipiente en el refrigerador durante entre 20 y 30 minutos...

Page 51: ...accesorios consulte el cuadro de velocidades en la p gina 9 2 Baje los brazos de elevaci n del recipiente presionando hacia abajo sobre los mismos 1 Aseg rese de que la batidora est desenchufada y ap...

Page 52: ...os hasta que se bloqueen sobre sus posiciones Uso de la Batidora de Pie 8 Use el dial de velocidad y gire el mismo hasta la velocidad deseada Una vez que finalice vuelva a girar el mismo hasta la posi...

Page 53: ...al de velocidad 8QD YH TXH QDOLFH YXHOYD D JLUDU HO dial de velocidad hasta la posici n OFF Apagado y entonces se visualizar OFF Apagado en la pantalla Pausa Presione el bot n central para pausar la a...

Page 54: ...d no est realizando un batido gire el dial de velocidad hasta cualquier posici n hacia la derecha y atr s r pidamente NOTA El Temporizador permite realizar incrementos de 15 segundos si se presiona un...

Page 55: ...recetas y actualizaciones con el paso del tiempo Siga las instrucciones provistas en la aplicaci n Smart HQ Recetas Guiadas con Conexi n La funci n Connected Guided Recipes Recetas Guiadas con Conexi...

Page 56: ...ientes mojados use una tela caliente h meda y con jab n para limpiar de forma suave la parte exterior y cualquier resto de masa que pueda permanecer 4 Para asegurar la limpieza de todo el rango de mov...

Page 57: ...resione cualquier bot n para reactivar el motor La balanza es imprecisa al usar Auto Sense Sensor Autom tico o recetas guiadas El envase o recipiente de batido usado para pesar ingredientes es retirad...

Page 58: ...ito particular se limitan a un a o o al per odo m s corto permitido por la ley Para su venta en los 50 Estados Unidos y el Distrito de Columbia nicamente Para Clientes de EE UU Esta garant a limitada...

Page 59: ...Registre su electrodom stico en GEAppliances com register Cont ctenos Si no se encuentra satisfecho con el servicio que recibi de GE Appliances comun quese con nosotros a trav s de nuestro sitio Web c...

Page 60: ...20 49 9000044 Rev 1...

Reviews: